Sunday 31 March 2019

Flamingo Birthday Explosion Card

Hello my crafty friends

I'm still itching to play with my flamingo stamps, so decided to make a tropical birthday explosion card for a friend. I started with this Cloudy Frame die set, then added my stamped flamingo and a bunch of die cut tropical leaves.


The leaves and the flamingo got touches of glitter for some shimmer & shine.


I see that this type of card is making a come-back, and that makes me smile. I have been making this type of explosion card for almost 30 years. In fact, I would haul a bunch of stamps, ink pads etc into my kids classrooms twice a year and teach the kids how to make these for Christmas and Mother's Day. I can do the folds with my eyes closed, which is also funny because I can NOT do any other type of origami folding.


The label & sprig dies, and the Happy Birthday stamps are by Lynda Kanase for Sizzix.


Below you can see the card as it is opening - it folds completely flat for mailing. I used a heavy patterned paper (not card stock) for the inside so there isn't a lot of bulk.


It was so much fun to make this type of pop-up card again - and I can see me making more in the future. They whip up so quickly and they are a fun way to add lots of OOOOOH to the inside of a card.

Supplies:
Flamingo (stamps, inks and dies) - Hero Arts
Patterned paper - Prima
Leaf dies - MFT Stamps
Spring Things (label and sprig inside) - Lynda Kanase (Sizzix)
Happy Birthday, Spring Phrases - Lynda Kanase (Sizzix)
Birthday greeting - MFT Stamps
Cloudy Frame die set - Pink and Main
White, green card stocks
Chameleon Color Tops markers
Spectrum Noir glitter pen

Thanks for stopping by today

Saturday 30 March 2019

C4C477 Pop-Up Card with Dog Humour

Hello my crafty friends

It's Saturday and that means a new challenge at the Crazy4Challenges Blogour March hostess is Frances Byrne and please welcome our Guest Designer Barb Anders - Paper Pursuits. I've long been a fan of Barb's creations!


Frances' challenge is:
April Fools day is right around the corner. For our challenge this week, create a card that has some sort of “trick” to it. It could be an interactive card of some sort or maybe an image that has some humor to it.

**I am also entering this card into the Fun Friday Challenge #110 at Your Next Stamp, which is to use Pastels. You can see all the details of the challenge here.**

I had a lot of fun making my card today. Both the dog stamps and the word stamp are new - I picked them up at the Mesa Rubber Stamp show earlier this month. I'm such a sucker for cute dog images and these ones have SO much character!


There is a framed window on the card front, where you see another dog peeking through and the first part of the greeting. This was actually a single stamp that I snipped in half. Stamp surgery isn't a bad thing folks!


Inside I used Karen Burniston's Spinner Square Pop-Up to animate the rest of the greeting. I like this stamp - because I do feel like that sometimes. People who don't have 'furry kids' will say to me 'it's JUST a dog' and I often don't say anything because whatever comes out of my mouth at that point would not be polite. Ha.


This guy ... this guy made me stop in my tracks and pick up the stamp set. Love him.


TIP:  Add all of your embellishments BEFORE placing the greeting on the spinner. I had to re-do this one, and it took me as long to get it to work properly again as it did to assemble the entire card. It now spins in a different direction than I intended, but it was the only way I could make it work. It had been in the perfect location to read the words until I adhered the Dachshund - then you could no longer read the left half of the words. AACK. So it's not perfect, but the mechanism works just fine and you can finally read the greeting again.


I have a friend who feels the same way about dogs, so I thought of her while I was making this card and I am going to just pop it in the mail to her as a fun surprise. I hope it makes her smile.


Finally, for those that like to pin card fronts and insides together on your Pinterest boards ... here you go!


Check out the C4C blog to see how the Crazies have been inspired by the challenge. We'd  love to see your take on it, so be sure to stop by the Crazy 4 Challenges blog and link up your creations. If you are uploading to an online gallery, please use the keyword C4C477.

Supplies:
Dog Stamps - Katzelkraft
Bristol Smooth card stock
Words - Carmens Veranda
Black Oliva ink - Your Next Stamp
Dashing Rectangle dies - Elizabeth Craft Designs
1042 Spinner Square Pop-Up - Karen Burniston
Patterned paper - Sizzix
Zig Colour Markers
Water brush
Sakura Black Glaze Pen
Sakura White Gel Pen
1089 Rockin Rectangle (Scalloped Rectangle) - Karen Burniston


Thanks for stopping by today

Friday 29 March 2019

Pair of Pop-Up Gift Card Holders

Hello my crafty friends

I like to have a few Gift Card Holders on hand so that is what I'm sharing today. I used this lovely patterned paper by Lynda Kanase, which is sadly very hard to find anymore. The Pop-Up Gift Card Holder die set is also by Lynda Kanase and it's perfect for Fun Fold Friday here on my blog.


The butte/cactus silhouette border, cactus and coyote dies are by Craftin' Desert Diva's.


This shows the pop-up inside, but the gift card is one I use for photos and not the one we will be gifting.


I used one of the flowers and the flower centres from Lynda's Spring Things die set to create a little sun at the top right corner.


I die cut the label from Lynda Kanase's Treat Pouch twice, once from white and once from the textured green card stock. Then I cut it in half and layered each half on either side of the white one. I was happy with how well they fit across inside the card, and that it gives us an area to write our note and acts as a border decoration as well.


This second Pop-Up Gift Card holder was made using the same products, just different patterns and colours.


The label and label mat come from Lynda's new Spring Things die set - I love that set! Once again, the gift card is one I use for blog photos.


These two are heading right into my stash.

Supplies:
Patterned paper - Succulent Serenity Collection, Lynda Kanase (Sizzix)
Pop-Up Gift Card Holder die set - Lynda Kanase (Sizzix)
Green, black and white card stocks
Silhouette, coyote and cactus - Craftin' Desert Diva's
Spring Things (label and 'sun')
Stitched rectangle die - Elizabeth Craft Designs
Treat Pouch (label) - Lynda Kanase (Sizzix)

Thanks for stopping by today

Thursday 28 March 2019

Fin-Tastic Birthday Card

Hello my crafty friends

Today I'm playing along with Your Next Stamp's Fun Friday Challenge #110, Pastels.  Details can be found HERE. This WAS a challenge for me, as I'm liking bright happy colours right now so doing a pastel card took some thinking.


I chose some mint green and baby blue card stock from my stash, and die cut the YNS Photo Booth Panel Die from the green piece. The stitched waves were die cut and adhered behind the windows for a fun look.


I adore these cute fish stamps from Your Next Stamps Aquarium Antics, so I coloured them with Chameleon Color Tone markers then added them into the windows with different layers of foam tape. The balloon comes from a YNS Easter stamp of a chick holding a balloon. I stamped it on white card stock, then only cut out the balloon and adhered it to the crab's claw. The balloon was also coloured with the Chameleon markers.


The sentiment inside is from Your Next Stamp as well - I love how well it works for ocean and sea themed cards.


I found these seashell sequins and picked up a package for me and a friend. They are super sparkly which I liked and it was fun to add a couple onto this card.


I'm happy with how this turned out - and it goes right into my stash.

Supplies:
Photo Booth Panel die set - Your Next Stamp
Mint, light blue and white card stock
1038 Tropical Scene - Karen Burniston
Chameleon Color Tone markers
Sakura black gel pen
Aquarium Antics - Your Next Stamp
Sentiments on the front - Make a Fish, Waffle Flower
Shell Sequins
All Aboard - Bunch of Happiness (chick with balloon) - Your Next Stamp
Black Olive ink - Your Next Stamp
Spectrum Noir Glitter Pen
Little Darling Mermaid (greeting) - Your Next Stamp
Nuvo Crystal Drops

Thanks for stopping by today

Wednesday 27 March 2019

Black and Red Birthday Cards

Hello my crafty friends

I love using journal cards in my card making, and lots of paper stacks come with these 3 x 4" cut aparts now. The ones I used today are actually journal cards used for pocket scrapbooking but they were so perfect for birthday cards I had to grab them. These are the first six cards I made with the package.


Who doesn't love ice cream for a birthday! I added a couple of fish tail flags and Karen Burniston's Celebrate die cut from red and black card stocks.


The balloon area on this card was open so you could write your journalling for your scrapbook page. Instead I stamped a greeting and added a bakers twine bow.


There are two of each design in the package, so this next card uses the ice cream image again but this time I added a long fish tail banner and some bakers twine.


I wrote Happy Birthday on the balloon trio journal cards, matted them and added them to the card front with a strip of that fun striped paper. I am in LOVE with this striped paper by Echo Park so you will be seeing a lot of it in my upcoming cards. I save every little scrap as even just a small fishtail flag or banner adds such a fun pop of colour!


These birthday cards will be donated to my Mom's Nursing home.

Supplies:
White, red, aqua, black card stocks
Journal cards - Betty Higgins, Project Life
Rounded rectangle infinity dies - Hero Arts
Striped patterned paper - Echo Park
1057 Celebrate - Karen Burniston
Stitched fishtail banner - MFT Stamps
Copic marker
Stamps - MFT Stamps
Bakers twine
Fun foam
MISTI - My Sweet Petunia

Thanks for stopping by today

Tuesday 26 March 2019

Graphic Flamingo Card Trio

Hello my crafty friends

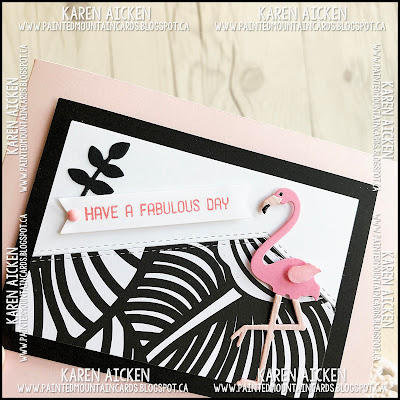
I didn't have a plan when I made these cards. I just wanted to make something with a flamingo and since I had just picked up a box of patterned A2 cards I flipped through them to see if anything would catch my eye. This graphic black and white card jumped out at me so then I was off and running.


Since the card was patterned on the front and the back, I cut it into two panels at the score line. Then I used an MFT border die to cut one of them into two pieces. This border is nice in that it leaves a stitched line on both sides of the cut edge. Then it was just a matter of embellishing and adhering the finished panel to a light pink base card.


This second card uses the negative piece of the black and white card, but I trimmed the entire decorator panel smaller and popped it up with foam tape.


The little (trimmed) sprig is from Lynda Kanase's new Spring Things die set and I added the stamped words to a fishtail banner along with a pink enamel dot.


The final card uses the whole black and white card front. I trimmed it down with a rounded corner rectangle die as I like a border showing on my cards. The flamingo was getting lost in all the black and white so I die cut a second one from black and slightly off-set it.


These cards will be donated to my Mom's nursing home and I'm sure they will make the residents smile.

Supplies:
Black, white and pink card stocks
Black and white patterned card (cut apart) - the Paper Studio
Rounded rectangle dies - Hero Arts
Flamingo Layering stamps and dies - Hero Arts
Scalloped rectangle die - Honey Bee 
Words and inside stamps - MFT Stamps
Washi Tape - Stampin' Up
Sequins
Rectangle dies - Elizabeth Craft Designs
Stitched Basic Edges - MFT Stamps
Nuvo Glitter pen
Sakura black glaze pen
Flamingo die - Jen Long (Sizzix)
Fabulous day stamp - MFT Stamps
Fishtail banner - MFT Stamps
Happy Birthday stamps - Altenew
MISTI - My Sweet Petunia
Spring Things (sprig) - Lynda Kanase
Enamel dot - Echo Park
1030 Happy Birthday - Karen Burniston
Nuvo Crystal Drops
Flamingo & word stamps - MFT Stamps

Thanks for stopping by today

Monday 25 March 2019

We Herd It's Your Birthday

Hello my crafty friends

I had a Waffle Flower wish list for the Mesa Rubber Stamp Show this month, and while wandering around in their booth I found this stamp set called 'We Herd'. I adored the herd of sheep with all the party accessories and I knew it would make some really fun birthday cards.


This was my first time playing with the stamp & die set and I'm so glad I picked it up! I also tried out some new-to-me marker paper, but I think it's going to take some getting used to. I wanted to use my new Chameleon Color Tones markers, which is why I purchased the marker paper. These markers are really cool - notice the light to dark colouring on the sheep faces? All done with a single marker. Now it is a little streaky, but that is because of the marker paper and that is what I meant by needing to get used to working with it. I have been playing with the Chameleon Color Tones markers on Neenah card stock and didn't have much streaking at all. With any new art supply though, I expect a bit of a learning curve. I am really REALLY liking the markers and want to say THANK YOU again to Chameleon, for sending them to me to use with my card making.


The Chameleon Color Tone markers worked really well for the balloons too!


Here is a peek at the inside:


One of these cards will be going to the Nursing Home, where I donate birthday cards each month and I will set the other aside for when I give our daughter's a big set of Birthday Cards for Mother's Day.

Supplies:
Party Lambs - We Herd, Waffle Flower
MISTI - My Sweet Petunia
Bee Paper Company Bleedproof Marker paper
Chameleon Color Tones Markers
White, blue card stocks
Dashing rectangle dies - Elizabeth Craft Designs
Spectrum Noir Glitter Pens
Inside words - Papertrey Ink
Black Olive Ink - Your Next Stamp

Thanks for stopping by today

Sunday 24 March 2019

Narwhal Birthday Card

Hello my crafty friends

I had a lot of fun at the Mesa Rubber Stamp Show again this March, and my first stop was the Pink and Main booth. This Sunny Cover die has been on my Wish List for a long time, so I was happy to add it to my collection.

Walking by a different booth this Lawn Fawn Narwhal die set practically jumped out at me. I thought it would make cute birthday cards for girls, and without the 'tusk' it becomes a whale for boy cards. It can also be a sea lion so you will be seeing more of this die in future cards.


The 'swim' and 'laugh' were die cut from one of the border patterns in the paper stack using the stitched fishtail banner die that comes with the Sunny Cover Die.  I added some sequins and a touch of glitter to the Narwhal for some birthday sparkle.


Inside I added a couple of birthday stamps and some bubbles.


Three of our grandkids were visiting, and Olivia showed me her rather tattered bookmark. Well we can't have that! She said she would love a Narwhal one and accompanied me into the craft room to choose what colours etc she wanted. She is heading back home with a brand new Narwhal bookmark that I forgot to take a photo of.

Supplies:
Sunny Cover Die - Pink and Main
Black, pink, white and peach card stocks
Patterned paper - Craft Smith
Narwhal and Friends - Lawn Fawn
Sakura clear glaze pen
Sakura white gel pen
Stickles
Bubble stamps, Happy Days Mermaids - Your Next Stamp
Sequins
Stitched rectangle dies - Elizabeth Craft Designs
Inside stamps - Tailored Expressions

Thanks for stopping by today

Saturday 23 March 2019

C4C476 Magical Mermaid Shaker Card

Hello my crafty friends

It's Saturday and that means a new challenge at the Crazy4Challenges Blogour March hostess is Frances Byrne and please welcome our Guest Designer Barb Anders - Paper Pursuits. I've long been a fan of Barb's creations!


Frances' challenge is:  According to the Days of the Year Calendar the 20th March was Hufflepuff Pride Day, 21st – Slytherin Pride Day, 22nd – Gryffindor Pride Day and 23rd – Ravenclaw Pride Day. These are the four Houses of Hogwarts School of Witchcraft and Wizardy from Harry Potter. This is a challenge for all the Harry Potter fans out there, create a card inspired by Harry Potter. This could include using stamps of the characters, using colors from any one of the four houses on your card. Or anything else that inspires you.

I don't have any Harry Potter anything in my stash, and I don't buy product just to make a challenge card. I thought about using Karen Burniston's House Pivot Panels, but then didn't have a reason for those on a card this week either. I DID need a little girl's birthday card for our nephew's daughter though, and since I had picked up this 'MAGICAL' stamp and die set at the Mesa Rubber Stamp Show I decided to go with the magic theme of Harry Potter and make a Birthday shaker card.


The cute cloud frame die is also from Pink and Main and was another purchase from my Wish List at the show. 


The sweet mermaid is from Your Next Stamp, and I had fun adding glitter and glaze pens for lots of sparkle. 


I also added this cute starfish and it is covered with a glitter marker. It's always hard to capture the sparkle in a photograph though.


Inside I used a gold foil framed journal card and left a white area for us to sign our names.


Check out the C4C blog to see how the Crazies have been inspired by the challenge. We'd  love to see your take on it, so be sure to stop by the Crazy 4 Challenges blog and link up your creations. If you are uploading to an online gallery, please use the keyword C4C476.

Supplies:
Patterned paper - Craft Smith
Cloudy Frames dies - Pink and Main
Sequins, gold flakes, micro beads
Acetate - Hero Arts
Magical stamps and dies - Pink and Main
Happy Days Mermaid stamps - Your Next Stamp
Spectrum Noir glitter pen
White card stock
Gold foil card stock - Stampin' Up
Sakura glaze pen
Copic markers
Stickles
Sakura white gel pen
Dashing rectangle dies - Elizabeth Craft Designs


Thanks for stopping by today