Showing posts with label Z Fold Card. Show all posts

Friday, 26 September 2025

Double Z Fold Birthday Card


It’s Fun Fold Friday here on my blog, and today I’m sharing the Double Z Fold birthday card made for our eldest granddaughter. She is very interested in space etc, so I pulled out this very old paper pad for her card. 


Below you can see the card open and standing for display.


I always like how nice and sturdy these cards are and I was able to make use of some border strips and other cut-aparts in the paper pad for decorating. The flowers, stars & moon were fussy cut and added as decorative elements.


There are a number of pages in the paper pad that contain four 6x6” panels. I rarely make 6x6” cards, but I cut one down for the front of the envelope and wrote her name inside the moon. Since we were hand delivering the card, I didn’t have to worry about anything catching in the mail so the fussy cut flowers were added with thin foam tape.


Supplies used:
5 x 6.5” card base & envelope - Michaels
Patterned paper - Moon Flower Magic, Craftsmart (old form my stash)
Large Birthday - Technique Tuesday
Self Adhesive Gem stickers - Dazzles
Stardust gel pen - Sakura


Monday, 4 November 2024

5x7" Fall Z-Fold Card


I made so many Fall & Thanksgiving cards last year that I didn't need to make any this year. Then, I ran out of time and didn't get any mailed for our Canadian Thanksgiving in October, so now I have lots for next year too. Sheesh. At least I can mail cards to our American friends & family this month. I found this single 12x12" sheet of fall themed paper in my stash and decided to use it up. I made 4 different sized cards and will be sharing them throughout the week. This 5x7" Z-Fold crd is the first one.

The cute stamped images (Lawn Fawn) were stamped and cut with my Scan 'N Cut several years ago. I stamped & cut out a whole sheet of images from the stamp set and then just had them stored in a baggie in with my Fall embellishments. At some point I even coloured some of them so those are the ones I pulled out for this card.


Supplies used:
Patterned paper - Fall Harvest, Echo Park
Narrow gold tape - Amazon .ca
Shimmer Spray
A6 Lacy Layers - Waffle Flower
Wash Tape - old, my stash
Happy Harvest - Lawn Fawn
Autumn Greetings - Sunny Studio

Wednesday, 31 July 2024

Anniversary Z-Fold Card


I used the March 2024 Paper Pumpkin kit for this card but of course changed it up from the kit instructions. I'm always a fan of the envelopes that are included with the Paper Pumpkin kit and this one is printed inside and has a rounded flap.

I stamped the sentiment on a stitched circle die cut which was matted with a crosshatch circle die cut from vellum. I added three mirrored hearts above and below the sentiment.


Here is a look at the inside. The patterned card base was turned inside out, so it was white on the outside front & back and all the pattern was inside. The centre score line was already there, so I just scored a second line on the left side of the (opened) card in the centre of that panel. Then, simply fold as shown! I used a corner rounder to punch the top two corners which ties in with the rounded flap on the envelope.

The greeting was stamped on a same size stitched circle as on the front, and placed so it cannot be seen when the card is closed. While I could have stamped the greeting directly on the card base, I liked the look of the stitched circle better.


One more look ...


Supplies used:
March 2024 Paper Pumpkin kit "Memorable Meadows", Stampin' Up
Circles Crosshatch - Karen Burniston
Stitched circles - MFT Stamps
Vellum - Stampin' UP
Word stamps - The Inside Scoop Anniversary, Taylored Expressions
Mirrored hearts - Kat Scrapiness
Corner Rounder - Amazon .ca


Wednesday, 17 July 2024

'Sweet Friend' Slimline Diamond Z-Fold Card


I have a couple of friends dealing with health issues, so I've been making cards to send for Happy Mail. This is one of them ... a Slimline Diamond Z-Fold Card. I made a number of this type of card back in 2022 in a 5x7" size. I loved making them, so I also came up with the measurements and a tutorial for making this Slimline size. You can find that tutorial HERE, and the measurements are at the end of my post.


I usually have a Wish List for Stampin' Up items but rarely order everything on that list. Sometimes I wait and wait and by the time I decide I'd really like/use a set, it's either discontinued or out of stock or .....     So I keep an eye on a Facebook group for Canadian's selling retired SU products. This Honey Bee Bundle is one of those sets - it had been retired for a while before it popped up on that group and I claimed it right away. I've had it for over a year now, and it's one of those sets I get a lot of use out of. 


The stamped & die cut bees were coloured with alcohol markers and I added Wink of Stella glimmer paint to their wings. On the inner diamond, there is the honeycomb die cut as well as a small sentiment (from a different set). I will sign on the blank white diamond when I go to send the card.


While I prefer a Slimline card to measure 3.5 x 8.5", this one is a full 4 x 8.5" to give me room to make the diamonds this size. It fits perfectly in a #10 business envelope for mailing, and this one will mail for a single stamp!


Measurements for Diamond Z-Fold Slimline Card by Karen Aicken 

Card base - 8 x 8.5". With the 8" side at the top, score at 2" and 4". The 4" scoreline is the center, so fold your card in half along that scoreline. Then fold the front right flap back to the outside along the 2" scoreline.

Patterned paper - TWO 1.75 x 8.25" pieces and ONE 3.75 x 8.25" piece. I don't always use the two smaller ones, often just adding one to the front and leaving the inside one undecorated. It's entirely up to you.

Diamonds - TWO 2.75" squares and ONE 2-1/2" square

Patterned paper (BE MINDFUL OF THE PATTERNED PAPER IF IT HAS A DIRECTIONAL PATTERN) TWO 2.5" squares and ONE 2.25" square.

Signing block - 2.25" cardstock square with a 2" square of white or light cardstock of your choice.

Pop Up strip - 4 x 3". With the 4" side at the top, score at 1, 2 & 3"
Assemble as shown in the video.


Supplies used:
Patterned paper - Bee Happy, Echo Parl
Honey Bee Bundle - Stampin' Up
Catherine Pooler coloured inks
Alcohol markers
Tasteful Label dies - Stampin' Up
1-1/2" square die - Hero Arts
Inside sentiment - Hand Delivered, Stampin' Up
Nesting circles - Hero Arts
Blending sponges
Wink of Stella


Friday, 5 July 2024

'Game On' Birthday Card

Welcome to Fun Fold Friday here on my blog! 

I had bought the Z Fold With Layers die set (Divinity Designs) as soon as it came out several years ago, and love to get it out. While it's probably easy enough to create this type of card BASE without the dies - this one comes with the layering dies so all the patterned paper pieces fit perfectly. No math or measuring required and that makes it fairly quick and easy to put a finished card together.

The only thing I am not crazy about is the name ... while it IS technically a Z Fold card, it's very distinctive with that Diagonal cut line, so I always refer to it as a Diagonal Z Fold, or Diagonal Trifold card. 😊


Our grandson has a birthday coming up and since he is getting older, 'cute' images aren't really appropriate for him right now. I mean - he is taller than I am! I got this Game Controller die last year knowing it would work for 'boy' birthday cards, so I pulled it out for his card. Then I flipped through a 'boy' themed 6x6" paper pad and saw the game controller print in it. Woo hoo!


There is just enough room for hubby and I to sign our names on the inner circle piece. Oh, and the sentiment is one of the leftover sentiment strips from Paper Roses' BEE HAPPY cardmaking kit. There are a lot of them left - they were very generous with the sentiments in the kit.


When my card was done, I got flipping through the remaining sheets & scraps in the (old) pad and decided it wouldn't take much to actually use it up! So I have been busy making birthday cards to share in the coming weeks. (And I did finish off that paper pad, since there were only a few sheets left 👏🏻👏🏻👏🏻)

Supplies used:
A-2, Z-Fold With Layers die set - Divinity Designs
Patterned paper - Boy Oh Boy, Carta Bella (6x6") - OLD!
Game controller die - Marianne Designs
Pops of Color - Scrapbook .com
Stardust Glitter Pen - Sakura
Stitched circle die - MFT Stamps
Happy Birthday strip - Bee Happy Cardmaking Kit, Paper Rose
Catherine Pooler coloured inks
Water brush
Inside - Everybody Say Happy, Catherine Pooler

Friday, 21 June 2024

Ice Cream Z-Fold Card Trio


Welcome to Fun Fold Friday here on my blog! I had found these older ice cream ephemera pieces in a ziplock bag in my craft room so decided to pull them out and use them on my ice cream cards this year. I haven't made a Z-Fold card in awhile so that is what I did as well - they are my very favourite fun fold card to make.


When my Mom was a little girl, there was always a July parade in their town. Afterwards her dad, my Grampa, would take her to the drugstore for an ice cream soda. She continued the tradition with my brother and I, taking us for ice cream on that special day in July.  I did that with our kids too - bringing my Mom along. We always made sure she had ice cream on that day. 

Now that she has passed, we continue the tradition - raising an ice cream cone or sundae to her in a toast,  and our grandkids think it's a great tradition! I also send my family ice cream themed cards to celebrate. 


I love the Lacy Layer dies from Waffle Flower and have managed to collect most of the shapes. There are alternating scalloped & stitched/straight edge dies in each set, which is what I used for these cards.


I added Pops of Colour (glitter glaze) on each of the ice cream pieces for some shimmer and shine, and added the elements using thin foam tape. The Celebrate was stamped in grey ink onto narrow cardstock scraps then I fishtailed the ends.


Here is a look at the inside of the above card, but they were all done the same.


Supplies used:
Patterned paper - Heart Throb, Queen & Co (6x6")
Petite Prints - Doodlebug (Love Notes)
Lacy Circles - Waffle Flower
Pops of Color, Icicle - Scrapbook .com
Ice cream ephemera - unknown, from my stash
Happy stamp - Biggest Wish, Stampin' Up
Coloured pens & markers
Share a Milkshake - Stampin' Up
Catherine Pooler coloured inks


Friday, 16 February 2024

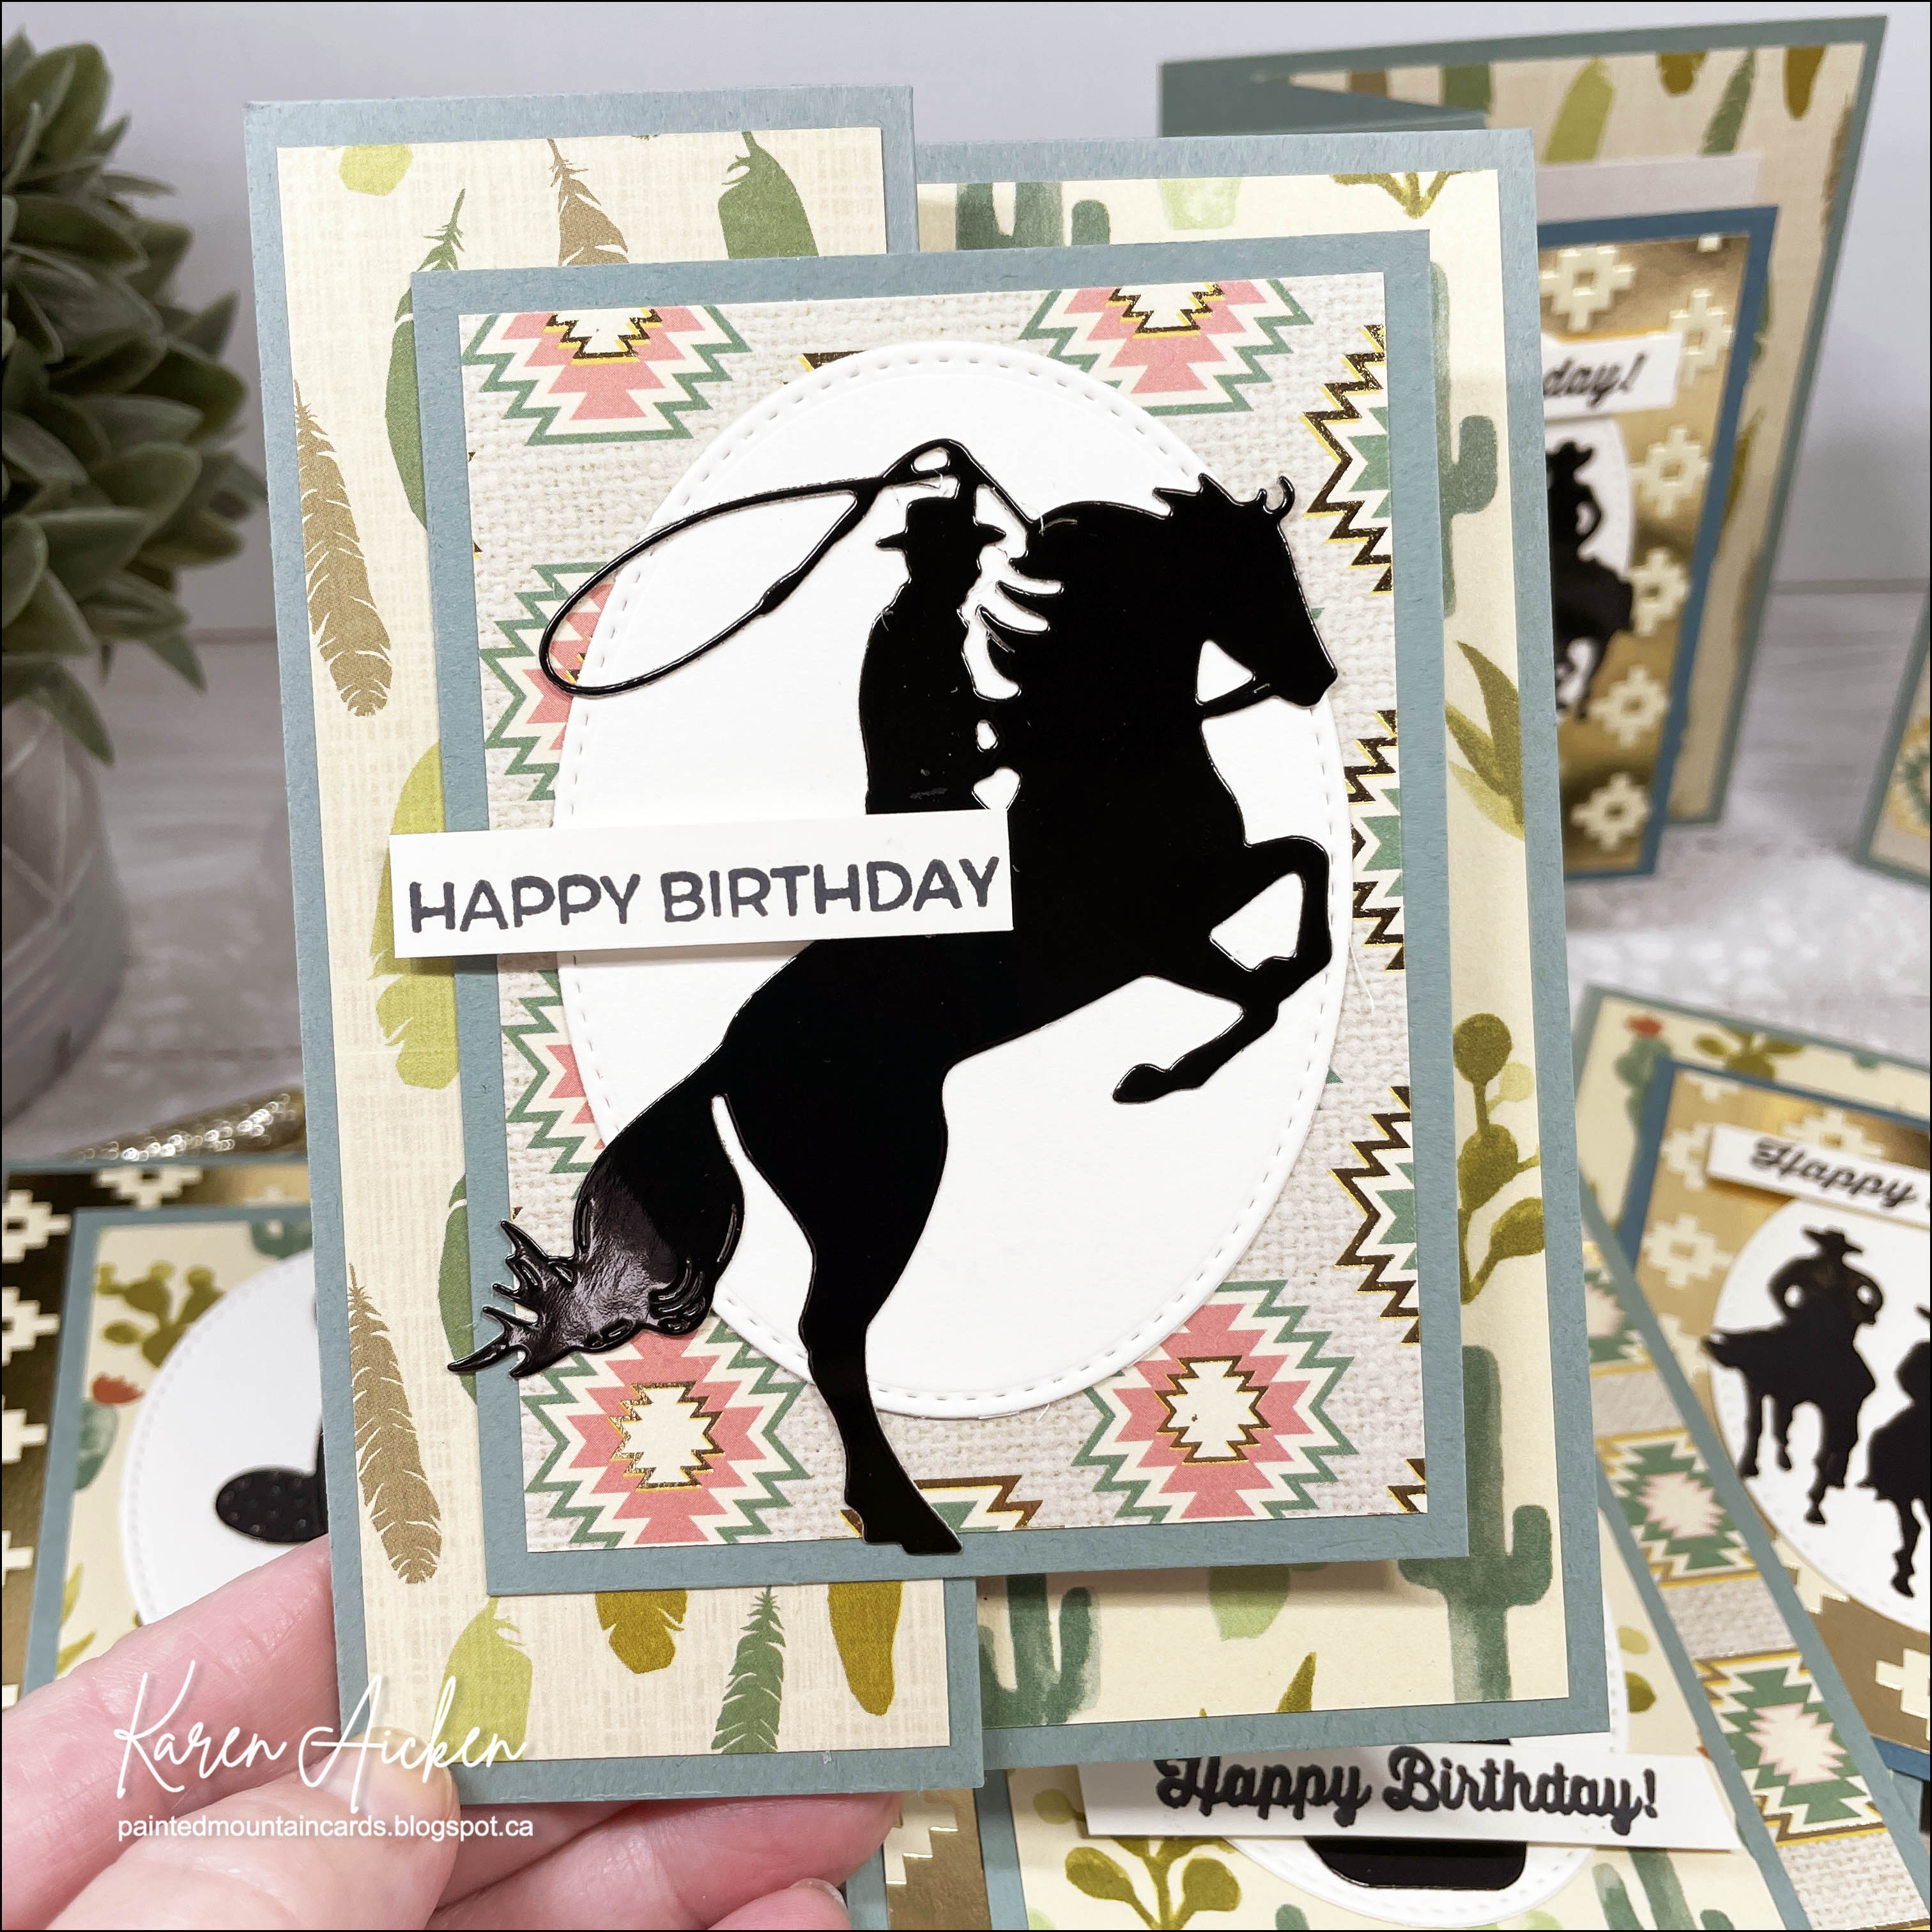
Eight Desert Themed Birthday Cards


Welcome to Fun Fold Friday here on my blog!

It's no secret that I love making Z Fold Cards, and since I am going to need several masculine birthday cards in the next little while I pulled out the October 2019 Sheetload of Cards.

I have a walkthrough of my cards on YouTube:


I've had this paper pad for a number of years and I like that some of the sheets have gold foiling on them. It was fun to pick the four different patterns to use with the Sheetload cutting guide as well as what die cut elements I would be adding to the fronts. These were cut from black glossy cardstock for a little more pizzazz.


Inside the cards I chose a couple of Funny Bones sentiments and alternated which ones went with which cards.


There are two of each silhouette design so I have enough variety to choose what card goes to which friend/family member.


I thought this sentiment went perfectly with the horseback riders above.


I love this 'bucking bronco' die so it was fun to get it out again.


Below is one more of the funny sentiments.


Supplies used:
Patterned paper - Desert Dream, Recollection (old)
Stitched oval dies - MFT Stamps
Black glossy cardstock
Feather dies - Elizabeth Craft Designs (old)
Bucking horse - Paper Rose
Cactus & Pot - Paper Rose
Cowboys & Cactus Silhouettes - Divinity Designs
Small Happy Birthday - Birthday Banners, Stampin' UP
Larger Happy Birthday - Happy Birthday Many Ways, Catherine Pooler
Inside sentiments - Funny Bones, Riley & Company
Gold Nuvo Drops

Thursday, 15 February 2024

Daisy Z Fold Card


Today I'm sharing the 11th card made with Paper Roses' Bee Happy cardmaking kit - and this one went to a friend who recently had surgery. I actually used a printed note card for the base, turning it inside out so the print was on the inside. The center score line was already there, so I added a 2nd one at 2-1/8" on the left (patterned) side to give me the Z-Fold base.

For additional contrast inside, I used a yellow ombre note card that I've had for several years. Both note card sets I've had for at least that long, and I'm trying to remember to USE them. I trimmed the ombre note card front slightly smaller so I would have the yellow border all around the outer edge and adhered it inside the card. 

The stitched oval was cut from the back of the note card and added to the front with some of the ephemera in the kit. The wax seal piece was given a coat of Nuvo Glaze to make it look more like a real was seal and I added a stamped sentiment to finish off the front.


Inside I added a stamped sentiment along with a gold foil bee sticker, then added another sticker to the Kraft envelope.


Supplies used:
Patterned note card & Ombre note card - Hobby Lobby (old)
Lacy Oval dies - Waffle Flower
Nuvo Glaze
Catherine Pooler coloured inks
Bakers Twine
Front sentiment - More Essential Sentiments, MFT Stamps
Inside sentiment - Wishing You Well,  Scrapbook .com
Foiled bee sticker - Amazon .ca

Wednesday, 14 February 2024

Valentine's Z-Fold Card


Happy Valentine's Day!

Today's card uses a bunch of bits and pieces and scraps from the Love Notes paper package & I created a Z-Fold card with a couple of older stamp sets from my stash.


I love this scalloped heart die from Studio Katia. When I laid it out with the different print papers, I decided I liked the coordinating grey print. But looking at it in the photos, I wish I'd chosen something with a bit more contrast. Ahh well.


I combined the stamp sets on the clipboard ephemera and added glitter to the bees' wings. The envelope got some pretty red & gold washi tape on the flap.


Supplies used:
Patterned paper - Love Notes, Doodlebug
and Love Notes Tiny Prints, Doodlebug
Scallop heart die - Studio Katia
Odds & Ends - Love Notes, Doodlebug
Black glaze pen
Nesting heart dies - Hero Arts
Sending Love stamp set - Waffle Flower
Bee Mine stamps - Lawn Fawn
Pops of Color - Snowflake, Scrapbook.com
Alcohol markers
White paint pen

Wednesday, 20 December 2023

Our Groomer's Christmas Card & Gift Card Holder


When I saw this sheet of cut-aparts (Photo Play) I knew I had to buy a sheet. I love the colours with the fun dog images and the 'spa day' one was just too perfect for what I had in mind.

Since Jasper had a grooming appointment last week, I wanted to bring the groomer a holiday card that included a Gift Card. They always do such a good job with Jasper and he looks totally handsome when he comes out. Not like the 'homeless Sheltie' look he has going in, ha ha.


First up is the Gift Card Holder. I used the measurements in my Gift Card Holder Tutorial (click HERE) and some patterned paper that matched the card. The purse/dog was fussy cut from another cut apart on the sheet and popped up onto the scalloped oval with foam tape. I stamped WOOF! on the oval to fill up some of the white space and the front was done.


Inside, there is the pocket for the Gift Card, and one more WOOF!. We wrote a personal message onto the inside oval.


After matting the 4 x 6" cut-apart onto pink patterned paper, I stamped a sentiment on a fishtail banner and adhered it over the words that were printed on the cut-apart. Then I created an infinity shaker with a transparency and filler that resembled bubbles from a bubble bath.


I stencilled on the card front from the upper left to the lower right corner, and also added stencilling to the envelope.


Here is a peek at the inside. The dog on the spa towel was fussy cut from one of the 3 x 4" cut-aparts on the sheet and I added Nuvo Glaze to the cucumber slices on his eyes. Too funny.


Having been asked how many cards I make I thought it would be fun to keep track this year. Many of my posts include more than a single card or project and below is my tally. 

Card Tally for 2023
January - 53 cards
February - 56 cards
March - 55 cards
April - 32 cards
May - 43 cards
June - 34 cards
July - 56 cards
August - 106 cards
September - 61 cards
October - 51 cards & 5 Tags
November - 46 cards
December so far - 19 cards (& 16 simple tags)

I decided to cancel the subscription that provided linked thumbnails to what products I used on my cards. It was costing me out of pocket each month, so I’m back to listing what I used.

Supplies:
Cut aparts - Pampered Pooch, Photo Play
Pink patterned paper - - Pampered Pooch, Photo Play
5 x 7" card blank and envelope
Outside sentiment - Encircled in Warmth, Stampin' Up
Catherine Pooler inks
Blending sponge - Ranger
Transparency
Bow Wow Stencil - Photo Play
Blending Brushes - Taylored Expressions
Snowflake peel offs - Ecstasy
Nuvo Glaze
Stitched oval dies- MFT Stamps
Scalloped stitched oval dies - MFT Stamps
Woof - Dog Happiness, Frantic Stamper
Blue patterned paper - Countdown to Christmas, MME (old!)

Wednesday, 22 November 2023

Stepped Up Sheetload Cards


Alicia at 'Call Me Crafty Al' releases a new Sheetload of Cards (Sketch and Cutting Guide) on the 1st of each month, and you can pretty much bet that on the 1st I'm in my craft room cutting down papers. This month was no exception, and as usual I finished my panels and had them ready to attach to card bases. 

At that point I had the idea to step up the cards AND do a video tutorial for them. Which was all well and good, but when I was finished the video was over 45 minutes long. After an additional 90+ minutes of editing I wasn't even half finished so I threw in the towel. I just don't have the time or energy to spend over 3 hours editing a video, then another hour to preview the video and get it uploaded, as well as getting the blog post written. So ... no tutorial ... although I haven't deleted the video in case I end up having lots of free time between now and Christmas. 😂


I added narrow gold foil tape to my panels for some holiday shine, and instead of a vellum circle element I used the 3 x 3" cut aparts that were in the paper pad. So in addition to the four sheets of 6 x 6" paper that the Sheetload called for, I used up an additional two with the cut aparts AND additional sheets for the layers and insides. Yeah!

The easiest way to step up the inside of your cards is simply to add a printed paper panel. That is what I did for the first two, adding a smaller white panel to the inside with a stamped sentiment.


For the next two cards I added the panels to white card bases but did a simple box pop up inside. The 3 x 4" cut aparts were also in the paper pad so I got to use them up as well. I do have video tutorials on creating simple box pop ups and HERE is one of them. The pop up box measured 5 x 1", scored .5,  2.5  and 3".


Of course I had to make a pair of Z Fold cards - my favourite type of fun fold. I haven't done them with such a large front element before but I was happy with how they turned out.


The final two cards are Faux Step cards. Again, I wouldn't normally use such a large element as it doesn't leave much room to add other elements onto the 'steps' but they still turned out cute. They also stand beautifully for display!


With all the dilly dallying around with the video, I'm quite late sharing my November Sheetload cards ... but at least I'm getting them shared in the same month! 

Having been asked how many cards I make I thought it would be fun to keep track this year. Many of my posts include more than a single card or project and below is my tally. 

Card Tally for 2023
January - 53 cards
February - 56 cards
March - 55 cards
April - 32 cards
May - 43 cards
June - 34 cards
July - 56 cards
August - 106 cards
September - 61 cards
October - 51 cards & 5 Tags
November so far - 32 Cards

I decided to cancel the subscription that provided linked thumbnails to what products I used on my cards. It was costing me out of pocket each month, so I’m back to listing what I used 

Supplies:
November Sheetload of Cards, Call Me Crafty Al
6x6" patterned paper & cut aparts - Jingle All The Way, Echo Park
Narrow gold tape
Sentiment - Joy to You, Stampin' Up
Catherine Pooler Inks
Snowflake peel offs & Glitter dots - Ecstasy Crafts

Wednesday, 27 September 2023

Dog Sympathy Card


Three friends have had to say goodbye to their dogs in as many months ... and then I heard that another friend did as well That's four furry kids gone - enough already! Today I'm sharing another pet sympathy card that I sent to one of my grieving friends.


This card started with a printed panel (the bulldog) from the Little Book of Muddy Paws by Hunkydory. Their dog wasn't a bull dog, but I loved the soft florals on the panel so that is why I chose it. I created a 5 x 7"  Z-fold card with dies inside by Karen Burniston.


Having been asked how many cards I make I thought it would be fun to keep track this year. Many of my posts include more than a single card or project and below is my tally. 

Card Tally for 2023
January - 53 cards
February - 56 cards
March - 55 cards
April - 32 cards
May - 43 cards
June - 34 cards
July - 56 cards
August - 106 cards
September so far - 59 cards

I decided to cancel the subscription that provided linked thumbnails to what products I used on my cards. It was costing me out of pocket each month, so I’m back to listing what I used with a few affiliate links included.

Supplies:
Little Book of Muddy Paws, Hunky Dory
5 x 7" Card blank and envelope
Twine
Paw Print Stencil - Your Next Stamp
Blending brushes - Taylored Expressions
Hearts Crosshatch - Karen Burniston
Stamps - Critter Coondolences - MFT Stamps
Mirrored Hearts - Kat Scrappiness

Friday, 14 July 2023

Double Z Fold Cards (and Tutorial!)


I have a video tutorial to share today, for creating these easy Double Z Fold cards. While technically this isn't a NEW to me fun fold, I haven't made one in many years, so I'm counting it as the 7th edition to my monthly series "New Fun Folds". It's also Fun Fold Friday here on my blog!  You can find the YouTube video tutorial HERE: 


This first one is one of my July Ice Cream cards. Having ice cream on a certain day in July is a generational tradition and I've also been sending the family ice cream cards to celebrate that day for the past 20 years or so. If you would like to read more about the tradition, I wrote about it in THIS blog post.


I added both Pops of Color and Nuvo Glaze to two of the ice cream layers, then a tiny enamel heart. The letters for JULY also got a coating of Nuvo Glaze for lots of shine.


When I was doing the tutorial, I wanted to show how easy it is to change up what you add to the front. So I made a holiday card using a cut apart (or journal card) instead of the ice cream panel. So that also means this post is my 7th edition to the monthly series "12 Months of Christmas". 😊. Talk about packing a lot into a single post, ha ha.


I was actually so happy with how these cards turned out, I can't wait to make a few more for the holidays. Could be a great way to use up some of the scraps, partial sheets and leftover stickers I have laying around. 🤔🤔🤔

This card features a matted cut-apart on the front, and a stitched snowflake on the inner centre panel. You can decorate this panel - or not - it's up to you!

Measurements - assemble as shown in the video tutorial.

Card Base:  11 x 4.25", scored at 2.75 and 5.5"

Patterned paper for card base:  two at 2.5 x 4", one at 5.25 x 4"


Smaller Card Base:  9.75 x 3", scored at 4.25 and 7"

Patterned paper for smaller card base:  4 x 2.75" and two at 2.5 x 2.75"


Embellish the front as desired. You can add other layers or use embossing folders and coloured cardstock instead of patterned paper. Lots of ways to change this one up!


Having been asked how many cards I make I thought it would be fun to keep track this year. Many of my posts include more than a single card or project and below is my tally. 

Card Tally for 2023
January - 53 cards
February - 56 cards
March - 55 cards
April - 32 cards
May - 43 cards
June - 34 cards
July so far - 19 cards

Additional Supplies:
Patterned paper (including peach) Neapolitan, American Crafts (old, from my stash)
White cardstock
Ocean tides cardstock - Papertrey Ink (my stash)
Plaid patterned paper - Oh Canada, Flannel Shirt (Photo Play)
Cut Apart - Winter Meadow (Photo Play)
Shimmer Spray

This blog uses affiliate links whenever possible. This means, if you make a purchase through one of my affiliate links that you pay the same amount but I may receive a small commission from your purchase. I only link products that I own, love and use for my card making and not every link below is an affiliate one! 😊