Showing posts with label Baby Cards. Show all posts

Friday, 5 August 2022

Pop Up Baby Card


Hello my crafty friends! Today I'm sharing the baby card I made for our niece & her hubby, who had a baby girl recently 🥰.   The patterned paper is one I've had in my stash for YEARS as well as that sweet ribbon. The paper has some sparkle to it and I used a pink pearl glimmer foil for the other elements.


Since it's Fun Fold Friday on my blog, this card has a little surprise inside ... it's an explosion card! I have been making this type of explosion card for over 30 years (gasp). I would go into our kids classroom with a suitcase full of stamps & ink pads and teach these to the kids.  This card started with a 9" square of patterned paper. I think I will have to do a YouTube tutorial on this fun fold for those who haven't seen them before. Adding it to the list!

Since I also did some reverse foiling, there were areas of pink pearl foiling left on the cardstock after die cutting the circle and Congrats inside. So I pulled out an old heart punch and punched out the hearts from the leftover area. No waste and they coordinate perfectly!


I spelled out the baby's name using an alpha die set and rainbow holographic cardstock. Everything that is available is linked below. 😊 


This blog uses affiliate links whenever possible. This means, that at no cost to you, if you make a purchase through one of my affiliate links that I may receive a small commission from your purchase. I only link products that I own, love and use for my card making and not every link below is an affiliate one! 😊

Any supplies I'm unable to link are listed at the very bottom of my post.

Additional Supplies:
Card (6.5 x 5")  and envelope - Michaels
Patterned paper - Nana's Nursery Baby Girl, DCWV (old, from my stash)
Pink patterned paper inside - Provocraft? (old, from my stash)
Pink cardstock - stash
White card stock - Accent Opaque Digital Super Smooth (Amazon .ca)
Sequins - leftover from an older Paper Pumpkin kit
Hearts - retired punch from Stampin' Up
Rainbow Holographic cardstock - Hunkydory

Wednesday, 23 February 2022

"Welcome Twin Girls" Slimline Pop Up Card


Hello my crafty friends!  Today I'm sharing the card I made for our Nephew and his wife who had twins last month. I have a walkthrough of my card on YouTube:  


I used mostly dies by Karen Burniston (which I linked below) but added in the Waffle Flower Slim Lacy Layers as I adore the edges on this set. The patterned paper is soft and celebratory at the same time and I added two little ducklings to the front to represent the two girls.


Inside, there is more of the pretty paper - which is just perfect for this family - and I used the Little Labels Pop Up along with more of the Baby Charms.


I took advantage of the stencil feature on the Baby charms, and of course added a little Wink of Stella and mirror card stock too. Also some of those sweet Rainbow Hearts from Doodlebug.


This blog uses affiliate links whenever possible. This means, that at no cost to you, if you make a purchase through one of my affiliate links that I may receive a small commission from your purchase. I only link products that I own, love and use for my card making!

Any supplies I'm unable to link are listed at the very bottom of my post.


Additional Supplies:
Fine point markers
White card stock - Accent Opaque Digital Super Smooth (Amazon .ca)

Monday, 17 May 2021

Oh Baby Slimline Shaker Card


Hello!  Today Crafty Meraki is sharing another week of new stamps and dies for their Anniversary Release. Friends of ours are new Grandparents, and I wanted to make them a card to celebrate so the new "Oh Baby" stamp set was perfect!

I used the Three Room Studio Slimline die to create the shaker card, and decorated it with fussy cut images from the "Oh Baby" set.


Here is a peek at the inside, where there is lots of room to write our message.


One more look ...


"Crafty Meraki is a tribe of women who are all creators but more importantly, love helping others in any way we can! 

Meraki (may-rah-kee) a verb, or adverb, a Modern Greek word, derived from the Turkish “Merak” (Labor of love, to do something with pleasure), is applied to tasks, usually, creative or artistic tasks, but can be applied to any task at all. Meraki means to do something with passion, with absolute devotion, with undivided attention.

Crafty Meraki was born out of a vision to help creators do what they love doing the most- to create!"


The list below contains some affiliate links. If you use these links to purchase I may earn a small commission at NO extra cost to you.


Additional Supplies:
Oh Baby - Crafty Meraki
Shaker filler - stash
Card size - 3.5 x 8.5", fits in a #10 Business Envelope

Thanks for stopping by


Thursday, 1 October 2020

Baby Boy Shaker Card


Hello crafty friends ...

Today I'm sharing a shaker Baby Card I made for a friend who is a new Grandma. Well, not new anymore - that sweet baby is 4 months old and because of COVID I still haven't met him or been able to visit with my friend. Hoping we can change that with a porch visit soon, although I won't meet the little one for awhile yet. 


The card is a larger than A2 card & envelope package I got years ago at Michaels. I also pulled out my Blueprints die set - I love those sets and I'm always happy to have invested in the ones I did before they were retired! I also pulled out some cute papers and elements from Doodlebug Designs.


I didn't add a verse or sentiment inside the card, but wrote a personal note instead. 

Supplies:
Blueprints #31 - MFT Stamps
Patterned paper - Snips & Snails, Doodlebug Designs
Acetate
Various shaker filler - Kat Scrappiness, Studio Katia and others
Card Stocks
Stitched Sentiment Rectangles - Kat Scrappiness
Sakura black glaze and white gel pens
Bakers Twine
Card & Envelope - Michaels
Simple Strips Background - Taylored Expressions
Simple Strips Die - Taylored Expressions
1/8" Quick Strips - the Stamp Market

Card size - 5 x 6.5", fits in the included envelope

Thanks for stopping by today

Friday, 3 July 2020

Doubled Charm Accordion Baby Card

Hello crafty friends ...


This is one of those cards that is just better in real life, but seeing it on a video is the next best thing! 


I have had this patterned paper for many years, and it was fun to pull it out again for this card.  This card was not difficult, but it sure did take a long time. I would suggest being familiar with how the Charm Accordion goes together and probably do one first with scrap card stock before you cut into the nice stuff. Also, I used wet glue to add the patterned paper panels to the white card base so I'd have some 'wiggle room'. That was probably the hardest part of the project.


Below is how the card looks opened, and likely how it will be displayed.


The Charm Accordion comes with a die that cuts 4 jump rings, which is what I used here. I did secure them with a TINY piece of card stock so they didn't come open. Another step that took awhile and is not necessary - but I didn't want to put all this work into the card and find out that a charm fell off while they were enjoying the card.

Folded, the Charm Accordion is ~3.25" wide, so slightly narrower than a Slimline Card which is 3.5". But it still works and fits perfectly in a #10 Business Envelope.


Finally, you can see the back of the card here. I didn't add decorations to the backs of the accordion panels, but you definitely could.


In the next photo, I am showing how I created the doubled Accordion. If you click on the photo it should open up larger, in a separate window for a closer look. The white card base was folded in half and the fold is at the top. I placed the Charm Accordion on the fold, with the top cut line ABOVE the fold so it didn't cut. Other details are on the YouTube video.


Supplies:
White card stock
Patterned paper - Baby Girl Stack, DCWV (old, from my stash)
1007 Charm Accordion - Karen Burniston
Scallop border die - Papertrey Ink 
1086 Baby Charms - Karen Burniston
Black pen
Sakura White Gel Pen
i-crafter Blending Brushes
Scalloped label - Dotted Patterns  Set 4, Studio Katia
Welcome Little One, Swan-derful - Your Next Stamp
Pink Carnation Crystals - Studio Katia
Crystal Rainbow Confetti - Studio Katia

Card size - 3.25 x ~8.5", fits in a #10 Business Envelope

Thanks for stopping by today

Sunday, 1 April 2018

Mila's Baby Card

Good morning friends

Our nephew and his wife welcomed a new baby girl into their family, and this is the card I made for them.


The peel -off pony sticker is one I've had for a very long time.  I adhered it to white card stock with double sided adhesive on it, then poured silk microfine glitter over top and burnished it in with my fingers. Colour was added with alcohol markers then I fussy cut the pony out and adhered it to a framed card stock circle with an Action Wobble.


The patterned paper has pretty glossy and/or sparkly bits in it - so pretty!


Inside, I used one of the journal cards (or cut-aparts) over Karen Burniston's Cupcake Pop-Up to create the pop-up inside.


I am loving the stitched scalloped borders by Prickley Pear stamps. I penned the words on another framed circle.


Finally, a side view so you can see the pop-up a little better.


Supplies:
Pink card stock
Patterned paper and Cut Aparts - DCWV
1008 Cupcake Pop-Up - Karen Burniston
Stitched Scalloped Border die - Prickley Pear Stamps
1038 Tropical Scene (stitched scalloped border) - Karen Burniston
Pony Peel-Off - Elizabeth Craft Designs
Double Sided Adhesive - Elizabeth Craft Designs
Warm diamond Silk Microfine Glitter - Elizabeth Craft Designs
Copic markers
Action Wobble
Seam binding
Stitched circle scalloped frame dies - MFT Stamps
Black sharpie
Marvy LePlume II markers
Water Brush
Sequins

Thanks for stopping by today

Wednesday, 3 May 2017

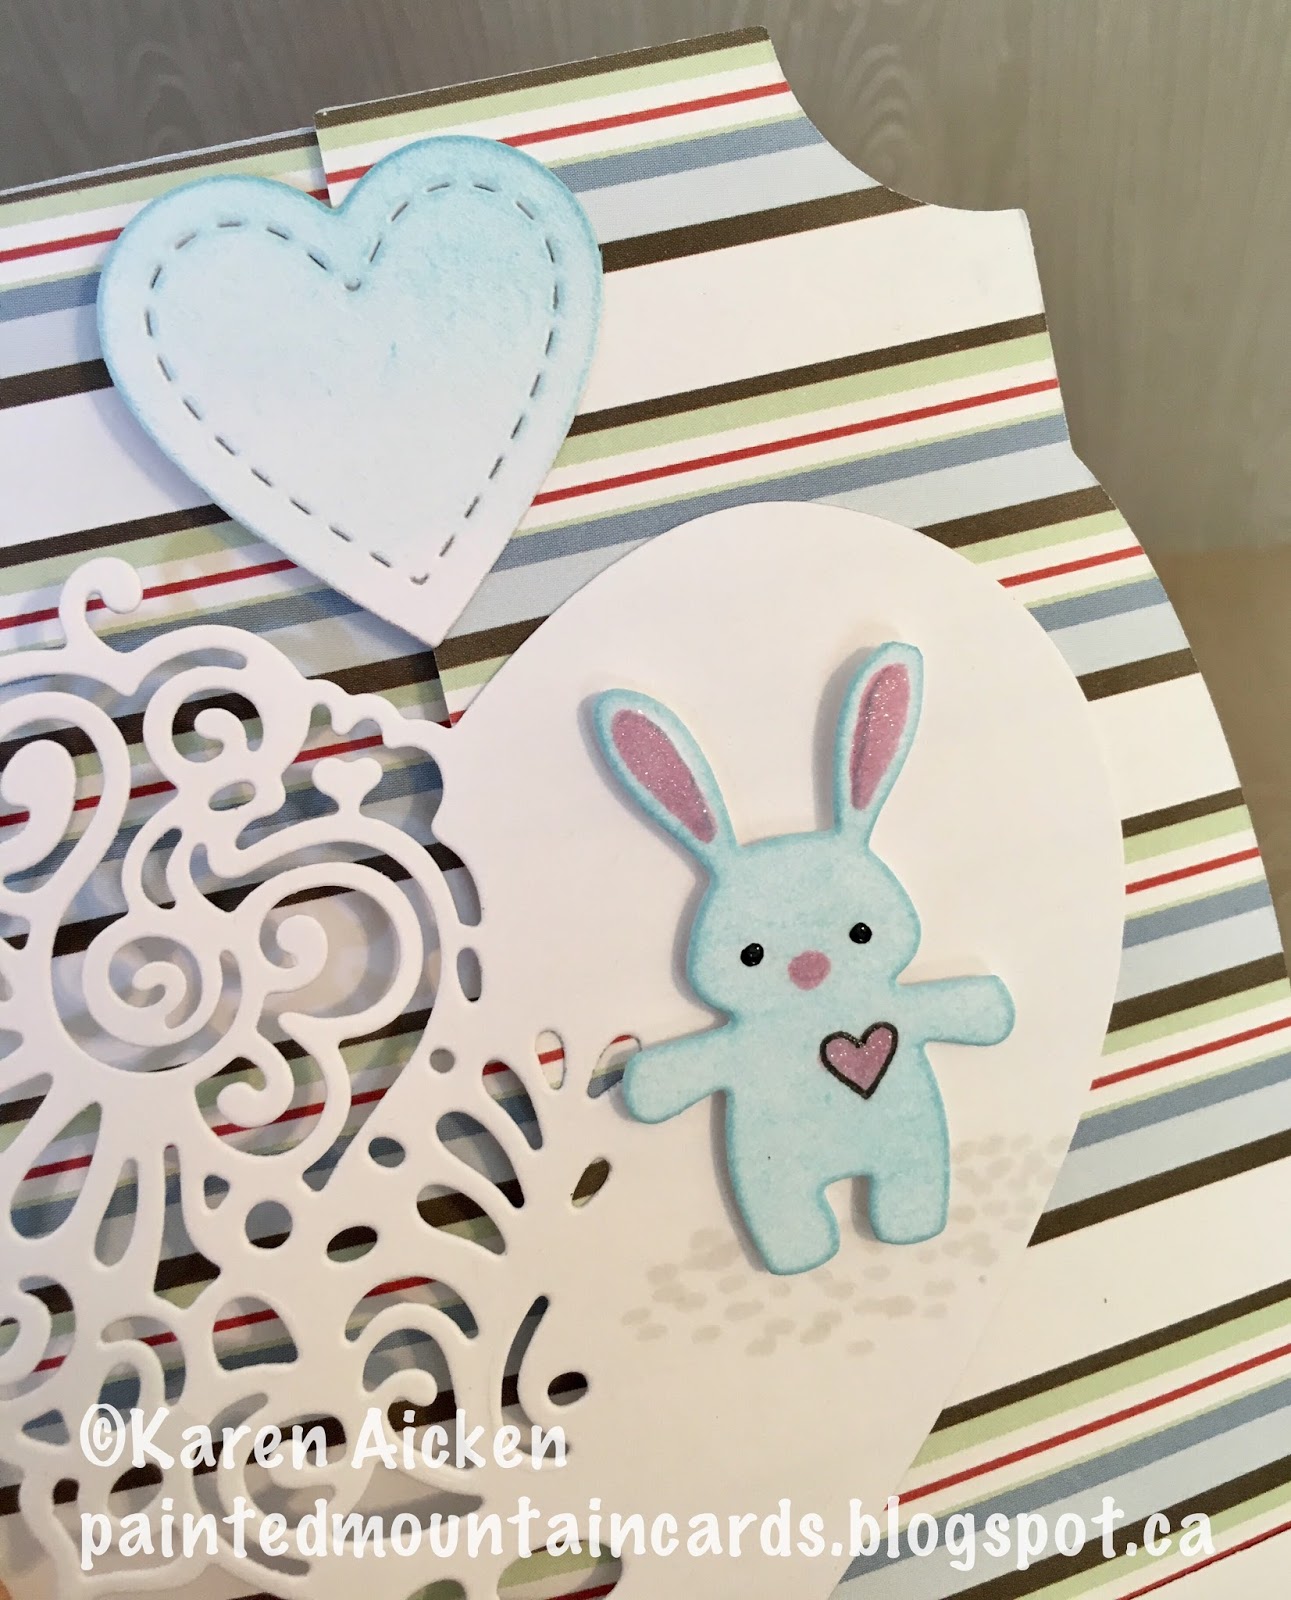
Blue Bunny Baby Pop-Up Card

Good morning friends

My friend recently became a Grandma for the first time, so I made her a card to celebrate. No surprise there, ha ha.

I saw a fun interactive card by Jen Long at CHA this year ... in the shape of a CACTUS. Well you know I had to have it. I stalked the on-line shops waiting for it to come in, and when it did I also added this one to my shopping cart. Like the cactus shape, this is called a Fold-a-Long, specifically the Ticket Fold-a-Long.


Karen Burniston's bunny charm is just adorable, and the Paper Pros (formerly KB's Designer Challenge Team) used it in quite a few different ways. Here I trimmed off the hanging charm, and used the openings in the die to add the face, heart and colour the ears.


Like a gatefold card, this one opens from the centre and that centre label pops forward. To hold it closed, I added a belly band on the bottom edge and added one of the smaller stitched hearts to it. In the top photo you can see the belly band, even though it blends in with the patterned paper. Below you can see it with the opened card. On the patterned paper, the baby feet are flocked with white - so sweet.


Finally, here is a top view so you can see how the card works a little better.


Welcome to the world of being a Grandma, SB ... it's a fabulous place to be. 

Supplies:
Ticket Fold-a-Long - Sizzix
Patterned paper - Me and My Big Ideas
Lace Heart die - Elizabeth Craft Designs
Baby Charms (Bunny), Pop it Ups - Karen Burniston (Elizabeth Craft Designs)
Wink of Stella
Copic markers
Congrats die - Lawn Fawn
Stitched Heart - Elizabeth Craft Designs
Glaze Pen

Thanks for stopping by today

Friday, 14 April 2017

Baby Boy Pull Card

Good morning friends

It's Flip-It Friday here on my blog, and I have a baby pull card to share.  Joset at Elizabeth Craft Designs had a baby boy in January, and this is the card I sent to her & her family. I used the Spiral Circle Pull Card by Karen Burniston for the card base and some new stamps to decorate the circles.

The banner set on the front was free with Stampin' Up's Sale A Bration, and the sweet little bunny and bird are new Krista Schneider stamps available at Elizabeth Craft Designs. The corner dies are also ECD.


Inside I added a stamped and die cut banner, as well as another little stamped bird.


Supplies:
Patterned A2 card - DCWV
Spiral Circle Pull Card, Pop it Ups - Karen Burniston (Elizabeth Craft Designs)
Stitched Scallop Border die - MFT Stamps
Blue card stock - Stampin' Up
White card stock
Clock & Gears (circle), Pop it Ups - Karen Burniston (Elizabeth Craft Designs)
Woodland Pals clear stamps - Elizabeth Craft Designs
Banner stamps - Stampin' Up
Copic Markers
Wink of Stella
Pan Pastels
Stickles
Corners - Elizabeth Craft Designs
Congrats and banner stamp and die - the Stamps of Life

Thanks for stopping by today

Friday, 3 February 2017

Flip-It Baby Boy Card

Good morning friends

It's Flip-It Friday here on my blog, and I used some sweet stickers to make a baby boy Flip-It card for our nephew & family.


I've said that I want to use some of my older products this year - so this card uses an older border die by the Stamps of Life. It makes a fun zig-zag border!


I made a belly band to hold the card closed, adding a strip of cloud Washi Tape across the centre. There was one sticker left on the sheet, so I made a coordinating tag to add to the baby gift. No way I was going to store that one little sticker!

The stripes on the little jumper sticker actually match the stripes on the baby's gift so that was a happy coincidence.


Supplies:
White card stock
Triple Circle Flip-It die- Sizzix
Patterned paper - stash
Border die- The Stamps of Life
Stickers - dollar store
Chalks - Craft T
Staedtler fine point markers
Washi tape
Tag topper punch - Stampin' Up
Sheer ribbon

Card size - A2    clear bag envelope, hand delivered

Thanks for stopping by today

Monday, 16 January 2017

Baby Card for Alma


Good morning friends

Today's share is the baby card I made for our newest Grandbaby, Alma.


Inside I made it a Pop-Up card using the Lorna Label Pop-Up by Karen Burniston. The sweet little lamb was in my stash, cut eons ago and stored.


I sprinkled some Glitter Flower Peel-Off's ...


... and added some hand lettering to the label.


Here is a side view so you can see the Pop-Up portion a little better.


Note, you can find my cards from July 2011 - December 2016 on Alteredscrapbooking.blogspot.ca   I had a bunch of cards made ahead, which are already water marked with alteredscrapbooking and I'm choosing not to re-do all those photos with the Painted Mountain Cards watermark.

Supplies:
Lamb - Cricut cut
Lorna Label Pop-Up, Pop it Ups - Karen Burniston (Elizabeth Craft Designs)
Patterned paper - DCWV
Stitched puffy clouds die - MFT Stamps
White card stock
7048 Glitter Flower Peel-Off's - Elizabeth Craft Designs
Pink sheer ribbon - Creative Packaging
Labels and Circles, Pop it Ups - Karen Burniston (Elizabeth Craft Designs)
Glitter Dots
Alpha dies - Stampin' Up
Bic fine markers
Fine point black marker

Card size - 5 x 6"

Thanks for stopping by today