Hello! I had placed an order with Divinity Designs that took awhile to arrive (no surprise, with both USPS and Canada Post still experiencing slow service) but it DID get here and I couldn't wait to play with this Accordion Card With Layers Die set. I have a walkthrough of my card on YouTube:
My card is held closed with a Belly Band that's decorated with a lovely Easter word stamp, butterflies and rectangles from Karen Burniston's Rockin' Rectangle. Below is what the card looks like as it opens. I decorated it with Karen Burniston's Easter and Backyard Charms, then made a pop up inside the last panel using her Mini-Pops.
I love the bright and happy papers (Doodlebug, of course) and that is part of the reason I bought this die set. I have a lot of 12 x 12" patterned papers with large prints and a die set like this will be perfect to use those papers on. Next time I will add a simple box pop up inside as another option.
The snail from the Garden Charms set is just too cute.
The largest arm from the Mini Pops animates a scalloped circle, a stamped and coloured Easter Basket and punched butterflies.
I have seen this type of card on social media, made without dies. But I know that if I have a die set - especially one that includes the layering dies - I will make this type of card more often than just trying to fold it on my own. It goes together easily but has big impact when it is opened and displayed. Win win!
Supplies: Accordion Card with Layers - Divinity Designs Card stocks Patterned paper - Doodlebug 1078 Easter Charms - Karen Burniston Glitter Brush Pen 1130 Backyard Charms- Karen Burniston 1146 Mini Pops- Karen Burniston 1089 Rockin' Rectangle (rectangles)- Karen Burniston Joyful Easter stamp - impression obsession Find Joy stamp - Big Bold Easter, Taylored Expressions Stitched Mini Scallop Ovals - MFT Stamps Butterfly punch - Martha Stewart (old) Card size - Standard A2, 4.25 x 5.5"
Hello!I'm back today with my weekly Crafty Meraki Design Team Post and today's card is a Fold Flap Slimline featuring a juggling fox! As soon as I saw this fox image in the To-Tail-Ly Awesome set I wanted to make a juggling fox card and I finally got to make it! I also have a walkthrough of my card on YouTube:
I went through my stash and pulled out colourful enamel dots for the fox to juggle. If you don't have enamel dots, you could use small buttons, sequins, Nuvo Drops etc. I went over the ears and all of the white areas on the fox with a Wink of Stella pen so they are nice and shimmery.
Inside I added some simple lettering, a narrow strip of black card stock & sequins and this card is perfect to send out for Happy Mail!
Measurements for my Fold Flap Slimline Card:
Cut card stock 7 x 8.5"
Putting the 7" edge at the top of your scoring tool, score at 1-1/4" and 3-1/2".
Fold your card in half at the 3-1/2" scoreline, to form your card base
Fold the 1-1/4" scored edge to the front of the card.
NOTE: I adhered the flap right to the card front using thin foam tape, but most of the A2 Fold Flap Cards I've seen utilize pretty patterned papers and have the card open as more of an accordion.
Now you can decorate it as you desire! I die cut the Craft-A-Round Slimlinedie from white card stock. and used the die cut as a stencil. That is another way to get more mileage from your dies!
For the 1" wide rainbow strip, I cut 1/2" strips of colourful card stock and adhered them next to each other onto text weight paper. I ended up creating two sheets of these and have just been cutting strips or pieces as needed to decorate my Crafty Meraki Design Team Cards.
"Crafty Meraki is a tribe of women who are all creators but more importantly, love helping others in any way we can!
Meraki (may-rah-kee) a verb, or adverb, a Modern Greek word, derived from the Turkish “Merak” (Labor of love, to do something with pleasure), is applied to tasks, usually, creative or artistic tasks, but can be applied to any task at all. Meraki means to do something with passion, with absolute devotion, with undivided attention.
Crafty Meraki was born out of a vision to help creators do what they love doing the most- to create!"
Supplies: Craft A Round Slimline Die - Crafty Meraki To-Tail-Ly Awesome - Crafty Meraki Stitched Circles - MFT Stamps Ohuhu Markers Water brush Black glaze and white gel pens - Sakura Wink of Stella Sequins Enamel Dots Black marker Copics Card stocks Card size: 3.5 x 8.5", fits in a #9 or #10 Business Envelope for mailing
Hello! Today I'm sharing a fun Slimline card - that is a Shaker Card as well as a Pop Up. The Sun die is from Lawn Fawn and a new addition to my craft room - I loved it as soon as I saw it. I had to make a shaker with it right away then went on to make a card and I have a walkthrough on YouTube as well:
The eyes, nose and cheeks are dies that come with the sun die but I added eyelashes with a sharpie marker. When I started this card, I thought I would send it as Happy Mail to our youngest Granddaughter. Whenever I see her, I say 'Hello Sunshine'. Those words fell out of my mouth the first moment I met her - just hours old, in the hospital with her parents ... and they just stuck.
I added a lightly stencilled background and stitched puffy clouds from Your Next Stamp, and the 'Hello' & 'SUNSHINE' are from Pink & Main. Finally, I added a few sparkly Gumdrops from YNS.
Inside I used Karen Burniston's Katherine Label Pop Up to animate several stitched puffy clouds.
The sun and sentiment stamps are from an older Paper Pumpkin kit. I found an online listing for an unused kit and haven't put it together yet! But the stamps are great so I decided to go ahead and use them. That's the fun thing about Paper Pumpkin, and I have yet to receive one where I wasn't keen on the stamp set.
One more look ...
Once I got the card finished, I decided it might be better to send it off for Happy Mail to a friend ... eyelashes and all. Ha!
Supplies:
Stitched Sun Frame - Lawn Fawn Circle die - Hero Arts Acetate Sequins Glitter Brush Pen Sakura White Gel Pen Sharpie Marker Card stocks - stash Stencil - Radient, Honey Bee Taylored Expressions Blending Brushes Hello - Pink & Main Stitched Puffy Clouds - Your Next Stamp Slim Stitched Rectangles - Your Next Stamp Bling It On Sparkly Gumdrops - Your Next Stamp 1011 Katherine Label Pop Up - Karen Burniston Stamps inside - June 2020 Paper Pumpkin, Box of Sunshine (Stampin' Up) Card size - 3.5 x 8.5", fits in a #10 Business Envelope
Hello! I just had to make another Shutter Card - this one is for Easter. I adore the sweet animals in the Sketch Easter set by Pink and Main so that is what I used for my card today. I have a walkthrough of my card on YouTube if you are interested in more details:
After you slide off the Belly Band and open the card, the shutters slide to each side to reveal another cute Easter critter.
I expect to play with this die set again soon as I really do enjoy it!
I don't need any more Easter Cards this year, but since I like to work ahead I will probably make a couple more to put away for next year. We are expecting cold temperatures, snow and high winds tomorrow so I think working on Easter Cards is a good way to deal with that!
Supplies: Gatefold Reveal 2 - Taylored Expressions Sketched Easter, stamps & dies - Pink & Main Card stocks Double Stitched Circles - Divinity Designs Circle die (inside shutter area) - Hero Arts Mini MISTI - My Sweet Petunia Glitter Brush Pen Ohuhu Markers Patterned paper - Picture Perfect, Queen & Company Copics Card size - standard A2, 4.25 x 5.5"
Hello! Today I'm sharing another Easter Tag that I'll be tying onto an Easter Goodie Bags I have for our kids & grandkids. This tag is for our middle daughter and I used a new floral stamp set! I am lacking in the floral stamp department, and had looked at this set in the Stampin' Up Mini Catalogue many times but never ordered it. Then I realized it appealed to me so much because it a SOLID image to stamp rather than one that needs to be coloured in. The stamp set comes with layering images and I am really going to enjoy using it!
I stencilled around the outside edge of Crafty Meraki's Love Slimline Tag, and included a square vellum doily under the pretty flower.
I wrote Happy Spring and added some big sparkly gems from my stash. The nice thing about tags, is they can be as bulky as I wish!
Supplies: Love Slimline Tag - Crafty Meraki Art Gallery Stamps & Dies - Stampin' Up Shimmer brush pen Incredibly Grateful Stencil Set - Pink Fresh Studio Copic markers Vellum doily Shimmer Spray Black marker Bling - stash Taylored Expressions Blending Brushes
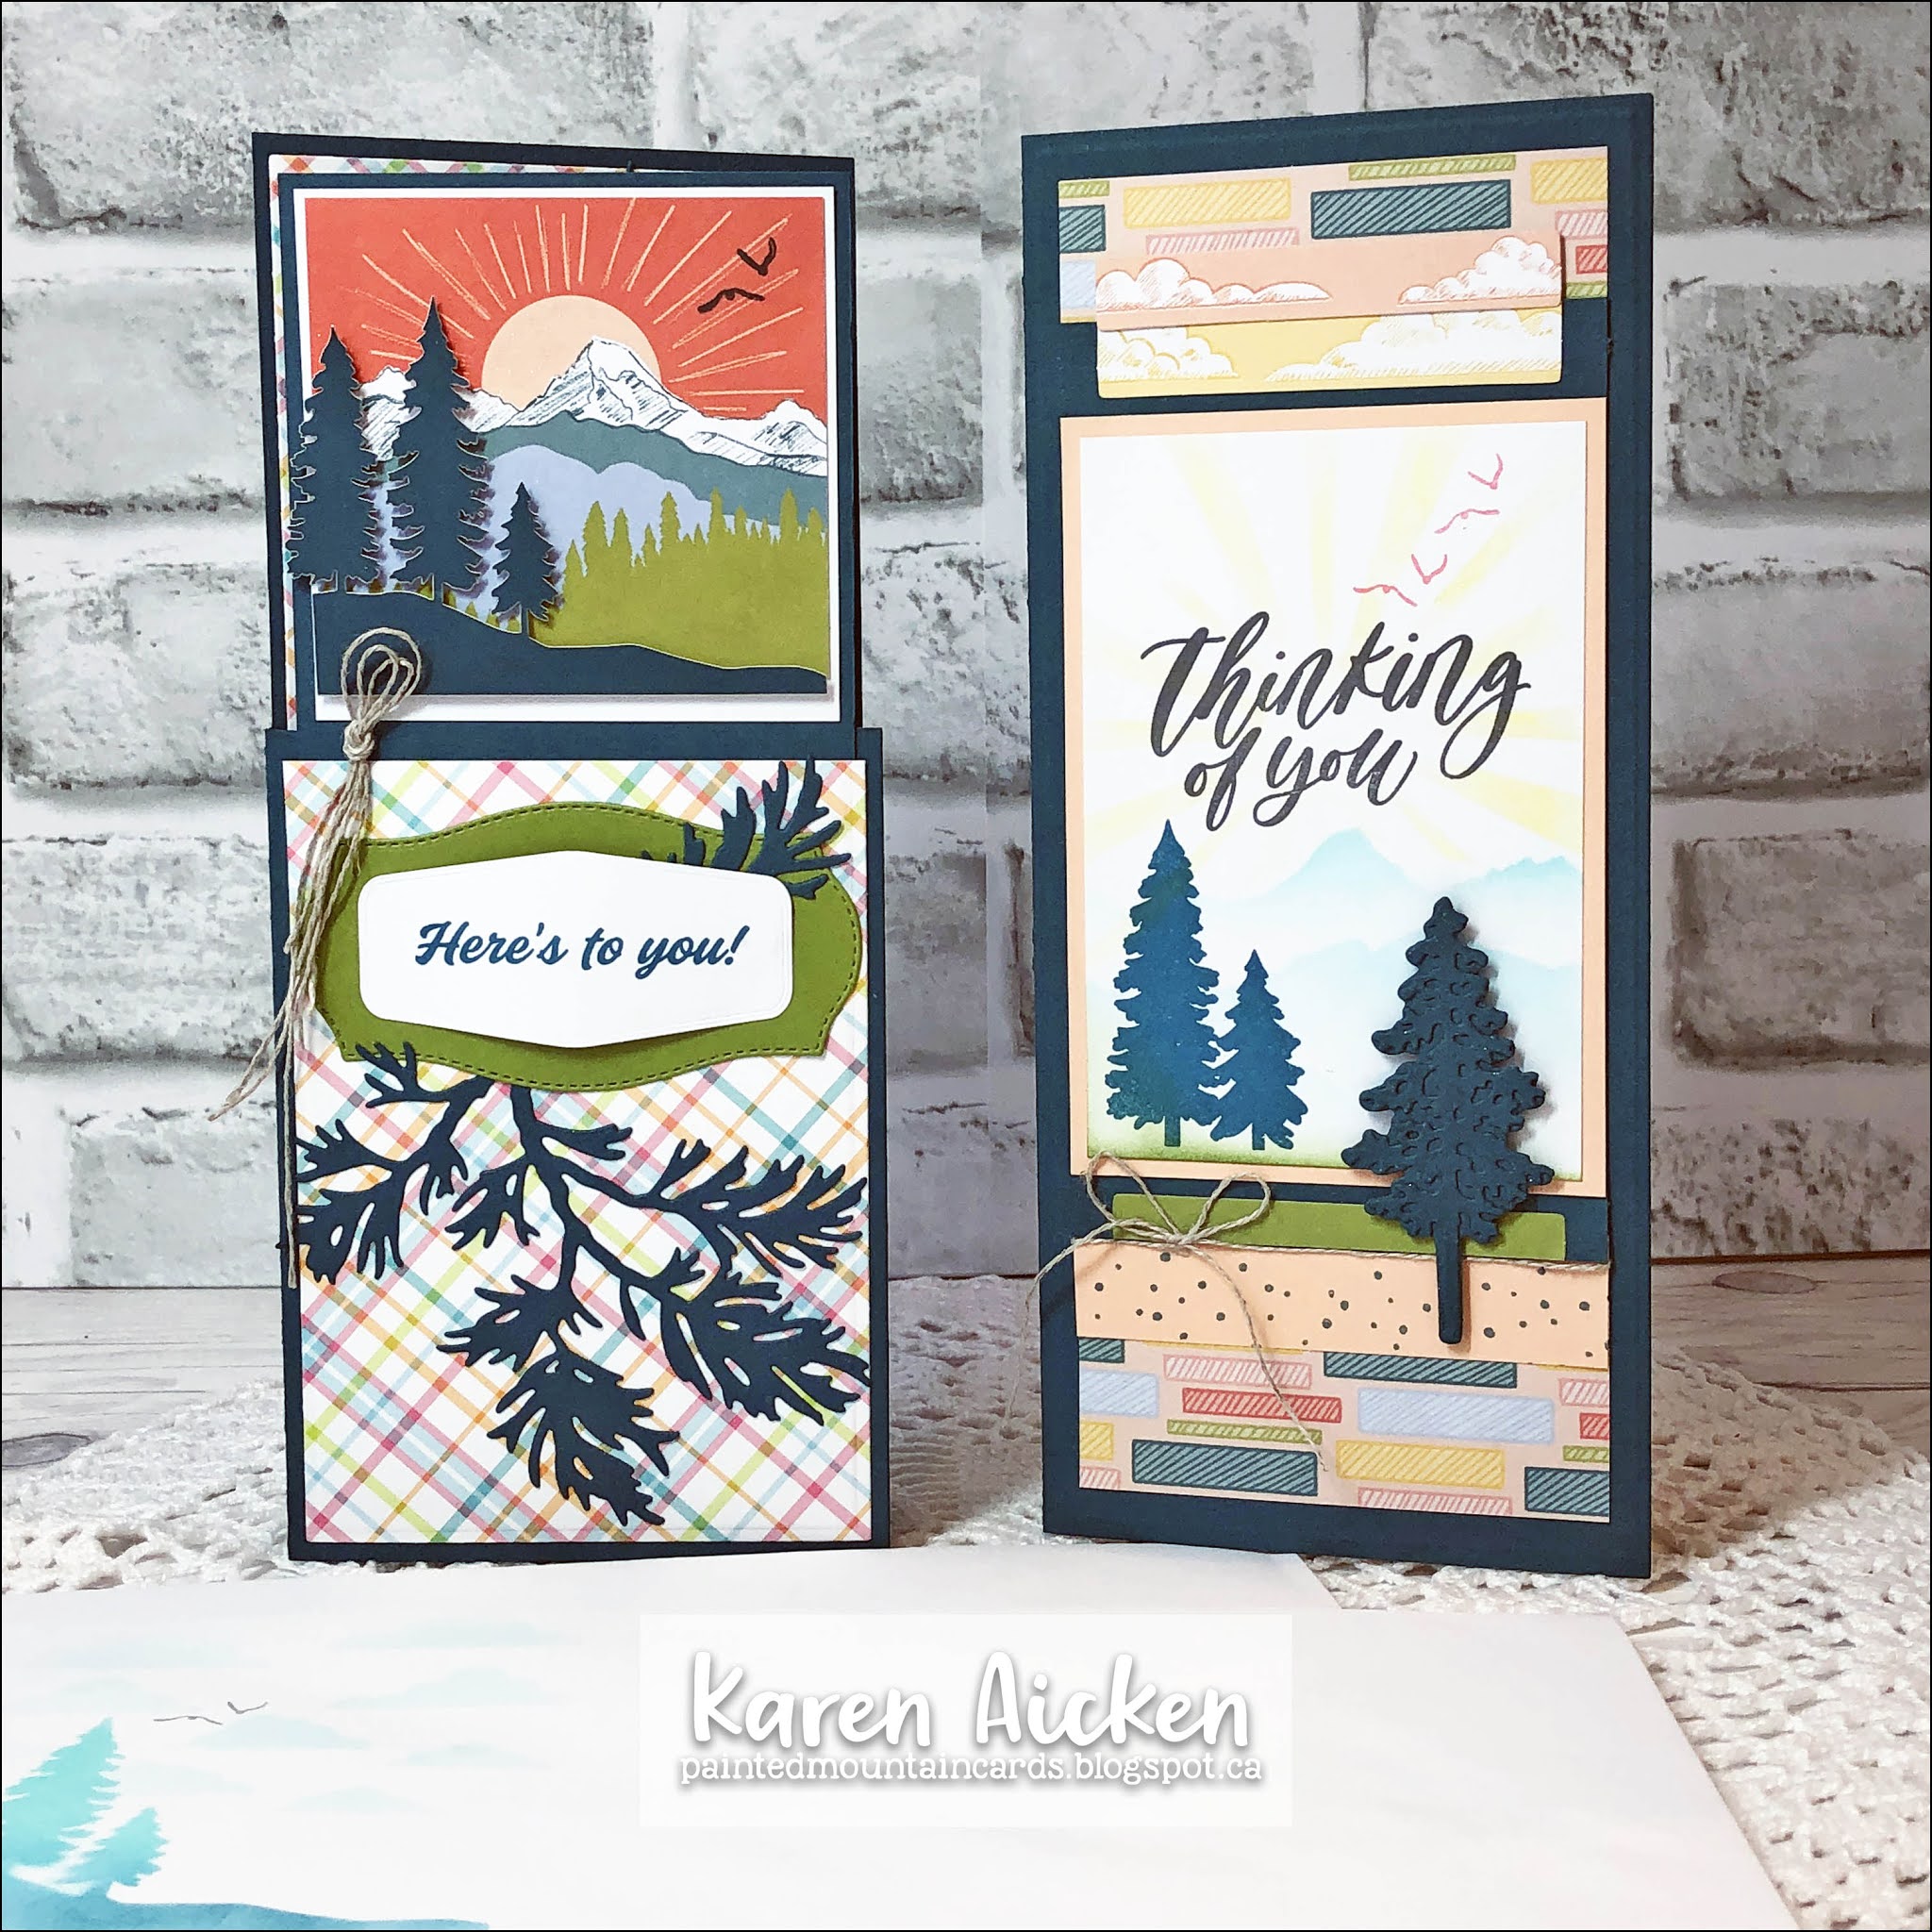
Hello! It's Fun Fold Friday here on my blog and today I'm sharing my first two alternate cards using the March 2021 Paper Pumpkin kit called "Here's To You". The First card is a Dutch Door fun fold card, and the second one has a Pop Up inside. I am going to have a lot of fun making up this kit! I have a walkthrough of my cards on YouTube:
Both of my Paper Pumpkin Alternates are Slimline cards, and this first one started out as a Dutch Door Card but I had to make some adjustments as I explained in the video.
I pulled in the Peaceful Boughs for added elements, since I think they work so well with the laser cut trees that are included in the Paper Pumpkin Kit.
Here is a peek at the inside ...
I used Slimline dies by Divinity Designs for my cards, both the Slimline Card Base** and the Slimline Rectangles. Both have an embossing feature on the edges, which adds a lovely detail.
Since the March Paper Pumpkin came with stencils as a free gift, I decided to add a little scene inside my card with the stencils. On the envelope, I used a couple of the stencils as well as the negative portion of the laser cut trees as a stencil.
My second card also uses the stencils, as well as the In The Pines bundle.
The stamped sentiment is from Gina K and I added some of the printed cloud rectangles from the kit as well as pieces of one envelope liner.
Inside is the pop up, created using a simple box pop up. I will link a tutorial below for that.
I added some older patterned paper from my stash and both inner panels were die cut and embossed with the Slimline Rectangle dies by Divinity Designs.
Click HERE to see the video on how to make a simple box pop up on YouTube.
As I said above, I am looking forward to playing more with this Paper Pumpkin kit - but have put it aside for a bit while I work on Design Team projects.
Supplies: Everything included in the March 2021 Paper Pumpkin kit "Here's To You", plus what is listed below
Slimline Card Die** - Divinity Designs Slimline Rectangle Dies - Divinity Designs Card stocks - stash Glimmer Brush Pen Mini MISTI - My Sweet Petunia Plaid patterned paper - Lawn Fawn Peaceful Boughs bundle (dies) - Stampin' Up Tasteful Label dies - Stampin' Up Sentiment inside - Another Year Older, Taylored Expressions Celebrate - Birthday Greetings, Studio Katia Thinking of You stamp - Just Because, Gina K In the Pines Bundle (dies) - Stampin' Up Patterned paper - Studio K (old, stash) Smile Often stamp - Impression Obsession Stitched Mini Scallop Oval dies - MFT Stamps Card size (both) - ~4 x 9", fits in a #10 Business Envelope
Hello! I had another play with this die set and made a pretty card for our middle daughter & family for Passover. You can check out the walkthrough of this card on YouTube:
I used some 6x6" patterned papers from my stash and their coordinating printed elements. I wasn't confident that the patterned paper used on the shutter arms would hold up though. To prevent it cracking and breaking away from the card sides. I reinforced the folds on the shutter arms on the back side with Scotch Tape.
In the photo below, you can see how much shine you get when you add a transparency behind the circle opening.
I actually started on another one of these shutter cards, which I will be sharing in a day or two. It's a fun die set for sure!
Supplies: Card stocks - stash Gatefold Reveal 2 - Taylored Expressions Patterned paper & elements - Recollections Tasteful Labels - Stampin' Up Transparency Chameleon Fineliner Markers Stickles Glitter Brush Pen Card size - Standard A2 (4.25 x 5.5")
Hello! Today I'm on the Divinity Designs Blog with these two Slimline cards. (All of the Divinity Designs items used are linked in the Supplies below.) I have a walk through of both cards on YouTube:
First up is a bright Birthday Card that is also a Fun Fold! I used the new Slimline Z Fold Card With Layers and papers from the slimline sized Geometric Paper Pad. Below is how the card would look coming out of the envelope.
Using the Big Balloon die and coordinating colours of card stock I placed the two balloons inside that first flap so they would be hidden when the card is closed. You could stamp a birthday greeting on one (or both!) of those two inner balloons. I intended on doing that but the Divinity Designs order I had placed with Birthday sentiment stamps, was delayed at Customs and didn't make it to me before I had to take these photos.
The Slimline Z Fold With Layers comes with layering dies for three of the sections of the Z Fold Card, and if you want to decorate the other two sections you just need to cut the card stock or patterned paper from the back side instead of the front. I go over that more in the YouTube video. It's easy peasy to do, and is what I did for my yellow card stock layer.
When you open this Z Fold card two more balloons and a Birthday Sentiment are revealed! The yellow balloon is the perfect place to write a personal message and sign our names when I'm are ready to send this card in the mail.
I used black mirror card stock for the balloon strings and this cute frame. To create the frame, I nested two of the Double Stitched Rounded Rectangles together and I saved that fallaway piece from the centre as it also has a lovely stitched edge. I stamped the Happy Birthday on white card stock that was die cut with the larger of the two rectangle dies I used for the frame, which ensured a perfect fit for the frame.
Now for my second card - I am SO happy with how this one turned out! I knew when I saw the Slimline Flower Petal Background that it would make a beautiful Stained Glass looking card. Using the Divinity Designs Slimline Card Base** I die cut and embossed white card stock and set it aside while I worked on the Stained Glass Panel. After cutting the die from black card stock, I adhered a transparency to the back side and then a vellum panel behind that. I coloured the vellum from the back side using bright & happy colours, and when I was done I added it to the Slimline Card Base**.
Using the Double Stitched Circle die set, I cut a white circle and stamped the Raspberries and sentiment on it then added a couple of sequins for even more sparkle. That was popped up with foam tape and my card front was finished. In the photo below you can see all the shine you get from the transparency behind the Slimline Flower Petal Background.
Inside I used the Slimline Rectangles to cut a yellow and a white panel, embossing both so they have a lovely raised edge. I added some of the black fallaway pieces from the background die in two corners and added some shimmer with a Wink of Stella pen. Then I stamped the Raspberries again using a light colour of ink and finally, a single black sequin.
I hope you've enjoyed my March projects for Divinity Designs as much as I enjoyed creating them! I'll be back with more Divinity Designs Projects next month.
Hello! I'm back today with my weekly Design Team Post and today's card is a Slimline featuring the cute owls from Owl Yours. I started my card by cutting a white card base 7 x 8.5" and scoring it down the centre at 3.5". I set that aside then cut the 3 Room Studio Slimline Die from Kraft card stock and stamped the words "owl you need is love" on an angle over the entire panel. Inking the edges with brown ink finished that off.
I then turned it over and adhered a same size piece of transparency across the back and set the panel aside. A same sized white card stock panel was dipped into puddles of diluted blue water colour marker and that was set aside to dry. I stamped and coloured the images from Owl Yours then the card was ready to be assembled!
The (now dry) white inked panel was adhered behind the Kraft window panel so the blue areas showed through the windows. The transparency gives the card lots of shine as it catches the light! After adhering this to my folded white card base I added the stamped images as shown.
The sentiment comes from Essential Sentiments by MFT Stamps and I added sequins for additional sparkle and shine.
Since I like to decorate the insides of my cards as well, I added a stitched scalloped panel from the Slimline Pull Tab Dies by Heffy Doodle and another white panel. Finally, I stamped a single owl, used a water brush & diluted dye ink to add some blue behind him then added two more sequins.
One more look ...
"Crafty Meraki is a tribe of women who are all creators but more importantly, love helping others in any way we can!
Meraki (may-rah-kee) a verb, or adverb, a Modern Greek word, derived from the Turkish “Merak” (Labor of love, to do something with pleasure), is applied to tasks, usually, creative or artistic tasks, but can be applied to any task at all. Meraki means to do something with passion, with absolute devotion, with undivided attention.
Crafty Meraki was born out of a vision to help creators do what they love doing the most- to create!"
Hello! Today I'm sharing one more Easter tag - this one will be tied onto our Grandson Ilai's Easter Goodie Bag. Since they actually celebrate Passover and not Easter, his tag is more Happy Spring than Easter. I used the Leaf & Ladybug from Lawn Fawn.
I started out die cutting two of the Slimline Celebrate Tags. After stamping the leaves from a Stampin' Up set I added some clouds with a blending brush and blue ink. The two tags were glued together so it would be nice and sturdy and I wrote the words Happy Spring with a black marker. Colouring was done with fine point markers.
The leaf was die cut from green card stock and the fall away pieces were inked and added back into their openings. Then I cut the ladybug and added both to the tag. A white gel pen was used to write his name on one of the leaf sections. Then I added some ladybug pieces that are meant to be used inside shaker cards. I bought them from a Canadian seller on Etsy, and I will link her below.
Supplies: Ladybug & Leaf - Lawn Fawn Celebrate Slimline Tag - Crafty Meraki Card stocks Leaf stamp - In Bloom, Stampin' Up Glitter Brush Pen White Gel Pen Fineline Markers Black Sharpie Marker Small Ladybugs - Mommy Panda Supplies (Etsy) Bakers Twine
Hello! Today I'm sharing a Pop Up Slimline Easter card using one of the multi coloured card panels I made when the Slim Stitched Rectangle dies arrived from Your Next Stamp. I have a walkthrough of my card on YouTube:
It was so much fun creating all of those colourful background panels and I love the stitched edges! I also love how easy this pop up is to create and how versatile it can be - you can use it to pop up (or float) any number of elements. I chose a printed scalloped circle punch out from the Doodlebug paper package I'd been poking around in. To see how to create a simple box pop up, click HERE. (Note, the pop up box on this card is 1" high and the one in the video is 3/4" high).
The Happy Easter is from Karen Burniston's Easter Charms. I added Washi Tape to the top and bottom stitched panel and a couple of metallic stickers too.
Supplies: Slim Stitched Rectangles - Your Next Stamp Card Stocks Patterned Paper & Cut Aparts - Doodlebug Washi Tape 1078 Easter Charms - Karen Burniston Stickers - Dollar Store Wink of Stella Flower Stickers - stash Fine Point Markers Card size - 3.5 x 8.5", fits in a #9 or #10 Business Envelope
Hello! Today I'm sharing a card for the Coffee Lover's Blog Hop, which I will link below. I made a Mini Slimline Trifold Card using goodies from Your Next Stamp, who is one of the amazing sponsors of this massive Blog Hop. I have a walkthrough of my card on YouTube:
I chose the Cute Blooms for my card today - who wouldn't love a cup full of Spring blooms! After water colouring and die cutting with the coordinating die (see? It even cuts out the areas between the cup and the handles) I gave it a spritz with my shimmer spray. For even more sparkle I added some sequins.
You open the left flap and see the smaller right flap, which on this card just has a panel of patterned paper. Sometimes I add a sentiment or coordinating image to this panel.
Below is the card displayed fully open. The image from Cute Blooms was stamped in a light colour ink on the white panel, then I stamped Happy Spring over it with a dark ink. One single sequin adds the sparkle.
To create the card base for my Slimline Trifold, cut card stock 8-1/2 x 8-1/2". Score 3" from left edge and 2" from right and you can decide whether to use the 2" flap on the right or left side. I change it up often! NOTE: There is a label on the right side of my blog called Trifolds if you want to see more of them in a variety of sizes. Decorate the panels as desired.
I hope you will check out the Coffee Lover's Blog Hop - there is always a ton of inspiration! Click HERE to be taken to the Coffee Lover's Blog Hop!
Supplies: Cute Blooms - Your Next Stamp Cute Blooms Die Set- Your Next Stamp Black Olive Ink- Your Next Stamp Water colour card stock Various card stocks - stash Karin Water Colour Markers Water Brush Mini MISTI - My Sweet Petunia Eucalyptus patterned paper - Hobby Lobby (gift from an American friend) Fine line markers Scallop Stitched Nesting Circles - Tutti Designs Circle Die - Hero Arts Vellum Doily - Stampin' Up Shimmer Spray Glitter Brush Pen Crystal Clear Confetti - Studio Katia Card size - 3-1/2 x 6", fits in a #6 Envelope