Monday 31 October 2022

Metallic Leaves Thanksgiving Card


Hello my crafty friends. Today I'm sharing a 5 x 7" card for Thanksgiving, using an A2 sized background die. I cut the leaves background die from metallic card stock then added small bits of foam tape to the more solid areas on the back side. I like the shadows that show up when the panel was mounted to a slightly larger white card stock panel!

The patterned paper has gold foiling on it, and both the sentiment and the background die were cut from a subtly patterned metallic card stock so this card has lovely shimmer and shine.


Here is a peek at the inside, where I added more of the gold foiled stickers and a bit more patterned paper.


This blog uses affiliate links whenever possible. This means, that at no cost to you, if you make a purchase through one of my affiliate links that I may receive a small commission from your purchase. I only link products that I own, love and use for my card making and not every link below is an affiliate one! 😊

Any supplies I'm unable to link are listed at the very bottom of my post.


Additional Supplies:
5 x 7" card and envelope
White cardstock
Leaves background die - Tutti Designs
Metallic cardstock - Damask Dreams, Hunky Dory 
Stickers - Paper Studio (from my stash)

Friday 28 October 2022

Warm Wishes Fireplace Pop Up card


Hello my crafty friends and welcome to Fun Fold Friday here on my blog. 

I have a box where I store my Thanksgiving and Halloween stickers & embellishments, and rooting through it I decided to build a cozy indoor scene using Karen Burniston's Fireplace Pop Up and some stickers from the box.
 

I also used the Fireplace Add-Ons (Sets 1 and 2), and some older patterned paper from my stash. The pumpkin stickers are glossy and dimensional and I wasn't sure how they would work but the card isn't too bulky at all. This is a 5 x 6.5" card that came with envelopes from Michaels years ago.


When I'm finished using my Glimmer Foil on a project, often there are very useable bits leftover from die cutting the foiled image. I save all those, and a copper foiled scrap is what I used to die cut the clock and tiny florals on the fireplace swag. The stickers all have foiled bits in them too. 😊


When I went to link the Warm Wishes, I couldn't find it ... I thought it was from Honey Bee Stamps, but it's not on their website or others I looked at. Maybe I have the wrong manufacturer, and if so I will edit the post when I do find it.

This blog uses affiliate links whenever possible. This means, that at no cost to you, if you make a purchase through one of my affiliate links that I may receive a small commission from your purchase. I only link products that I own, love and use for my card making and not every link below is an affiliate one! 😊

Any supplies I'm unable to link are listed at the very bottom of my post.


Additional Supplies:

5 x 6.5” card and envelope - Michaels

Wood grain patterned paper … OLD, misc sheets from my stash

Patterned paper - K & Co (old, from my stash)

Black Pen

Misc stickers etc from my stash (old)

White cardstock

Warm Wishes Die - Honey Bee Stamps

Thursday 27 October 2022

Dog Themed Mini Slimline Note Cards


Hello my crafty friends. I've talked about our rescue dog before, and actually share pictures and updates on Instagram every Friday as part of the Furball Friday hashtag. Since she came from the Soi Foundation in Thailand she also came with some restrictions. Apparently Soi dogs are flight risks! So Willow had to wear a special harness, two collars and two leashes as well as a GPS tracker for the first three months we had her. After that time we could return the harness and GPS tracker if we didn't feel she would try to escape. We knew she was happy and settled with us even before that 3 month mark, so we were happy to return both to Pawsitive Match to be used for newer rescues that might need them.

I also had several (washed) harnesses here from previous dogs that didn't fit Willow or Jasper, so I wanted to donate those as well. And of course I wanted to write a quick note of thanks to add to the bag that we were dropping off. To my dismay, I didn't have a single dog themed note card in my stash. 

So ... I remedied that. 😊


These Mini Slimline cards were quick and easy to put together, look cute and have lots of room for a personal message inside. 


This blog uses affiliate links whenever possible. This means, that at no cost to you, if you make a purchase through one of my affiliate links that I may receive a small commission from your purchase. I only link products that I own, love and use for my card making and not every link below is an affiliate one! 😊

Any supplies I'm unable to link are listed at the very bottom of my post.


Additional Supplies:
White cardstock
Copic marker
Patterned paper - Guilded Ink, Recollections

Wednesday 26 October 2022

Dog & Balloon Mini Slimline Card


Hello my crafty friends! Today's share is a Mini Slimline card that was made with mostly older items that I found when doing a tidy up. I don't even remember where the digital images are from or how long ago I printed them. But the sheet was sitting on top of a couple of white birch tree embossed panels, so I decided to combine them.

I added some inking to the embossed background and trimmed it down to fit on the front of a Mini Slimline card (3.5 x 6"). Then I fussy cut the images and added a torn brown cardstock strip to 'ground' the dog.


Here is a peek at the inside ... the two brackets were part of the same digital print out so I popped them up on foam tape. No way I was going to save them for another day 😂. I stamped a sentiment inside, added a few dot stamps to the brown on t he front and another sentiment. This card is ready to be donated to my Mom's old nursing home!


This blog uses affiliate links whenever possible. This means, that at no cost to you, if you make a purchase through one of my affiliate links that I may receive a small commission from your purchase. I only link products that I own, love and use for my card making and not every link below is an affiliate one! 😊

Any supplies I'm unable to link are listed at the very bottom of my post.


Additional Supplies:
Birch embossing folder - Stampin' Up
White cardstock
Brown cardstock scrap
Dot stamp - Stamps by Judith

Tuesday 25 October 2022

Pumpkin Season Diamond Z-Fold Card


Hello my crafty friends. If you follow me, you know that I rarely post my cards in the same order I make them.  Today I'm sharing the second Diamond Z-Fold card I made last month. I had made a Halloween one as my first one and enjoyed it so much I immediately created this one! Then, I figured out the measurements for a Slimline version so I've been doing more with that layout than this 5 x 7" one. 

You can always click the label Diamond Z Fold on the right side of my blog to see the cards I've shared so far. (There are several more finished which will be shared in the coming weeks)

This card uses a pretty A4 patterned paper pad from Prima that I've had for years. I fussy cut the butterflies from one of the cut apart sheets included in the pad.


Inside I added another one of the cut aparts instead of a diamond for a different look.


There are a lot of tutorials online for this type of card, but I really liked the 5 x 7" version as then the diamonds are a nice size for decorating. I found a tutorial to link for you, but of course, she doesn't refer to it as a Diamond Z-Fold. 😂  I always find it funny when stampers come up with their own names for a popular fun fold, not realizing it makes it hard for people to find your blog or YouTube video when searching. Anyhow, her finished card is BEAUTIFUL, which is why I chose to share her tutorial.  NOTE:  I didn't add all the layering panels that are often shown in these cards, as they are heavy enough and with even more layers the card would require extra postage. Click HERE to see Heather's tutorial and card.

This blog uses affiliate links whenever possible. This means, that at no cost to you, if you make a purchase through one of my affiliate links that I may receive a small commission from your purchase. I only link products that I own, love and use for my card making and not every link below is an affiliate one! 😊

Any supplies I'm unable to link are listed at the very bottom of my post.

Additional Supplies:
Kraft card & envelope - 5 x 7"
Sequins - Purple Rita, Picket Fence Studios
White cardstock
Patterned paper & cut aparts - Amber Moon, Prima

Monday 24 October 2022

Dog Birthday Tag


Hello my crafty friends! In the late summer I saw a collection from Hunkydory called "Muddy Paws". I had my eyes on the 'Little Book Of Muddy Paws' and the foiled acetate but they were both sold out at several Canadian on-line retailers, However, I was able to get my hands on both and this is the one of the projects I'm sharing with a panel from the book. There are 4 of each design, and lots of different designs/dogs so I'm going to have fun creating dog themed projects.

Our son has a sweet little dog with similar colouring to the one that was on this panel. So I trimmed it into a tag shape and matted it with brown card stock. This tag was attached to his birthday gift bag. He loved it - and thought I must have painted it. (I didn't take the credit, ha ha.)

The sentiment is from a YNS set - I had stamped a bunch of them onto Fishtail Banners to keep on hand, so I pulled one out and mounted it with foam tape. I added his name with a black marker and finally added some shine with the Copper Pops of Colour.

Friday 21 October 2022

Fall Explosion Card


Hello my crafty friends and welcome to Fun Fold Friday here on my blog. When I was going through my box of Fall & Thanksgiving embellishments I saw this 6 x 6" patterned paper pad by Lawn Fawn in the box. I only have two fall themed 6 x 6" pads, so I keep them both in the box. I decided to use a few more sheets and some of the smaller pieces in the pad and make an Explosion Card. 

I made one of these recently and did a tutorial on YouTube, so click HERE if you would like to see how to make these cards. 


This is another card that uses up a bunch of older items from my craft room. Other than the Happy Fall, which I bought in August - everything has been in my stash for several years! The acorns were created with an older punch from Stampin' Up.

This blog uses affiliate links whenever possible. This means, that at no cost to you, if you make a purchase through one of my affiliate links that I may receive a small commission from your purchase. I only link products that I own, love and use for my card making and not every link below is an affiliate one! 😊

Any supplies I'm unable to link are listed at the very bottom of my post.

Additional Supplies:
White cardstock
Banner punch - Stampin' Up (retired)
Acorn punch - Stampin' Up (retired)
Copic markers
Patterned paper - Fall Fling 6 x 6" (retired)

Thursday 20 October 2022

Blue & Kraft Scottie Birthday Cards


Hello my crafty friends. Awhile ago I was wanting to finish up a Paper Pumpkin kit, which is where the navy ovals and botanical printed labels came from. I didn't like them with the colours in the kit, so saved them to use on different cards. They worked great for these birthday cards, which will be donated to my Mom's old nursing home.


I didn't add a sentiment on the front, since the whole embossed panel says Happy Birthday over and over. While this set comes with a punch for one of the dogs, I didn't use that image so fussy cut the ones on the front.

This blog uses affiliate links whenever possible. This means, that at no cost to you, if you make a purchase through one of my affiliate links that I may receive a small commission from your purchase. I only link products that I own, love and use for my card making and not every link below is an affiliate one! 😊

Any supplies I'm unable to link are listed at the very bottom of my post.

Additional Supplies:
Navy ovals & printed labels Paper Pumpkin - October 2018
Christmas Scottie - Stampin' Up
White cardstock
Happy Birthday Embossing Folder - Cuttlebug 
Black sharpie marker

Wednesday 19 October 2022

Four Paper Pumpkin Alternates - Sympathy Cards


Hello my crafty friends. I have a number of older Paper Pumpkin kits, that I was able to purchase over time and I decided to work on the "October 2018 Friends Of A Feather" one. I pulled out these A1 sized trifold cards/envelopes and some other goodies from my craft room and came out with four Sympathy Cards.

The printed leaves & florals were the perfect colours - they are from Pink Fresh Studio's In The Meadow (Washi tape & die set), and the Thinking of You was from the included Paper Pumpkin stamp set. I also added some gems onto the Washi Tape sprigs for some subtle shimmer.


When you open the laser cut card front, you see this deep plum water coloured looking panel. I stamped one of the little feathers on those panels. I also added another hexagon label to the inside left, to hide the adhesive on the back of the one on the card front.


Then you open that plum panel and the sentiment is revealed.


I used two different sentiments - so two cards have the sentiment in the photo above, and the other two have the sentiment in the photo below.


The envelopes have a printed liner that coordinates perfectly, and there was a pale area for easier reading of the address. I stamped a feather on either side of that as well.


I was happy with the cards, happy to have a couple more sympathy cards for my stash and happy to finally use up some of that kit! 

This blog uses affiliate links whenever possible. This means, that at no cost to you, if you make a purchase through one of my affiliate links that I may receive a small commission from your purchase. I only link products that I own, love and use for my card making and not every link below is an affiliate one! 😊

Any supplies I'm unable to link are listed at the very bottom of my post.


Additional Supplies
Oct 2018 Paper Pumpkin Kit "Friends of a Feather", Stampin' Up 
Stitched Nested Label dies - Stampin 'Up (retired)
White cardstock

Tuesday 18 October 2022

Mini Slimline Shaker Card Duo for Halloween


Hello my crafty friends.  Today I'm sharing a pair of Mini Slimline Shaker cards I made for Halloween. These shakers are 'edge to edge' or 'full front' shakers. Which means a piece of acetate was cut larger than the cut apart, the mitred corners were wrapped around the cut apart panel adhered to the back on 3 sides. After pouring sequins in that 4th side is adhered down at the back and the shaker part is done!

For this first card, the 'October 31st' panel is the full shaker and I adhered it to some cute Patterned paper by Doodlebug Designs. In fact, pretty much everything I used on these cards is by Doodlebug Designs! Below is the inside of the first card ...


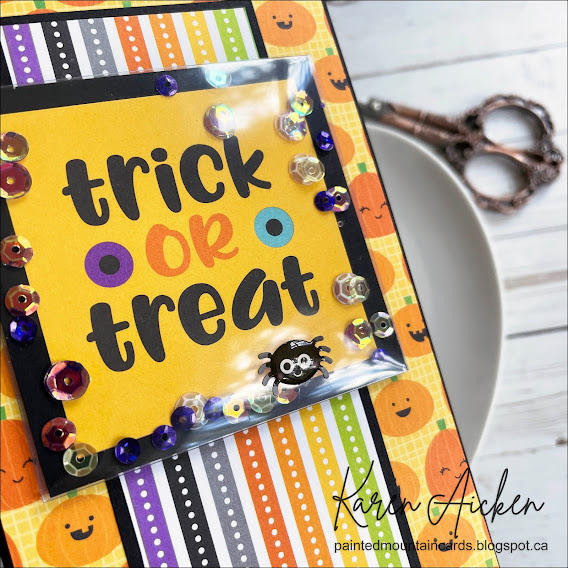
Next up is the Mini Slimline with the 'Trick or Treat' panel being the full front shaker. 


I added one of those enamel dot spiders to the top of the shaker - I get such a kick out of those things.


Finally, here is a peek at the inside of the second card ...


Since not everything I used is available anymore, I will link a few other Doodlebug Designs sets (that I also have!).

This blog uses affiliate links whenever possible. This means, that at no cost to you, if you make a purchase through one of my affiliate links that I may receive a small commission from your purchase. I only link products that I own, love and use for my card making and not every link below is an affiliate one! 😊

Any supplies I'm unable to link are listed at the very bottom of my post.

Additional Supplies:
Journal cards, papers & stickers - various Doodlebug packages, including Boos & Brews.
Acetate - stash
White cardstock
Sequins - Purple Rita, Picket Fence Studios
Element inside, old, random collection of D Bug (or other embellishments, not necessarily inside)???

Monday 17 October 2022

"Just a Dog" Birthday Card


Hello my crafty friends and welcome to Masculine Card Monday here on my blog. I'm back with another dog card, created with a dog panel from The Little Book Of Muddy Paws by Hunky Dory. This seemed to be very popular, and was sold out at several Canadian online retailers when I first saw it. There are lots (and lots and lots) of pages in this book, so you will be seeing lots (and lots and lots) of dog cards using it! 

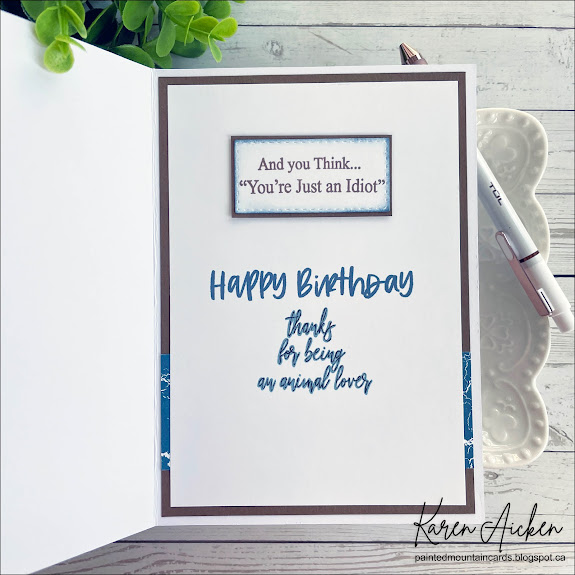
You can see how well the panel fits on a 5 x 7" card, and I love the sweet images as well as the watercolored look to them. I used a true fun sentiment stamp from Crackerbox Palace I've had for several years. It's actually a single stamp that says "Someone says "It's just a Dog." and you think "You're Just An Idiot". But I had cut it into two pieces so I can use it as I did here, with one part on the front and one on the inside of a card.

Our new rescue dog has extreme separation anxiety that we are working on with our vet. It will take time to help her and we think she is worth that time. While (extended) family members had no problem voicing their opinion "she's just a dog" to us, I doubt they would have appreciated the answering sentiment that was rolling around in my head. 


I made this card for a dog-loving friend, who WILL appreciate the humour, and meanwhile I will keep biting my tongue when these people continue offer their opinion about our furry kids. 
Especially when they say we should just 'give her back'. 

That being said - any comeback you can think of that wouldn't offend anyone - would be appreciated. 😊

This blog uses affiliate links whenever possible. This means, that at no cost to you, if you make a purchase through one of my affiliate links that I may receive a small commission from your purchase. I only link products that I own, love and use for my card making and not every link below is an affiliate one! 😊

Any supplies I'm unable to link are listed at the very bottom of my post.

Additional Supplies:
5 x 7" Card & envelope
Sentiment - Crackerjack Stamps
Patterned paper - K & Co - OLD (from my stash)
Brown cardstock
White cardstock
Black fine point pen
Dog panel - Muddy Paws, Hunky Dory
Scrap of blue patterned dsp - sitting on my table

Friday 14 October 2022

Slimline Pivot Panel Card for Thanksgiving


Hello my crafty friends and welcome to Fun Fold Friday here on my blog. It's been awhile since I made one of these offset Slimline Cards, so I pulled out the House Pivot Panels by Karen Burniston. I also used her Tree Pop Up, Autumn Elements and Word Set 7 Autumn. Below is what the card looks like as it comes out of the envelope:


And here it is fully open!


I handwrote the sentiment on fishtail banners and adhered them to the top and bottom edges of  the pivot panel. I guess I didn't take a photo, but there is lots of room to write a message on the back side of the card.

Remember Karen Burniston has assembly videos for her pop up dies! You can find Karen Burnistons dies and videos here:  

Once you know how to assemble your die, the rest is card size, paper and colour choice as well as embellishments! You can change the look of your card every time you use the dies. 😊  I always enjoy showing you many different looks and ways you can use your dies once you have & know how to assemble them.


Measurements used:
Cut two panels of cardstock, one is 8.5 x 3.5" and the other is 6 x 3.5".
On the smaller panel, score 1/2" down the right short edge. This gives you a 1/2" tab which you will use to adhere to the back of the larger panel. Now you have your card base!

Patterned paper:
I cut a 3.25 x 12" patterned paper into sections: a 5.25" piece for the front, a 5" piece for the inner right and the leftover piece fits perfectly on the inner left side of the card. 

This blog uses affiliate links whenever possible. This means, that at no cost to you, if you make a purchase through one of my affiliate links that I may receive a small commission from your purchase. I only link products that I own, love and use for my card making and not every link below is an affiliate one! 😊

Any supplies I'm unable to link are listed at the very bottom of my post.


Additional Supplies:
Patterned paper - K & Company (OLD, from my stash)
White cardstock
Alcool markers
Brown fine point marker

Thursday 13 October 2022

Fox Thanksgiving Card


Hello my crafty friends. After I finished yesterday's Diamond Z-Fold Slimline card I had a little of the leafy patterned paper leftover. So I made two A2 cards with it and here is the first one.  I wish I had chosen a lighter rust colour for the fox, but it isn't quite as dark in real life. And it's super cute anyways. 


Here is a peek at the inside ...


This blog uses affiliate links whenever possible. This means, that at no cost to you, if you make a purchase through one of my affiliate links that I may receive a small commission from your purchase. I only link products that I own, love and use for my card making and not every link below is an affiliate one! 😊

Any supplies I'm unable to link are listed at the very bottom of my post.

Additional Supplies:
Boxed Card & envelope - stash
Patterned paper - old, Stampin' Up
Brown fine point marker
Rust, white, black and peach card stocks
Shimmer Spray
Cross stitched circle dies - Tutti Designs