Wednesday 30 March 2022

Watering Can Card for Spring


Hello my crafty friends. Today I'm sharing the first card made with the Watering Can Fold-Its  from the Stamps of Life. I added the Happy Spring cut from a pretty green pearlized card stock, then florals from the April 2021 Blessings Box from Divinity Designs. The extra leaves were die cut long ago and I had them in my stash. 

A couple of butterflies and some shimmer 'n shine and the card front was finished. 


Here is a peek at the inside, with a stamped sentiment on a stitched oval. You can see the little hinge I used to attach the front and back pieces to create the shaped card. While you can create a shaped card by using the main die on folded card stock & keeping the fold line from cutting with the die, I wanted to try it this way first. 😊


This blog uses affiliate links whenever possible. This means, that at no cost to you, if you make a purchase through one of my affiliate links that I may receive a small commission from your purchase. I only link products that I own, love and use for my card making!

Any supplies I'm unable to link are listed at the very bottom of my post.


Additional Supplies:
Patterned paper - Recollections
Grey fine point marker
Extra leaves - old, from my stash. Possibly Elizabeth Craft Designs
Pink cardstock
Green pearl cardstock
White card stock - Accent Opaque Digital Super Smooth (Amazon .ca)
Big Bold Easter - Taylored Expressions (retired)

Tuesday 29 March 2022

Floral Birthday Card Duo


Hello my crafty friends. Today I'm sharing two birthday cards made with some boxed cards & envelopes and coordinating 3D stickers. One is a standard A2 and the other is a 5 x 7". First up is the A2 card ...

Since the boxed cards (a package from Hobby Lobby a few years ago) are printed on the front and back, I usually cut them apart to use both sides and my own white card bases. I pulled in some mint polka dotted paper as well - another Hobby Lobby find. The stickers have a lots of foam tape, which I carefully pulled apart and replaced with thin foam tape to reduce the bulk. I also pulled off the gemstone and replaced it with a flat gem sticker.


Here is a peek at the inside, with a humorous stamped sentiment. I like that bit of surprise from a more 'formal' card front.


The second card has a stamped greeting on the front, and I added shimmery butterflies to go with the rose gold foiled, stitched frame.


While this card started as a 5 x 7", I did end up trimming off a little so the framed panel would be more centred. So it's more like a 5 x 6.5", but fits in the same 5 x 7" envelope.


This blog uses affiliate links whenever possible. This means, that at no cost to you, if you make a purchase through one of my affiliate links that I may receive a small commission from your purchase. I only link products that I own, love and use for my card making!

Any supplies I'm unable to link are listed at the very bottom of my post.


Additional Supplies:
Boxed A2 Cards and envelopes - Paper Studio, Hobby Lobby
3D stickers - Paper Studio, Hobby Lobby
White card stock - Accent Opaque Digital Super Smooth (Amazon .ca)
Alcohol markers - Angrowy (Amazon)
Green card stock scraps
Circle stickers - Dazzles

Monday 28 March 2022

Masculine Z-Fold Birthday Cards


Hello my crafty friends and welcome to Masculine Card Monday here on my blog. Today I'm sharing three birthday cards that are also fun fold cards. I pulled out an older Paper Pumpkin kit, but since I wasn't keen on the samples in the instructions I just did my own thing. 

OMGoodness, this donkey just cracks me up. It's from Whimsy Stamps (linked below) and I actually purchased the stamp set to make some humorous cards for another friends birthday. I'll be sharing those next week - after his Big Day. I added gold gel pen and glossy accents to one of the front teeth. 😂


Here is a peek at the inside, with a second funny sentiment.  


When I was making the cards, I had a friend on the brain. We were meeting him for dinner that weekend and I wanted to bring him a Birthday card. We celebrate Birthday's close together so were celebrating both at once. Below is the card I made specifically for him. 


I'm still having fun with the Cool Cactus set from your Next Stamp - I used Chameleon coloured pencils, Gamsol and a blending stump to add the colour. Below you can see the black glazed pen glasses as they are raised and shiny.


This is a peek at the inside of his card ... the little banners were cut from leftover pieces in the kit and added to each of the cards.


The other two cards have been put into my stash. 

 This blog uses affiliate links whenever possible. This means, that at no cost to you, if you make a purchase through one of my affiliate links that I may receive a small commission from your purchase. I only link products that I own, love and use for my card making!

Any supplies I'm unable to link are listed at the very bottom of my post.


Additional Supplies:
Paper Pumpkin kit "On My Mind", July 2019 - Stampin' Up (retired)
Rust card stock - stash
White card stock - Accent Opaque Digital Super Smooth (Amazon .ca)
Chameleon coloured pencils
Blending Stump
Circle Stickers - Dazzles

Friday 25 March 2022

Pop Up Floral Birthday Card

Hello my crafty friends and welcome to Fun Fold Friday here on my blog. Today's Birthday Card uses mostly older items from my craft room and has a Pop Up inside. I started with a set of boxed cards & envelopes that I've had for several years. Since the pattern is on both the front and back of the cards I usually cut them apart and use my own white card bases. 

I used two different cards from the box for this one ... a floral one and a rose gold foiled one. All the leftover pieces were saved and used on other cards to be shared later on.


Inside I used Karen Burniston's Katherine Label Pop Up, and the backs of the patterned cards I cut apart for the front of the card. The butterfly punch is a really old one from Stampin' Up ... long retired but one I still use a fair bit.


The rose gold foiling is just SO pretty!


This blog uses affiliate links whenever possible. This means, that at no cost to you, if you make a purchase through one of my affiliate links that I may receive a small commission from your purchase. I only link products that I own, love and use for my card making!

Any supplies I'm unable to link are listed at the very bottom of my post.


Additional Supplies:
Boxed cards/envelopes - Paper Studio (Hobby Lobby)
White card stock - Accent Opaque Digital Super Smooth (Amazon .ca)
Stickers - 3D Paper Studio (Hobby Lobby)
Circle stickers - Dazzles (old, from my stash)
Butterfly punch - retired, Stampin' Up


Thursday 24 March 2022

'Hi There' Mini Slimline Card


Hello my crafty friends! Today I'm sharing a Mini Slimline card that I made for Happy Mail. I was looking through the bag of elements from Doodlebug's Love Notes Odds & Ends package and saw this cute bicycle. Seeing as it would fit perfectly on a Mini Slimline card, that is what I went with. 


I added a strip of coordinating patterned paper along the inside bottom, then die cut the HI and THERE. The letters for THERE fallaway, so I backed the opening with white card stock and added an enamel heart on either end.

One more look ...


This blog uses affiliate links whenever possible. This means, that at no cost to you, if you make a purchase through one of my affiliate links that I may receive a small commission from your purchase. I only link products that I own, love and use for my card making!

Any supplies I'm unable to link are listed at the very bottom of my post.


Additional Supplies:
White card stock - Accent Opaque Digital Super Smooth (Amazon .ca)

Wednesday 23 March 2022

Slimline Pop Up Butterfly Card


Hello my crafty friends! Today I'm sharing my first card made with the Pop Up Butterfly die from Spellbinders. The designer is BiBi Cameron and they released a bunch of butterfly related stamps and dies last month. I covet them ALL - seriously! But ... exercising restraint, I only ordered this Butterfly Pop Up and it's going to be lots of fun. Especially since it fits in a 3.5" width card so I can use it for both Slimlines and Mini Slimline cards!

The card base was created with the patterned paper, which is surprisingly heavy. More like a patterned card stock. I have had it for several years, it's a variety pack from Hobby Lobby which I bought when we were visiting Arizona that year. The tall sentiment was cut from mirror card stock and I added a couple of the Pinkfresh Studio butterflies and a single 3d floral sticker. The sticker is hard to see in the photo above but it's glittery and shows up perfectly in real life.

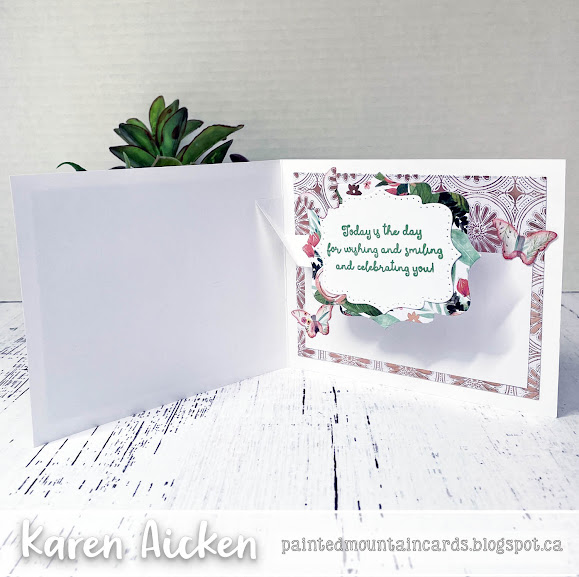
Below is the inside, with that beautiful Butterfly Pop Up!


I die cut the floral border from the same patterned cardstock as I used to create the card base and I really like the soft colour they bring to the card. The Slimline border dies are ones that I've had for a couple of months (linked below) and I love dies like this that you can use for so many different cards and occasions.

The butterfly base was cut from white pearl card stock (again, that shows up beautifully in real life) and the detail layer & body from mirror card stock. The sentiment was stamped on a stitched circle to separate it a little from the background and I added a gold Peel-Off sticker as well.


Can't wait to play with this Pop up Butterfly again, and plan on making a Mini Slimline card with it!

This blog uses affiliate links whenever possible. This means, that at no cost to you, if you make a purchase through one of my affiliate links that I may receive a small commission from your purchase. I only link products that I own, love and use for my card making!

Any supplies I'm unable to link are listed at the very bottom of my post.


Additional Supplies:
Patterned paper - Park Lane, Hobby Lobby (from my stash)
3D Stickers - Hobby Lobby
Grey fine point marker

Tuesday 22 March 2022

"Cheers to Low Maintenance Friends" Mini Slimline Card


Hello my crafty friends.  Earlier this month I shared the card I made to send to our eldest daughter, who wanted to send it to a long-time friend. She had gifted me the Plant stamp and die set for my Birthday and I'd been reading her the sentiments from a different sentiment set when said they would be perfect for her and her friend. Of course, I had to make her the card, and when I was finished I decided to make a second one. Here is a link to that first card if you are curious and today I'm sharing the second card.

Lots of different product lines used for this one - and mostly older items! The patterned card stock was die cut using a Taylored Expressions window die - man, I get a lot of use out of that one. 


Inside I stamped the sentiment she liked onto a matted oval, and added a couple of clear stickers from my stash. I added one to the envelope as well.


This blog uses affiliate links whenever possible. This means, that at no cost to you, if you make a purchase through one of my affiliate links that I may receive a small commission from your purchase. I only link products that I own, love and use for my card making!

Any supplies I'm unable to link are listed at the very bottom of my post.


Additional Supplies:
Patterned paper - Park Lane, Paper Studio (old, from my stash)
Plentiful plants - stamps and dies, Stampin' Up
Shimmer spray
White card stock - Accent Opaque Digital Super Smooth (Amazon .ca)
Stickers - Old, from my stash

Monday 21 March 2022

Southwest Themed Four Panel Birthday Card


Hello my crafty friends and welcome to Masculine Card Monday here on my blog. Today I'm sharing a Four Panel card and I have a walkthrough on YouTube:  


I pulled out several different product lines for my card, and everything available is linked below for you. The photo above shows what the card looks like coming out of the envelope. When you open that first panel, you see the Happy Birthday, a fussy cut feather and a hawk.


The sentiment was stamped on the final panel, and I added a couple more silhouette die cuts ... they were cut from a charcoal pearlized card stock so they have a little more 'life' than if I'd used solid black cardsotck.


Below you can see the card fully open!


This blog uses affiliate links whenever possible. This means, that at no cost to you, if you make a purchase through one of my affiliate links that I may receive a small commission from your purchase. I only link products that I own, love and use for my card making!

Any supplies I'm unable to link are listed at the very bottom of my post.


Additional Supplies:
12 x 12" white cardstock - Recollections
Scrap of grey pearl cardstock - charcoal (stash)
Green cardstock

Sunday 20 March 2022

Mini Slimline Trifold Birthday Card

Hello my crafty friends. Today I'm sharing the birthday card made for our grandson who LOVES Arizona and talks about it all the time. Hopefully they can join us the next time we visit there as I know how much he enjoyed it a few years ago.

I started out with a Mini Slimline Trifold card base/envelope from Kat Scrappiness, then just started pulling out products from my craft room. Everything that is available is linked below. The card front has a window in the front that shows the grinning cactus through it. When you open the first panel you see the little scene below. I stencilled the clouds and sun, stamped the sentiment and added a strip of the same patterned paper as on the card front.


Below is what the card looks like fully open. We wrote our message to him in between the two stamped sentiments.


One more look ... I just adore the Cool Cactus stamp set from Your Next Stamp and haven't had nearly enough playtime with it!.


This blog uses affiliate links whenever possible. This means, that at no cost to you, if you make a purchase through one of my affiliate links that I may receive a small commission from your purchase. I only link products that I own, love and use for my card making!

Any supplies I'm unable to link are listed at the very bottom of my post.


Additional Supplies:
Alcohol Markers - Annagrowy (amazon)
Biggest Wish - Stampin' Up


Friday 18 March 2022

Happy, Happy Birthday Z Fold Card


Hello my crafty friends and welcome to Fun Fold Friday here on my blog. Today I'm sharing the birthday card I made for a friend and it's a Z-Fold card ... my favourite fun fold card style to make. I like them because you can do a Z-Fold on pretty much any card size and this card uses a printed card base with matching envelope from Stampin' Up. The papers and dies are from the same bundle, called Hand Penned. It's quite possible it's a retired bundle - I've had it for awhile.


I added coordinating patterned paper to the inside of the card, and the ovals are from Waffle Flower (linked below). I stamped a sentiment on the inside oval, which is hidden when the card comes out of the envelope. The Happy Happy Birthday stamp is likely from Your Next Stamp ... but I'm not sure which set. I have a plastic storage envelope with a bunch of Happy Birthday sentiment strips and that is where this one came from. I made them about a year ago, so that's why I can't remember which set I used.

I also added a few of those mirrored hearts I've been loving the past couple of months. 😊


This blog uses affiliate links whenever possible. This means, that at no cost to you, if you make a purchase through one of my affiliate links that I may receive a small commission from your purchase. I only link products that I own, love and use for my card making!

Any supplies I'm unable to link are listed at the very bottom of my post.


Additional Supplies:
Patterned Paper, printed card & envelope, flower dies- Hand Penned suite, Stampin' Up (retired)
Mint patterned paper - Hobby Lobby
White card stock - Accent Opaque Digital Super Smooth (Amazon .ca)

Thursday 17 March 2022

St. Patrick's Day Birthday Pop-Up Card


Hello my crafty friends. Every year I send my friend and teammate Kelly, a St. Patrick's Day Birthday Card because her Birthday falls on March 17th. 😊   This one is a 5 x 7" card, and I kept the front fairly simple since there's a lot going on inside! While I did film a walkthrough of my card, when I went to edit it it was mostly off-screen. So I deleted that video and just have a short one on YouTube so you can see the card 'in action':  

Inside I used Karen Burniston's Little Label Pop Up as well as lots of Doodlebug Designs goodies. You know I'm a huge Doodlebug fan!


The rainbow strips are actually created by adhering rainbow packing tape onto white card stock. I love the look as there is a bit of shine but it is just thin packing tape and tends to stretch and buckle when you are working with it. Warning ... patience is required. 

I really liked the gold foiled bits on the elements - perfect for St. Patrick's Day!


This blog uses affiliate links whenever possible. This means, that at no cost to you, if you make a purchase through one of my affiliate links that I may receive a small commission from your purchase. I only link products that I own, love and use for my card making!

Any supplies I'm unable to link are listed at the very bottom of my post.


Additional Supplies:
Rainbow Packing Tape - old, from my stash but originally purchased at Amazon .ca
Gold circle stickers - Dazzles
Narrow oval dies - Dees Distinctivly
Green card stock - my stash
White card stock - Accent Opaque Digital Super Smooth (Amazon .ca)