Showing posts with label Coffee Cup Pop-Up. Show all posts

Tuesday, 4 January 2022

'Coffee & Cupcake' Pop Up Birthday Card


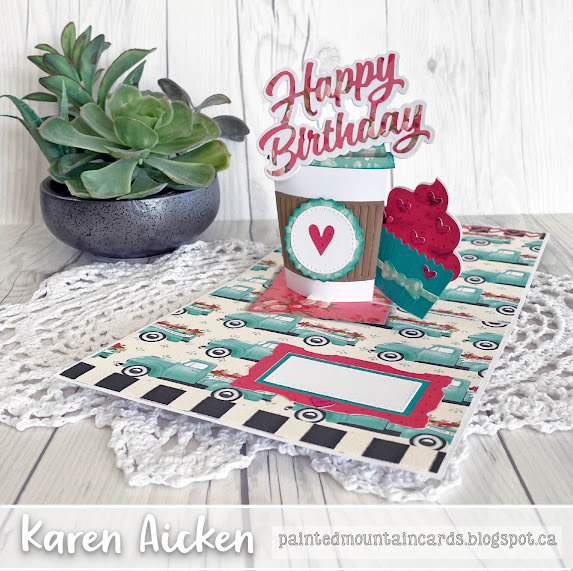
Hello my crafty friends!  It's time for Karen Burniston's first Designer Challenge of 2022, where she challenged the Design Team with ""BIRTHDAY CAKE" - make a birthday card featuring cake or cupcakes." I combined several different die sets for my pop-up Birthday card and I'm really happy with how it turned out!

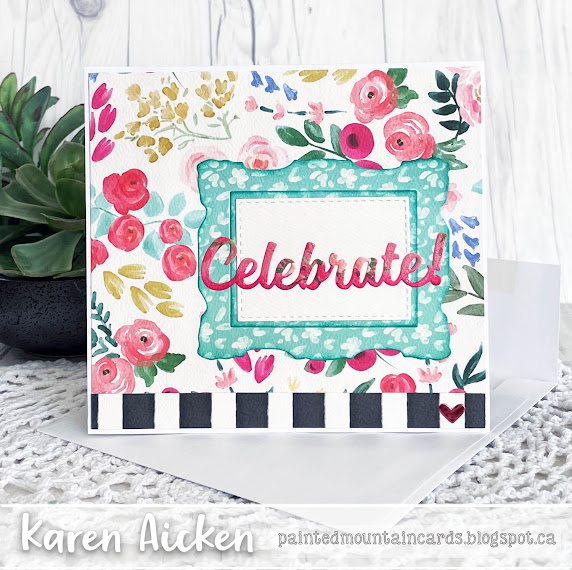
The front is nice and flat, since the card will likely be displayed open.  Using the frames from the Flip Frame Pop Up and the Celebrate die with patterned paper (retired) my card front was finished.

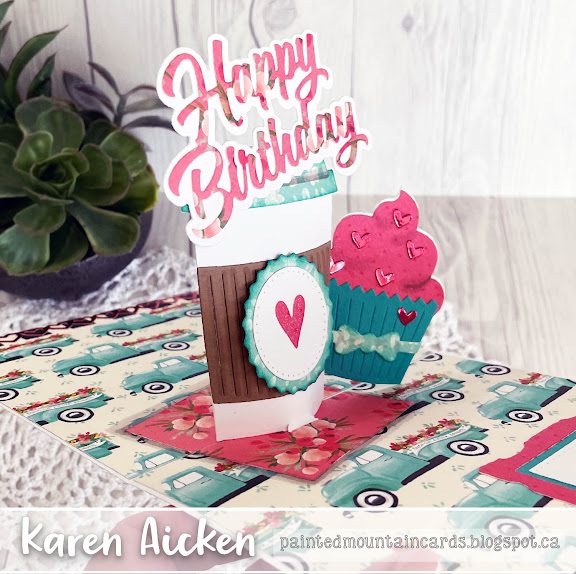
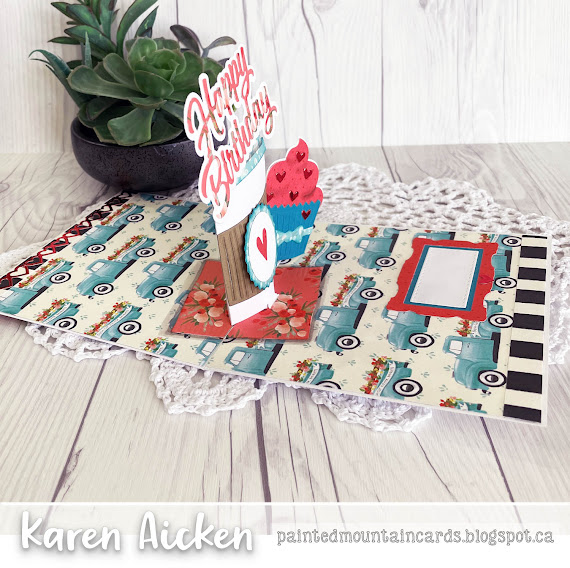
Inside, I used the Coffee Cup Pop Up as the main feature and added a cupcake from the Cupcake Pop Up onto the right side. What could go better with a cupcake than a hot cup of coffee? ❤️  Finally, I added the Happy Birthday and Happy Birthday Shadow to the cup lid.


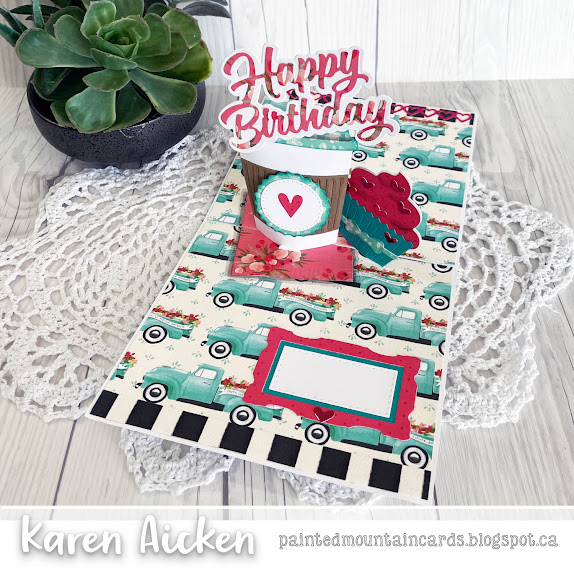
I always say that the dies by Karen Burniston play well together, so I pulled out a previously released Cake Trims for the pretty heart border. I cut it from a red mirror card stock and saved the fallaway hearts to decorate the cupcake icing etc.


There is also extra shimmer from a Wink of Stella pen, and of course my Shimmer Spray.


To make sure I could fit the height of the tall Coffee Cup AND the Happy Birthday, I made a custom card size - 5.5 x 6". Since it will likely be hand delivered, I have a 6" square envelope to slip it into. Otherwise, I could have made it 5 x 6" and used a standard A7 (5 x 7") envelope.
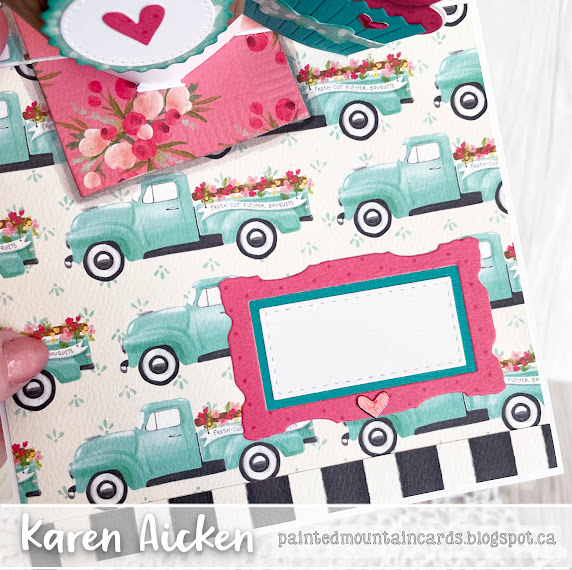
The Slim Frames made a good signing block as well as bringing in a little more solid colour.


One more look ...


The patterned paper package is one I've had in my stash for about 3 years, and I've decided to USE IT instead of hoarding it. You will be seeing a number of cards made with these papers in the coming weeks. 😊


I have the rest of the Design Team linked on the right side of my blog, and I hope you will check out what they came up with for the challenge. Karen Burniston will have her post tomorrow (Wednesday) on her BLOG.

This blog uses affiliate links whenever possible. This means, that at no cost to you, if you make a purchase through one of my affiliate links that I may receive a small commission from your purchase. I only link products that I own, love and use for my card making!

Any supplies I'm unable to link are listed at the very bottom of my post.

Additional Supplies:
Shimmer Spray
White card stock - Accent Opaque Digital Super Smooth (Amazon .ca)  
Patterned paper, cut aparts & stickers - Flower Market Carta Bella (retired)

Friday, 2 August 2019

Coffee Themed Flip Card

Hello crafty friends

It's Fun Fold Friday here on my blog and today I'm sharing another one of my adaptations to Karen Burniston's new Triple Flip die set. This time I tried using a regular A2 side fold card - up until now people have been only using it in a landscape format.

I was careful placing the die, checking placement from the back and the front of the turquoise chevron panel making sure the far left slot was off the left edge of the paper so it didn't cut. I then added just the coffee cup from the Coffee Cup Pop-Up to the 'centre' flipper, which is now the one at the far left.

To get the coffee cup, I simply trimmed off the excess that I didn't need - the folding tab and the part that wraps around to the back of the cup to attach to that folding tab. Easy peasy - if you try it yourself you will see exactly what I mean as soon as you cut the cup. I cut the cup twice, so I could sandwich the flipper paddle between the cups.

I decorated the front with the circles that are included with the Coffee Cup Pop Up, and added the Crabby til Coffee stamp to the sweet little stitched oval that comes in the new Enjoy the Ride set.


I adore the coffee beans that you can cut from the Coffee Cup Pop Up so added a trio here. I also added a couple of borders from the Border Blends Argyle, and made my scallopy border at the top and bottom using the Nature Edges Clouds.  Some got a white gel pen outline and others got gold.


The words that are revealed when you pull the tab (Funny Bones from Riley & Company) are funny and very true for me! I LOVE my morning cup of coffee!  There was still the slot that cuts with the die for the far right paddle, which is what I covered up with the word panel. I had to careful trimming (a scant 1/16" at a time) to get it to fit behind the coffee cup while not cutting off any of the letters. But it did work and fits perfectly.


I didn't think the inside needed another sentiment, so instead I added a fun Riley the Moose image and a die cut heart.


I have a short YouTube video for you as well, so you can see this card in action. The Triple Flip die set is really fun and proving to be versatile as well.


Supplies:
Kraft, white and brown card stocks
Patterned paper - Snap, Color Vibe - Simple Stories
1104 Triple Flip die set - Karen Burniston
1006 Nature Edges - Karen Burniston
Sakura white gel pen
Sakura gold gel pen
Sakura black glaze pen
W-1 Copic marker
1033 Coffee Cup Pop Up - Karen Burniston
This Morning I Drank Water - Funny Bones, Riley & Company
1090 Border Blends Argyle - Karen Burniston
Catherine Pooler Over Coffee Ink
Crabby Til Coffee - Funny Bones, Riley & Company
1103 Enjoy the Ride (stitched oval) - Karen Burniston
1019 Gift Card Label (hearts) - Karen Burniston
1091 Border Blends Party - Karen Burniston
1054 Rectangle Crosshatch - Karen Burniston
Cookie Riley - Riley & Company
Chameleon Color Tone markers

Thanks for stopping by today

Friday, 12 July 2019

Coffee & Cow Pop-Up Card!

Hello my crafty friends

I get such a kick out of the Funny Bones sentiment stamps at Riley and Company and have quite a few in my collection.  I have vowed to use them more in my card making so I can make someone else smile as well.  I used one on the front of my card today:


Inside I used Karen Burniston's Coffee Cup Pop-Up and added the new cow stamp from Riley and Company as well as another humorous sentiment.


The Border Blends make a fun border element and I like that I can cut them from different colours of card stock.  The ENJOY is from the new Enjoy The Ride die set.


The inside sentiment ties in the cow image - and makes me smile at the same time.


I have included a short YouTube video so you can see this card in action!


Supplies:
1040 Coffee Cup Pop-Up - Karen Burniston
Kraft, white and brown card stocks
Patterned paper - Simple Stories
Sakura pink glaze pen
1090 Border Blends Argyle - Karen Burniston
1103 Enjoy the Ride - Karen Burniston (shipping mid July 2019)
Distress Oxide Inks
Catherine Pooler Inks!
Water Brush
Sakura black blaze pen
Chameleon Grey Marker
1089 Rockin Rectangle (rectangles) - Karen Burniston
1042 Spinner Square Pop-Up (squares) - Karen Burniston
1011 Katherine Label Pop-Up (hearts) - Karen Burniston
A Yawn Is A Silent Scream - Riley & Company
Do Cows Moo? - Riley & Company
Basic Dress Up Cows, stamps and dies - Riley & Company

Card size - 4-1/2 x 5-1/2", fits in an A6 envelope

Thanks for stopping by today

Tuesday, 29 May 2018

Coffee Lovers Blog Hop Card #4 (Teacher Thank-You Coffee Cup Pop-Up)

Good Morning friends


Today I'm sharing my fourth card for the Coffee Lover's Blog Hop. There has been a TON of inspiration - this is always such a fun hop.

I was making our daughters some Teacher Thank You cards, so that is what this card is. In Alberta, the kids don't get out of school in May like they do in many parts of the US ... they go til at least the third week of June.

I wanted to put THANKS on the card front, but didn't have a die big enough. Instead I used Karen Burniston's new Alphabet die set - it's going to be so handy to customize a card! Karen Burniston Riley is a Super Sponsor of the Coffee Lover's Blog Hop! Yup - there are lots of prizes to be won as you are hopping around. I also added a sweet little To Go coffee cup from the Coffee Charms set.


I love the floral lid on the To Go cup ... it was a scrap of paper leftover from a different card, but so pretty I had hung onto it for a bit. It is double sided, with the floral on the front and the brown & white print on the back. I was able to use up the whole scrap for this card using both patterns! Gotta love that.


The Coffee Cup Pop-Up cuts slits for you to insert a gift card if you wish. Because our daughter wanted this for a teacher thank you and wanted to include a Tim Horton's gift card, I photographed the card with my printed gift card.


Such a true sentiment for sure.


There is room for the kids to sign their name on the white crosshatch rectangle, and I popped up the A+ with foam tape. I was careful to check for catch points before adhering it down though.


Our daughter was thrilled with the card, and I know the teacher that receives this will also be happy. I love that I can customize a card for someone specific and it won't be like any of the other cards they receive.

Supplies:
Patterned paper - Dear Lizzy
1054 Rectangles Crosshatch - Karen Burniston (shipping early June 2018)
1040 Coffee Cup Pop-Up - Karen Burniston
Scraps of patterned paper - Echo Park
White and pink card stocks
Sakura glitter pen
Copic
1057 Circles Crosshatch - Karen Burniston (shipping early June 2018)
Teacher stamps - Sugar Pea Designs
Crayola markers
Sakura white gel pen - Karen Burniston
1053 Alphabet - Karen Burniston (shipping early June 2018)
1041 Coffee Charms - Karen Burniston

Thanks for stopping by today
SaveSave

Monday, 28 May 2018

Coffee Lovers Blog Hop Card #3 (Coffee Cup Pop-Up with Critters in Cups)

Good morning friends


I'm back with my third card for the Coffee Lovers Blog Hop and today's card uses Karen Burniston's Coffee Cup Pop-Up die set.

For my card front I used a sweet Pink & Main stamp (as I did with my first card for the hop) and an older die from Paper Smooches. I kept the front nice and simple as all the fun is on the inside.


Inside I used Karen Burniston's (who is a Super Sponsor for the Hop) Coffee Cup Pop-Up and a few more stamped critters & cups. There are over 80 sponsors and lots of chances to win a prize. Not to mention all the fabulous coffee themed inspiration!


There is SO much dimension with the Coffee Cup Pop-Up! The cup has slots at the back to hold a gift card but I didn't use them for this one. I did for a teacher thank you card though, that I will be sharing later this week.


Had a bit of trouble with my black glaze pen bleeding - apparently I didn't wait until the water coloured images were dry enough. Lesson learned!


Have fun hopping and enjoying all the inspiration!

Supplies:
Turquoise, white and black card stocks
Patterned paper - DCWV
Blueprints #21 - MFT Stamps
1040 Coffee Cup Pop-Up - Karen Burniston
Critters in cups stamps and coordinating dies - Pink & Main
Copic markers
Black sakura gel pen  
Fun foam
Smile die - Paper Smooches
Blueprints #31 - MFT Stamps
Doodlebug Sprinkles
Xyron
Spectrum Noir Glitter Pen

Thanks for stopping by today
SaveSave

Saturday, 14 April 2018

C4C 430 Perfect Blend

Good morning friends

It's Saturday and that means a new challenge at the Crazy 4 Challenges blog..  Maryann Einam is our hostess for April and our Guest Designer is Kelly Santi, Sandcastle Stamper

Maryann's challenge is: "
Perfect blend - Create a card with coffee for inspiration in the form of colours, stamps or dies".  

For my card front, I used strips of patterned paper from a paper stack I'm trying to use up and decorated it with cute coffee cup charms and this Funny Bones stamp.


The cups each have glossy accents on them for some shimmer and shine, and there are embossed and sparkling bits on the patterned paper as well.


I knew I wanted to use Karen Burniston's Coffee Cup Pop-Up for the challenge, but I also wanted to make it into a Mother's Day card. I didn't want to just put 'Happy Mother's Day' inside, without tying it to the coffee cup but I couldn't think of anything to put inside and didn't have any stamps that would work. So I asked on the Coffee Lovers FaceBook group and Lisa B came up with the cute saying for the inside. Thanks so much Lisa - it's perfect!!

Below you can see the card fully opened, and where I hand lettered the sentiments.


This Coffee Cup Pop-Up is one of my favourite dies from Karen Burniston. It is pretty slick the way it goes together and that it can also be used as a gift card holder gives it double duty. I chose not to add a gift card to this one and just made a pop-up. The adorable Doodlebug coffee cup and cookies made for cute embellishments and because they are enamel they also add some shine to the card. The tiny tag is looped around the stir stick - and the tag die comes from the Twist Panel Pop-Up die set.


The banners were outlined with glitter glue, and I filled in the heart on the flower (which was fussy cut and is all sparkly on it's own) with the same glitter glue.


Because I have trouble with this brand of patterned paper cracking, I actually reinforced all the folds with micropore tape (on the back side) to ensure that nothing falls apart when the card is being opened and closed. Pop-Up cards are so fun and everyone loves to receive them and they do get opened and closed a lot more than regular 'flat' cards.


Check out the C4C blog to see how the Crazies have been inspired by the challenge. We'd  love to see your take on it, so be sure to stop by the Crazy 4 Challenges blog and link up your creations. If you are uploading to an online gallery, please use the keyword C4C430.

Supplies:
1040 Coffee Cup Pop-Up - Karen Burniston
Patterned paper - DCWV
Teal soft finish card stock - Elizabeth Craft Designs
Stickers - Doodlebug
Folgers stamp - Funny Bones (Riley & Company)
1012 Snowman Twist Circle Pop-Up (circles) - Karen Burniston
Stickles
1009 Twist Panel Pop-Up (tiny tag) - Karen Burniston
Stitched fishtail banner dies - Elizabeth Craft Designs
Marvy LePlume II markers
1041 Coffee Charms - Karen Burniston
Glossy Accents
Bakers Twine
Wink of Stella


Thanks for stopping by today

Tuesday, 6 March 2018

Coffee Cup Pop-Up Gift Card Holder

Good morning friends

It's time for Karen Burniston's  March 2018 Designer Challenge. This month our challenge theme is:  "COFFEE & CAKE" - use either the Coffee Cup Pop-up OR the Cake Pop-up for your project.

I chose the new Coffee Cup Pop-Up and made a fun birthday card for a friends mother who turned 97! They had requested a 'card shower' for his Mom as she enjoys receiving cards and it's fun for them to go through the cards with her and talk about how they know the person who sent her the card.


On the front I used the new Happy Birthday die - which will not be a surprise as I use it frequently. I love that it cuts in a single piece and the font works for masculine birthday cards too. I added a little 'to go' cup on the front from the Coffee Charms, to give a hint as to what was inside.


You might be wondering why I would use a coffee cup for a card like this instead of the more obvious cake choice. Well, whenever my friends visit his mom, they bring along her favourite iced coffee! So I included a gift card so they could pick her up a couple of coffee's on us.


This Coffee Cup Pop-Up is really cool - the curve to the cup when the card is opened is amazing. You can use it with or without a gift card, too. I added a party hat from the Birthday Cards to my 'to go' cup since it is for a special birthday.


The new number dies are very handy for customizing a card, so I used it here as well as a stamped greeting.


The squares are from the Spinner Square Pop-Up.


Be sure to check out what my fellow teammates have come up with for the challenge - their blogs are linked on the right. Karen Burniston will have her post tomorrow (Wednesday) on her Blog.

Supplies:
Patterned paper - Heidi Grace
Marvy LePlume II markers
White card stock
Stickles
Happy Birthday stamp - MFT Stamps
Nuvo Crystal Drops

Card size - 5 x 6",  fits into a 5 x 7 envelope

Thanks for stopping by today
SaveSave

Monday, 29 January 2018

Valentine Coffee Cup Gift Card Holders & Shaker Photo Frames!

Good morning friends

Yesterday I shared a Coffee Cup Gift Card holder, which I made using Karen Burniston's new Coffee Cup Pop-Up. Since I won't be near our grandkids on Valentine's Day, I decided to do something different this year. Usually I make sure the Grands have treat bags.

I made two Valentine themed Coffee Cup Gift Card holders, and tucked a Tim Hortons Gift Card inside each cup. I thought our daughters could take the kids to Tim Hortons and they could each get a donut and cup of hot chocolate. They turned out SO cute - but when I went to do this post I discovered that this was the only photo I took of them. What the? And it's not even a good photo! The little Coffee charms worked perfectly as decorations, and the stir stick was the perfect place to hang a little tag from. The tag is from the Tag Book Pop-Up.


You will see below each one, is a (gift card sized) family photo I took on New Years Day out at The Farm. I thought they would enjoy getting a photo with their Valentine's Coffee Gift Card but of course I wanted to dress up those photos. I used Lynda Kanase's Photo Shaker Box to make these fun shaker frames.


Since the words from the different frame sets are interchangeable, I added the vertical LOVE from the Photo Frame, Lovely die set and backed the word with a piece of black card stock to make it pop. Then I highlighted the letters with glitter glue.


I also made a little easel stand for the back, so they could stand on a shelf away from little fingers.


This is the second one ...


I packaged the Coffee Cup Gift Card Holder, and the Photo Shaker Frame with some chocolates in a cello bag, but we were in a huge rush to get going so I did not get a photo of them all done up.

Tips and Tricks
Because these are going to homes with inquisitive little fingers, I adhered the cover to the box bottom.   I know our daughters would not be thrilled having to pick up spilled confetti & sequins. Securing the lid to the box bottom is entirely optional, because they work perfectly to present a Gift Card in as well!

To create the Easel Back for the landscape orientation shaker box, I took a piece of card stock 1-1/2 x 3-1/2". It was scored at 1/2, 2, 2-1/2 and 3". You put adhesive above the first 1/2" score line and it adheres to the back of your shaker box at the top centre.  Then you form a 'W" with the other score lines, and again the 1/2" tab is adhered to the centre bottom at the back of the shaker box. Now it can stand on it's own!

Supplies:
Patterned paper - Recollections
Copic markers
Stickles
White and pink card stocks
Puffy heart sparkly stickers - Recollections
Bakers Twine
Instax SHARE SP-2 printer
Photo Shaker Box, Seasonal - Lynda Kanase (Sizzix)
Photo Frame, Lovely - Lynda Kanase (Sizzix)
Miscellaneous sequins and confetti

Thanks for stopping by today