Tuesday 30 June 2020

Slimline Canada Day Card with Zentangle


Hello crafty friends ...


Today I'm sharing another Slimline Card, this time for Canada Day! I had SO much fun creating this using my iPad, Apple Pencil and the app Procreate. I intended to use the app to practice my lettering and doing Zentangle so it was fun to combine those things for this card.


I filled in my Maple Leaf outline with different tangles. I printed the main panel as well as two additional Zentangle Maple Leaf's to fussy cut and pop up with foam tape.


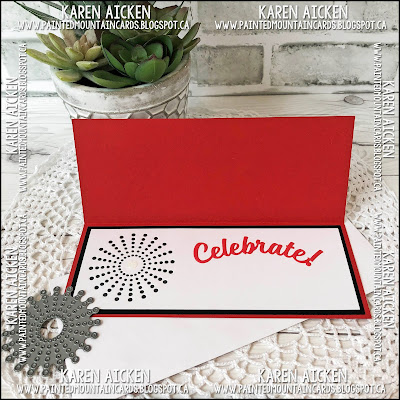
Here is a peek at the inside, with the Your Next Stamp Circle Burst and Karen Burniston's Celebrate.


While it's hard to see in photos, I backed the Circle Burst Opening with acetate for some shimmer & shine. I love how it catches the light and is a fun surprise when you open the card.


Supplies:

Red sparkle card stock
White, black and red card stocks
Acetate
printer
White Sugar & Sparkle Gumdrops - Your Next Stamp
1067 Celebrate - Karen Burniston
Circle Burst Die - Your Next Stamp

Card size - 8.5 x 3.5", fits in a #10 Business Envelope


Thanks for stopping by today

Monday 29 June 2020

Slimline Nautical Trifold Birthday Card


Hello crafty friends ...

It's Masculine Card Monday here on my blog, and I have a fun Slimline Trifold to share today.


I had stumbled on this 12 x 12" paper pad on clearance a year or two ago. Even though I did NOT need any more paper, I couldn't resist this one with all the glossy and foiled bits in it. It's always good to find a masculine paper pad and I use this one a lot for my nursing home donation cards.

Since I'm enjoying the Slimline card format these days, I have also been having fun figuring out different ways to fold or make them interactive. For this trifold card, I cut my card base 8-1/2 x 8-1/2", then scored down the left side at 2" and down the right side at 3". That gave me my fold over panels while still keeping the card at the Slimline size.


Finally, this is what the card looks like fully open.


Supplies:
Patterned paper - Hey Sailor, DCWV
Off white confetti card stock
Ahoy Matey - Black Beards Loot, TAWS (retired)
Stitched Fishtail Banner die - MFT Stamps
Skull - Black Beards Loot, TAWS (retired)
Splish Splash Sentiments, Elizabeth Craft Designs
Anchor stamp - Sayings4Sailboats, the Stamps of Life
Birthday words - LJD Birthday Greetings, MFT Stamps

Card size: 3.5 x 8.5", fits in a #10 Business Envelope

Thanks for stopping by today

Sunday 28 June 2020

Four Birthday Cards with Pocket Scrapbooking Supplies


Hello crafty friends ...

Today I'm sharing some Birthday Cards made to donate to my Mom's old nursing home. I had picked up a small Project Life kit on clearance last year, and it contained some fun acetate embellishments. So I paired them with a few of the 2 x 3" Journal Cards from the package, and patterned paper from my stash.


A few of the Journal Cards also got Happy Birthday stamped on them.


Black Nuvo Drops give a POP to the cards.


They are all the same inside, and I used my trusty MISTI for even stamping on all four panels.


Supplies:
White, yellow and gold card stocks
Patterned paper - Sweet Tangerine, DCWV (old, from my stash)
Happy Birthday stamp - Birthday Builder, Altenew
Catherine Pooler Inks
Nuvo Drops
Stickles
Stamp inside - Handwritten Happiness, MFT Stamps
MISTI - My Sweet Petunia

Card size, all - Standard A2, 4.25 x 5.5"

Thanks for stopping by today

Saturday 27 June 2020

Layered Mushroom House Card


Hello crafty friends ...

About the time I was looking to add some Gnomes to my stamp & die collection, I saw Tanya's video on creating these 3-D mushroom houses using the Riley & Company Mushroom Lane stamps. Since I was ordering the large Gnomes anyhow, I added this Tri-Level Mushroom House to the order. (Stamps and dies).

After stamping it in Copic friendly ink, I coloured it up then made three colour copies. This was a suggestion Tanya had in her video so I thought I'd give it a try.


The coordinating die set cuts different portions of the Mushroom House, so I cut those out from the colour copies and layered everything together with foam tape. Very similar to Paper Tole, which was popular years ago. 


Lots of fun dimension on the card, and I didn't want to add a sentiment to the front and distract from the layered look of the mushroom house. I added a fun sentiment inside though!


Supplies:
White, Kraft and tan card stocks
Mushroom Lane Tri- Level House stamp and dies - Riley & Company
Copic markers
1054 Rectangles Crosshatch - Karen Burniston
Sakura white gel pen
Nuvo Glitter Pen
Inside stamp - Impression Obsession
MISTI - My Sweet Petunia
Small mushroom stamp - You Gnome Me, MFT Stamps

Card size - Standard A2 (4.25 x 5.5")

Thanks for stopping by today

Thursday 25 June 2020

Happy Flowers Slimline Card


Hello crafty friends ..

It's time for a new Challenge at Your Next Stamp - 
the Fun Friday Challenge #142 has a theme of 'How Does Your Garden Grow!'
 (Flowers, bugs, anything in a garden - including critters, which LOVE anything I attempt to plant outside!)

The Fun Friday challenges come with two chances to win prizes!!
Comment on the YNS BlogInstagram or Facebook pages for a chance to win a free stamp set. Comment on all three to increase your chances, but comments must be left by July 1st 2020. The winner will be announced on July 3rd on the YNS Blog.

More details about the prizes at the end of my post.

I made a Slimline card today using the new Long Striped Panel Die, cutting it from double sided patterned paper. The yellow is on the front, and the blue print is on the reverse side. Once the die cut was adhered to the card base, I flipped the fallaway rectangles over and glued them back into place with the reverse side showing. Such an easy peasy way to create lots of texture & design on your background.


I used the smallest Scalloped Frame with Piercing Marks, cutting it out of scraps of pink card stock in different hues. Then I cut some slightly larger circles from scraps of yellow and stamped the faces from the Fun Faces stamp set. I couldn't resist ordering those faces - and I'm going to enjoy using them!

The leaves were freehand cut from scraps of green card stock, and I added some veins with a copic marker then added white dots with a gel pen. Distress Stickles was smeared onto the pink blooms for some sparkle and shine.


Here is a peek at the inside, with a stamped sentiment from the All Aboard Bunch of Happiness stamp set, and I added another flower and hand cut leaves to tie in the design from the front.


The Fun Faces stamp set is going to be lots of fun!


The Fun Friday Challenge #142 runs through July 19th 2020 at midnight. One random participant will win a $15 gift certificate to the Your Next Stamp store.  If YNS stamps or dies are the focal point then the winner receives an additional $5 gift certificate for a total of $20!!  The winner will be announced on the YNS Blog the Sunday after the challenge closes. Check it all out on the Your Next Stamp blog HERE. 

Pink,  yellow, green and white card stocks
Sakura white gel pen
Copic markers
Patterned paper - American Crafts
Distress Stickles - Ranger

Card size - 3.5 x 8.5", fits in a standard #10 business envelope.

Thanks for stopping by today

Jeep Pop Up Card for Father's Day


Hello crafty friends ...

I talk about the details of my card in my YouTube video here:  


I kept the card front nice and simple, since all the fun is on the inside. I stamped the sentiment, and inked over it lightly with a gear stencil. Then I added a scrap of the patterned paper to the envelope and stencilled the gears on the envelope too! 


Karen Burniston's Cupcake Pop Up can be a very generic pop up die if you masquerade the cupcake shape of the pop up. Here I used a Crosshatch Rectangle, then mounted a die cut jeep to the pop up platform.


My hubby drives a white jeep, so I thought he would really enjoy this card. I added some banners as well, and sparkly Your Next Stamp Gumdrops for the headlights.


A little more stamping and stencilling and my card was done.


Supplies:
Safari Jeep die set - Elizabeth Craft Designs
Brown glossy card stock (recycled packaging from my stash)
White, black, gray and green card stocks
1008 Cupcake Pop Up - Karen Burniston
Patterned paper - Basic Grey (old, from my stash)
1054 Rectangles Crosshatch - Karen Burniston
Words - tie-rific, Reverse Confetti
Fishtail Banner - MFT Stamps
1057 Circles Crosshatch - Karen Burniston
Banner dies - Birthday Bonanza Stampin' Up
Copic Markers
Spooky Cute Gumdrops - Your Next Stamp
Bling It On Sparkly Gumdrops - Your Next Stamp
Gear Stencil - Karen Burniston (retired)
Blending Brushes - Taylored Expressions

Card size - 6.5 x 5"

Thanks for stopping by today

Tuesday 23 June 2020

Shaker Gift Card Holder


Hello crafty friends

Today I'm sharing a project made with the new release at Your Next Stamp. I always need Gift Card Holders, so that is what I went with and decided to 'shake things up' a bit by adding a shaker to the front!


It's hard to see in the photos, but the shaker base is actually the new Cool Tag 6! The smaller scalloped frame fits perfectly on top and that is what inspired my project today. I thought this sentiment from the new Positive Affirmations was a fun one for a Gift Card Holder, so stamped it on the pink base tag before assembling the shaker.


Love the bright yellow Gumdrops from the Retro Gumdrops set!


The white rectangle inside is fallaway piece from the large Scalloped Frame With Piercing Marks that is on the front.  It was added before  the notched strip, which holds the gift card in place. I stamped Thank You on that white panel and I like that it is hidden until you remove the gift card.


A tip for you when adding a notched panel to hold a gift card, is to use a very thin line of wet glue instead of a tape runner or double sided tape. If you use the latter, the width of the gift card can cause the attached edge to lift a little and the gift card gets stuck in the adhesive. If you use wet glue, that doesn't happen!

Supplies:
White card stock
Patterned paper - Garden Party, Pebbles (6 x 6")
MISTI
Various filler from my stash
Seam binding
3/4" circle punch

Card size - Standard A2, 4.25 x 5.5"

Thanks for stopping by today

Thinking of You Pop Up Card


Hello crafty friends

Today's card uses some Doodlebug cut aparts and a Pop Up die from the Stamps of Life. I talk about some of the details on the card in my YouTube video here:


The Hello Sunshine cut apart was square, so I added a little Doodlebug patterned paper on either side and covered the seams with Bakers Twine. That gave me a perfectly sized A2 panel.


The Thank You 3-D Drop Ins makes a great generic pop up if you don't use the Thank You dies, so that is what I did here, cutting it from cheerful patterned paper in my stash.


The critters are also Doodlebug cut aparts that were each on a 2" square. I simply fussy cut them from the sheet and popped them up with foam tape.


This is one of the cards I am sending out for Happy Mail!

Supplies:
Cut aparts - Doodlebug Designs
Stickles
Twine
Sakura black and clear glaze pens
Patterned paper - Hello Spring, American Crafts
Hello and white card stocks
Thank You 3D Drop-Ins - Stephanie Barnard, the Stamps of Life
Scallop Stitched Nesting Circles - Tutti Designs
Stitched Mini Scalloped Rectangle die set - MFT Stamps
Words - Tucked In, Thinking of you - Papertrey Ink
MISTI - My Sweet Petunia
i-crafter Blending Brushes
White Peel Off Border
Enamel Dots - Echo Park

Card size: Standard A2 (5.5 x 4.25")

Thanks for stopping by today

Monday 22 June 2020

Chameleon Record Card - You Rock


Hello crafty friends ...

Today for Masculine Card Monday here on my blog,  I'm sharing a card I made to show the versatility of the Chameleon Fineline markers. These things are sooo cool! For example, you take the lid off the yellow marker and add the orange marker lid for a few seconds. Then you add the red marker lid for a few seconds When you go to write, the colour flows from the red through orange before returning to the original colour. 

I had just received this fun record die set from MFT so that is pretty much what inspired my card. Note, I made this card in the Spring of 2019 but didn't get it posted so am sharing it now.


I used the markers to write 'you rock' on one stitched card stock strip, and then drew a plaid on a second one. The Fineline markers coordinate with the Chameleon Color Tone and Color Tops so I used those to colour the record label and banner.


Inside I added a stitched panel with marker colour outside the stitched line and a die cut word. The other words were done with the Chameleon Fineline markers!


Supplies:
Sketch - C4C 475, Crazy4Challenges.
The Bee Paper Company, marker paper
Stitched vertical stitched strip dies - MFT Stamps
Chameleon Color Tones markers
Chameleon Color Tops
Chameleon Fineliners
White, black card stocks
Black glossy card stock - Tonic Studios
Nuvo Crystal Drops
Record die - MFT Stamps
Silver for card stock - Stampin' Up
AWESOME and FANTASTIC dies - Verve (retired)
Fishtail banner die - MFT Stamps
Stitched rectangle dies - Elizabeth Craft Designs

Thanks for stopping by today

Sunday 21 June 2020

Folded Gift Card Holders


Hello crafty friends ...

Today I'm sharing a pair of Gift Card holders that I added to the package for our son's girlfriend and a friend of mine. I have made this type several times before, using a video by Dawn's Stamping Thoughts. (That video is linked in the supply list below)

12 x 12" patterned paper works so well for these Gift Card Holders, and you can get two from a single sheet. The two use papers I chose were  from the same paper pad, but I did use two different sheets. The first one had this crisp and fresh butterfly print, so of course I decorated the front with butterflies!


The butterflies were cut with Lawn Fawn dies, and adhered to a YNS Stitched Wavy Circle.


Inside is a flap where you can tuck in the gift card, and a label to write a message.


This is the second one, which features one of the little cut-aparts that were included in the paper stack.


Inside I added a larger cut-apart but otherwise they were done the same.


I actually  made these last year, but I'm just getting them posted now.

Supplies:
Patterned paper and cut-aparts - Pebbles
Dawn's video which can be found here:  https://www.youtube.com/watch?v=6jty4zuE6iM&t=22s
White and teal card stocks
Fun foam
Nuvo Drops
Rounded rectangle dies - Hero Arts
Stitched Wavy Circle die - Your Next Stamp
Butterfly dies - Lawn Fawn
Stickles

Thanks for stopping by today

Saturday 20 June 2020

Cactus Row Slimline Card


Hello crafty friends ...

Today I'm sharing another quick and easy Slimline Card, which uses the bottom portion of a 12 x 12" sheet of patterned paper.


I added Glitter Dots to the centre of random cactus blooms then die cut the SENDING from black card stock and adhered it on the right side of the cactus panel. I stamped and fussy cut the fishtail banner, popping it up with foam tape.


Inside, I added the leftover portion of the cactus print, and stamped 'Thinking of you' as I will be sending this out for Happy Mail. There is enough room to write a short note on the panel when I go to send the card.


Supplies:
Patterned paper - Desert Dream, Recollections
Kraft, white and black card stocks
Slimline Stitched - Trinity Stamps
Sending Happy Thoughts - Simon Says Stamps
Glitter Dots - Elizabeth Craft Designs

Card size - 8.5 x 3.5", fits in a standard #10 Business Envelope

Thanks for stopping by today