Monday 28 February 2022

Birthday Cactus Shutter Card


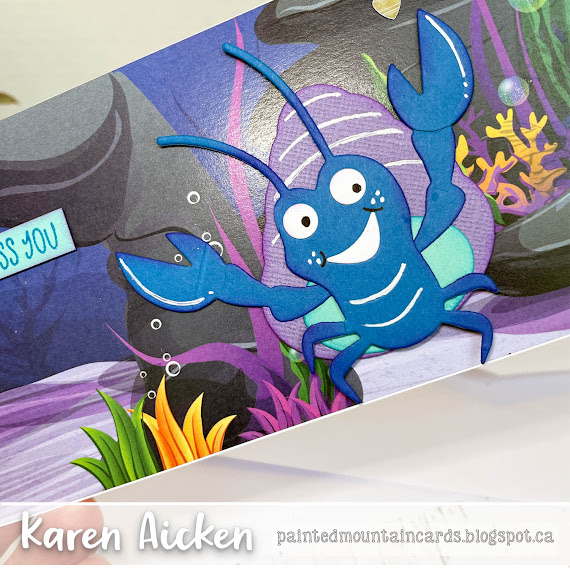
Hello my crafty friends! Today I'm sharing another shutter card - this is one I sent to a friend for her Birthday. The patterned paper (by Lynda Kanase) is several years old, as are the clear stickers. The group of cacti & pots was a single sticker that was adhered to white card stock and fussy cut, then adhered to the Belly Band.


When you slide off the Belly Band and open the card - the shutters move to each side to reveal the stamped sentiment,.


The clear stickers from my stash worked out really well with the patterned paper! 


I chose to decorate the inside panels with more of the patterned paper, but that didn't leave me with anywhere for a personal message. A stamped and decorated panel on the back solved that problem!


 This blog uses affiliate links whenever possible. This means, that at no cost to you, if you make a purchase through one of my affiliate links that I may receive a small commission from your purchase. I only link products that I own, love and use for my card making!

Any supplies I'm unable to link are listed at the very bottom of my post.


Additional Supplies:
Patterned paper - Succulent Serenity, Lynda Kanase (retired)
Watercoloured stickers - old, from my stash
White card stock - Accent Opaque Digital Super Smooth (Amazon .ca)

Sunday 27 February 2022

Heart Sunburst Mini Slimline Card Duo


Hello my crafty friends!  I had another play with the Mini Slimline Heart Sunburst die from Kat Scrappiness and this is what I came up with. I used a leftover patterned paper piece from the pop up baby card shared earlier this week - it's from Whimsy Stamps.  

The fun thing about a sunburst die, is you can often add the fallaway pieces from the first card onto a second panel and end up with a second card front! I also used some white pearl card stock for subtle shimmer. 


Inside this first card, I added a stamped sentiment onto a stitched oval and popped it up with thin foam tape.


The second card has a rainbow heart embellishment instead of the mirrored hearts I used on the first one and I didn't add a sentiment to the front.


Inside, another stamped sentiment - this time on a scalloped heart (the heart dies are from Karen Burniston's new Hearts Crosshatch set). This second card is on it's way to my Mother In Law, since it's been quite chilly where she lives.


 This blog uses affiliate links whenever possible. This means, that at no cost to you, if you make a purchase through one of my affiliate links that I may receive a small commission from your purchase. I only link products that I own, love and use for my card making!

Any supplies I'm unable to link are listed at the very bottom of my post.


Additional Supplies:
White card stock - Accent Opaque Digital Super Smooth (Amazon .ca)

Friday 25 February 2022

Shutter Card for Happy Mail


Hello my crafty friends and welcome to Fun Fold Friday here on my blog.  Today I'm sharing the second Shutter Card done with the Lawn Fawn Shutter Card die set. Now I rarely post things in the same order I make them, so while this is the second one I made it's the third one I've posted. In between I had been invited to join the Wild & Whimsy Inspiration Hop at Scrap'N Stamp and made one from mirror card stock. You can see that one HERE.  I will have another one to share next week, and have already made a couple of others. Yes, I am having lots of fun with this die set. 

I have a walkthrough of my card on YouTube:  


Using the included die to create the Belly Band, I added the Hello & Shadow die cut from Karen Burniston. You slide off the belly band, and below is what the card looks like when it's open.


Since I was sending this to a friend for Happy Mail, I added a sentiment from Waffle Flower. I wanted her to know I was thinking of her.


This blog uses affiliate links whenever possible. This means, that at no cost to you, if you make a purchase through one of my affiliate links that I may receive a small commission from your purchase. I only link products that I own, love and use for my card making!

Any supplies I'm unable to link are listed at the very bottom of my post.


 Additional Supplies:
Patterned paper, cut aparts & sticker - Flower Market, Carta Bella (retired)
Pink marker

Thursday 24 February 2022

Two Sand Crab Slimline Cards


Hello my crafty friends!  Last week I shared a trio of Shark Slimline cards that I made to send three grandkids and these two Sand Crab cards are going to our other two grands. They all love getting Happy Mail!  For these cards, once again I used Whimsy's Slimline paper pad Under the Sea, but instead of the shark I used the Sand Crab die from Elizabeth Craft Designs. I bought it a couple of years ago because his expression just makes me smile.

I was able to use card stock scraps to die cut both crabs, and I added White Gel Pen highlights and some unkinging to the edges.


If you would like to see the Slimline shark cards, as well as a video showing all of the patterned paper - click HERE.


This blog uses affiliate links whenever possible. This means, that at no cost to you, if you make a purchase through one of my affiliate links that I may receive a small commission from your purchase. I only link products that I own, love and use for my card making!

Any supplies I'm unable to link are listed at the very bottom of my post.


Additional Supplies:
Card stock scraps - my stash
White card stock - Accent Opaque Digital Super Smooth (Amazon .ca)

Wednesday 23 February 2022

"Welcome Twin Girls" Slimline Pop Up Card


Hello my crafty friends!  Today I'm sharing the card I made for our Nephew and his wife who had twins last month. I have a walkthrough of my card on YouTube:  


I used mostly dies by Karen Burniston (which I linked below) but added in the Waffle Flower Slim Lacy Layers as I adore the edges on this set. The patterned paper is soft and celebratory at the same time and I added two little ducklings to the front to represent the two girls.


Inside, there is more of the pretty paper - which is just perfect for this family - and I used the Little Labels Pop Up along with more of the Baby Charms.


I took advantage of the stencil feature on the Baby charms, and of course added a little Wink of Stella and mirror card stock too. Also some of those sweet Rainbow Hearts from Doodlebug.


This blog uses affiliate links whenever possible. This means, that at no cost to you, if you make a purchase through one of my affiliate links that I may receive a small commission from your purchase. I only link products that I own, love and use for my card making!

Any supplies I'm unable to link are listed at the very bottom of my post.


Additional Supplies:
Fine point markers
White card stock - Accent Opaque Digital Super Smooth (Amazon .ca)

Tuesday 22 February 2022

Speedy Recovery Slimline Card


Hello my crafty friends! Today's card is one I made for a friend who had just had surgery. She wasn't up for visitors so I sent her some Happy Mail instead. This Slimline card uses items from Pinkfresh Studio - their 'In The Meadow' Washi Tape and coordinating die. I applied the Washi Tape to white card stock, held the die in place with several pieces of removable tape and ran it through my machine. All the pieces cut with a single pass! 

The sentiment is one I wanted to use and I didn't really want to cut the stamp into two pieces so it would fit on the front. My finished card size is 3.5 x 8.5", but the business envelope is just over 4" wide so even though the sentiment hung over the card on each side, it easily fit in the envelope. And I liked the way it looked!


While they don't show up in the photos, I added a few of the mirrored hearts from Kat Scrappiness and the butterfly has some sparkle too.

Inside I added some patterned paper from my stash, a rounded white rectangle and a few more florals from the Washi Tape. That gave me plenty of room for our personal message but still a pop of colour when you open the card.


After I finished this card, I ended up cutting several more sets to have on hand. They are SO pretty and I had everything out anyhow. Many years ago I had a binder with 2.5 x 3.5" pockets - the ones for collecting sports cards and I used it to store smaller stamp sets and stickers.  I thought this would be a good way to store all the Washi Tape bits and pieces, so also bought a few 4 x 6" and also a few 5 x 7" pockets to put in the binder for the larger items. One evening I sat and added a whole other pile of leftover embellishments to the binder and hopefully this will keep everything in one spot and be easy to flip through to see the different embellishments. 😊

I think the hardest part, will be remembering to LOOK at it. Previously, if I had an extra flower or butterfly I would add them to a little box on my stamping table. The box was getting full and I had to go through the whole thing every time to see if there was something I could use up. Seeing them spread out in clear pockets just makes me happy.

This blog uses affiliate links whenever possible. This means, that at no cost to you, if you make a purchase through one of my affiliate links that I may receive a small commission from your purchase. I only link products that I own, love and use for my card making!

Any supplies I'm unable to link are listed at the very bottom of my post.


Additional Supplies:
White card stock - Accent Opaque Digital Super Smooth (Amazon .ca)

Monday 21 February 2022

Nautical Birthday Card


Hello my crafty friends!  It's Masculine Card Monday here on my blog and today I'm sharing the Birthday Card I made for our Son In Law. I pulled out an older Paper Pumpkin kit (On My Mind, July 2019) for my card ... but wasn't really feeling the colours they had for the card base & layers. Once again - I did my own thing with the kit.

I started by cutting apart one of the envelopes, which had the navy map print inside as the liner. I adhered that to a white card base and everything else came from the kit. I added some inking to the pieces to add some depth.

Inside, I added a stitched panel die cut with the Double Stitched Rectangles from Divinity Designs, some stencilling and a stamped sentiment. Can I just say how much I'm enjoying this sentiment stamp set? I make a LOT of Birthday cards, and am always looking for 'different' Birthday stamp sets - this one by Penny Black fits the bill - and I linked it below for you. Such a fresh combination of fonts!

Oh, I continued the stencilling onto the envelope. It was light enough to write the address on the front and gave a bit of a hint as to the card inside.


One more look ...


This blog uses affiliate links whenever possible. This means, that at no cost to you, if you make a purchase through one of my affiliate links that I may receive a small commission from your purchase. I only link products that I own, love and use for my card making!

Any supplies I'm unable to link are listed at the very bottom of my post.


Additional Supplies:
Paper Pumpkin - On My Mind, July 2019 (Stampin' Up)
White card stock - Accent Opaque Digital Super Smooth (Amazon .ca)

Friday 18 February 2022

Dangling Butterfly Circle Charm Pop Up Card


Hello my crafty friends and welcome to Fun Fold Friday here on my blog. Today I'm sharing another way to use Karen Burniston's Butterfly Collage Add-On, which was designed to go with the Heart Collage Pop Up. For my card today I just used the Add-On paired with the Circle Charm Pop Up dies and sparkly patterned paper from my stash.


Whatever you add to the front circle, pivots to the inside when the card opens. I cut the centre frame in half, and added one of the expanding butterflies to the centre. The Border Blends Trims decorate each side and there is a matted rectangle to add my personal message.


In addition to the sparkle in the patterned paper, I used pink mirror card stock and added gold peel off stickers 😊.

This card folds completely flat for mailing, and will only need a single stamp!


This blog uses affiliate links whenever possible. This means, that at no cost to you, if you make a purchase through one of my affiliate links that I may receive a small commission from your purchase. I only link products that I own, love and use for my card making!

Any supplies I'm unable to link are listed at the very bottom of my post.


Additional Supplies:
Pink card stock scraps
White card stock scrap
Patterned paper - Kanbon Crafts (old, from my stash)
White twine
Circle stickers - Dazzles

Thursday 17 February 2022

A Trio of Shark Slimline Cards


Hello my crafty friends!  When I shared the two shark Valentine's I'd made, I mentioned how long it took me to actually receive my die because of COVID shipping/travel delays. I am making up for that lost time and sharing another three cards made with the shark dies.. These ones were made specifically for three of the grandkids to send for Happy Mail. I have made another two cards for the other grands, and will share those non-shark ones another day. 😊  I also have a walkthrough of these three cards on YouTube, as well as a look at the different patterned papers in the package: 


Once again I was able to use up some scraps for the sharks, and the patterned paper is from a Slimline pad from Whimsy Stamps. I love these pads!


This light blue shark is actually blue sparkle card stock which was recycled from a purchased card.


I added some ink blending and white gel pen highlights on the sharks as well.


This blog uses affiliate links whenever possible. This means, that at no cost to you, if you make a purchase through one of my affiliate links that I may receive a small commission from your purchase. I only link products that I own, love and use for my card making!

Any supplies I'm unable to link are listed at the very bottom of my post.


Additional Supplies:
Blue card stock scraps - stash
White card stock - Accent Opaque Digital Super Smooth (Amazon .ca)

Tuesday 15 February 2022

Paper Pumpkin Alternate Birthday Card


Hello my crafty friends ... today I'm sharing the Birthday Card I made for my Brother In Law - it's a trifold card from the Adventure Begins Paper Pumpkin Kit. I think this was the last kit I purchased, then I cancelled my subscription,

There are a couple of Paper Pumpkin Facebook groups where I would share my creations, and after the last couple of kits I grew weary of the 'odd' comments from demonstrators who it seemed didn't think I should be posting since I didn't actually SELL the product or annoyed that I combined other products with my kits. What the??  These are supposed to be INSPIRATION groups!  Some were even surprised that I was 'allowed' to purchase these kits, which really had me thinking about what kind of education Stampin' Up was providing - or NOT providing -  to their demonstrators! Please note, you do NOT have to be a Stampin' Up demonstrator to use or purchase their products, at least not in Canada or the USA.  You do have to purchase THROUGH a demonstrator, and there seems to be lots of incentives to 'join the team' throughout the year.  I've been a Stampin' Up Customer for more years than they have officially been in Canada, but lately I'm just weary of drama.  After I had cancelled my Paper Pumpkin Subscription I was once again thankful I had never joined up to actually SELL Stampin' Up. 

I really enjoyed the kits I did purchase - and still have several to work through as I was lucky enough to find some un-used older kits online. So I'll still be sharing my Paper Pumpkin cards ... and I'll be using whatever products I want to on those cards. I won't bother sharing the inspiration with the Paper Pumpkin groups.  

This kit was one of my favourites - I loved the colours and the fun fold cards and coordinating envelopes, but of course I had to make it it into an Alternative rather than just follow the directions.


When the card is fully open, there are stamped greetings,  some patterned paper and still lots of room to write a personal message.

This blog uses affiliate links whenever possible. This means, that at no cost to you, if you make a purchase through one of my affiliate links that I may receive a small commission from your purchase. I only link products that I own, love and use for my card making!

Any supplies I'm unable to link are listed at the very bottom of my post.


Additional Supplies:
Paper Pumpkin - Adventure Begins (Stampin' Up)
Tree stamp - Peaceful Christmas, October Paper Pumpkin - Stampin' Up
Patterned paper - Artistry Blooms, Stampin' Up (retired)

St. Patrick's Day Slimline Card


Hello my crafty friends!  Today I'm sharing a Slimline card for St. Patrick's Day that combines several different product lines from my craft room. I started with the Slimline paper and Slimline Cloud die from Whimsy Stamps for the card front, then combined Karen Burniston's new Good Luck Charms along with stickers. The Smile is from her Word Set 14 and I added gold gel pen highlights. 

Last year I realized any shamrock dies I owned were quite small, so I ordered this one by Impression Obsession and have been waiting almost a year to use it! It's so pretty - especially when cut from green mirror card stock. I'm not able to link it in the thumbnails below, but I got it from R&R Scrapbooking in Edmonton AB and at the time I'm writing this post she still has it in stock. Click HERE if you are interested in it.


Here is a peek at the inside, with a sentiment stamp I have had for YEARS. This set from The Stamps of Life is one I pull out every year when I go to make St. Patrick's Day cards. 😊

This blog uses affiliate links whenever possible. This means, that at no cost to you, if you make a purchase through one of my affiliate links that I may receive a small commission from your purchase. I only link products that I own, love and use for my card making!

Any supplies I'm unable to link are listed at the very bottom of my post.


Additional Supplies:
Stickers - old, from my stash
Fancy Shamrock die - Impression Obsession
Washi - Doodlebug Designs
White card stock - Accent Opaque Digital Super Smooth (Amazon .ca)