Saturday 30 November 2019

Doodlebug Kids Pivot Panel Christmas

Hello my crafty friends

Today I'm sharing a bright and cheery card for the holidays.


I have more details below this short YouTube video if you are interested.


I save almost all my scraps of Doodlebug patterned paper.  When I was looking at the package and saw the little pieces, I figured I'd use them with this Blueprints #29 die set to create the background for the card front. The sentiment strip is a Simple Strip sentiment - it's fun having a selection of sentiment strips all stamped, embossed, cut and ready for my projects.


Once I got the card all finished, I realized I had intended on using the Gift Pivot Panel upside down but instead adhered it 'correctly'.


These stickers are just so cute. Since they are over a year old, they are losing some of their tackiness so I used glue to adhere them to the white shimmer panel. I added a few more sentiment strips, this time using the Mini Strips Christmas set.


Because the card base is shimmery white card stock and would require a permanent marker to sign our names, I added a white card stock fish tail banner. That way we can sign with a regular ball point pen.


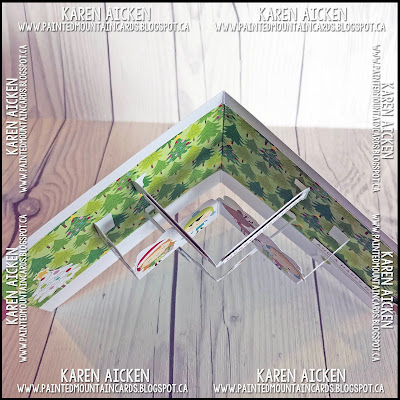
People always seem to like to look at these cards from the top, so here is a top view for you!


Supplies:
1115 Gift Pivot Panel - Karen Burniston
White shimmer card stock
Stickers - Doodlebug (from last year)
Patterned paper - Doodlebug Designs
Kraft and white card stocks
Blueprints #29 - MFT Stamps
Mini Strips Christmas, stamp and die - Taylored Expressions
Simple Strips Christmas stamp and die - Taylored Expressions
Sakura black glaze pen

Card size, standard A2 (5.5 x 4.25")

Thanks for stopping by today

Friday 29 November 2019

Alma's Pop Up Birthday Card

Hello my crafty friends

It's Fun Fold Friday here on my blog and today I'm sharing the Pop Up card I made for Alma's 3rd Birthday. I used Karen Burniston's new Parcel Pop Up for the inside, so kept the front nice and simple. Alma is such a sweetheart, the "You're Sweet' die was perfect for the front. 


First though, here is a short YouTube video so you can see the card in action ...


I cut the 'You're Sweet' from recycled packaging, and adhered it to the balloon patterned paper panel with a bakers twine bow & a printed heart element.


I love Doodlebug Designs, so pulled out a package of printed elements and added several to the card. The main one is the layered ice cream cone, which slides in and out of the wrapped present as the card opens and closes. I added a star, purple heart, party hat and rainbow as well.


The rainbow and ice cream got some shimmer from a Wink of Stella pen, and I added a pink die cut border using Border Blends Party.


Finally, here is a side view so you can see the pop up a little better.


I've been having lots of fun with this new die by Karen Burniston, and you can expect to see it used again and again. 

Supplies:

Patterned paper - Let's Party, Echo Park
1116 Parcel Pop Up - Karen Burniston
Printed elements - Doodlebug Design
Pink and white card stocks
Seam binding
Recycled packaging
1087 You're Sweet - Karen Burniston
Wink of Stella
1055 Ovals Crosshatch - Karen Burniston
Circle die - Hero Arts
Word stamp - Happiest Birthday Wishes, Stampin' Up
Sakura sparkle, black glaze and white gel pens
1091 Border Blends Party - Karen Burniston

Card size:  4-1/2 x 6" (A6)


Thanks for stopping by today

Thursday 28 November 2019

Row of Mittens Christmas Card

Hello my crafty friends

I saved this cute mitten element to use with the coordinating mitten patterned paper for one of my Christmas Cards.  For this one I chose to make a Z Fold Card.


Here is a quick YouTube video for you, and I have more photos & details below that if you are interested.


I added some YNS Gumdrops as well as Nuvo Drops for a little sparkle.


I HAD to order this Moose punch with coordinating stamp set from Stampin' Up's Holiday catalogue. I have several ideas for it, but haven't had time to really play with it yet. I did add a black punched moose to the centre panel of my card though, and that made me happy. Like the SU Playful Penguin stamp set, I ordered the Moose punch because I can use it year round and not just for holiday cards.


This retired stamp set from Stampin' Up was perfect to go with the mitten patterned paper!


Supplies:
Confetti and grey card stocks
Patterned paper, elements and stickers - Comfort & Joy, My Minds Eye
Stitched Rectangle dies - Your Next Stamp
Words on front - Papertrey Ink
Words inside - Stampin' Up (retired)
Moose Punch - Stampin' Up
The Perfect Blend Gum Drops - Your Next Stamp

Card size - standard A2 (5.5 x 4.25")


Thanks for stopping by today

Wednesday 27 November 2019

Vintage Truck Shaker Card Duo

Hello my crafty friends

When I saw that Queen and Company's Special Delivery kit, I was SO excited. I love images of old vintage trucks - have no idea why, but I do. Shipping to Canada can be really expensive, but since we were going to be visiting Arizona in early November I was able to have it shipped to a friends house there. WOOT!

The die set comes with pumpkins and hearts (among others) so it's not just a Christmas kit. If you follow my blog, you know I like to purchase things for their versatility and longevity. The Special Delivery 6 x 6" patterned paper has both Christmas and fall prints as well as some dots, plaids and stripes that would work for a multitude of occasions.

I pulled out a sheet of cute Christmas dog stickers from my stash and made a Christmas card for friends. When I was finished though, I realized there was another couple that would enjoy a card like this so while everything was out I went ahead and made a second card.


I really had fun creating these cards - shaker cards are appealing to me more and more these days so you can expect to see them regularly for the next little while. Here I cut the truck from some of the blue plaid patterned paper, adding the trees and snowflakes that also come with the die set.


The dog stickers are just too cute, wearing their sparkly winter coats and hats. 


Here is a peek at the inside of the first card - I love the greeting stamps that come with the kit and chose this one for inside the card.


For the second card I made a red truck and added some 'road' washi tape under the wheels.


I used various filler, both from my stash and from the kit.


This is the second Q&Co greeting stamp I picked for inside the card. 


Seriously - aren't these dog stickers adorable?


Supplies 
Special Delivery Shaker Kit - Queen & Company (unless specified, everything came from the kit)
Black, red and white card stocks
Charcoal Stardream card stock
White shimmer card stock
Silver foil card stock scraps
Dog Stickers - Tatoo King
Other filler - stash
Sakura white gel pen
Stitched Rectangle dies - Your Next Stamp
Stitched Vertical Strip die - MFT Stamps
Road Washi tape 
Sketch SC 314
Jingle All The Way - Simple Strips Christmas, Taylored Expressions
MISTI - My Sweet Petunia
Stickles
Stitched panel frame - MFT Stamps

Card sizes - standard A2 (4.25 x 5.5")

Thanks for stopping by today

Tuesday 26 November 2019

Reinbeer Christmas Card

Hello my crafty friends

Today I have another card for Your Next Stamp's Fun Friday Challenge #127 - Mad for Plaid. You can find all the details for the challenge HERE.  I'm using up every scrap of this wonderful buffalo plaid paper, so added it here to a kraft card stock base with a snowflake pattern from the same paper package. I like to use YNS products when I enter their challenges so I also pulled out the fun Reinbeer stamp set and coordinating die.


I added some sparkle pen to the tree on the bottle label as well as the bottle cap AND added glossy accents to the nose so it's raised and shiny.


Here is a peek at the inside:


When I was stamping the Reinbeer image, I used my MISTI and decided to stamp and colour three of them. So I have two left to use on other cards or tags this year! 

Supplies:
MISTI - My Sweet Petunia
Reinbeer stamps and coordinating die - Your Next Stamp
Black Olive Ink - Your Next Stamp
Copic markers
Sakura black glaze and white gel pen
Black and white card stocks
Patterned paper - Comfort & Joy, My Minds Eye
Stitched Rectangle die - Your Next Stamp
Sketch - Mojo Monday #438
Arteza glitter pens
Stitched Fishtail Banner die - Your Next Stamp
Bling It On Sparkly Gumdrops - Your Next Stamp
Circle bursts - Your Next Stamp
Black marker
White pearl card stock
Stitched snowflake die - Lawn Fawn

Card size - Standard A2, 4.25 x 5.5"

Thanks for stopping by today

Monday 25 November 2019

Farm Truck Birthday Shaker Card

Hello my crafty friends

Today I'm sharing my first card made with Queen & Company's 'Special Delivery' Shaker Card kit. I really like their kits, but don't often purchase them because of the cost of shipping to Canada. This vintage truck one though - it stopped me in my tracks. When I knew we would be visiting Arizona, I asked a friend if I could have it shipped to her house there.


This card is for my Mother In Law, who was raised on a farm. The filler included in the kit is SO cute - these little teal hearts were in there and are perfect for this card and I added some of my own as well.


The verse is one of many that are included in the stamp set with the kit. 


Inside I added a YNS birthday verse, as well as a popped up banner using the Simple Strips Birthday stamp and die from Taylored Expressions. There are also some fun Gum Drops on both the front and inside of the card.


Supplies:
Special Delivery Shaker Card Kit - Queen & Company. Unless listed below, the supplies all came from this amazing kit.
Red patterned paper - scraps from my stash
Red, kraft and white card stocks
White pearlized card stock
Blueprints #23 - MFT Stamps
Stitched Fishtail Banner die - Your Next Stamp
MISTI
Fun foam
White embossing powder
Winter Wonderland Sparkly Gumdrops - Your Next Stamp
Sakura white gel pen
Stitched Scallop rectangle - Your Next Stamp
Verse inside - Whatnot Sentiments Set 12 - Your Next Stamp
Black Olive ink - Your Next Stamp
Birthday Girl stamp - Simple Strips Birthday stamps and die - Taylored Expressions
Clear embossing powder

Card size - Standard A2 (5.5 x 4.25")

Thanks for stopping by today

Sunday 24 November 2019

Snowflake Trio Cards

Hello my crafty friends

I was peeking through my In Progress bin and found this  package of three cards waiting for assembly. Blue textured cards, matted patterned paper and the large die cut snowflakes and I don't even remember getting them started. That's how long they were in that bin. So ... time to get them assembled, finished and sent off this year.


I added two more snowflake die cuts, these ones cut from white pearlized card stock as well as some gold peel off snowflakes.


I white embossed a sentiment on the bottom right corner of each panel.


Inside I cut a smaller panel of white shimmer card stock with a snowflake edge die and embossed a sentiment as well.


Supplies:
Blue card bases
Patterned paper -s tash
White card stock
Large snowflake die - Stampin Up
White shimmer card stock
Stitched snowflakes - Lawn Fawn
Snowflake border die - Elizabeth Craft Designs
White embossing powder
Clear embossing pwoder
White Christmas stamp - Snowman2Build, the Stamps of Life
MISTI - My Sweet Petunia
Celebrate the Season stamp - Holiday Hello, Your Next Stamp
Gold snowflake peel off's - Elizabeth Craft Designs

Card sizes - Standard A2 (4.25 x 5.5")

Thanks for stopping by today

Saturday 23 November 2019

Polar Bear Christmas Card

Hello my crafty friends

I'm back today with another card for the Fun Friday Challenge #127 at Your Next Stamp, which is Mad for Plaid. So fun, right? Plaid is VERY trendy right now and I'm in love with Buffalo Plaid at the moment. You can find all the details for the challenge HERE.

I don't like to waste pretty paper - and by that I mean hide an entire portion of pretty paper behind another layer. Which is what happened with the buffalo plaid panel for this card. I had needed a large plaid panel for another card, but realized that most of it would be hidden by the elements I was adding. So I used the YNS Stitched Rectangle die to cut the centre of the large panel and put it aside. I finished that card, and then had this lovely stitched plaid rectangle which was the inspiration for this card!


The stitched snowflake die set is one I added to my collection last year and I'm so glad I did. I have really been enjoying them for my holiday cards again this year.  I am still working on using up the Comfort & Joy patterned paper package, which also had stickers and elements - so I added the plaid label sticker to the top of my stitched buffalo plaid panel. I was going to stamp right on the label, but since I have these nifty Simple Strip stamp & dies from Taylored Expressions I added sentiment from the little bag of holiday sentiments I now have ready to go. More on that later.***


This bear - oh, how I adore this bear! I cut the head and front from the same white pearlized card stock as the snowflakes, and the back layer plus muzzle from plaid white card stock. I love the subtle shading this gives the bear. I managed to get this bear die set last year after the holidays, but now I don't know why it took me so long to use it. I guess I was waiting to use it for my holiday cards but I think he would make a cute black bear too which will be great for masculine cards!

Once I got this bear made though - I immediately put the card aside and made 5 more polar bears to have on hand.


Inside I stamped a greeting on a matted stitched rectangle (from YNS) and added one of the elements from the package.


One more holiday card for the stash!

***Taylored Expressions came out with this fun idea called Simple Strips. It is a sheet of red rubber sentiments for specific theme. I have the Birthday and the Christmas stamps. You stamp that single large stamp onto your choice of card stock using your choice of ink colours - or embossing ink if you are stamping on black card stock to emboss with white etc) and you have a whole sheet of different stamped sentiments with one shot! But to save you from having to trim each of those apart and keep the edges straight there is also a coordinating die. After you stamp (and emboss if desired) your sentiments, you line up the die and run it through your machine ... and you are left with a whole pile of perfectly stamped, perfectly cut sentiment strips! Now there is a little bit of a learning curve, which surprised me and with my machine I did have to use a shim to get the strips to cut cleanly but I am loving having a whole pile of sentiments ready to add to cards. When I run out it's easy peasy to stamp and die cut another bunch.

Supplies:
Patterned paper, stickers and elements - Comfort & Joy, My Minds Eye
Polar bear die - Marianne Designs
White shimmer card stock
Pink, black and white card stocks
Sketch - OWH #33
Holiday cheer - Mini Strips Christmas, stamp and die - Taylored Expressions
Sakura white gel pen
Stitched snowflake dies - Lawn Fawn
Nuvo Drops
Stitched Rectangle die - Your Next Stamp
Words inside - More Merry Messages, Stampin' Up

Card size - standard A2 (4.25 x 5.5")

Thanks for stopping by today

Friday 22 November 2019

Decorated Gift Pivot Panel Birthday Card

Hello my crafty friends 

It's Fun Fold Friday here on my blog, and today I'm sharing another card made with Karen Burniston's new Gift Pivot Panel. I chose to decorate it with pre-made elements instead of the included gift & bow dies as the shape can be fairly generic if you wish!


Here is a short YouTube video so you can see this card in action ...


I used the included gift & bow dies to put on the chair element, and added the tiny tag with a penned 'for you'.


The bow and ribbons were cut from pink foil card stock and I added a die cut sequin from the Rockin' Rectangle die for some sparkle and shine.


The Border Blends Party worked perfectly at the top and bottom edges of the card, and the Happy Birthday is from Word Set 2 Birthday. I liked adding all the pink foiled accents, like the Happy Birthday, the bow & Ribbons and the die cut sequins.


I did snip off the centre points from the Gift Pivot Panel to show more of the leafy elements in the centre.


Whenever I give someone one of these Pivot Panel cards, they turn it over to view it from the top. So here is the top view for you!


Supplies:

Blue and white card stocks
Patterned paper - Crafts (Dollar Store)
1115 Gift Pivot Panels - Karen Burniston
Embellishments - Pebbles
1091 Border Blends Party - Karen Burniston
Sakura Black Glaze Pen
Nuvo Drops
Green patterned paper for borders (scraps)
1056 Squares Crosshatch - Karen Burniston
Pink mirror card stock - Tonic Studios
Twine - Stampin' Up
1089 Rockin Rectangle (sequins and rectangles) - Karen Burniston
1003 Word Set 2 Birthday - Karen Burniston
Wink of Stella

Card size - 6 x 5", fits in a 5 x 7" envelope


Thanks for stopping by today