
Hello my crafty friends

I think this card is lots of fun inside, with the snake tongue sliding in and out of his mouth and the 'love you' heart appearing when the card is fully open. That heart comes from the new Love Charms. It's like playing with a puppet, ha ha.

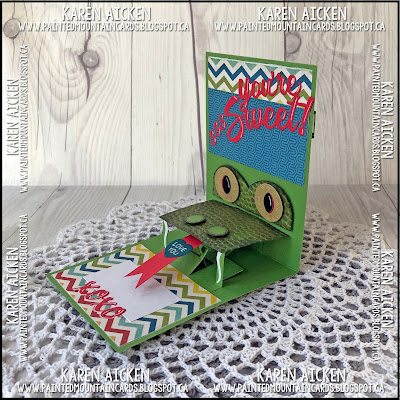
I added some extra S's for a snake's hiss on the ssssSweet part of the sentiment.

OK - for those that are interested, this is how I made the snake face. I would strongly recommend making a sample card with old card stock first, so you can see how everything goes together. Especially if you are new to the Parcel Pop Up!
First, I took the second largest square from the crosshatch rectangles and die cut it from the green pearl card stock. Then I ran it through with the Bubbles embossing folder, and cut it with a trimmer so I had a piece that was 2-1/4". That is the piece on the left, which will become the snout. The narrower piece will be what we use for the eyes in the next step.


Next, add a dot in between the eyes and connect that dot with the eye tracings using your pen or pencil.

Now, use scissors to trim the top portion away and discard ... and ... tada! You have your eye piece!


After your Parcel Pop Up mechanism is finished and adhered inside your card, lay this bottom rectangle piece on top of the mechanism. Don't adhere it yet. I centred it above the two supports (which will become the fangs for our snake) and made a small dot on the back side so it wouldn't overhang on the sides. Alternatively, you could just make a dot about 3/16" in from each bottom edge (top edge in the photo). I used scissors to trim from the bottom corner up to my dot, slicing off a long narrow triangle from each side. I just noticed in the photo below that the snout piece is upside down - you want the wider part up under the eyes as you can see in the finished card photos.

There - this next photo shows that snout piece in the right direction - wider below the bottom of the eyes and the narrower end towards the open mouth of the snake.

For the snake forked tongue, I die cut the fish tail banner from the Triple Flip die set using red card stock. I trimmed it to 3" long and discarded the small fishtail end. Then I eyeballed how deep I wanted the forked tongue to be and added a dot on the back side.

Use scissors to trim from each corner up to the dot and discard the fallaway piece.

The eyes were easy, - I cut the eyeballs with the smallest Crosshatch Circle because I liked the detail it gives around the edge. The pupils? They are the Footballs from Tiny Accessories 3!
I cut the fangs from white card stock (the horns from the Cow & Coat) and adhered them onto the two supports. Once they were trimmed flush with the platform I was able to adhere the snout to the top of the platform and then used foam tape to adhere the eye piece just above it.
Oh, and the nostrils were cut with the small stitched circle which would be the centre of the sun from the Tropical Scene. For the snake tail on the card front, I used the sand/hill from the same die set.
This card is quite bulky, because I couldn't resist adding so much foam tape. But it will still fit in an envelope for hand delivery or would require extra postage for mailing. While I made a snake, it could be a dragon or frog or other type of critter too ... you are only limited by your imagination! You can also use all different dies in your collection. I chose to only use dies by Karen Burniston, since this is a Sneak Peek of her new release. But in future cards I will be adding other dies/shapes to the Parcel Pop Up.
Supplies:
Green pearl card stock
1056 Squares Crosshatch - Karen Burniston
Tiny Bubbles Embossing Folder - Cuttlebug
1057 Circles Crosshatch - Karen Burniston
Gold pearl card stock
Black, green, white, kraft and red card stocks
1095 Tiny Accessories 3 (football) - Karen Burniston
1104 Triple Flip (fishtail banner) - Karen Burniston
1116 Parcel Pop Up - Karen Burniston SHIPPING MID NOVEMBER 2019
Black Archival Ink
1038 Tropical Scene - Karen Burniston
1076 You're Sweet - Karen Burniston
1114 Happy Valentine's Day - Karen Burniston SHIPPING MID NOVEMBER 2019
1093 Cow and Goat (horns) - Karen Burniston
Patterned paper - All About A Boy, Echo Park 6 x 6" pad
1083 Word Set 9 Love (S's) - Karen Burniston
1113 Love Charms - Karen Burniston SHIPPING MID NOVEMBER 2019
Sakura white gel pen
Card size - Standard Tall A2 (4.25 x 5.5")
I have a long post for you today, sharing just one of my ideas for Karen Burniston's new Parcel Pop Up. Honestly, I have so many ideas for this die set I never know which one to start with! I started out thinking the card interior would be a dragon spitting fire, but as you can see I went in a different direction.
I have a quick YouTube video for you to see the card in action, and below the still shots I have a tutorial on how I created some of the pieces for this sssssnake card. First though, the card front. I used the new Happy Valentine's Day and added a 'snake tail' using a border die from the Tropical Scene set.
I have a quick YouTube video for you to see the card in action, and below the still shots I have a tutorial on how I created some of the pieces for this sssssnake card. First though, the card front. I used the new Happy Valentine's Day and added a 'snake tail' using a border die from the Tropical Scene set.

I think this card is lots of fun inside, with the snake tongue sliding in and out of his mouth and the 'love you' heart appearing when the card is fully open. That heart comes from the new Love Charms. It's like playing with a puppet, ha ha.


I added some extra S's for a snake's hiss on the ssssSweet part of the sentiment.

OK - for those that are interested, this is how I made the snake face. I would strongly recommend making a sample card with old card stock first, so you can see how everything goes together. Especially if you are new to the Parcel Pop Up!
First, I took the second largest square from the crosshatch rectangles and die cut it from the green pearl card stock. Then I ran it through with the Bubbles embossing folder, and cut it with a trimmer so I had a piece that was 2-1/4". That is the piece on the left, which will become the snout. The narrower piece will be what we use for the eyes in the next step.

I took the second smallest circle from the Crosshatch Circles and traced the top half onto the narrower green rectangle as shown.

Next, add a dot in between the eyes and connect that dot with the eye tracings using your pen or pencil.

Now, use scissors to trim the top portion away and discard ... and ... tada! You have your eye piece!


After your Parcel Pop Up mechanism is finished and adhered inside your card, lay this bottom rectangle piece on top of the mechanism. Don't adhere it yet. I centred it above the two supports (which will become the fangs for our snake) and made a small dot on the back side so it wouldn't overhang on the sides. Alternatively, you could just make a dot about 3/16" in from each bottom edge (top edge in the photo). I used scissors to trim from the bottom corner up to my dot, slicing off a long narrow triangle from each side. I just noticed in the photo below that the snout piece is upside down - you want the wider part up under the eyes as you can see in the finished card photos.

There - this next photo shows that snout piece in the right direction - wider below the bottom of the eyes and the narrower end towards the open mouth of the snake.

For the snake forked tongue, I die cut the fish tail banner from the Triple Flip die set using red card stock. I trimmed it to 3" long and discarded the small fishtail end. Then I eyeballed how deep I wanted the forked tongue to be and added a dot on the back side.

Use scissors to trim from each corner up to the dot and discard the fallaway piece.

The eyes were easy, - I cut the eyeballs with the smallest Crosshatch Circle because I liked the detail it gives around the edge. The pupils? They are the Footballs from Tiny Accessories 3!
I cut the fangs from white card stock (the horns from the Cow & Coat) and adhered them onto the two supports. Once they were trimmed flush with the platform I was able to adhere the snout to the top of the platform and then used foam tape to adhere the eye piece just above it.
Oh, and the nostrils were cut with the small stitched circle which would be the centre of the sun from the Tropical Scene. For the snake tail on the card front, I used the sand/hill from the same die set.
This card is quite bulky, because I couldn't resist adding so much foam tape. But it will still fit in an envelope for hand delivery or would require extra postage for mailing. While I made a snake, it could be a dragon or frog or other type of critter too ... you are only limited by your imagination! You can also use all different dies in your collection. I chose to only use dies by Karen Burniston, since this is a Sneak Peek of her new release. But in future cards I will be adding other dies/shapes to the Parcel Pop Up.
Supplies:
Green pearl card stock
1056 Squares Crosshatch - Karen Burniston
Tiny Bubbles Embossing Folder - Cuttlebug
1057 Circles Crosshatch - Karen Burniston
Gold pearl card stock
Black, green, white, kraft and red card stocks
1095 Tiny Accessories 3 (football) - Karen Burniston
1104 Triple Flip (fishtail banner) - Karen Burniston
1116 Parcel Pop Up - Karen Burniston SHIPPING MID NOVEMBER 2019
Black Archival Ink
1038 Tropical Scene - Karen Burniston
1076 You're Sweet - Karen Burniston
1114 Happy Valentine's Day - Karen Burniston SHIPPING MID NOVEMBER 2019
1093 Cow and Goat (horns) - Karen Burniston
Patterned paper - All About A Boy, Echo Park 6 x 6" pad
1083 Word Set 9 Love (S's) - Karen Burniston
1113 Love Charms - Karen Burniston SHIPPING MID NOVEMBER 2019
Sakura white gel pen
Card size - Standard Tall A2 (4.25 x 5.5")
Thanks for stopping by today!
Totally LOVE this fun interactive card you created using Karen's new Parcel Pop Up die. I especially like that you flipped the mechanism ... since the movement for this card seems to be activated by the bottom panel of the card, flipping it makes total sense and really makes the moving action bigger and more apparent! Pure genius, Karen!
ReplyDeleteThanks so much for sharing you creative talents with us. I love the sssSnake card!
ReplyDeletethis is so amazing!!!!!
ReplyDeleteSsspectacular!!! You are having way too much with the new release. Footballs for the eyes, so clever! Thanks for your step by step directions.
ReplyDelete