Thursday 29 February 2024

Mini Slimline Thank You Card


This is the 13th card I'm sharing made with Paper Roses' cardmaking kit 'BEE HAPPY'. I think it was actually the first one I made, but I rarely share things in the same order I make them.  I just loved this print and didn't want to cover any of it up. I simply added two pieces of ephemera to the card front - both came in the kit. Then a bit of Stickles glitter glue for sparkle & shine.


Supplies used:
BEE HAPPY cardmaking kit - Paper Rose
Stickles glitter glue
Embossed edge Mini Slimline dies - Kat Scrappiness

Wednesday 28 February 2024

Christmas Card Duo in Blues


I want to work on my holiday cards throughout the year, hopefully making a couple each month. Here are the two cards I made in February - a Slimline and a 5x7" & card. I'm loving the winter scene patterned paper (Hunkydory) and managed to get both cards out of a single 8x8" sheet!

I haven't used vellum in awhile, so that is how I added the stamped sentiment. I like that you can still see the scene through the vellum. Of course I added the Winter Owl die cut, which I LOVE ... and it was cut from white pearl cardstock then lightly inked on the feathers with brown ink. I added a scrap of white cardstock behind the body to keep all those fallaway bits in the die cut, but did let the ones on the wings fall away.


Some silver snowflake stickers & Glitter Dots added the holiday sparkle I like and my card fronts were done.


Here is a peek at the inside of the cards:


Supplies used:
Patterned paper - Frosted Forests & Falling Flakes, Hunkydory (now retired)
Vellum
Words - Christmas Classics - Stampin' Up
Catherine Pooler coloured inks
Silver Snowflake Peel Offs - Stamp On It
Glitter Dots - Ecstasy Crafts
Winter Owls Bundle - Stampin' Up
White Pearl cardstock
Inside sentiment - Wonderful Christmas - Waffle Flower

Tuesday 27 February 2024

Six Birthday Cards made with Journal Cards


Several years ago I found some crazy good deals on packages of Project Life kits - journal cards for pocket scrapbooking. They come with both 2x3" cards and 4x6" ones - and I bought the kits to use for cardmaking. Mostly for my nursing home donation cards. The trouble is, I keep forgetting to use them!

When I pulled this package out I realized I could actually finish this one off & these are the cards I came up with. The journal cards were mounted to 4x6" folded card bases and then I added various embellishments. Some have stamped greetings popped up with foam tape since the cards are hand delivered and I don't have to worry about bulk. I also added die cut & punched stars on two of the cards.


The balloon ones were actually journal cards with a background I didn't like. So I fussy cut the balloons out and popped them up on two journal cards with lots of white space in the center.


Supplies used:
4 x 6" journal cards, 'This & That' - Project Life
Happy Birthday - Succulent Sentiments, Ellen Hutson
Yellow Bakers Twine
Stickles glitter glue
Little Something Sentiments - Catherine Pooler
Everybody Say Happy Sentiments - Catherine Pooler
Stitched star dies - the Stamps of Life
Stacking star dies - Honey Bee
Star Punch - old, from my stash

Monday 26 February 2024

Eight Birthday Cards Using Leftovers


After creating TWO sets of Cards using the November 2021 Sheetload of Cards (shared HERE and HERE) I decided to just go for it and finish off the 6x6" paper pad. I ended up with another 8 Birthday Cards I can donate to my Mom's old nursing home, used up a paper pad (YAY) and used up a bunch of older embellishments too. Win Win WIN!

There were lots of narrow strips left in the package so I was able to use those up as well with this layout. The embellishments had been in my stash for years, the Peel-Off sticker ones were adhered to double sided adhesive and sprinkled with Silk Microfine Glitter then coloured with Tombow markers & fussy cut. This was a technique we did a lot at Elizabeth Craft Designs!


This last card used up the final paper strips/scraps. 😊


Supplies used:
Patterned paper - 6x6" Reunion, My Minds Eye (old, from my stash)
Double Stitched Circles - Divinity Designs
Everybody Say Happy Sentiments - Catherine Pooler
Catherine Pooler inks
STASHBUSTER!! went through my embellishment binder pockets for the candles (the Stamps of Life??) and Peel off Balloon Stickers & glitter (Elizabeth Craft Designs)
Happy Birthday Many Ways - Catherine Pooler
Birthday Wishing - Colorado Craft Co
Pops of Color - Scrapbook.com
Girl w/ balloons - unknown
Large Bronze Butterfly - unknown (old, from my stash)
Shimmer Spray

Sunday 25 February 2024

Cute Little Gift Boxes!


I loved the Candy Hearts Box die set by Karen Burniston when it was released back in December, but didn't get it until recently. Definitely not in time to use it for Valentine's Day but I LOVE boxes and Gift Card Holders so I had to play with it right away. The die comes with basic shape dies so you can create a window in the front of your box and back it with acetate, and some cute candy heart dies as well. I have a walkthrough of my first play with the die set on YouTube!   


I LOVE how versatile this die set is going to be - and when I cut it out of double sided paper I was even happier with it. The floral boxes will be for Mother's Day and I'm looking forward to decorating them. For the blue marbled box I added a stitched rectangle with notches cut in the top with scissors to hold a bracelet.


I made this as a gift for a friend, and will be adding her name to the fishtail banner.


Supplies used:
Patterned paper - Guilded ink - Recollections
Stitched Rectangle #2 dies - Pink & Main
Ephemera - Woodland Stories, Little Birdie

Friday 23 February 2024

'Hello' Shutter Card


Welcome to Fun Fold Friday here on my blog!

Today I'm sharing my 12th card made using Paper Roses BEE HAPPY Cardmaking Kit. I made a Shutter Card using dies from Lawn Fawn and also added a couple of gold foiled bee stickers.


You slide off the belly band then open the side flaps to reveal the sunflower ephemera inside the shutter. I haven't made a Shutter Card since December, so it was fun to pull the dies out again.


I'm getting pretty close to finishing off that kit - and I sure have enjoyed it.

Supplies used:
Shutter Card die set - Lawn Fawn
Shutter Card Add On - Lawn Fawn
Gold foil bee sticker - Amazon .ca
Catherine Pooler Coloured Inks
White circle - leftover from an old card kit
Fluttering By sentiments - Waffle Flower
Tasteful Labels - Stampin' Up
Glitter Dots - Ecstasy Crafts

Thursday 22 February 2024

Three Rainbow Dog Birthday Cards


I couldn't help myself. I saw these rainbow dog note cards on Amazon when we were visiting Arizona and they practically leapt into my shopping cart! 😂  I thought the price point was decent for 20 cards & envelopes as well as the coordinating envelope seals. I have a YouTube video on my thought process, more ideas and how I made these 5 x 7" cards, which were my first play with the note cards.


As I said in the video, the cards are listed as 4 x 6" cards that come packaged in a box. Instead they are more like 3.75 x 5.75" and arrived in a cello bag - NOT a box. The cards are heavily plasticized on the front and they are nice and sturdy so none were damaged in shipment, thank goodness.

This card is for our (almost) daughter-in-law - it reminds me of their smiling Phoebe dog and I think she will get a kick out of it.


Here is a peek at the inside of the cards, which were all done the same.


Supplies used:
Rainbow note cards, Mr. Lucky Artwork - Amazon .com
Patterned paper - Guilded Ink, Recollections
Rainbow Holographic cardstock - Recollections
Anything But Basic Birthday Wishes - MFT Stamps
Catherine Pooler coloured inks
Glitter Dots - Ecstasy Crafts
Inside stamps - Big Happy Sentiments, Catherine Pooler

Wednesday 21 February 2024

Sympathy Card Trio


I pulled out this box of note cards and wanted to see what I could do with them. I HAD to have them when I saw them a few years ago, but I tend to forget that I have them. I have a matching sticker sheet so I got that out as well and decided to make three sympathy cards for my stash.

The first note card was cut in half along the score line, then the front was trimmed slightly smaller before adding it to a folded white A2 sized card base. After using a blending brush to add some colour to the centre I stamped the words with a dark grey ink. Then I added two small die cut butterflies which brings out the copper foiling on the floral image. I also added some glitter dots that were originally gold, but I coloured them with a brown alcohol marker so they look more coppery.


Inside I trimmed down the back note card panel then adhered it inside the card.  The sentiment was stamped on an inked scalloped circle and I added another copper butterfly with thin foam tape.


The second note card was cut in half along the score line and then the front was cut slightly smaller (4 x 5.25"). It was then attached to one of the other printed note cards in the package - the black with polka dots. I stamped the With Sympathy with grey ink on a scrap of white card stock then fussy cut it out and popped it up in the centre of the wreath with foam tape.

Adding one of the coordinating stickers to the lower left of the wreath and then a copper butterfly to the top right and some coloured Glitter Dots finished off the front.


Below is the inside of the second card. You can see I cut down the back of the notecard and added a stamped sentiment as I did on the card above. 


This third card was done the same as the above card only using a green ink for the With Sympathy.


The note card package also has a couple of black and white printed ones that I haven't used very much. So I cut one down for the inside of this final card to use as a mat behind the stamped panel.


Supplies used:
Foiled note cards - the Paper Studio
3D Stickers - the Paper Studio
Inside Out Sympathy - Catherine Pooler
Catherine Pooler coloured inks
Scallop Circle die - Divinity Designs
Glitter Dots
Alcohol markers
Copper metallic cardstock
Little Etched Butterflies - Paper Rose

Tuesday 20 February 2024

Beehive Half Shutter Card


Last year I bought the Beehive Magic Iris Add-On dies (Lawn Fawn) because I knew I could use it for more than just a Magic Iris Card. Today created a Half Shutter Card and used the beehive as the focal point. I am so happy with how it turned out!


The bee patterned paper is too cute and I pulled out these bee dies from Marianne Designs to embellish the card.


I love that the Half Shutter Card die set (Divinity Designs) comes with the layering dies - it makes it so quick and easy to complete the card base and all that's left is my choice for decorating! I added a hexagon where I can write a personal greeting and the tiny daisy's are in Karen Burniston's Twist Flower Pop Up die set. 


Supplies used:
Patterned paper - Busy as a Bee, Echo Park
Bee dies - Elines Bees, Marianne Designs
White pearl cardstock
Magic Iris Beehive Add On - Lawn Fawn
Nested Hexagon dies - Pinkfresh Studios
Stitched circle - leftover from previous Magic Iris cards
Front sentiment - Thinking of You, Penny Black
Glitter Dots - Ecstasy Crafts
Daisy's - Twist Flower Pop Up, Karen Burniston
Alcohol markers
Stickles glitter glue

Monday 19 February 2024

Six Sheetload Birthday Cards

Last week I shared six cards made with an older patterned paper pad and the November 2021 Sheetload of Cards. When I was finished those cards, I looked at the papers and just started cutting a second set of cards!  You can see the first set of cards HERE.

Once again, after adhering all the patterned paper panels to my card bases, I went hunting through my embellishment binder to see what I had that would work for decorating. All of these had been made several years ago so it felt good to get them out and onto cards. I always loved 'Poppy the Owl', which is a retired die from when Karen Burniston was with Elizabeth Craft Designs.


These butterflies were made with Peel Off Stickers and Elizabeth Craft Designs Silk Microfine Glitter. It was a technique we used a lot back when I was on Karen B's Design Team with ECD. Once buffed onto the adhesive, you could use water based markers to colour the glitter. 


Below is a peek at the inside - all of the cards were done the same.


By this time it looks like I could actually use up the paper pad, so I made one more set of cards - not using a Sheetload this time - and will share those next week.


Supplies used:
Patterned paper - 6x6" Reunion, My Minds Eye (old, from my stash)
Poppy the Owl - Karen Burniston (retired)
Bird/branch - punch from Stampin' Up
Large branch - probably cut with my old Cricut
Butterflies & glitter, Peel off stickers Elizabeth Craft Designs
Leaves - Elizabeth Craft Designs (retired)
Embosslit flower - Sizzix (old)
Cool Tag Banner Sentiments - Your Next Stamp
Everybody Say Happy Sentiments - Catherine Pooler
Mini Misti
Catherine Pooler coloured inks

Sunday 18 February 2024

February 2004 Sheetload of Cards

Today I'm sharing my cards made with this month's Sheetload of Cards. This one is similar to a Sheetload from last year, except this one is for an A2 sized card where the previous one was for a 5 x 7". I really enjoyed doing both of them!

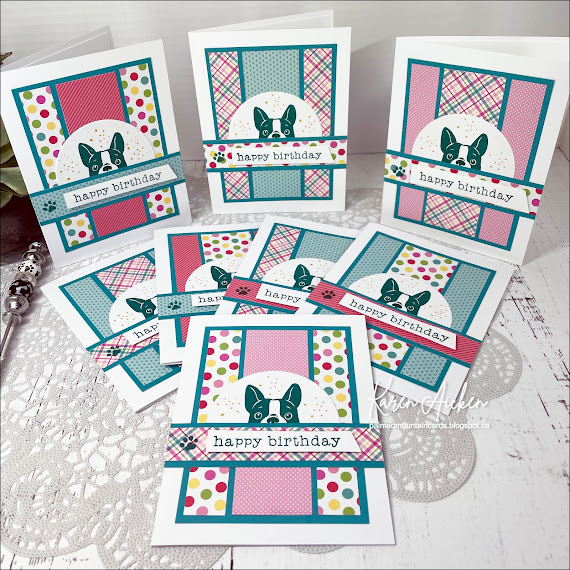
As usual, I made mine into birthday cards that I can donate to my Mom's old nursing home. I kept right to the sketch this time around, and thought that this peeking dog stamp (Catherine Pooler) would work perfectly on the semi circle. I went over the dog noses with Nuvo Glaze so they are raised and shiny. 😊

Here is a peek at the inside - and I did all of them the same.


Supplies used:
Patterned paper - 6x6" Cream & Sugar, Doodlebug
Peeking Pets - Catherine Pooler
Catherine Pooler coloured inks
Circle dies - Hero Arts
Happy Birthday - Happy Birthday Many Ways, Catherine Pooler
Inside stamp - Everybody Say Happy. Sentiments, Catherine Pooler
Dot stamp - Stamps by Judith
Nuvo Glaze
MISTI

Friday 16 February 2024

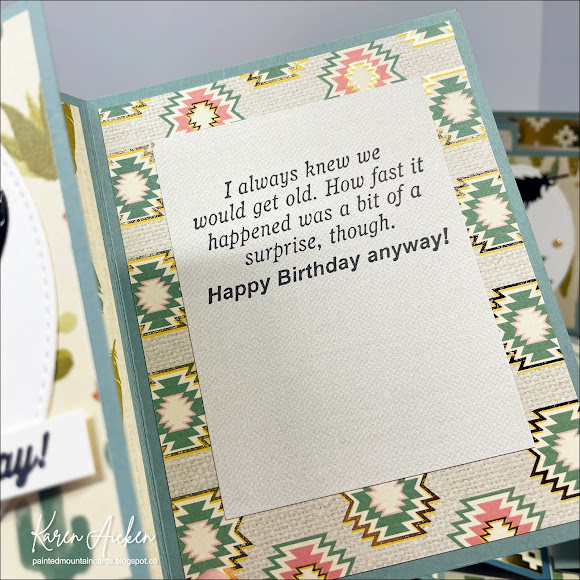
Eight Desert Themed Birthday Cards


Welcome to Fun Fold Friday here on my blog!

It's no secret that I love making Z Fold Cards, and since I am going to need several masculine birthday cards in the next little while I pulled out the October 2019 Sheetload of Cards.

I have a walkthrough of my cards on YouTube:


I've had this paper pad for a number of years and I like that some of the sheets have gold foiling on them. It was fun to pick the four different patterns to use with the Sheetload cutting guide as well as what die cut elements I would be adding to the fronts. These were cut from black glossy cardstock for a little more pizzazz.


Inside the cards I chose a couple of Funny Bones sentiments and alternated which ones went with which cards.


There are two of each silhouette design so I have enough variety to choose what card goes to which friend/family member.


I thought this sentiment went perfectly with the horseback riders above.


I love this 'bucking bronco' die so it was fun to get it out again.


Below is one more of the funny sentiments.


Supplies used:
Patterned paper - Desert Dream, Recollection (old)
Stitched oval dies - MFT Stamps
Black glossy cardstock
Feather dies - Elizabeth Craft Designs (old)
Bucking horse - Paper Rose
Cactus & Pot - Paper Rose
Cowboys & Cactus Silhouettes - Divinity Designs
Small Happy Birthday - Birthday Banners, Stampin' UP
Larger Happy Birthday - Happy Birthday Many Ways, Catherine Pooler
Inside sentiments - Funny Bones, Riley & Company
Gold Nuvo Drops

Thursday 15 February 2024

Daisy Z Fold Card


Today I'm sharing the 11th card made with Paper Roses' Bee Happy cardmaking kit - and this one went to a friend who recently had surgery. I actually used a printed note card for the base, turning it inside out so the print was on the inside. The center score line was already there, so I added a 2nd one at 2-1/8" on the left (patterned) side to give me the Z-Fold base.

For additional contrast inside, I used a yellow ombre note card that I've had for several years. Both note card sets I've had for at least that long, and I'm trying to remember to USE them. I trimmed the ombre note card front slightly smaller so I would have the yellow border all around the outer edge and adhered it inside the card. 

The stitched oval was cut from the back of the note card and added to the front with some of the ephemera in the kit. The wax seal piece was given a coat of Nuvo Glaze to make it look more like a real was seal and I added a stamped sentiment to finish off the front.


Inside I added a stamped sentiment along with a gold foil bee sticker, then added another sticker to the Kraft envelope.


Supplies used:
Patterned note card & Ombre note card - Hobby Lobby (old)
Lacy Oval dies - Waffle Flower
Nuvo Glaze
Catherine Pooler coloured inks
Bakers Twine
Front sentiment - More Essential Sentiments, MFT Stamps
Inside sentiment - Wishing You Well,  Scrapbook .com
Foiled bee sticker - Amazon .ca

Wednesday 14 February 2024

Valentine's Z-Fold Card


Happy Valentine's Day!

Today's card uses a bunch of bits and pieces and scraps from the Love Notes paper package & I created a Z-Fold card with a couple of older stamp sets from my stash.


I love this scalloped heart die from Studio Katia. When I laid it out with the different print papers, I decided I liked the coordinating grey print. But looking at it in the photos, I wish I'd chosen something with a bit more contrast. Ahh well.


I combined the stamp sets on the clipboard ephemera and added glitter to the bees' wings. The envelope got some pretty red & gold washi tape on the flap.


Supplies used:
Patterned paper - Love Notes, Doodlebug
and Love Notes Tiny Prints, Doodlebug
Scallop heart die - Studio Katia
Odds & Ends - Love Notes, Doodlebug
Black glaze pen
Nesting heart dies - Hero Arts
Sending Love stamp set - Waffle Flower
Bee Mine stamps - Lawn Fawn
Pops of Color - Snowflake, Scrapbook.com
Alcohol markers
White paint pen