Showing posts with label Neat and Tangled. Show all posts

Friday, 28 March 2025

Panda Birthday Card


While I had the panda face die out for our grandson's birthday, I thought it would also make a cute birthday card for our nieces little fella who is turning one. I die cut the panda from a white cardstock square (it cuts the openings rather than the outline) and backed the openings with black cardstock.

I tried something different this time and was very happy with how it worked out! I nestled the die back into the openings and LIGHTLY brushed grey ink over the die and onto the paper. The die acted as a mask and when I lifted it off you could more easily see the round face of the panda.

I have had the patterned paper (which is double sided) for a year or two so I wanted to use it. The card base is 5 x 6.5", I cut the patterned paper to fit then matted it with black. One of the party hats was fussy cut and popped up with foam tape on the panda's head. A little Pops of Color on the panda's nose for some sparkle, a bakers twine bow and the card front was finished.


Here is a peek at the inside ... the red & white star paper is the print that is on the reverse of the party hat print. I used the leftover patterned paper for a couple more birthday cards using the March '25 Sheetload and will share those another day.


Supplies used:
Patterned paper - Birthday Wishes, Echo Park
Panda face die - Neat & Tangled
5 x 6.5" Card Base and Envelope - Michaels
Blending Brush
Pops of Color - Snowflake, Scrapbook .com
Bakers Twine
Stickles glitter glue
Inside - Lots of Birthday2Stamp, the Stamps of Life
Stitched circle dies - MFT Stamps

Saturday, 22 March 2025

Panda and Cake Pop Up Birthday Card


I was supposed to post this yesterday for Fun Fold Friday on my blog, but I have no idea where the time goes! This is the birthday card I made for our grandson who loves Pandas. I haven't used this panda face die in a long time so I pulled it out and die cut it into white card stock. The die cuts the face/ear openings rather than the head so I backed the white panel with black glitter paper to show through the openings. 


There is often an indent left from the die that actually forms the head so I LIGHTLY went over that with a soft pencil and blending it out with a fingertip. It gives just a hint of the head shape but I like the effect. There was a strip of the rainbow paper sitting on my stamping desk so I matted it with black glossy cardstock (another scrap) and added a white heat embossed sentiment. 


I have shown these sentiments in video's before - they are the Simple Strips from Taylored Expressions and I just stamp, emboss and die cut a whole bunch of them at a time and store them into a clear plastic envelope. Saves so much time when I go to make a card!

Inside I used Karen Burniston's Twist Circle Pop Up since this grandson loves a pop up card. I decorated it with some older stickers from my stash and added a stamped sentiment onto the white panel. That is also where we signed the card.


Supplies used:
Panda face die - Neat & Tangled
Black glitter paper - American Crafts (old, from my stash)
Black glossy card stock scrap
Rainbow strip - leftover scrap of striped patterned paper
Simple Strips Birthday and coordinating die - Taylored Expressions
White embossing powder
Pops of Color - Snowflake and black, Scrapbook .com
Twist Flower Pop Up - Karen Burniston
Stickers - old, stash
Cross Stitched circle dies - Tutti designs
Best Birthday Yet - Catherine Pooler


Sunday, 10 November 2024

Thanksgiving Mini Slimline Card


I made so many Fall & Thanksgiving cards last year that I didn't need to make any this year. Then, I ran out of time and didn't get any mailed for our Canadian Thanksgiving in October, so now I have lots for next year too. Sheesh. At least I can mail cards to our American friends & family this month. I found this single 12x12" sheet of fall themed paper in my stash and decided to use it up. I made 4 different sized cards and have been sharing them throughout the week. 

I've made a 5x7" fun fold, a standard A2, a Slimline and today's card is a Mini Slimline that used up the last of the paper! I added a circle sticker to matted circles, then went around the outer edge with a gold gel pen. The little mushroom was also a sticker, and it was added to white card stock then fussy cut so I could pop it up with a foam tape.


Inside I wrapped the white panel with both washi tape and narrow gold foil tape, then stamped the sentiment. In the top photo, you can see a sticker on the envelope flap. I kept half of it on the folded liner, so when I go to send the card I can peel away the rest of the liner and the sticker will adhere to the envelope.


Supplies used:
Patterned paper - Fall Harvest, Echo Park
Narrow gold tape - Amazon .ca
Shimmer Spray
Wash Tape - old, my stash
Crosshatch Circles - Karen Burniston
Stickers - Amazon .ca, from a few years ago
Gold gel pen

Tuesday, 5 November 2024

Floral Pumpkin Card


I made so many Fall & Thanksgiving cards last year that I didn't need to make any this year. Then, I ran out of time and didn't get any mailed for our Canadian Thanksgiving in October, so now I have lots for next year too. Sheesh. At least I can mail cards to our American friends & family this month. I found this single 12x12" sheet of fall themed paper in my stash and decided to use it up. I made 4 different sized cards and will be sharing them throughout the week. 

Yesterday I shared a 5x7" Z-fold card and today's card is a standard A2 size. I went through my fall embellishments and found several of these floral sprays so added one to the top of my layered pumpkin. These were clip art from many years ago, printed and cut out with my Scan 'N Cut - then promptly stored away. 🤷‍♀️


I cut the pumpkin frame and the base, sandwiching a clear transparency in between the layers. I love the shine this gives! A sentiment was stamped inside and I added a strip of the patterned paper for some colour. The paper was double sided with the fall print on one side and this gingham on the other.


Supplies used:
Patterned paper - Fall Harvest, Echo Park
Narrow gold tape - Amazon .ca
Stitched Pumpkin Frame - Lawn Fawn
Outside In Stitched Pumpkin - Lawn Fawn
Clipart - old, from my stash
Mini Strips Harvest stamp & die - Taylored Expressions
Let our Lives stamp - Be Full, Neat & Tangled


Monday, 11 September 2023

Happy Fall Sunflower Card


I bought this sunflower background die last year, since it fits perfectly on the front of a 5 x 7" card.  I'm really glad I didn't just add it to my Wish List though, as it is already next to impossible to find. I sure wish companies didn't retire things so quickly although I know it's all about marketing. 

This one was cut from some subtle patterned paper and added right to the white card base. I added Nuvo Glaze into the centre of the blooms then sprinkled them with chunky glitter. I love the sparkle!


The Happy Fall was cut from gold mirror cardstock and the shadow from a rust scrap. Inside, I added some washi tape, a gold foiled bee sticker and a sentiment that I have been using for many Thanksgivings. After making this card I realized how long it's been since I had purchased any new Thanksgiving stamps and that was the catalyst for the orders I placed recently. 😊


Here are some detail shots ...


Having been asked how many cards I make I thought it would be fun to keep track this year. Many of my posts include more than a single card or project and below is my tally. 

Card Tally for 2023
January - 53 cards
February - 56 cards
March - 55 cards
April - 32 cards
May - 43 cards
June - 34 cards
July - 56 cards
August - 106 cards
September so far - 10 cards

I decided to cancel the subscription that provided linked thumbnails to what products I used on my cards. It was costing me out of pocket each month, so I’m back to listing what I used with a few affiliate links included.

Supplies:
Sunflower Splendour die - Crafters Companion
Patterned paper - Vivid Ink Drops, Craft Consortium
Blending Brushes - Taylored Expressions
Nuvo Glaze
Chunky Glitter - stash
A7 Double Stitched Frames - Honey Bee Stamps
Happy Fall die - Pink & Main
Gold foil cardstock - Stampin' Up
Gold Peel Off border sticker - unknown
Gold bee stickers - stash
Washi Tape
Inside stamp - Be Full, Neat & Tangled
5 x 7" card blank and envelope


Wednesday, 21 September 2022

Autumn Sunflower Shaker Card


Hello my crafty friends!  I've been making a lot of shaker cards lately - this one uses an A2 Shaker Pouch from MFT Stamps that I've had in my stash for several years. They came in a package of 10, and if they are still available I will link them below. I added a cardstock frame  (Lawn Fawn die) to hide the adhesive and edges of the pouch. The nice thing about these pouches, is you don't need to fuss with any foam tape!

I added the pouch & sequins over a piece of that lovely sunflower patterned paper I've been using a ton, then to the card front. The words are by Karen Burniston and were die cut from gold mirror card stock with double sided adhesive on the back. That way I knew it would stick to the plastic of the shaker pouch. I also added some sheer stickers & a felt acorn sticker from my stash.


Here is a peek at the inside. That sentiment is another one that I have had for years but pull it out almost every Thanksgiving to use on at least one of my cards.


This blog uses affiliate links whenever possible. This means, that at no cost to you, if you make a purchase through one of my affiliate links that I may receive a small commission from your purchase. I only link products that I own, love and use for my card making and not every link below is an affiliate one! 😊

Any supplies I'm unable to link are listed at the very bottom of my post.


Additional Supplies:
Sequins - stash
Caramel cardstock 
Buff textured cardstock - my stash
White cardstock
Stickers - Hallmark and others from my stash (old)
A2 Shaker Pouch - MFT Stamps (discontinued)
Sentiment inside - Be Full, Neat & Tangled

Saturday, 16 October 2021

Slimline Thanksgiving Card


Hello!  I know that the Canadian Thanksgiving has past, but I still need some for my US friends for their November Thanksgiving and I like to have some made ahead for next year. So I pulled out some textured and flocked patterned leaf paper from my stash and this is the card I came up with.

There is lots of shine on this card, with the gold flecked ribbon, the gold gel pen highlights and the metallic Happy Thanksgiving die cut. The pumpkin and leaf die cuts were also cut from foil card stock. 


Here is a peek at the inside ...


This blog uses affiliate links whenever possible. This means, that at no cost to you, if you make a purchase through one of my affiliate links that I may receive a small commission from your purchase. I only link products that I own, love and use for my card making!

Additional Supplies:
Patterned paper - K & Co, old from my stash.
Ribbon - stash
Gold and Copper foil card stock - Recollections
Be Full (stamp inside) - Neat and Tangled (retired)
Happy Thanksgiving - 3D Drop Ins, the Stamps of Life (retired)
Card size is 4 x 9" and fits in a #10 Business Envelope for mailing

Thanks for stopping by

Saturday, 4 September 2021

Teal Pumpkin Thanksgiving Card

Hello!  I'm sharing a Thanksgiving card today using some non-traditional colours. My friend Kelly created a teal pumpkin card last month, and when I was putting this patterned paper away from a different project I realized it would make a great Thanksgiving card with a teal pumpkin! I thank Kelly for her inspiration.

The Canadian Thanksgiving is just a month away, so I guess I had better get started making and sharing more cards in that theme so they can get in the mail in time!

It doesn't show up in the photos, but the stitched pumpkin base got a blast with shimmer spray and it's SO pretty in real life. The pumpkin dies are from Lawn Fawn and everything that is available is linked below for you.


The aqua card base and envelope are larger than A2 - the card measures 5 x 6.5". I had picked up a package of these at Michaels a few years ago. The sentiment stamp inside is retired, but it's a great one and I love it. So many companies make 'Happy Thanksgiving" or other one line greetings but so few make larger verses for the insides. 


Once again I used 'That Paper' which was a gift from a friend in the USA. It has my favourite colours in it and I love using it for my cards. 

This blog uses affiliate links whenever possible. This means, that at no cost to you, if you make a purchase through one of my affiliate links that I receive a small commission from your purchase. I only link products that I own, love and use for my card making!
Additional Supplies:
Patterned paper - Eucalyptus, Hobby Lobby
Aqua 5 x 6.5" card and envelope - Michaels
Various card stock scraps
Shimmer Spray
Stamp inside - Be Full, Neat & Tangled
Gold Glitter Dots - Elizabeth Craft Designs (out of stock)

Thanks for stopping by

Saturday, 3 April 2021

Mini Slimline Bookmark Cards


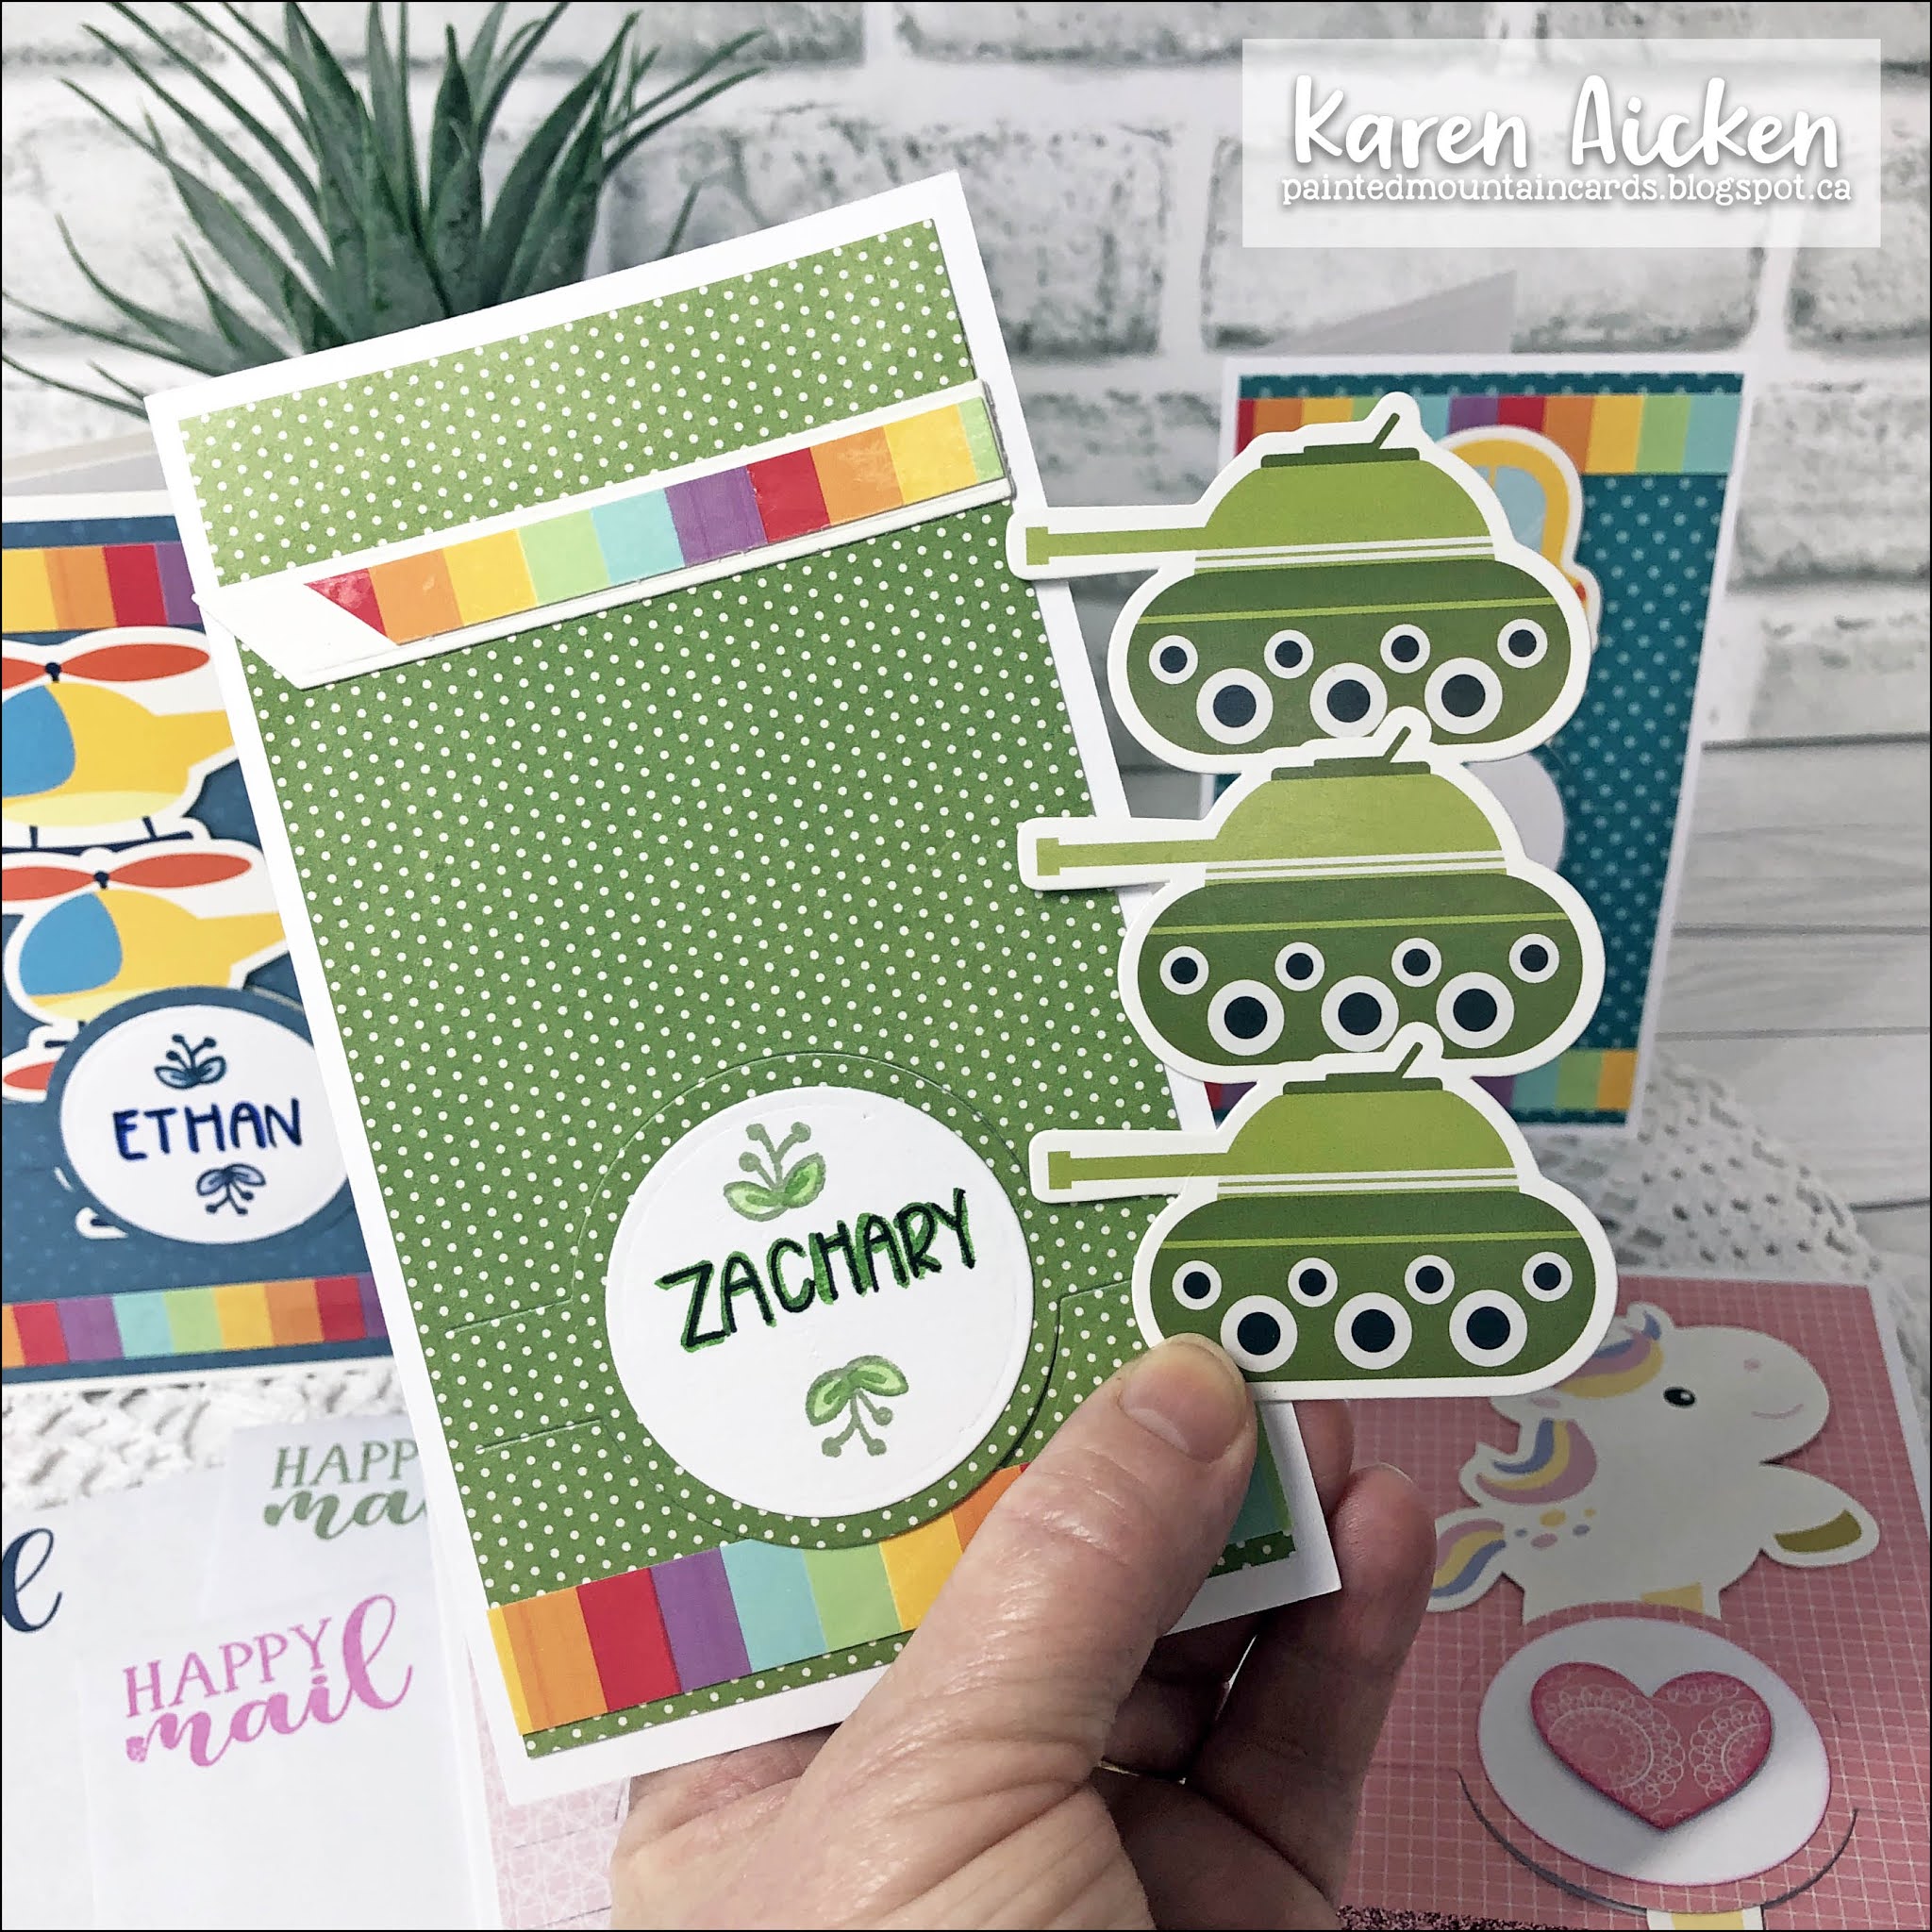
Hello! Today I'm sharing five Mini Slimline Cards that I'll be mailing out to our Grandkids for Happy Mail. These aren't just cards though, each one holds a bookmark on the front!

This Slimline die set by MFT peaked my interest. It was called a Slimline Slide In which I thought was interesting so I ordered it. I have no idea if I used it correctly on these cards, and it matters not - I'm really happy with it and you can see that it works perfectly for Mini Slimlines too! Win Win.

Below you can see how the die cuts slits on either side of the circle - perfect for tucking in these chipboard bookmarks. I picked these up a couple of years ago when visiting Arizona, probably from Amazon down there.. The package came with quite a few, and I enjoy using them on my cards as embellishments rather than bookmarks.


Not all of the bookmarks have a 'handle' like the unicorn ones above' but the slit is wide enough for these ones too!


The die set came with the circle die, which is what I wrote our Grandson's names on ... as well as the heart die that I added to each of our Granddaughters cards.


These cards are blank inside so I can write each of them a little love note.


Supplies:
Patterned paper - Garden Party, Pebbles
'Slimline Slide In' die set - MFT Stamps
Wink of Stella
Chipboard Bookmarks - stash (old, possibly from Amazon in the US)
Stickles
Teal patterned paper - Sweet Celebration, MFT Stamps
Blue patterned paper - Petite Patterns, Queen & Company
Rainbow packing tape
Flourish - Be Full, Neat & Tangled
Markers
Water brush
Card size - 3.5 x 6", fits in a #8 envelope

Thanks for stopping by today

Tuesday, 19 January 2021

Panda Tag


Hello! Today I'm sharing another tag ... this one is for our Grandson Zachary who LOVES Panda's. This tag is larger than most and I started with a piece of card stock that measured 3 x 6". I trimmed off each top corner to give me the tag shape then added a slightly smaller piece of brightly patterned paper. I made this tag back in December, but I was sharing holiday cards. Now I have those large Slimline Tag dies (both the LOVE and the CELEBRATE) from Crafty Meraki and will be using those to die cut my tag bases going forward.


I decided to personalize the tag with my label maker! NOTE:  Panda die doesn't cut out completely, instead it only cuts the ears, eyes and nose/mouth out. So if you cut it from white card stock, you can back the openings with black for a quick and easy Panda Face on your card panel. To use it like an embellishment though, you need to fussy cut it away from the card panel which I did here.


I was so happy with this tag, I stood it on my shelving unit across from where I stamp where it made me smile every time I was in my craft room working. I know Zachary is going to love it as well, when his birthday rolls around.

Supplies:
Various card stocks
Panda die - Neat & Tangled
Patterned paper - Over the Rainbow, Recollections
1023 Tag Book Pop Up (reinforcement) - Karen Burniston
Label maker - Brother
Banners Pick A Punch - Stampin' Up
Enamel Dots - Echo Park
Seam Binding
Orange cording - recycled from packaging

Thanks for stopping by today

Sunday, 1 November 2020

Sunflower Jar Slimline Card

Hello Crafty friends ...

Today I'm sharing a Slimline Thanksgiving card that uses products from several different companies. I have a walkthrough of the card on YouTube HERE:


These sunflower's are just one of four different bouquets included in the Jar of Flowers set and I love that there is a coordinating punch available too.


Inside, I used one of the new Mini Pop dies from Karen Burniston which she designed to work with Slimline cards!


I didn't get it sent out this year, so now I am one ahead for next Thanksgiving. Ha.


Supplies:

Jar of Flowers - Stampin' Up

Ohuhu alcohol markers

Jar punch - Stampin' Up

Water brush

Wink of Stella

1151 Crosshatch Long Rectangle Dies - Karen Burniston (New Release, shipping early November 2020)

Various card stocks

Vellum Doily - Stampin' Up

Taylored Expressions Blending brushes

Shimmer mist

Autumn Greetings (Hello Fall) - Simon Says Stamp

Copper trim - Stampin' Up

Sequins

Inside stamps - Be Full, Neat & Tangled

1146 Mini Pops - Karen Burniston (New Release, shipping early November 2020)

1055 Ovals Crosshatch - Karen Burniston

Stickles

Card size: 3.5 x 8.5", fits in a #10 Business Envelope

Thanks for stopping by today

Saturday, 6 June 2020

Teacher Thank You Flip-It Card


 Hello crafty friends ...

Remember you can always see my Interactive Cards in action HERE, on my YouTube Channel!


I rarely post my cards in the same order I make them, so while this is the first Teacher Thank You card I made this year, it's not the first one I posted.


I used the i-crafter Cosmic Flare stencil and my Taylored Expressions Blending Brushes for the sun rays & grass (on the front side).


Supplies:
Circle Flip-It’s, 5 x 7” - Stephanie Barnard, the Stamps of Life
Red and white card stocks
Patterned paper and stickers - Back To School, Echo Park
Scalloped Nesting Circles - Tutti Design
Cosmic Flare Stencil - i-crafter
Words - Schoolhouse, Neat & Tangled
Small Fishtail Banners - MFT Stamps
Large Fishtail banner - MFT Stamps
Black Nuvo Drops
Blending Brushes - Taylored Expressions

Card size - 5 x 7”

Thanks for stopping by today

Tuesday, 22 October 2019

Thanksgiving Shaker Leaf

Hello my crafty friends

I haven't played nearly enough with the Tonic Studios Craft Kit 12 that I bought last year, so I pulled it out again for my card today. What inspired the card, is actually the filler ... it was in with the box of Thanksgiving embellishments so I knew I wanted to make a shaker card and use the filler. Actually, I was hoping to use it up - it's many years old - but there is still enough left for another shaker another year.


The leaf dies (which I love, and is why I purchased that kit in the first place) are quite large so this is a 5 x 7" card. I only used a single layer of foam tape for the shaker, as the filler is all quite flat, unlike sequins and beads.


The patterned paper has shiny embossed bits on it, and the leaf was fussy cut from one of the sheets in the stack.


Here is  peek at the inside:


Supplies:
Patterned paper - Spiced Cider stack, DCWV
Large leaf dies & Happy Autumn stamp/die - Tonic Craft Kit 12, Tonic Studios
Acetate
Filler - OLD, from my stash
Kraft and white card stocks
Catherine Pooler inks
Rectangle dies - Waffle Flower
Inside stamp - Be Full, Neat and Tangled
MISTI - My Sweet Petunia
Thick bakers twine - Stampin' Up
Nuvo Drops

Card size - 5 x 7", fits in a standard 5 x 7" envelope

Thanks for stopping by today

Saturday, 1 June 2019

C4C486 Father's Day Flip-It Card

Hello my crafty friends

It's Saturday and that means a new challenge at the Crazy4Challenges Blog. It's also a new month so we have a new hostess - Rebecca Ednie! Kelly Booth is joining us as our Guest Designer and you can find Kelly's blog HERE.   This is Rebecca's challenge for us this week:


Summer’s here and hopefully we can all get outdoors and into nature. So this week let’s use wood grain on your project. Images, embossing, even real wood paper or veneer shapes.

I had a leftover piece of this wonderful woodgrain patterned paper and there was enough of it to cut the layering panels for a Flip-It card so that is what I went with today.


This little fox from Your Next Stamp is just soooo cute! I added a stamped and fussy cut stump and also a chick from a different YNS stamp set. Those chicks just crack me up. Both were coloured with Chameleon Color Tone and Color Top markers.


Inside I added a stamped axe from the same stamp set as the stump (by Neat and Tangled) and wrote Happy Father's Day above it. The bullrushes were just fun to add on either side, and I added a word bubble that you can see when the card is closed.


I still have a small piece of this patterned paper leftover, so I want to use it up soon on a masculine birthday card for my Mom's nursing home. I love to use things up!

Check out the C4C blog to see how the Crazies have been inspired by the challenge. We'd  love to see your take on it, so be sure to stop by the Crazy 4 Challenges blog and link up your creations. If you are uploading to an online gallery, please use the keyword C4C486.

Supplies:

Kraft and White card stocks
Patterned paper - Gone Camping, Carta Bella
Stitched Circle die - MFT Stamps
Circle Flip-Its #4 - Stephanie Barnard, the Stamps of Life
Black Olive Ink - Your Next Stamp
Woodland Cuties, stamps and coordinating dies - Your Next Stamp
Chick stamp - All Aboard Spring Carts, Your Next Stamp
Chameleon Color Tone Markers
Chameleon Color Top Markers
Sakura black glaze pen
Sakura white gel pen
Brown fine point marker
Stump and axe stamps, Lumberjack Love - Neat & Tangled
Word bubble die - Stampin' Up
It's your day stamp, Best Catch - Stampin 'Up (Grass/bullrush die as well)
Wink of Stella


Thanks for stopping by today