Wednesday 30 November 2022

Snowman & Snowflakes Diamond Z Fold Card


Hello my crafty friends! Today I have another Diamond Z Fold card for the holidays - this time I used square dies to cut the diamonds instead of cutting by hand. They worked out SO much better - and I have all the details in my YouTube video:   


Below is what the card looks like open ...


I mentioned in the video, that I wasn't really happy with how that center diamond looked on the  white pop up base. I cut a 1.25 x 4" strip of the snowman print and glued it over the top of the white pop up piece. It hangs over on all three sides but that means you don't see any of the white and I was much happier with how it looked.

Everything I used was in my stash and at least a year old ... I think the newest thing used was the Pops of Color and I have had that since before last Christmas. Everything else is a lot older than that so it felt good to use it up.


With blue mirror cardstock and the glitter, this card is nice and sparkly! The 'let it snow' was die cut three times, twice from white card stock and once from the blue mirror. They were stacked together with the blue one on top for a nice sturdy element.


*****There are a lot of tutorials online for this type of card, but I really liked the 5 x 7" version as then the diamonds are a nice size for decorating. I found a tutorial to link for you, but of course, she doesn't refer to it as a Diamond Z-Fold. 😂  I always find it funny when stampers come up with their own names for a popular fun fold, not realizing it makes it hard for people to find your blog or YouTube video when searching. Anyhow, her finished card is BEAUTIFUL, which is why I chose to share her tutorial.  NOTE:  I didn't add all the layering panels that are often shown in these cards, as they are heavy enough and with even more layers the card would require extra postage. Click HERE to see Heather's tutorial and card.

Additional Supplies:
5 x 7" card and envelope
Patterned paper - Holiday Bash, Recollections (old, from my stash)
White cardstock
Blue mirror cardstock - Hunkydory
Snowflake dies - Impress
Blue mirror cardstock - Hunkydory


This blog uses affiliate links whenever possible. This means, that at no cost to you, if you make a purchase through one of my affiliate links that I may receive a small commission from your purchase. I only link products that I own, love and use for my card making and not every link below is an affiliate one! 😊

Tuesday 29 November 2022

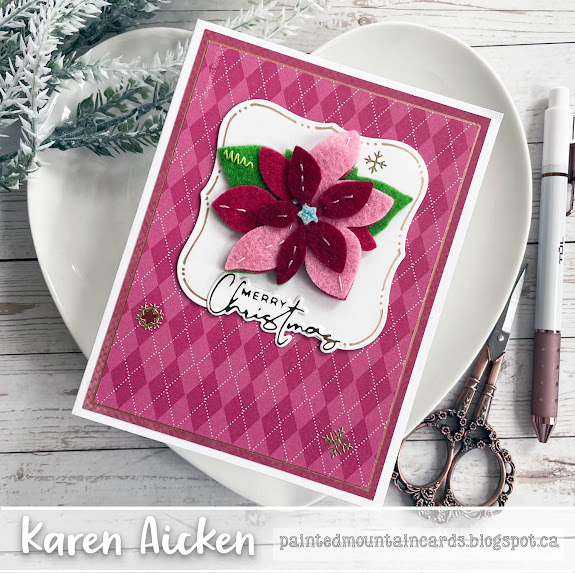
Felt Poinsettia Christmas Card


Hello my crafty friends. This card front was sitting in my 'in progress' bin, and it was time to finish it off, wouldn't you say? The felt sticker was already attached to the white die cut label and that was attached to the patterned paper & mat. 

I aded some gold gel pen doodling, gold peel off snowflake stickers and a gold foiled sentiment before adding the panel to my card base.


Here is a peek at the inside ...


Additional Supplies:
White cardstock
Label die - old, Spellbinders
Felt Poinsettia sticker - old, from my stash
Patterned paper - old, from my stash
Copic Marker


This blog uses affiliate links whenever possible. This means, that at no cost to you, if you make a purchase through one of my affiliate links that I may receive a small commission from your purchase. I only link products that I own, love and use for my card making and not every link below is an affiliate one! 😊

Monday 28 November 2022

Fun Fold Christmas Card Trio

Hello crafty friends. Today I have THREE different fun fold cards to share today. While they could have each been separate posts, since the supplies on each are identical I decided to lump them together in one ***long*** post. 😊. 

I have a walkthrough of the cards on YouTube as well:  

The first card is a Double Z Fold card - I haven't done one of these in a long time! The patterned paper is double sided, with the paw prints on one side and cutaparts on the back. In the video I said I'd purchased three sheets, two to use the cutaparts and one to use the cutaparts. But in fact I only purchased TWO sheets and a coordinating 12 x 12" sticker sheet. 


I love now nice and sturdy these cards are for display.


The second card uses my favourite cut apart from the sheet. I added Pops of Color to his nose so it's nice and shiny.


Inside is a simple box pop up for the sentiment piece (another cut apart) and I also added one of the Mini Pops arms for the circle dog piece. I show more of that detail in the video.


All of the cards started with these Memories & More card bases (with. matching envelopes) from Stampin' Up. There are 10 green speckled card/envelope sets and 10 red & green polka dotted cards with red envelopes. The front of the third card has another one of the cutaparts as well as stickers from the sheet.


Inside I used another of Karen Burniston's pop up dies - the Rockin' Rectangle. I also used the second double decker bus cut apart on this one and a few more stickers from the sheet.


I made another trio of cards, and will be sharing those in the coming weeks.


Additional Supplies:
Santa Express Memories & More card pack - Stampin' Up
White cardstock
Peppermint embellishments - from my stash, but I linked similar ones for you below.

This blog uses affiliate links whenever possible. This means, that at no cost to you, if you make a purchase through one of my affiliate links that I may receive a small commission from your purchase. I only link products that I own, love and use for my card making and not every link below is an affiliate one! 😊

Saturday 26 November 2022

Paper Frames Pop Up Christmas Card Duo


Hello my crafty friends! I pulled out an older patterned paper pad for my cards today. In fact, I cut down several of the sheets and ended up with SIX similar card fronts. I made two each with different pop up's by Karen Burniston and these first two cards were the quickest to make. 

Using various rectangles, I die cut these cut aparts from a 12 x 12" sheet and mounted them to the front of a 5 x 7" card base. I added Glitter Dot peel-off stickers and a gold foiled sentiment.


Inside these cards is the Paper Frames Pop Up, cut from other patterned papers in the package. I added stamps and die cut sentiments and also sparkly Glitter Dot peel off stickers.


Below is a view from the top side ...


This is the front of the second card. I added glitter dots, gold gel pen dots and puffy dots as a garland on the tree.


Below is the inside - this one is a little stepped up with some gold foil card stock.


 I'll be back next week with another two cards using those same cut aparts on the fronts but different pop up dies inside!

Additional Supplies:
Patterned paper - Holiday Wonder, Hobby Lobby (old, from my stash)
White cardstock
Glitter Dot Peel Offs - Elizabeth Craft Designs (old, from my stash)
5 x 7" Cards & Envelopes

This blog uses affiliate links whenever possible. This means, that at no cost to you, if you make a purchase through one of my affiliate links that I may receive a small commission from your purchase. I only link products that I own, love and use for my card making and not every link below is an affiliate one! 😊

Friday 25 November 2022

Diamond Z Fold for Hanukkah


Hello my crafty friends and welcome to Fun Fold Friday here on my blog. I pulled out this 12 x 12" patterned paper to make a Hanukkah card and got looking at the sticker sheet that was included.  I hadn't planned on making ANOTHER Diamond Z Fold card but with the partial paper sheet and those stickers ... it seemed to be the perfect choice.


I added some gold gel pen highlights and Pops of Color for shimmer and shine. The two navy stitched circles were the fallaway pieces from when I made a Magic Iris Card  and they were popped up with foam tape.


There are a lot of tutorials online for this type of card, but I really liked the 5 x 7" version rather than an A2 as then the diamonds are a nice size for decorating. I found a tutorial to link for you, but of course, she doesn't refer to it as a Diamond Z-Fold. 😂  I always find it funny when stampers come up with their own names for a popular fun fold, not realizing it makes it hard for people to find your blog or YouTube video when searching. Anyhow, her finished card is BEAUTIFUL, which is why I chose to share her tutorial.  NOTE:  I didn't add all the layering panels that are often shown in these cards, as they are heavy enough and with even more layers the card would require extra postage. Click HERE to see Heather's tutorial and card.

Additional Supplies:
5 x 7" card and envelope
White cardstock

This blog uses affiliate links whenever possible. This means, that at no cost to you, if you make a purchase through one of my affiliate links that I may receive a small commission from your purchase. I only link products that I own, love and use for my card making and not every link below is an affiliate one! 😊
Thursday 24 November 2022

Two Wintery Cards!

Hello my crafty friends!   I'm sharing a pair of cards using this collection by Echo Park. It was sent to me by Scrap 'n Stamp Canada for an upcoming Christmas Inspiration video hop (December 3rd) and when I finished my projects for that hop I couldn't stop playing with the papers, stickers, ephemera etc.   

I've also been having fun showing lots of different cards with the cut aparts that are included in the package. These two cut aparts are sized 3 x 4" and I matted them on blue mirror cardstock for holiday sparkle and shine.


I also added some silver peel-off Snowflake stickers!


Both cards have the same sentiment stamped inside. This is a large stamp and it worked perfectly with these 5 x 7" cards!


To create the backgrounds, I cut two patterned paper panels 4.75 x 6.75". Holding them tightly together, I sliced them on the diagonal then alternated the patterns on each of the two card fronts.


The card below shows the second cut apart .. so cute!


While these can be sent for Christmas, they also work great for winter happy mail for those that don't celebrate. 

Additional Supplies:
5 x 7" card and envelopes
White cardstock
Blue mirror cardstock
Sentiment - Winter Wishes, Crafters Companion

This blog uses affiliate links whenever possible. This means, that at no cost to you, if you make a purchase through one of my affiliate links that I may receive a small commission from your purchase. I only link products that I own, love and use for my card making and not every link below is an affiliate one! 😊
Wednesday 23 November 2022

Jingle Bells Mini Slimline Card


Hello my crafty friends! Today I'm sharing the third and final card I made using this lovely Jingle Bells die that a friend loaned me. After cutting it from blue mirror cardstock I layered it over silver foiled patterned paper for even more shimmer and shine!

To make the bells stand out more, I backed them with white card stock before attaching the panel to the silver foil dotted paper piece.


Inside is a matted white panel, a stamped sentiment and some silver snowflake peel off stickers.


Additional Supplies:
White cardstock
Patterned paper - Stampin' Up (retired)
Navy cardstock
Sentiment inside - Hero Arts (Older set, long retired)
Blue mirror card stock - Hunky Dory

This blog uses affiliate links whenever possible. This means, that at no cost to you, if you make a purchase through one of my affiliate links that I may receive a small commission from your purchase. I only link products that I own, love and use for my card making and not every link below is an affiliate one! 😊

Tuesday 22 November 2022

Wintery Blues Christmas Pop up Card


Hello my crafty friends.  You will be seeing a lot of cards using this collection by Echo Park. It was sent to me by Scrap 'n Stamp Canada for an upcoming Christmas Inspiration video hop (December 3rd) and when I finished my projects for that hop I couldn't stop playing with the papers, stickers, ephemera etc. 


Using a solid Hot Foil Plate, I was able to reverse foil the Merry Christmas, using up the leftover piece from THIS card. I love that there is no foil wasted using the solid plate. 


Inside I used Karen Burniston's Rockin' Rectangle Die set. I hadn't used it in awhile, but when I pulled it out for a card a few weeks ago I remembered how much I liked it and I've been using it a LOT since!

 
While the Rockin' Rectangle comes with rectangles to add to the mechanism, but of course you can add other things instead. I chose this 'Let It Snow' cut apart from the package. The words were too pale for my liking though, so I added a shadowed look with a blue alcohol marker and liked it much better.


Additional Supplies:
5 x 7 card and envelope
White cardstock
Alcohol markers
Sequins - stash

This blog uses affiliate links whenever possible. This means, that at no cost to you, if you make a purchase through one of my affiliate links that I may receive a small commission from your purchase. I only link products that I own, love and use for my card making and not every link below is an affiliate one! 😊

Monday 21 November 2022

Christmas Animals Holiday Card Duo


Hello my crafty friends. Today I'm sharing two holiday cards - one is a Slimline and the other is a Mini Slimline. Both were created from a single sheet of 12 x 12" patterned paper from an older pad called Holiday Bash. The design was in the lower third of the sheet and the rest was just the blue with snowflakes, so I have been using that up on other cards and as layering panels.

First up is the Slimline card. I die cut the panel with a stitched slimline die by Waffle Flower (linked below) and mounted it to the front of my card base. 


I added some sparkle with iridescent snowflake stickers and a sparkle gel pen, then popped up a stamped sentiment.


Here is a peek at the inside ...


Using Karen Burniston's Short Crosshatch Rectangle dies, I cut the remaining border piece and stamped a few snowflakes in pink. Then I added more of those iridescent snowflake stickers and a stamped sentiment before adding the panel to my white Mini Slimline card base.


Here is a peek at the inside of the second card ...


I have been working away at this paper pad, and have managed to make a number of holiday cards with it this year!

Additional Supplies:
White cardstock
Patterned paper - Holiday Bash, Recollections
Adhesive backed snowflakes - Stampin' Up (retired)
Sentiment - Peaceful Poinsettia, Stampin' Up (retired)
Christmas stamp - Verve (retired)

This blog uses affiliate links whenever possible. This means, that at no cost to you, if you make a purchase through one of my affiliate links that I may receive a small commission from your purchase. I only link products that I own, love and use for my card making and not every link below is an affiliate one! 😊