Showing posts with label Bridge Card. Show all posts

Friday, 10 December 2021

Sunset Silhouette Mini Slimline Bridge Card


Hello!  Today I'm sharing the Birthday Card I made for hubby ... a Mini Slimline Bridge card. I have been in a MAJOR Moho slump, so barely got this card done in time to give him and I didn't have a chance to do a tutorial or video. I will list the measurements I used for the base itself, and since I'm happy with how the card turned out I will make more and promise to do a video tutorial as well. 

Thankfully I had already finished my Christmas cards and scheduled most of the posts or my blog would be pretty bare this month. I think I went over two weeks without making a card or even WANTING to make a card. Definitely out of character for me and I'm happy to say I'm starting to feel more like creating again. 

The silhouette dies I used are from Divinity Designs with the sunset/sunrise paper from Whimsy stamps. Everything that is available is linked below for you. I added the 'Love You' from Karen Burniston's Word Set 12 Snow, cutting it three times. Once from dark yellow, once from orange and the final time from black. Then I stacked them on top of each other and I like the little shadow of colour this gives the words and helps them stand out more. 

The card folds flat and fits in a #8 (or 6-3/4") envelope. I added several layers of foam tape for dimension knowing I would be hand delivering the card. Ha.


The back of the card is where I wrote him a personal message.


One more look ...


Measurements **I was just fiddling around and came up with this so there may be other measurements out there.

Folded, my card is 6 x 3.5", which is my favourite size of Mini Slimline card to make.

The Card Base measures 7.5 x 3.5", scored along the long side at .75". 1.5", 6" and 6.75". 

The Bridge Strip is 6" long, and as deep as you wish. Mine was about 6 x 1.25". Since the dies weren't quite long enough to reach across the 6" span I used scissors on either end to finish the cut. 

This blog uses affiliate links whenever possible. This means, that at no cost to you, if you make a purchase through one of my affiliate links that I may receive a small commission from your purchase. I only link products that I own, love and use for my card making!

Any supplies I'm unable to link are listed at the very bottom of my post.

Additional Supplies:
Card stock scraps - stash

Wednesday, 10 February 2021

Dragon Slimline Bridge Card

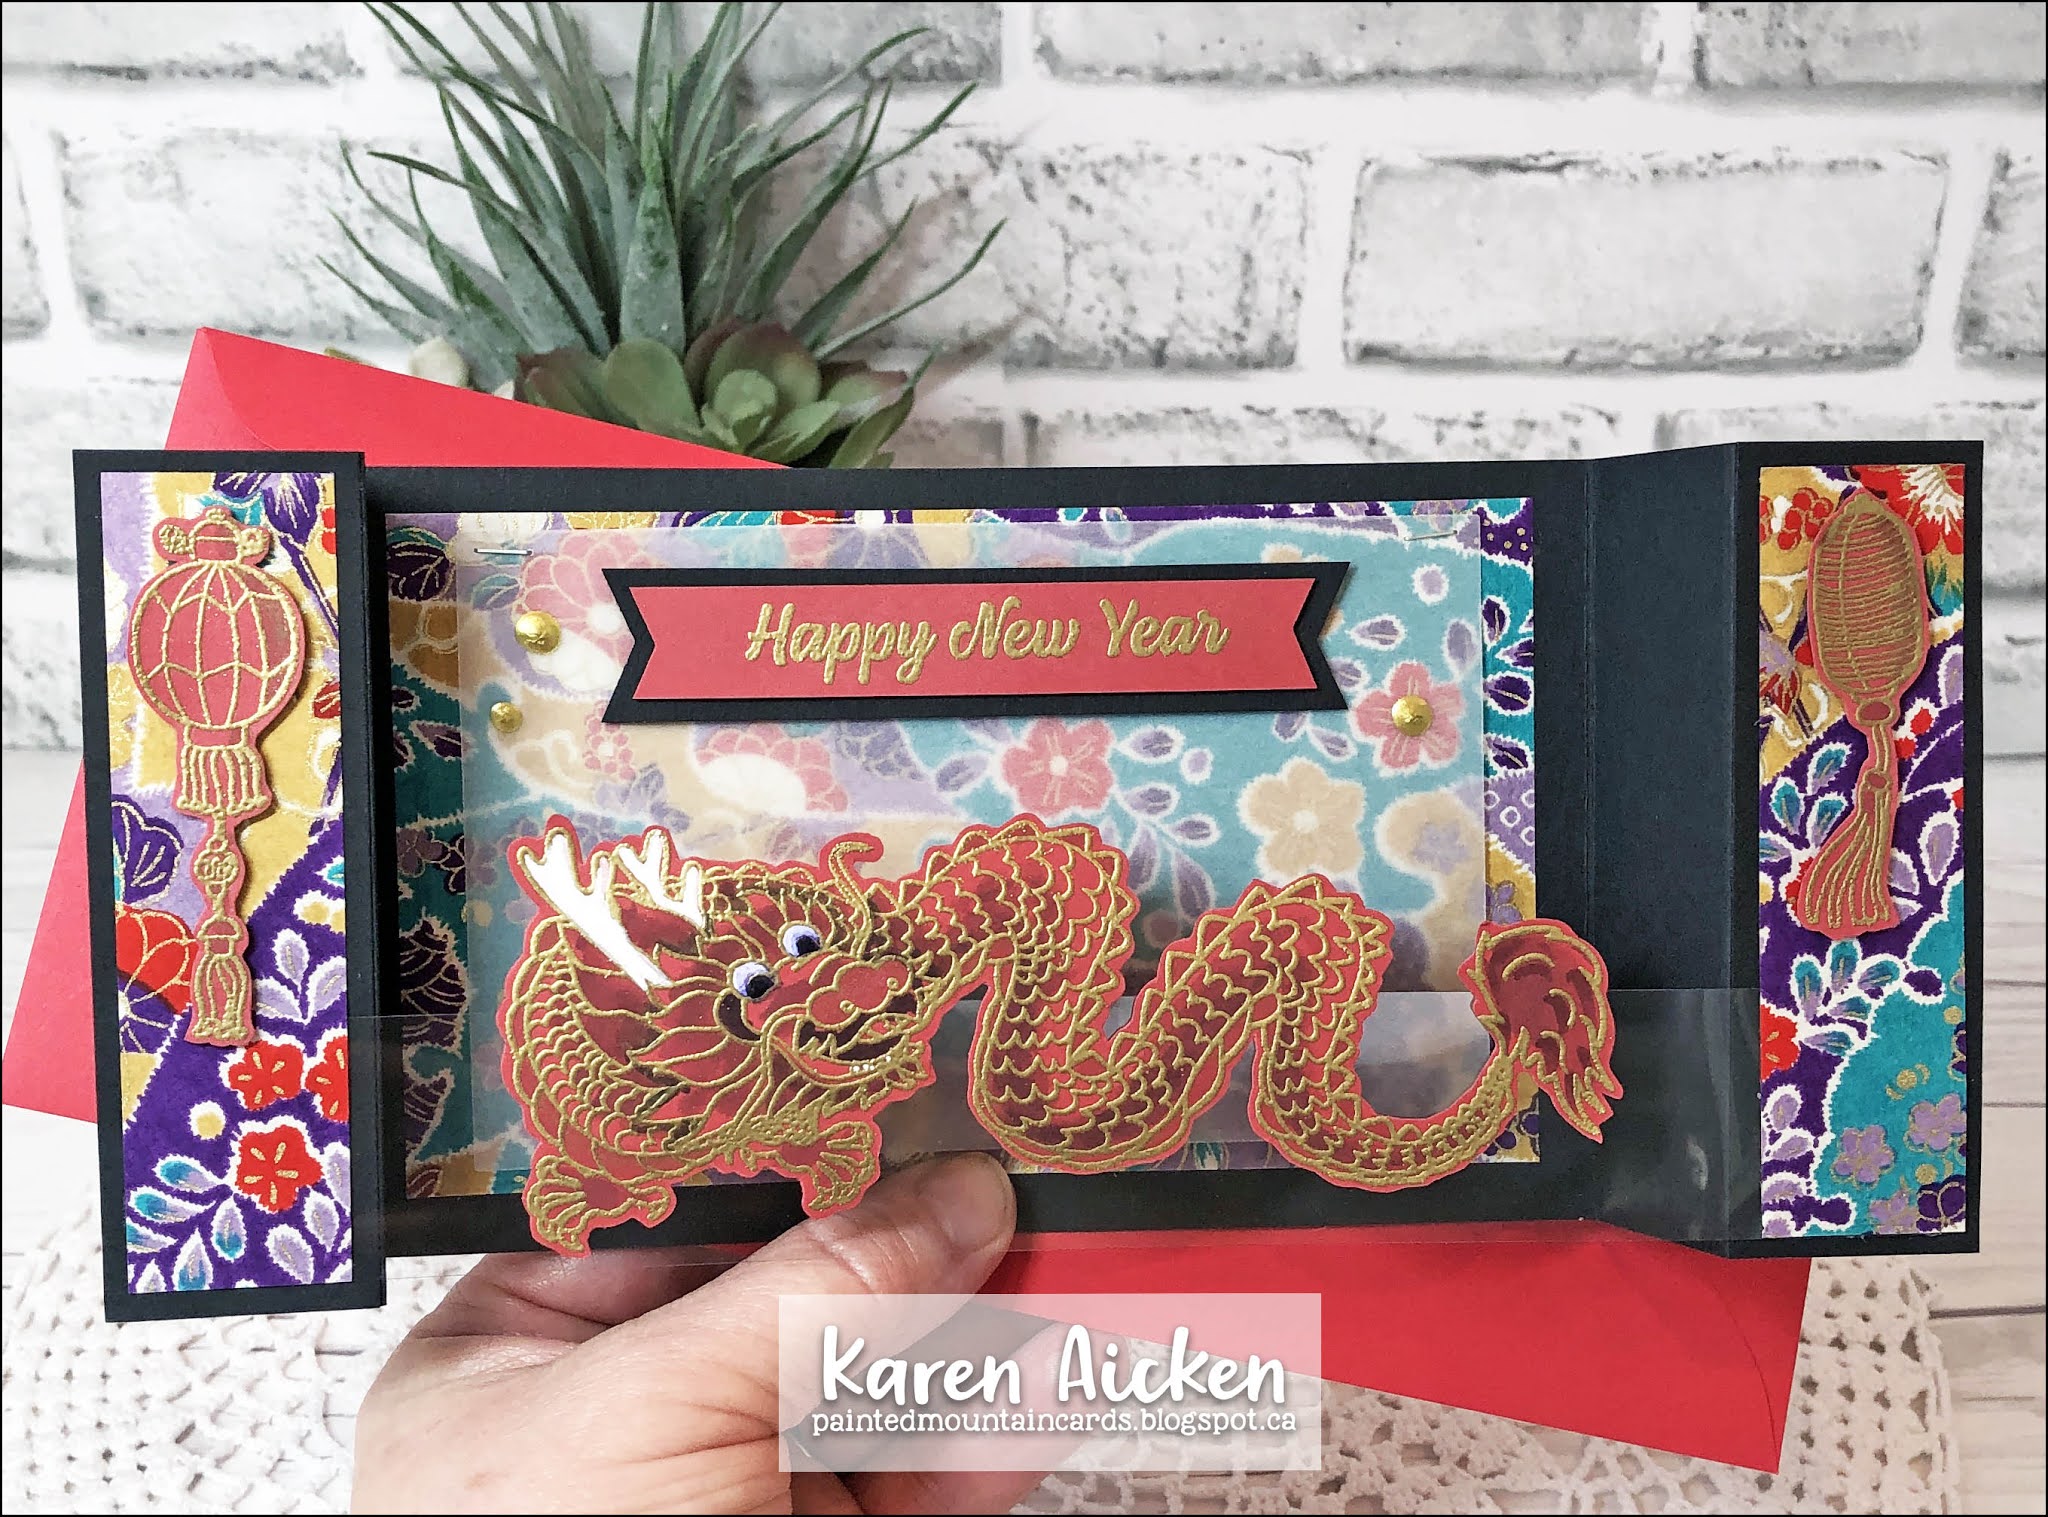
Hello! Today I'm sharing the card I sent to a friend to celebrate the Lunar New Year and I used the 'Year of the Ox' stamp set by Crafty Meraki. I also made a Slimline Bridge Card! I made one of these for Halloween and really enjoyed it - it is based on the measurements in one of Jennifer McGuire videos. I have a walk through of my card on YouTube here:  

The dragon was gold heat embossed on red card stock, and I added a little colour with alcohol markers and a white paint pen.

The back is where I added my personal message.


Here are the measurements I used for my Slimline Bridge Card:

Card base is cut 11 x 4".

Score 1-1/4" and 2-1/2" from each side.

The acetate bridge piece is about 1" high and 8-1/2" wide. 

Supplies:
Origami Paper - stash
Card stocks - stash
Mini MISTI - My Sweet Petunia
Year of the Ox - Crafty Meraki
Banners Pick A Punch - Stampin' Up
Copic markers
White paint pen
Copic markers
Water Brush
Black Sharpie
Vellum
Tiny Attacher - Tim Holtz
Gold embossing powder
Wink of Stella
Gold Nuvo Drops
Card size - folds down to 4 x 9" and fits in a #10 Business Envelope for mailing

Thanks for stopping by today!

Saturday, 5 December 2020

Snowman Family Bridge Card

Hello crafty friends ...

Today I'm sharing a wintery holiday fun fold card featuring this cute Snowman Family stamp set from Your Next Stamp. I have a walk through of my card and a quick Bridge Card Tutorial on my YouTube video here: 

I fussy cut the snowman images after colouring them with my Ohuhu alcohol markers, sprayed them with shimmer spray and added the Snowman Family to the inside panel of the Bridge Card with thin foam tape. The snowflakes were punched from white pearl card stock and I added a sparkly YNS Gumdrop inside of each one.


The bridge portion was created with Karen Burniston's new Long Nature Edge dies and the snowbank on the inner section is the YNS Double Pierced Hills. Both dies have a decorative feature (stitching or piercing) on either side of the cut line, which is a cool feature that allows you to use both sides of your die cut.


The back of the card is where we will sign our name and I added one of the cut apart from the patterned paper package as an additional decoration.

 
Below you can see how the card folds flat and is ready to fit into an A7 envelope.


I think the Snowman Family stamp set might be out of stock, but you can click to be notified when it comes back in!

Supplies:
Black Olive Ink - Your Next Stamp
Snowman Family- Your Next Stamp
Double Pierced Hills Die Set - Your Next Stamp
Ice Ice Baby Sparkly Gumdrops- Your Next Stamp
Various card stocks - stash
White pearl card stock
Patterned paper & Cut Aparts - A Winters Night (6 x 6"), Recollections
Ohuhu markers
Shimmer Spray
Wink of Stella
1152 Long Nature Edges - Karen Burniston
Sakura white gel pen
Snowflake punch - Martha Stewart
Card size - 6.5 x 5", fits in a A7 envelope

Thanks for stopping by today 

Tuesday, 10 November 2020

Tea-riffic Christmas Bridge Card


Hello crafty friends ...

Today's card for the Coffee Lover's Blog Hop also features one of the sets from Your Next Stamp's November Release. How cute is this little kitty sitting in a holly mug? And the Meowy Christmas sentiment goes perfectly with it.

I have a walk through of my card in a YouTube video, including a quick tutorial on how to make this 'larger than A2' sized Bridge Card!


In the photo below, you can see all the sparkle in the patterned paper, and the glitter added to the centre of the poinsettia and around the sentiment wavy circle.


On the back of the card (which is where I will sign it) and I added another one of the YNS Coffee & Tea Border dies.


If you would like the measurements again, I'll add them here:
Bridge piece - 6.5 x ~1"
Card base - 9 x 5"
scored down from the 9" side at 1-1/4", 2-1/2", 6-1/2" and 7-3/4"


I'll be back tomorrow with another card for the Coffee Lovers Blog Hop!

Supplies:

Stitched Wavy Circle Die - Your Next Stamp

Tea-riffic Holly Day - Your Next Stamp

Tea-riffic Holly Day Die - Your Next Stamp

Black Olive Ink - Your Next Stamp

Stitched Square Die Set - Your Next Stamp

White Sugar and Spice Gumdrops - Your Next Stamp

Coffee & Tea Border Die - Your Next Stamp

Patterned paper - I Believe, My Minds Eye

Ohuhu Markers

Stickles

Vellum Doily - Stampin' Up

Sakura white gel pen

Various card stocks - stash

Copics

Card size - 6.5 x 5", fits in an A7 envelope (5 x 7)

Thanks for stopping by today

Saturday, 24 October 2020

Halloween Slimline Bridge Card


Hello crafty friends ...

Today I'm sharing a Bridge Card that is also a Slimline Card. I have had this sticker sheet by Frances Meyer in my stash for many years. It featured a 12" long fence sticker and I just never got around to using it on a scrapbook page or A2 sized card. But since I love making Slimline cards these days, this year when I pulled the sticker sheet out of my bin I knew I could use it to make a Slimline. 

Jenifer McGuire had done a video on making Slimline Bridge Cards, and I decided to give it a try.


Since I went over the details in my video, I will keep my comments to a minimum here. This was a fun card to make and I will likely try it again maybe for a Christmas card. I certainly have enough border stickers in my stash to make more! Ha.


I added some stamping on the back and a pair of creepy hands just for fun. This is where I will sign our name before we go to send the card.


Here is a quick recap of the measurements I used: Cut your card base 11 x 4" Score 1-1/4" and 2-1/4" from each end (for the sides of your card) Acetate strip: 8.5 x 2" Decorate as desired!

There were a few pumpkins and a bit of the fence sticker leftover from this card and no way I was putting that sheet back in the bin. I was determined to use it up so I'll be back tomorrow with another Halloween Card that finished off the sticker sheet.

Supplies:

Jennifer McGuire's Video

Patterned paper - Doodlebug

Stickers - Spooky, Frances Meyer (old)

1013 Halloween Elements - Karen Burniston

Wink of Stella

Stamps on back - Halloween, Karen Burniston (retired)

Card size - 4 x 9", fits in a #10 Business Envelope


Thanks for stopping by today

Thursday, 4 April 2019

Easter Bridge Card

Hello my crafty friends

Today I'm playing along with the Fun Friday Challenge #111 on the Your Next Stamp Blog and the challenge is 'Florals'. Be sure to head over and leave a comment, as well as link up your floral creations. One random comment left on the Your Next Stamp Blog by midnight EST April 10th will win a stamp set of their choice and the winner announced on April 13th.  

This is also a challenge post and you can play along for the chance to win a Your Next Stamp Store gift certificate!! So fun! The Fun Friday Challenge #111 is open through midnight EST on April 16th so you have lots of time to play along.

I haven't made a Bridge Card in a long time and since it's Fun Fold Friday here on my blog I thought I could combine the two for a bright and cheerful Easter Card.


Of course I love Doodlebug Designs and this floral patterned paper worked perfectly. I also pulled out the All Aboard Spring Carts and All Aboard Bunch of Happiness from Your Next Stamp. The images were cut out and coloured with Chameleon Color Tone markers. I added them to a centre panel that had been sponged green and blue to create the grass and sky.


I love the sparkle from the Spectrum Noir glitter pen, so added it to several of the images including the little chicks bellies. I also added three sparkly white Gumdrops from Your Next Stamp - I think I might be addicted to these little beauties!


I added a decorated panel to the back as well, which is where we will sign our name.


This card folds completely flat for mailing in an A2 envelope.


Supplies:
White card stock
Patterned paper - Doodlebug Designs
All Aboard - Spring Carts, Your Next Stamp
All aboard - Bunch of Happiness, Your Next Stamp
Black Olive ink - Your Next Stamp
Ice Ice Baby Sparkly Gumdrops - Your Next Stamp
Chameleon Color Tone markers
Chameleon Color Tops
Fishtail banner die - MFT Stamps
Spectrum Noir Glitter Pen
Thanks for stopping by today

Thursday, 18 October 2018

Halloween Bridge Card

Good morning friends

Today's share is a Halloween card I made last year. I was having so much fun with these (then) new Stampin' Up products, I kept making cards even after I had enough for both myself and my Mom to send out. This one is a Bridge Card, also known as a U Card. 


 The pumpkins and witches hat were fussy cut from patterned paper in the stack, and the cat was punched out from another piece of the patterned paper. I used the little word balloon from the Lorna Label Pop-Up and stamped a spider and the words on it.


The card folds flat for easy mailing in a standard A2 envelope.


I added some stamps on the back, and there is lots of room for us to sign our names.


Supplies:
Patterned paper - Stampin' Up
Black and cream card stocks
Cat punch - Stampin' Up
Grass 'stencil' - Karen Burniston (retired), 
Wink of stella
Glitter Dots
Boo to you! stamp - Simon Says Stamp
Lorna Label Pop-Up (Word Balloon) - Karen Burniston (retired)
Spider, bat and word stamps - Halloween Clear stamps, Karen Burniston (retired)

Thanks for stopping by today

Wednesday, 8 August 2018

Southwest Sympathy Bridge Card

Good morning friends

Today's share is a sympathy card I made for a friend.


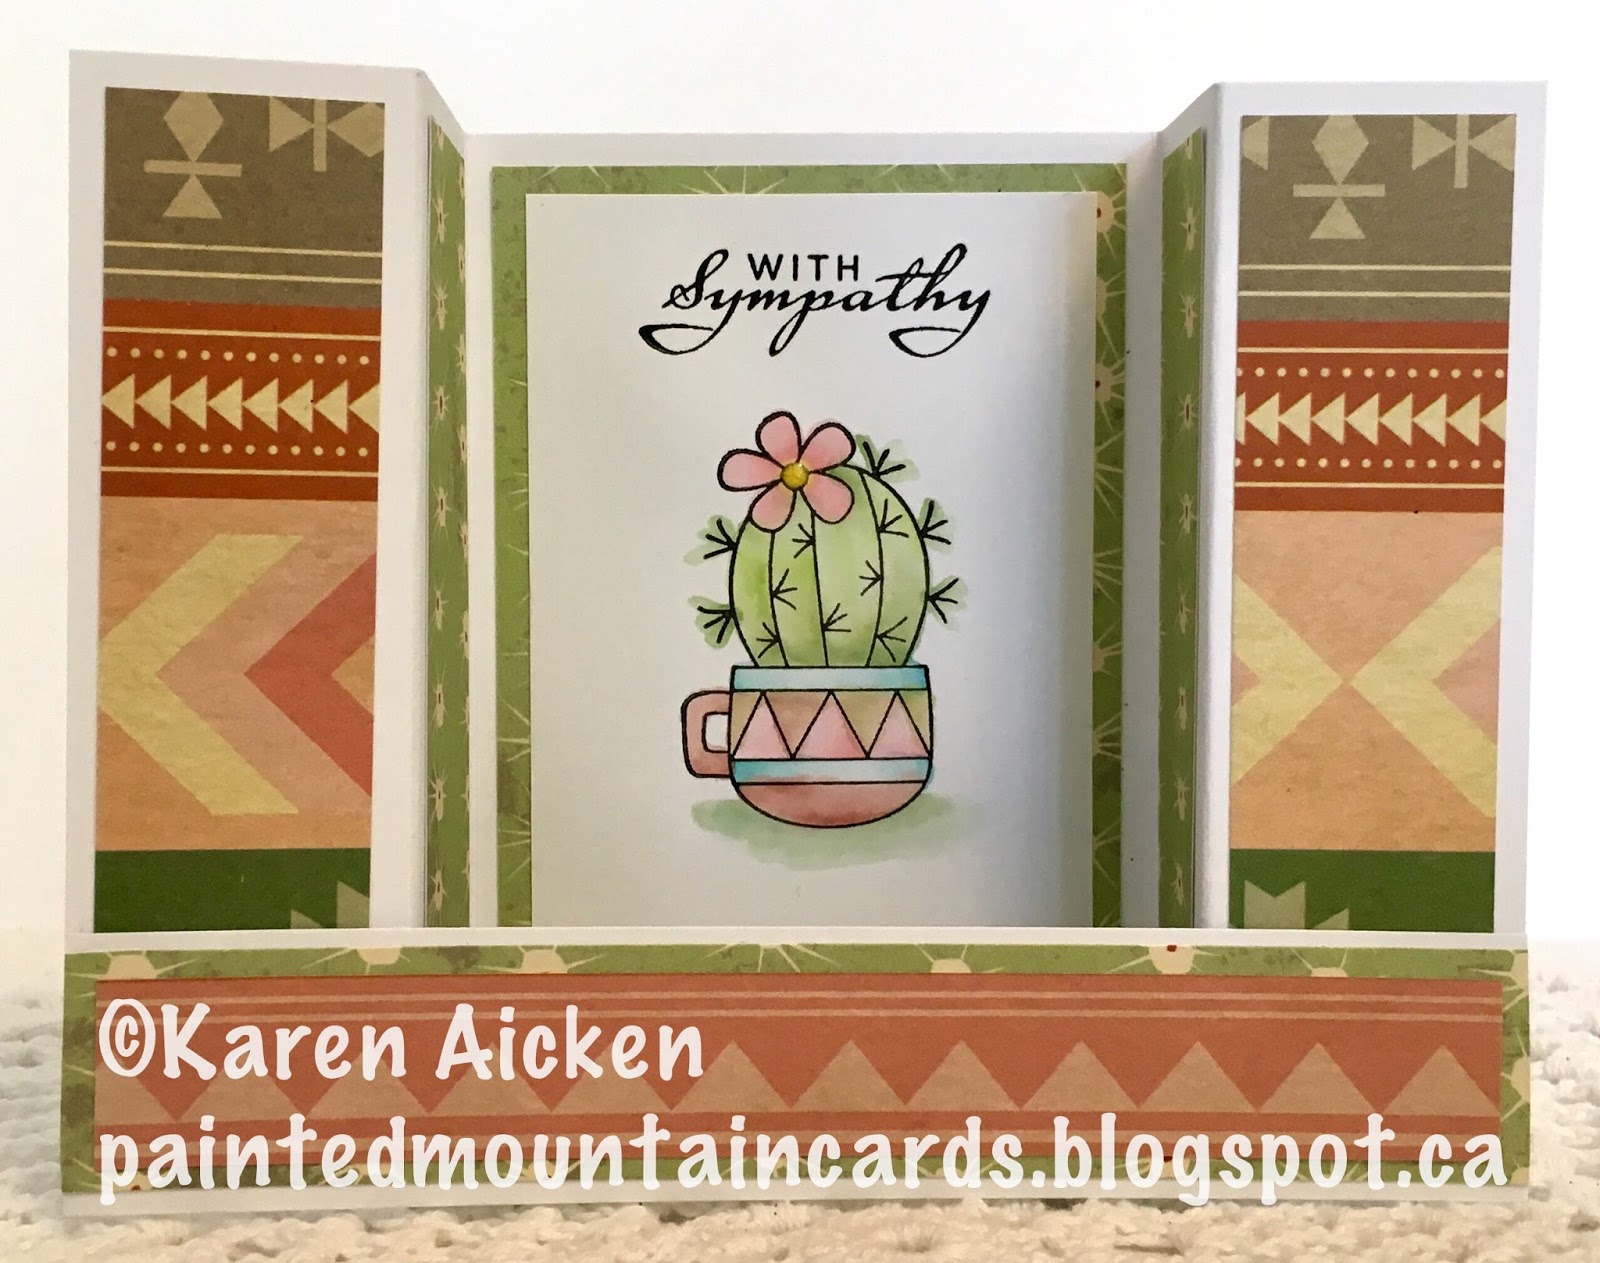
I made a Bridge Card (or U Card) and added a water coloured image for the decorative panel. Love these cactus images from Newton's Nook.


More stamping on the back ...


These cards fold flat for mailing and this one fit in a standard A2 envelope.


Supplies:
White card stock
Patterned paper - Recollections
Cactus/cup stamp - Newtons Nook
Crayola markers & a water brush
Nuvo Crystal Drops
With Sympathy stamp - Verve
Stamps on back - the Stamps of Life

Thanks for stopping by today

Saturday, 3 March 2018

C4C424 S'more Photo Card

Good morning friends 

It's Saturday, so that means a new challenge on the Crazy4Challenges blog. Bonnie Sharp was going to hostess this month, but had to leave the design team. She said to go ahead and use her challenges, which she had already prepared for us. Kristine Reynolds is our Guest Designer again this month - thanks Kristine!. You can find Kristine's blog HERE.

Bonnie's challenge is:  Today is National Banana Cream Pie Day - one of my favourites! My challenge to you is to create a Dessert card - which can include pie of course, or ice cream, or cookies - anything you consider to be a sweet dessert!

My challenge card is a Bridge Card featuring S'mores, cooked on a winter campfire. 


I have been having fun creating personalized cards using Instax printed photos. They are similar to a Polaroid but they are gift card sized. Sizzix designer Lynda Kanase has a cool line called the Picture This Collection, and I've been adding those dies to my stash. I think I have almost all of them now, because the cut-a-way words in each set are interchangeable! The entire Picture This Collection was designed to work with the Instax photos.

Lynda also has a die called 'Photo Stand, Seasonal'. It's seasonal, because it has fun accessory stamps & dies related to winter & Christmas. But the stand itself can be used year round and for any occasion. I cut this one from Lynda's 'Picture This' paper pad, a fun little 4 x 6" double sided paper pad with prints & patterns for different seasons. I love blue and green, so for me this stand can be used all the time.

I use the Photo Stand die a lot - first of all, it's easy peasy to assemble, and when the stand is finished you can't help but think how clever it is. I have one on my desk and whenever I print an Instax Mini photo, I stand the photo in it to display and enjoy. Even if I plan on making a card with the photo, I like to enjoy it for a bit first.


Below is a side view - you can see where the photo slips into the slot that forms when you assemble the Photo Stand. Rather than cut the word 'memories' from the stand itself when I die cut it, I cut the word 'memories' from a scrap of the same patterned paper and backed the word with black card stock. I left a narrow black mat and adhered it directly to the top of the photo stand.


I had taken a photo of our pretty Bougainvillea bushes, so when I went to make my card for today's challenge I printed off that photo and now it is in the photo stand for me to enjoy. 


Onto my challenge card... There is a new release at Riley & Company and I just HAD to have the Dress Up Riley Camping Set. Most of the stamps/dies I used on my challenge card today use that set. 


I chose some wintery patterned paper from Lynda's Picture This paper pad and the card base itself was cut from blue Soft Finish Card Stock. I love that it is white on the other side, and it's such a nice weight to work with. I die cut the Travel Photo Frame from the same patterned paper but didn't cut a word from the bottom. I really like how customizable these frames are.


Both the 'let it snow' and the winter hat stamps are from the Seasonal Props Photo Frame, but the lantern, S'mores, campfire and marshmallow/stick are from Riley & Company. This Bridge Card folds flat for mailing in a standard A2 envelope.


I added a bit of decorating on the back as well, since that is where I will write my note. The photo was taken out at our acreage, and I know it will be a happy surprise for my daughter & family when they receive this card in the mail.


Check out the C4C blog to see how the Crazies have been inspired by the challenge. We'd  love to see your take on it, so be sure to stop by the Crazy 4 Challenges blog and link up your creations. If you are uploading to an online gallery, please use the keyword C4C424.

Supplies:
Instax Mini SHARE Smart Phone Printer - Fujifilm
Patterned paper - Picture This by Lynda Kanase (Sizzix)
Photo Frame, Travel (frame) - Lynda Kanase (Sizzix)
Photo Frame, Seasonal Props - Lynda Kanase (Sizzix)
Seasonal Tag (label die) - Lynda Kanase (Sizzix)
Camping clear stamps and Dress-Up Camping dies - Riley & Company
Blue Soft Finish Card Stock  - Elizabeth Craft Designs
Fun foam
White & black card stocks
Sakura white gel pen - Karen Burniston


Thanks for stopping by today!

Monday, 1 January 2018

New Years Bridge Card

Good morning friends

Happy New Year!!

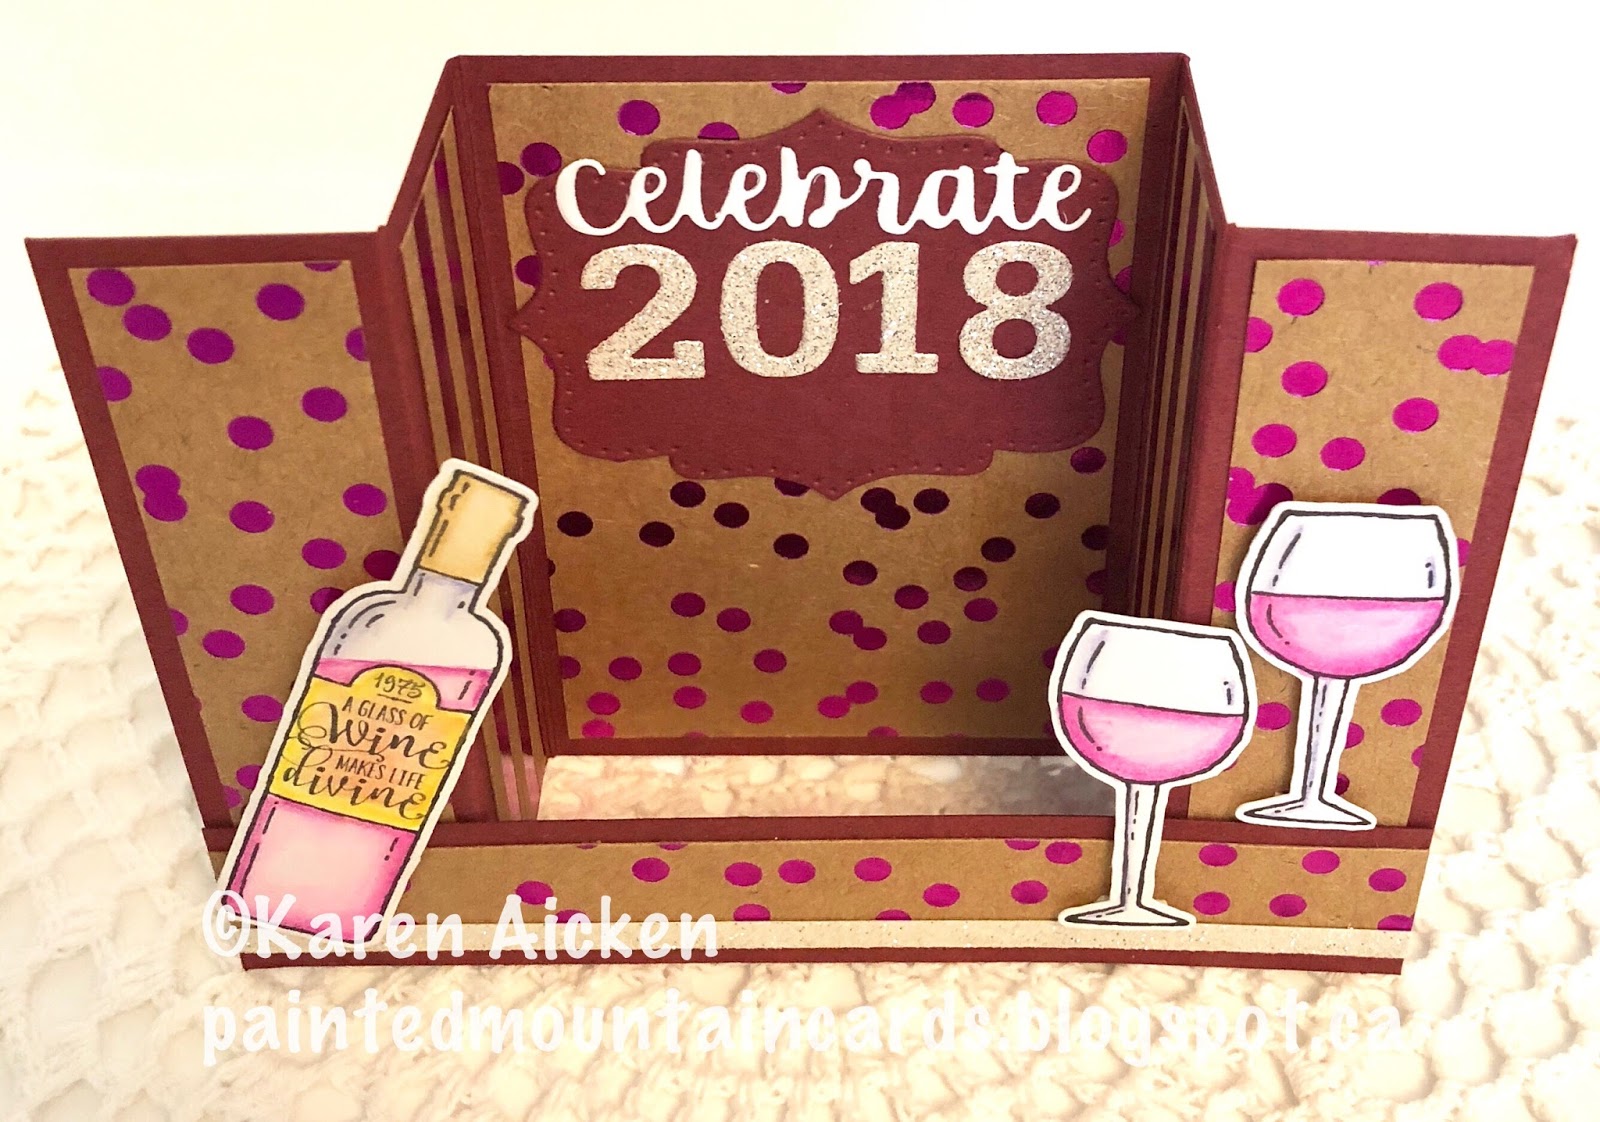
Today I have a sparkly card Bridge Card (or U Card) to ring in 2018. I have always been a fan of kraft card stock, and this Stampin' Up patterned paper with the metallic finishes is one I'm really enjoying.


I used Karen Burniston's Word Set 2 for the 'Celebrate', and die cut the numbers from white glittered card stock.


When my Canadian Stampin' Up Demonstrator Sandi MacIver asked me what my favourite sets from the Holiday catalogue were, this HALF FULL set was definitely on the list. I didn't use it for any of my Christmas cards this year because I was pretty much done them by the time I ordered the stamps. But these stamps can be used year round so you will be seeing more with them AND I will use them to make some Christmas cards for 2018 as well!.


This is the back side of the card, and where we signed our names.


Supplies:
Burgundy & white card stocks
Patterned paper - Stampin' Up
Derwent water colour pencils
Water brush
Wink of Stella
Number dies - Papertrey Ink
Stamps - Stampin' Up
Glimmer Paper - Stampin' Up
Black fine point marker
Crayola markers

Thanks for stopping by today

Saturday, 14 October 2017

C4C 407 Cupcake Shaker Bridge Card

Good morning friends

It's Saturday so that means a new challenge at the Crazy 4 Challenges Blog.  Bonnie Sharp will be our October 2017 hostess, with Marcie Sharp as our Guest Designer this month. You can find Marcie's blog HERE


This is Bonnie's challenge:  
Did you know that today is national dessert day?! So you know what that means?....please make a card with any sort of yummy dessert on it! Ice cream, cake, cookies, tarts, pie, popsicles...whatever you deem to be dessert!!

These 'Bridge Cards' (or U Cards) have been all over Pinterest lately, so I decided to try my hand at one. I needed a birthday card for our Nephew's daughter so I found some glittery girly paper from my stash and got to work. Jeanie Stark provided measurements in her post, so I used those for my card and it worked like a charm. You can see Jeannie's lovely card HERE.


See how sparkly the paper is? Perfect for a little girly-girl! I also made a shaker out of the cupcake icing, by cutting the smaller icing out of the larger one and backing the opening with acetate.


The shaker is filled with tiny hole-less beads, Prills, and little tiny open heart confetti.


The tickets were fussy cut from a different sheet of paper in the stack, and I added the Happy Birthday from Karen Burniston's Word Set 1 on the 'bridge' portion of the card. Below you can see how the card folds completely flat to fit into an A2 envelope.


This is the back of the card, with another cupcake and a stamped greeting.


Check out the C4C blog to see how the Crazies have been inspired by the challenge. We'd  love to see your take on it, so be sure to stop by the Crazy 4 Challenges blog and link up your creations. If you are uploading to an online gallery, please use the keyword C4C 407.

Transparency scrap
Patterned paper - DCWV
Stickles
Stamp - Stampin' Up


Thanks for stopping by today