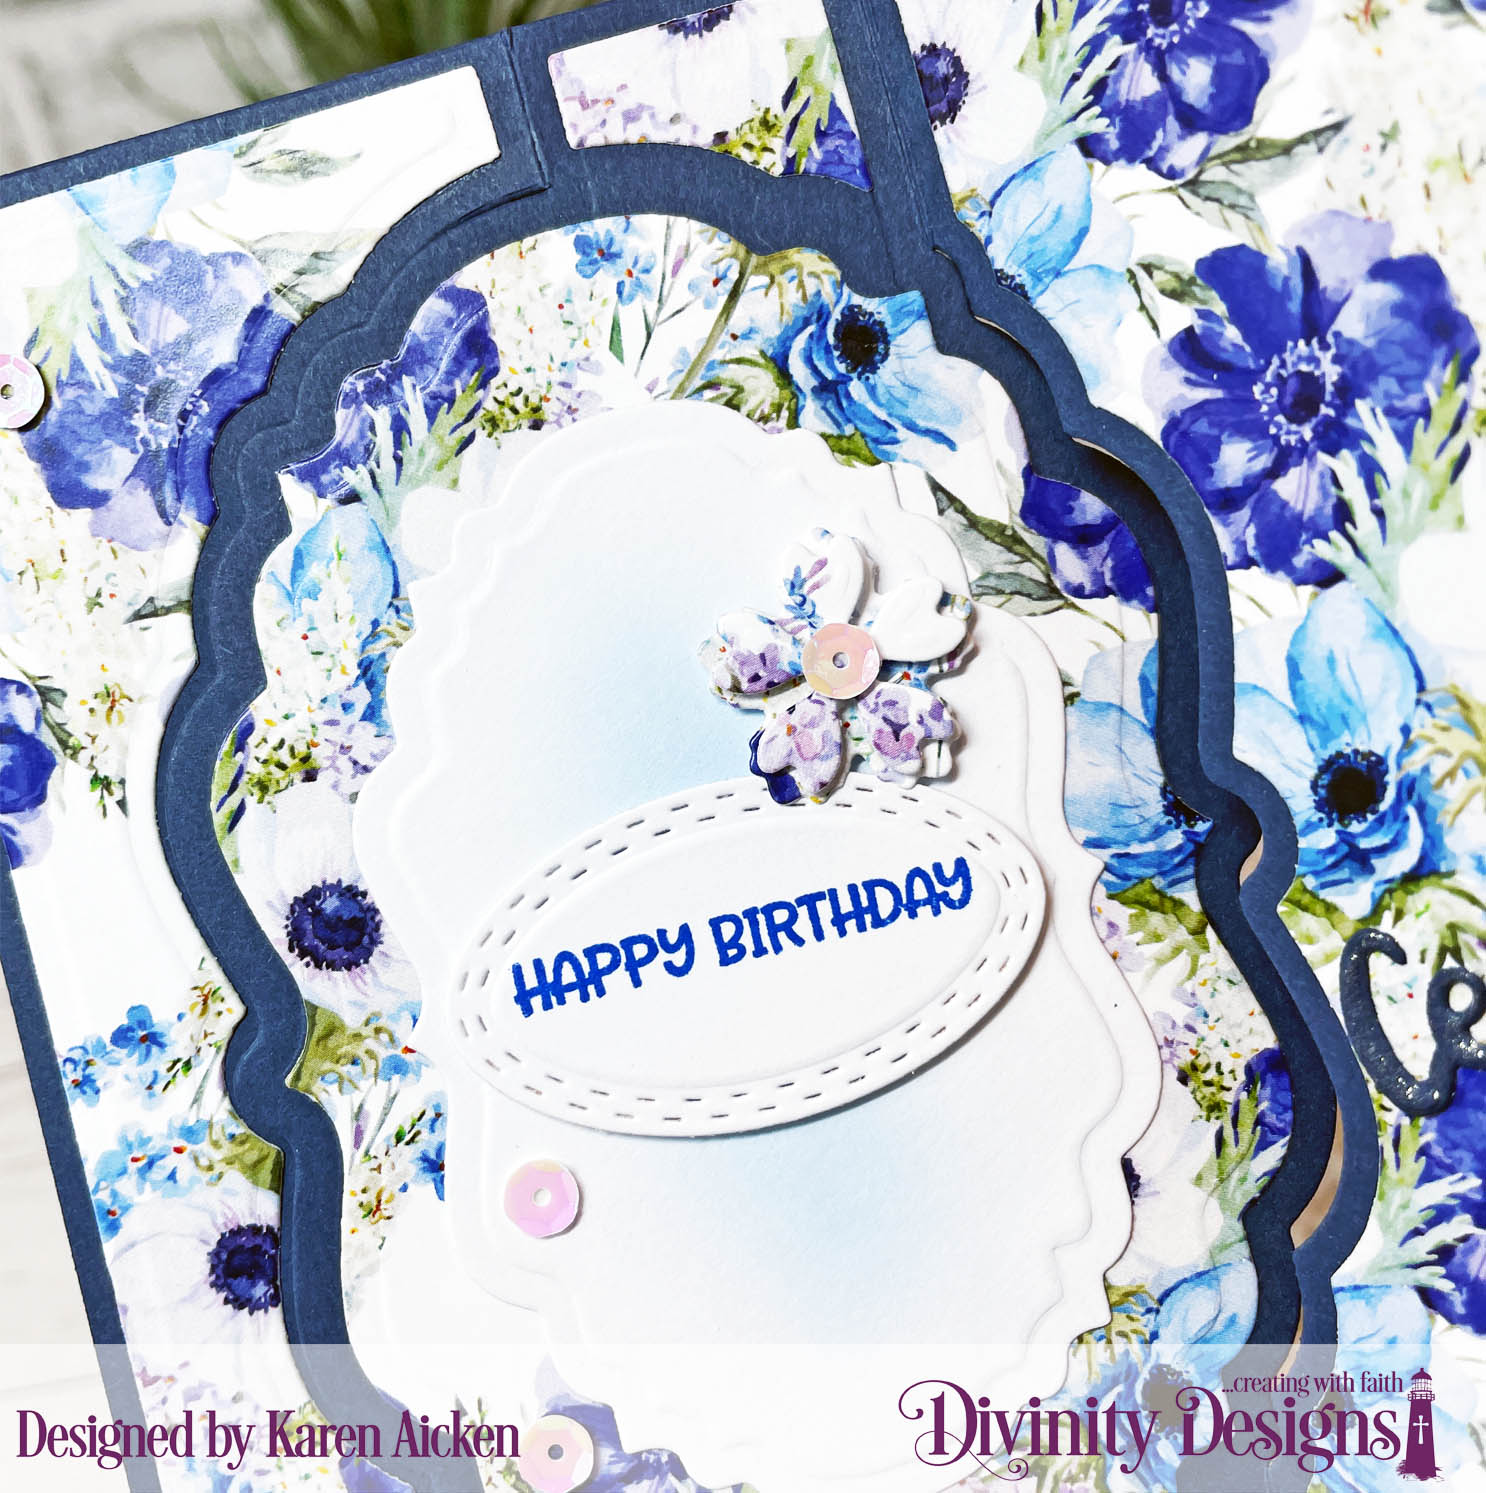
I had bought the Z Fold With Layers die set (Divinity Designs) as soon as it came out several years ago, and love to get it out. While it's probably easy enough to create this type of card BASE without the dies - this one comes with the layering dies so all the patterned paper pieces fit perfectly. No math or measuring required and that makes it fairly quick and easy to put a finished card together.
The only thing I am not crazy about is the name ... while it IS technically a Z Fold card, it's very distinctive with that Diagonal cut line, so I always refer to it as a Diagonal Z Fold, or Diagonal Trifold card. 😊
Our grandson has a birthday coming up and since he is getting older, 'cute' images aren't really appropriate for him right now. I mean - he is taller than I am! I got this Game Controller die last year knowing it would work for 'boy' birthday cards, so I pulled it out for his card. Then I flipped through a 'boy' themed 6x6" paper pad and saw the game controller print in it. Woo hoo!
There is just enough room for hubby and I to sign our names on the inner circle piece. Oh, and the sentiment is one of the leftover sentiment strips from Paper Roses' BEE HAPPY cardmaking kit. There are a lot of them left - they were very generous with the sentiments in the kit.
When my card was done, I got flipping through the remaining sheets & scraps in the (old) pad and decided it wouldn't take much to actually use it up! So I have been busy making birthday cards to share in the coming weeks. (And I did finish off that paper pad, since there were only a few sheets left 👏🏻👏🏻👏🏻)
Supplies used:
A-2, Z-Fold With Layers die set - Divinity Designs
Patterned paper - Boy Oh Boy, Carta Bella (6x6") - OLD!
Game controller die - Marianne Designs
Pops of Color - Scrapbook .com
Stardust Glitter Pen - Sakura
Stitched circle die - MFT Stamps
Happy Birthday strip - Bee Happy Cardmaking Kit, Paper Rose
I made this card for a friend for Happy Mail. I actually had the patterned paper out as I had used it for my February Sheetload of Cards ... so this is sort of a Sneak Peek of those! (The collaborators all share what they've made with the current month's Sheetload on the 2nd of each month).
I have a walkthrough of this card on YouTube HERE:
I had bought the Z Fold With Layers die set (Divinity Designs) as soon as it came out several years ago, and love to get it out. While it's probably easy enough to create this type of CARD BASE without the dies - this one comes with the layering dies so all the patterned paper pieces fit perfectly. No math or measuring required!
The only thing I am not crazy about is the name ... while it IS technically a Z Fold card, it's very distinctive with that Diagonal cut line, so I always refer to it as a Diagonal Z Fold, or Diagonal Trifold card. 😊
I added touches of gold with leaves from Karen Burniston's Landscape Scene and of course a few Pinkfresh Studios butterflies. The sentiments are by Stampin' Up and I don't know if they are still available or not.
Above is the front view, and below the back ...
Usually I add a sentiment and signing block to the inside front, but for this one I added one to the back panel along with another greeting.
Additional Supplies:
Patterned paper - Tropicool Vibes, Linda Kanase
Green 12 x 12" cardstock - Bazzill
White cardstock
Botanical Blooms - Stampin' Up
Happy Thoughts - Stampin' Up
Biggest Wish - Stampin' Up
This blog uses affiliate links whenever possible. This means, if you make a purchase through one of my affiliate links that you pay the same amount but I may receive a small commission from your purchase. I only link products that I own, love and use for my card making and not every link below is an affiliate one! 😊
Hello my crafty friends and welcome to Fun Fold Friday here on my blog. Today's card started out as more of an experiment than anything else but I'm thrilled with how well it worked out! I started with this pretty double sided 12 x 12" patterned paper (retired) and cut it down to 8.5" long. Then I scored down the 12" side at 4" and 8", which gave me a Slimline sized trifold card. The finished (folded) size of my card today is 4 x 8.5" and it fits in a standard #10 Business Envelope for mailing.
The next step was to create the diagonal cut at the top. Opening the trifold card flat, I made a small pencil mark 4" down from the top on the left side. I lined that 4" mark at one end of my trimmer, and the top right corner of the paper at the other end of my trimmer and cut ... presto!
I used some Mini Slimline dies to cut the inside rectangles, cut an oval for the card front, then pulled out some older poppy elements from my stash. The butterfly is from an very old punch, but the HOORAY is only a few months old. 😊 It's from a Mini Slimline die set by Picket Fence Studios, and I linked it below.
Below is what the card looks like opened. While is is only patterned paper and not overly heavy at that - the additional cardstock layers really help keep the card nice and sturdy. I think that is the part that made me the happiest as I'm not a fan of 'wussy' cards.
Now I do have the Slimline die set by Divinity Designs to create this type of card AND it has all the layering dies. It's called the Slimline Z Fold and I'll like it below as well. If you follow me, you know how much I enjoy layering dies. I'll also add their A2 sized set (which I also have). But I just wanted to see if this would work for a quick card and it did.
This blog uses affiliate links whenever possible. This means, that at no cost to you, if you make a purchase through one of my affiliate links that I may receive a small commission from your purchase. I only link products that I own, love and use for my card making!
Any supplies I'm unable to link are listed at the very bottom of my post.
Additional Supplies: Butterfly Punch - Stampin' Up (retired) Patterned paper - Flower & Field, Stampin' Up (retired) Poppy elements - Stampin' Up (retired) White card stock - Accent Opaque Digital Super Smooth (Amazon .ca)
Hello my crafty friends and welcome to Masculine Card Monday here on my blog. Today's Birthday Card uses dies from Divinity Designs with some scenic patterned paper. The photo above shows what the card would look like coming out of the envelope, and below shows it fully open.
I used all but the smallest piece of this 12 x 12" patterned paper sheet! Since I felt that the papers needed a little contrast, I added the hawks cut from black card stock.
The Hey You & shadow dies are from Picket Fence Studios and they fit perfectly across the card front.
Since you can see the middle section when the card is closed, I used one of the patterned paper panels on it, but also decorated the back side of the front flap with a stamped and matted oval.
This blog uses affiliate links whenever possible. This means, that at no cost to you, if you make a purchase through one of my affiliate links that I may receive a small commission from your purchase. I only link products that I own, love and use for my card making! NOTE: for some reason the thumbnail image of the Slimline Z Fold Card With Layers will NOT show up, even with several edits but the link should still work and the photos are fine on the DD website.
Any supplies I'm unable to link are listed at the very bottom of my post.
Additional Supplies: Rust, brown and yellow card stocks - stash White card stock - Accent Opaque Digital Super Smooth (Amazon .ca)
Hello! I'm on the Divinity Designs Blog today, with these two Fun Fold Cards. I have a walkthrough on YouTube as well if you are interested in more details or want to see the cards in action:
This first card uses the Vintage Label Flip Fold with Layers and beautiful paper from the Floral Favorites Paper Pad. The adorable bear is from the new Hog Wild Stamp/Die Duo and I added a couple of flowers from the Bitty Blossoms too.
Here is the card partially open ...
There is room to sign below the sentiment, which comes included in the Hog Wild Stamp/Die Duo set. The Celebrate comes in the Celebration Word dies and after adhering it I went over the letters with a Wink of Stella for additional shimmer.
Next up is the Z Fold Card along with the new Happy Mail Stamp/Die Duo set and the same patterned paper as above.
Below is the card open ...
This is the back view, with a sentiment stamp from the My World stamp set and lots of room to write a message. The pierced strips use the smallest dies from the Slimline Pierced Rectangles and Slimline Pierced Layering Rectangle die sets.
The list below contains some affiliate links. If you use these links to purchase I may earn a small commission at NO extra cost to you.
Additional Supplies: Ohuhu markers 12 x 12" card stock - stash Card sizes: Vintage Label Flip Fold Card is 4.25 x 5.5" Z Fold Card is 4 x 5.5"
Hello! Today I'm on the Divinity Designs Blog with these two Slimline cards. (All of the Divinity Designs items used are linked in the Supplies below.) I have a walk through of both cards on YouTube:
First up is a bright Birthday Card that is also a Fun Fold! I used the new Slimline Z Fold Card With Layers and papers from the slimline sized Geometric Paper Pad. Below is how the card would look coming out of the envelope.
Using the Big Balloon die and coordinating colours of card stock I placed the two balloons inside that first flap so they would be hidden when the card is closed. You could stamp a birthday greeting on one (or both!) of those two inner balloons. I intended on doing that but the Divinity Designs order I had placed with Birthday sentiment stamps, was delayed at Customs and didn't make it to me before I had to take these photos.
The Slimline Z Fold With Layers comes with layering dies for three of the sections of the Z Fold Card, and if you want to decorate the other two sections you just need to cut the card stock or patterned paper from the back side instead of the front. I go over that more in the YouTube video. It's easy peasy to do, and is what I did for my yellow card stock layer.
When you open this Z Fold card two more balloons and a Birthday Sentiment are revealed! The yellow balloon is the perfect place to write a personal message and sign our names when I'm are ready to send this card in the mail.
I used black mirror card stock for the balloon strings and this cute frame. To create the frame, I nested two of the Double Stitched Rounded Rectangles together and I saved that fallaway piece from the centre as it also has a lovely stitched edge. I stamped the Happy Birthday on white card stock that was die cut with the larger of the two rectangle dies I used for the frame, which ensured a perfect fit for the frame.
Now for my second card - I am SO happy with how this one turned out! I knew when I saw the Slimline Flower Petal Background that it would make a beautiful Stained Glass looking card. Using the Divinity Designs Slimline Card Base** I die cut and embossed white card stock and set it aside while I worked on the Stained Glass Panel. After cutting the die from black card stock, I adhered a transparency to the back side and then a vellum panel behind that. I coloured the vellum from the back side using bright & happy colours, and when I was done I added it to the Slimline Card Base**.
Using the Double Stitched Circle die set, I cut a white circle and stamped the Raspberries and sentiment on it then added a couple of sequins for even more sparkle. That was popped up with foam tape and my card front was finished. In the photo below you can see all the shine you get from the transparency behind the Slimline Flower Petal Background.
Inside I used the Slimline Rectangles to cut a yellow and a white panel, embossing both so they have a lovely raised edge. I added some of the black fallaway pieces from the background die in two corners and added some shimmer with a Wink of Stella pen. Then I stamped the Raspberries again using a light colour of ink and finally, a single black sequin.
I hope you've enjoyed my March projects for Divinity Designs as much as I enjoyed creating them! I'll be back with more Divinity Designs Projects next month.
Hello! I'm SO excited to share my first post as a Guest Designer for Divinity Designs. I'll be sharing projects weekly for my three month term and you can find all kinds of inspiration from the Divinity Designs Team on the BLOG!
I have three cards to share today, and of course this first one is a Slimline! I used the Slimline Card Base die to cut the card base (NOTE this die requires a larger die cutting machine). The white panel was die cut with the Slimline Rectangles and embossed. Many of the Divinity Designs dies come with this embossing feature!
The Slimline Quatrefoil Die is a new background die from the March release, and I cut it from the Beautiful Blooms Slimline Sized patterned paper and adhered it over a slightly smaller panel of pink card stock. Cutting it again from white, I took some of the white fallaway pieces and added them back into the centre area then the whole background piece was popped up with fun foam.
I like that the You Warm My Heart stamp set comes with a die to cut out the 'to go' cup, and that is the set I chose to finish off my card front.
Inside I added a strip of the patterned paper to a die cut & embossed panel from the Slimline Rectangles. I used the negative piece that I cut the front circle from as a stencil, and lightly brushed ink inside it then added a few more images from the You Warm My Heart stamp set.
My second card is a Flip Fold Card and if you follow me you know how much I love this style of card. I have had the Vintage Flip Fold With Layers die set since it was first released because I knew how much use I would get out of it and I love that it comes with all the layering dies too. I have a walkthrough of this card on YouTube:
Once again I used Kraft card stock for the card base and the Beautiful Blooms patterned paper for my card.
In the photo below you get a better look at the embossed edges. The Raspberries were white embossed onto one of the included labels in the Vintage Flip Fold With Layers die set. Then, I painted them in with diluted Distress Oxide inks, which I go over in the video.
A sentiment from the Raspberries set was stamped onto a Double Stitched Circle and popped up with thin foam tape.
Finally - my third card and it is also a Slimline card and uses one of the die sets that were released in March. I have the A2 sized Z Fold Card with Layers die set and I love it, so I was really excited to see it released in a Slimline size!!! I continued with the Kraft card stock and Beautiful Blooms patterned paper for this card as well.
The stamps I used are all from the Raspberries set and the only other die I used was the Double Stitched Circle. When the layering dies are included, it makes it so much easier to create a polished looking card.
Below is the view from the back and there is lots of room to write a note on the white panel.
All of the layering dies come with the set, but to cut the smaller white angled piece on the back, and the Kraft one on the front centre, you need to cut from the back side which is easy to do.
I'll be back next week with more Divinity Designs Inspiration!
Today for Masculine Card Monday on my blog, I'm sharing a new-to-me Slimline card format - a Diagonal Trifold card! This card was for my brother, who celebrates a December birthday and I used a couple of dies I purchased online last month. Both the cowboy silhouette and the large cactus are new and made by Paper Rose.
I have a walk through of my video on YouTube HERE as well.
It wasn't as easy as I thought it would be to cut the patterned paper to have even borders and I'm not sure why. It made perfect sense in my head, ha ha. Maybe I was too tired as I had been working on this late one evening when I should have been getting ready for bed. But I was inspired and wanted to keep playing!
Since I normally buy 12 x 12" patterned papers, a card like this is great to use those large patterns that would otherwise be lost on an A2 card.
Both the Happy Birthday and Go Wild are dies by Karen Burniston and I added a couple of Taylored Expression cactus dies as well. The barbed wire is an older die by MFT Stamps.
Because I like to work ahead, I have a couple more masculine cards & tags finished and planned on sharing them in the New Year for my Masculine Card Monday posts. However I was invited to join another Design Team and will be posting for them on Monday's in the New Year. I'm VERY excited about this new adventure ... and I will share more information as soon as I am allowed to. Any Masculine cards I make now, will be scattered throughout the week!
Measurements for my Slimline Diagonal Trifold:
Cut your card base to measure 8.5 x 10.5"
With 10.5" side at the top, mark 3" up from bottom left corner.
Use a trimmer (or craft knife and ruler if you are really brave and have steady hands) to make a diagonal cut from that 3" mark at the lower left to the top right corner. Set aside the top piece for another project.
Score the diagonal piece, which is still 10.5" wide, at 3.5" and 7". This gives you your trifold and the folded card size is 3.5 x 8.5".
NOTE: It might be easier to score your card stock at 3.5" and 7" before you make your diagonal cut.
Supplies: Various card stocks - stash Patterned paper - Desert Dream, Recollections Bucking Horse die - Paper Rose Cactus die - Paper Rose 1030 Happy Birthday - Karen Burniston 1128 Go Wild - Karen Burniston Fence (Barbed Wire ) - MFT Stamps Small Cactus dies - Can't Touch This, Taylored Expressions Celebrate - Large Birthday, Technique Tuesday Circles - stash Taylored Expressions Blending Brushes Card size - 8.5 x 3.5" (when folded) and fits in a #9 or #10 Business Envelope