Thursday 30 September 2021

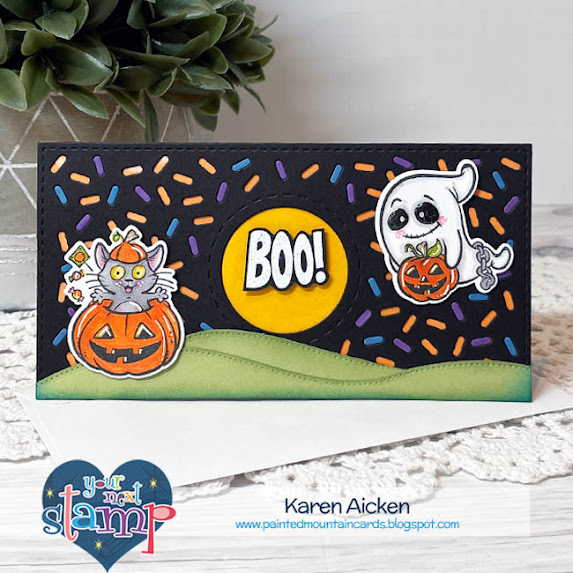
Fun Friday Challenge "Set the Scene"

Hello!  The newest Fun Friday Challenge at Your Next Stamp is "Set the Scene - include a scene on your creation".  I made a Mini Slimline card using some new and some previously released items, and everything that is available is linked below for you.

It's very hard to see in the photos, but first I backed the Mini Slim Sprinkles piece with a transparency so each of those little sprinkles is nice and shiny. Then I cut it again with scraps of blue and purple card stocks keeping only the 'sprinkles'. Those were inlaid back into the black Mini Slim Sprinkles for pops of colour. Both the Cat and the Ghost's eyes are raised and shiny with Glossy Accents.

Here is a peek at the inside ...


Our challenges always come with 2 ways to win:

#1 – Would you like the chance to win a YNS stamp set? Leave a comment on the Your Next Stamp Blog by October 6, 2021 at midnight EST to be entered in the random drawing. Want more entries in the drawing? Leave comments on YNS’ IG and FB pages too!

#2 – Would you like the chance to win a YNS store e-gift card? Play along with the challenge! Link up your creation at the bottom of the post on the YNS BLOG by October 14th, 2021 at midnight EST to be entered in the random drawing to win a $15.00 YNS gift certificate. If your creation contains YNS products and you are the random winner then you receive an extra $5.00. 

This blog uses affiliate links whenever possible. This means, that at no cost to you, if you make a purchase through one of my affiliate links that I may receive a small commission from your purchase. I only link products that I own, love and use for my card making!

Additional supplies:
Shimmer spray
Transparency
Purple and blue card stock scraps
Ohuhu alcohol markers
Orange Card Stock - stash

Thanks for stopping by

Anniversary Z Fold Shaker Card


Hello! While I was debating about whether or not I wanted to purchase the Hand Penned bundle and papers from Stampin' Up, I had already ordered the 'Memories & More' card pack from the suite. I really like the Memories and More card bases from them - they are nice and sturdy, & gave some kind of pattern on the card front with coordinating envelopes. They are also a nice size - 4-1/4 x 6-1/4" ... meant to add a 4 x 6" photo to if you choose to. Which I don't, ha ha.

Once I got the cards though, I decided that I would need the coordinating patterned paper as well ... I was still debating about the stamps & dies. For this Anniversary card, I pulled out both the Hand Penned Memories & More card & envelope as well as the patterned paper and a coordinating card stock. Everything that is available is linked below. Since I rarely post my cards in the same order I make them, you will know that I did finally decided to purchase the Hand Penned stamps & dies and used them to create a 5 x 7" Tower Pinwheel Card! you can see that one HERE.

For my Z-fold card today, I first folded the card 'inside out' so the polka dot pattern was inside the card on the right. Then I scored the left side of the card at 2-1/8" (half the width of the card front) and folded the right edge to the front along that score line. That created my Z Fold card base, that was all white except for the green polka dotted pattern inside. 


The shaker was created with the lovely Fancy Scalloped Heart Dies from Studio Katia and various sequins and filler from my stash. The bow was die cut from Stampin' Up's Pierced Blooms die set. 

I added some of the Hand Penned patterned paper to the card base then adhered the shaker heart. The Happy Anniversary is from Karen Burniston!


... one more look ...


This blog uses affiliate links whenever possible. This means, that at no cost to you, if you make a purchase through one of my affiliate links that I may receive a small commission from your purchase. I only link products that I own, love and use for my card making!

Additional Supplies:
Various Sequins
Embossed Pastel hearts Sequins - Kat Scrappiness

Thanks for stopping by 

Wednesday 29 September 2021

Halloween Tower Pinwheel Card with Pop Up's

Hello!  Yes, I made another 5 x 7" Tower Pinwheel Card. They are just so fun - both to create and 'play with' afterwards! Of course I like cards that stand really nicely for display and these ones do that for sure. They fold completely flat for mailing and I have a walkthrough of my card on YouTube: 

Below is a collage photo of each of the pinwheel paddles. Weeks ago, a talented crafter called Vy Tran shared a Tower Pinwheel card with a Pop Up and that is what inspired my card today. While I didn't have a chance to make a tutorial for this card specifically, I will link my tutorial for creating a Simple Box Pop Up below and the same technique works for these days.


I was happy to find a purple 5 x 7" envelope in my stash!


Click HERE for a Simple Box Pop Up Tutorial!

If you are interested in making a Pinwheel Tower Card, 
the video tutorial that I used is HERE

Additional Supplies:
Purple card stock - stash
Scallop Stitched Circles - Tutti Designs
Shimmer Spray
Stamps on envelope - Frightful Little Bits, Hello Bluebird

Thanks for stopping by

Monday 27 September 2021

Birthday Queen Slimline Card

Hello!  Today I'm sharing a Slimline Birthday Card using some new release and previously released items from Your Next Stamp. Everything that is available is linked below.

Keeping the dies together with removable tape, I die cut the Slim Stitched Rectangles from several different colours of card stock and patterned paper. Then I had fun piecing them back together in different combinations and this is the one I chose for my Birthday Card. The Birthday Queen is from the new Birthday Greetings and I white heat embossed it on a stitched circle before water colouring. Then I attached it to a YNS doily and popped it up on my card base.  The Happy Birthday is from the new Birthday Gnomies set.


Inside is another stamp from the Birthday Greetings set.


... one more look ...


This blog uses affiliate links whenever possible. This means, that at no cost to you, if you make a purchase through one of my affiliate links that I may receive a small commission from your purchase. I only link products that I own, love and use for my card making!

Additional Supplies:
Purple, Pink and Yellow card stocks - stash
Patterned paper - Doodlebug
Shimmer Spray
Heavyweight White card stock - Michaels

Thanks for stopping by

Mini Slimline Mailbox Card

Hello! This is one of those cards that was very meaningful to the people I sent it to. They are moving to an acreage, fulfilling a long time dream of owning a farm. Thus the sentiment (which I just LOVE) on the card front. 

Why the mailbox? They had to find out how and where to collect their mail for this rural property, and once they had an actual mailing address I wanted to send them their first Happy Mail. 


The area they will be moving to is surrounded by farms, ranches and wooded areas. There are lots of wooded areas to explore right on their property ... so again - this sentiment is perfect. It's from the same set as on the card front and everything that is available is linked below.


This blog uses affiliate links whenever possible. This means, that at no cost to you, if you make a purchase through one of my affiliate links that I may receive a small commission from your purchase. I only link products that I own, love and use for my card making!

Additional Supplies:
Patterned paper - Oh So Ombre, Stampin' Up (retired)
Grey card stock
Copic marker

Thanks for stopping by

Sunday 26 September 2021

Flip Frame Pop Up Card for STAMPtember


Hello! Simon Says Stamp is celebrating their 12th year of STAMPtember, and today is the day that they collaborate with Riley & Company. Each day of September, SSS collaborates with a different company with a special product that is only available while supplies last. Last year the Riley & Company collaboration set sold out, so if you like this set as much as I do - you will want to head right over to Simon Says Stamp to snag it. I have everything that's available, linked below for you. I also have a walkthrough of my card on YouTube


Here is the front of my card ...


My card is 4 x 6" and the dies I added are from Karen Burniston. The Crosshatch Ovals and the Flip Frame Pop Up. For the front, I fussy cut the Riley face and popped it up below the fun sentiment. 


Inside is the Flip Frame Pop Up. I added some white gel pen Zentangle to the frame. I love how Riley the Moose is pulling Simon the dog in this set.


On the left side of my card, is another one of the sentiments included in the stamp set.

I coloured Riley with dye inks and a water brush. After the first layer of colour dried I added a second layer and let that dry. Finally I added some shading with a pencil and glossy accents to the sunglasses, and Simon's eyes & nose.


Remember these stamps are available at Simon Says Stamp only as long as supplies last!

Additional Supplies:
Grey Copic markers
Patterned Paper - Over The Rainbow, Recollections

Thanks for stopping by

Saturday 25 September 2021

Farm Themed Theatre Fold Card


Hello!
 Today’s card is the Birthday card I made for our eldest daughter. It’s actually been done for awhile, but I rarely post things in the same order I make them. 😊.  I pulled out the farm themed stamps & dies from Your Next Stamp, some older farm themed patterned paper and the Theatre Fold die set from Taylored Expressions. I have all the details on YouTube:


In the video, I made reference to my 'hack' or fix for the Theatre Fold as I was very disappointed in my first one. It was unstable and fell apart in my hands whenever I tried to pick it up. I will link that video below, as well as all the supplies that are still available!

Below is what the card looks like coming out of the envelope:


... and here is is when you pull on the sides to open it:


... the view from above:


... and finally, the back of the card. Since there isn't room to write a personal greeting on the front of the card, I added decorative panels to the back side. The stamps and dies are from Taylored Expressions.


Click HERE to see my video to my Theatre Fold hack.

This blog uses affiliate links whenever possible. This means, that at no cost to you, if you make a purchase through one of my affiliate links that I may receive a small commission from your purchase. I only link products that I own, love and use for my card making!

Additional Supplies:
Patterned paper - Herbs & Honey, Basic Grey (old, from my stash)
Copic markers
Ohuhu alcohol markers

Thanks for stopping by
Friday 24 September 2021

Tower Pinwheel Birthday Card

Hello!  Today I'm sharing another Tower Pinwheel card - this one was made for a friend. Once again I made it in the 5 x 7" size and I had so much fun making it I started another one in a Halloween Theme. 😊.

I have all the details on YouTube

I am so impressed with how flat these cards fold down for mailing! Below is a collage photo showing all the different 'flaps'.

If you are interested in making a Pinwheel Tower Card, the video tutorial that I used is HERE

This blog uses affiliate links whenever possible. This means, that at no cost to you, if you make a purchase through one of my affiliate links that I may receive a small commission from your purchase. I only link products that I own, love and use for my card making!

Additional Supplies:
Shimmer spray
Austrian Collection, Salzburg Oval - Creative Expressions
Summer Posy die and Autumn Posy die - Creative Expressions
Glitter Dots - Elizabeth Craft Designs (out of stock)
White border Peel Off stickers - Dazzles

Thanks for stopping by

Thursday 23 September 2021

Dolphin Mini Slimline Card


Hello! Today I'm sharing a Mini Slimline card that is also a Pop Up. For the front of my card, I used one of my new edger dies from Creative Expressions. These were on a Flash Sale at R&R Scrapbooking and I had ordered several of them. 😊 Even though they are not my usual style, these dies work SO well for Slimline and Mini Slimline cards, I just knew I'd get a lot of use out of them. I have a walkthrough of my card on YouTube:   

The Dolphins were cut from a metallic card stock, and after cutting it again from white I added in a few of the white fallaway pieces back into the blue metallic one. I explained that better in the video, ha ha.


Inside I created the Pop Up by using one of the dies included with Karen Burniston's Street Lantern Pop Up. I cut it twice to give my large smile embellishment lots of support. The clouds on the front are from KB's Landscape Scene.


... one more look ...


This blog uses affiliate links whenever possible. This means, that at no cost to you, if you make a purchase through one of my affiliate links that I may receive a small commission from your purchase. I only link products that I own, love and use for my card making!


Additional to what is linked below:
Mirri Card - Glitter Ombre, Hunky-dory
Seashell sequins
White printer paper

Thanks for stopping by

Wednesday 22 September 2021

Pop Up Birthday Card with Roses


Hello!  Today I'm sharing another card using the printed florals from the April Blessings Box at Divinity Designs. I paired them with a lacy die cut from a 12 x 12" package that was on the clearance rack at Stampin' Up.  I have a walkthrough of my card on YouTube:


The Best Wishes is also from Divinity Designs and everything that is available is linked below.


Inside I created a simple Box Pop Up and I will link a tutorial below for you.  The square lacy frame is from the same sheet as the front, and the patterned paper square was a leftover piece in the package of papers from Divinity Designs. The Happy Birthday (and the Best Wishes on the front) were cut from gold foil card stock. I hope the shimmer and shine shows up better in the video than in the photos!


Click HERE for a Simple Box Pop Up Tutorial!

Supplies I'm unable to link:
Shimmer Details Laser Cut paper - Stampin' Up (retired)
Burgundy card stock - my stash
Roses stamps on envelope - Recollections

Thanks for stopping by

Tuesday 21 September 2021

Slimline Fall Blessings Card

Hello!  Sometimes there is a die I just have to have. Normally I purchase dies that I can see many uses for, something versatile and that I can use for years and for multiple people. When Pink and Main released this Slimline leaf die I knew I would just HAVE to add it to my collection, even though it doesn't tick many of my boxes. It's SO pretty, and - well, LEAVES. It took awhile before I could buy it, but I did and this is my first play with it. I have several ideas already, but of course my first card had to be a fall themed one.

I cut it from a metallic paper and I just adore the shine. The pretty pearls are new from Studio Katia ... Dark Chocolate Pearls. And I added a sentiment from Taylored Expressions Mini Strips Harvest.


Here is a peek at the inside ...


I added a leftover strip of the metalic card stock to the inside as well as some stencilled leaves on the Kraft envelope. While I can't find that stencil to link, I will like two others that would also work.


This blog uses affiliate links whenever possible. This means, that at no cost to you, if you make a purchase through one of my affiliate links that I may receive a small commission from your purchase. I only link products that I own, love and use for my card making!

Supplies I'm unable to link for you:
Mirri Card - Glitter Ombre, Hunky Dory
Copic Marker
Shimmer Spray for spatter
Sentiment - Echo Park (retired)
Kraft #10 Business Envelope

  Thanks for stopping by