Showing posts with label Pull Cards. Show all posts

Friday, 20 October 2023

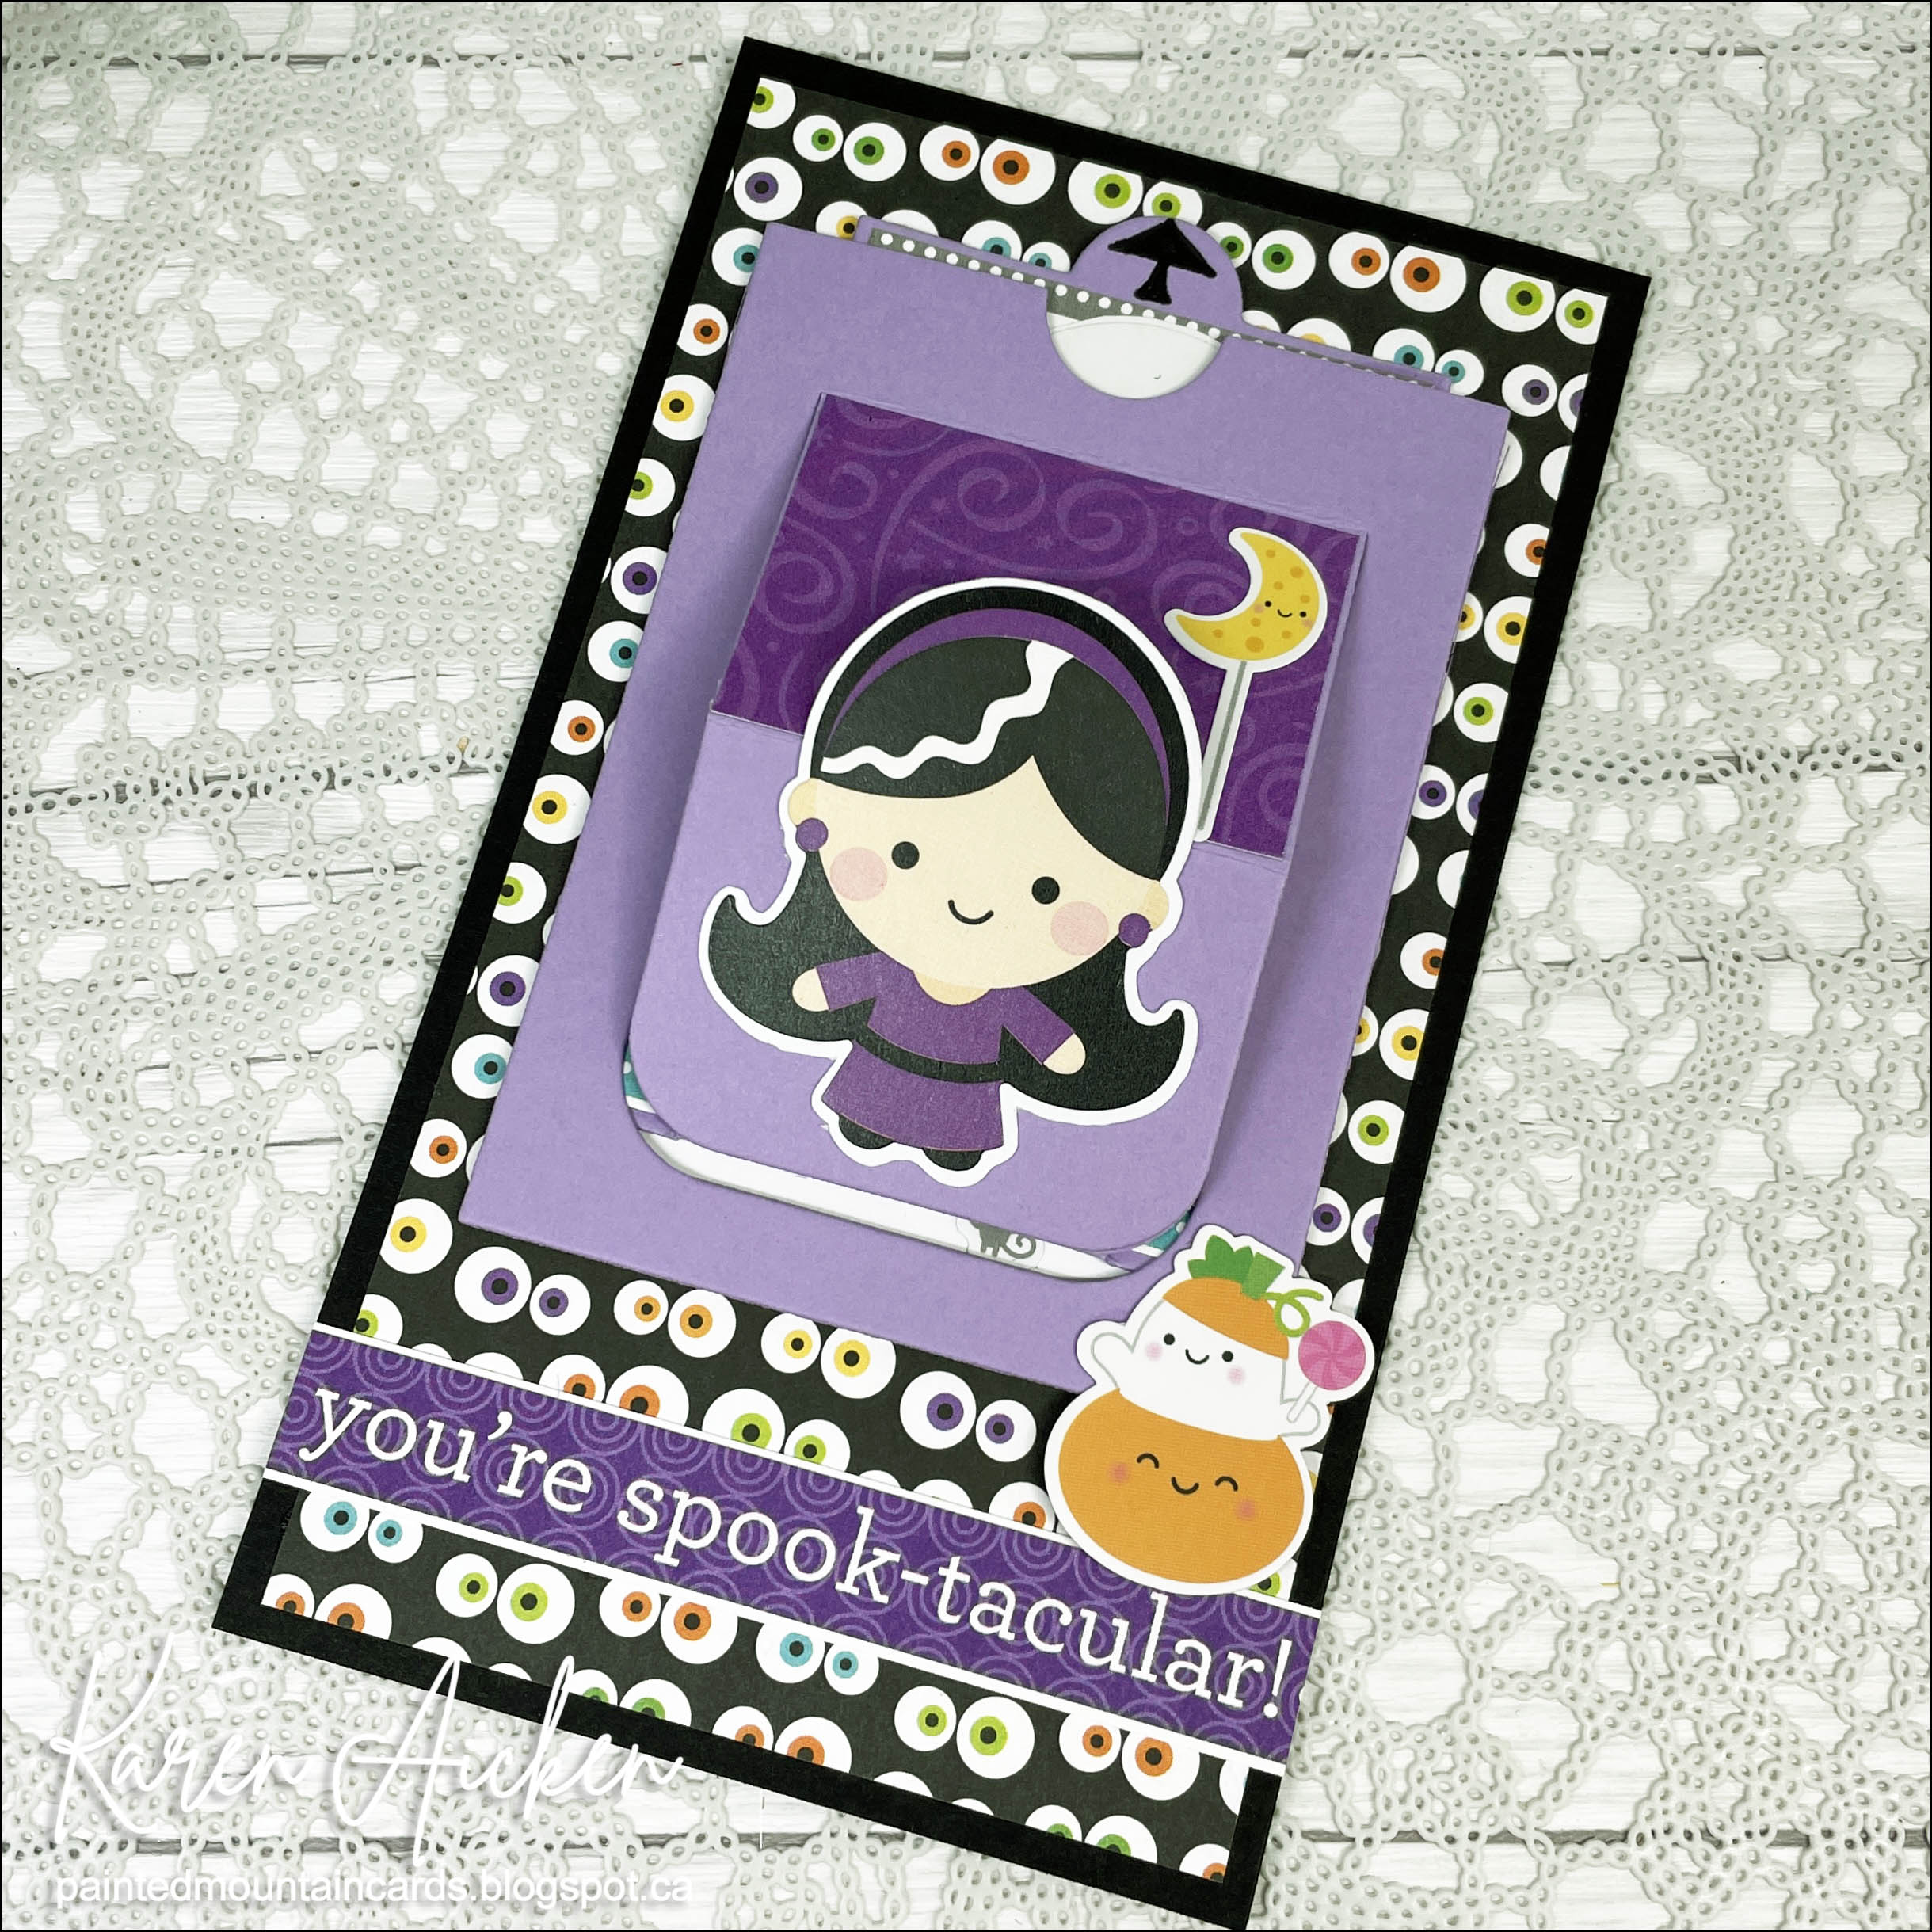
Mini Slimline Pull Tab Card for Halloween


Welcome to Fun Fold Friday on my blog! Today I'm sharing a Mini Slimline card made as the October edition to my monthly series 'Throwback Fun Fold Dies'. I pulled out these VERY OLD pull tab dies from Papertrey Ink. At the time there were very few fun fold dies out there, and I thought these were so fun! 


When you pull the tab, the center section lifts up to reveal the stamped sentiment. Aren't those tiny mouse stickers adorable? I added one in the greeting  area and one on the back as well. All of the papers, stickers and ephemera are from Doodlebug Designs. ❤️


When I make a card like this, I tend to make them post card style rather than an opening card. Below is the back of the card, which is where I will add our personal message & signature. The stamp set by Karen Burniston & is retired. It continues to be a set I pull out and use every year!


Having been asked how many cards I make I thought it would be fun to keep track this year. Many of my posts include more than a single card or project and below is my tally. 

Card Tally for 2023
January - 53 cards
February - 56 cards
March - 55 cards
April - 32 cards
May - 43 cards
June - 34 cards
July - 56 cards
August - 106 cards
September - 61 cards
October so far - 35 cards

I decided to cancel the subscription that provided linked thumbnails to what products I used on my cards. It was costing me out of pocket each month, so I’m back to listing what I used.

Supplies:
Pull Tab die - Papertrey Ink (old)
Patterned paper - Doodlebug, Boos & Brews
Stickers - Doodlebug, Ghost Town
Catherine Pooler Inks
Halloween stamps - Karen Burniston/ECD (retired)

Friday, 21 July 2023

Pull Card Duo - and a Video Tutorial!

It's Fun Fold Friday here on my blog, and today I'm sharing a Pull Card. Actually, I'm sharing two of them and I did a video tutorial for the second!  These cards are easy to do with lots of opportunity for variety.  

Both cards utilize printed note cards - and this foiled rose gold note card started things off.

When you open the card and pull the inside right edge open, a sentiment is revealed! You can find my tutorial on YouTube here:   addddddddd


The second card - the one made in the tutorial - has an ice cream cone on the front.

I didn't add a sentiment inside as I will be hand writing one when I go to send this card to family NEXT July. Ha - I finished all my ice cream cards for this year but it's good to be ahead as I was actually scrambling this year. Summers do get busy!


Having been asked how many cards I make I thought it would be fun to keep track this year. Many of my posts include more than a single card or project and below is my tally. 

Card Tally for 2023
January - 53 cards
February - 56 cards
March - 55 cards
April - 32 cards
May - 43 cards
June - 34 cards
July so far - 34 cards

Additional Supplies:
Note Cards - Paper Studio
Ice Cream punch - Stampin' Up
Sweet Ice Cream stamps - Stampin' Up
Picture Perfect Birthday - Stampin' Up
Scrap of Kraft cardstock
White cardstock
Red cardstock
Rose Glimmer paper - Stampin' Up
Stickers/Shakers K&Co - old from my stash
LJD Birthday Greetings - MFT Stamps
Stitched Circle dies - MFT Stamps

This blog uses affiliate links whenever possible. This means, if you make a purchase through one of my affiliate links that you pay the same amount but I may receive a small commission from your purchase. I only link products that I own, love and use for my card making and not every link below is an affiliate one! 😊

Friday, 14 April 2023

Christmas Pull Card


Today is Fun Fold Friday on my blog and I'm sharing the 4th edition to my monthly series "12 Months of Christmas". I've been having fun making these pull cards lately so had to try one with holiday papers and I also added acetate to the window. I like it and will probably do that again, as I know I will make more of these. Especially in a larger than A2 card size as this one is.


I'm not a huge fan of this paper pad, and every time I pull it out I think I'm just going to give it to the grandkids or something. Then I flip through it and some of the gold foiling catches my eye and I decided to make just 'one more card' with it. 

After the patterned paper was adhered to the card front, I used a hexagon die to cut a window in the card front. To create the frame, I simply nested two hexagon dies together held in place with Washi Tape. The smaller one was the die I used to cut the window and then a larger one. I die cut the red frame for the outside and the patterned frame inside. While the inside one isn't necessary, it does finish off the window and left side of the card. 

Using the larger die I cut a piece of acetate and adhered it over the opening on the card front with a tape runner. Then I added the frame on top! Since I didn't feel like hauling out all my Christmas stuff and rummaging through it, I added a bow using a tulip bouquet die that was a recent purchase.


The tag was one of the cut aparts included in the paper pad and the decorations on the left were fussy cut from some of the paper scraps in the package. You pull the piece with the tag to the right, and the sentiment inside is revealed. That is also where we will sign our name when we go to send the card.


I haven't done a tutorial for this size of card, but here are the measurements I used.
Card base - 5 x 6.5" (folded) card. If you are using card stock, a 10 x 6.5" sheet scored in the centre at 5" will give you the card base and it will fit in an 5 x 7" envelope.
For the pull card piece, the patterned paper was cut at 9 x 6" and scored at 4.5 and 6.75".

Having been asked how many cards I make I thought it would be fun to keep track this year. Many of my posts include more than a single card or project and below is my tally. 

Card Tally for 2023
January - 53 cards
February - 56 cards
March - 55 Cards
April so far - 17 Cards


Additional Supplies;
5 x 6.5" card base and envelope - Michaels
Patterned paper - Christmas Made, DCWV (old, from my stash)
Bakers twine - leftover from a Stampin' Up kit
Word stamp - Classic Christmas, from an old magazine
Peel Off gem stickers - Dazzles

This blog uses affiliate links whenever possible. This means, if you make a purchase through one of my affiliate links that you pay the same amount but I may receive a small commission from your purchase. I only link products that I own, love and use for my card making and not every link below is an affiliate one! 😊

Wednesday, 22 March 2023

Catherine Pooler's Canadian Adventure Video Hop


Welcome to the Canadian Adventure YouTube Hop! My crafty friends and I can't wait to share how we used the NEW 'O Canada Bundle' that’s part of the Global Adventure Pt. Tres Collection from Catherine Pooler Designs.

Since this is a video hop, all the details - including how to enter to win a prize - can be found with my YouTube video:  


Last week I shared a Mini Slimline sized Pull card, but didn't have a tutorial. The A2 sized ones have been around for many years but I had figured out the measurements for a Mini Slimline version and that is the tutorial in my video today. I'm featuring the products in the NEW 'O Canada Bundle' from Catherine Pooler!


When you open the card, you see there is a flap on the right side that you pull open to reveal the sentiment.


The cards stand for display, too!


I hope you will watch the videos in the hop, be inspired by all the fun creations - and leave comments on the videos for that chance to win a prize! Once again, the details are in the description of my YouTube video!


The O Canada bundle is available now at 

Catherine Pooler Designs!


Having been asked how many cards I make I thought it would be fun to keep track this year. Many of my posts include more than a single card or project and below is my tally. 

Card Tally for 2023
January - 53 cards
February - 56 cards
March so far - 35 Cards


Monday, 20 March 2023

Easter Pull Out Card


Recently I shared a Mini Slimline Pull Out Card (tutorial coming later this week) but I also wanted to try it in a 5 x 7" size. This is the card I came up with!


Using some older patterned paper that included these vintage cut aparts, along with Rainbow Holographic card stock I was happy with the card and left it on my craft room desk. When I went in the next day though, I decided it needed something more and pulled out my bin of butterflies. 


These are from Pinkfresh Studios ... last year I purchased the layering stencils, die and stamp for these butterflies, and made a BUNCH of them in several different colorways. The finished butterflies were added to a plastic bin and I love being able to go through it and chose 'already done' butterflies to add to my projects. 


When you pull the inner card to the right, the sentiment (Karen Burniston) is revealed.


I haven't done a tutorial for this size, but below are the measurements I used.
Card base:  10 x 7", scored at 5" for a 5 x 7" card.
Inner card:  9 x 6.5", scored at 4.5 and 6.75".

I used Karen Burniston's Labels & Rectangles Crosshatch dies to cut the frame and aperture (window) in my card front and my large die cutting machine. You could also opt to cut your 5 x 7" card base in two panels. The front panel at 5.5 x 7", score down the left edge at 1/2". That panel would fit through most popular die cutting machines so you can cut your aperture from that.

Then cut your back panel at 5 x 7". Adhere the two together (after you cut your window) using that 1/2" edge on the front panel and wrapping it around to the back of the back panel.

Having been asked how many cards I make I thought it would be fun to keep track this year. Many of my posts include more than a single card or project and below is my tally. 

Card Tally for 2023
January - 53 cards
February - 56 cards
March so far - 33 Cards
Additional Supplies
Blue cardstock
White cardstock
Rainbow Holographic cardstock - Recollections
Patterned paper and cut apart - Springtime, Authentique (old, from my stash)
Gems - leftover from a Stampin' Up Card kit 
Grey Fineline marker

This blog uses affiliate links whenever possible. This means, if you make a purchase through one of my affiliate links that you pay the same amount but I may receive a small commission from your purchase. I only link products that I own, love and use for my card making and not every link below is an affiliate one! 😊

Friday, 3 March 2023

Scrap N Stamp Canada March Inspiration Hop: "Baskets of Bunnies"


Welcome to the March Inspiration Hop by Scrap 'n Stamp Canada, with the theme 'Baskets of Bunnies'. They weren't able to get me any product for this hop, so I just pulled some older items from my stash and made a fun fold card. You can make this card with many of the items they have at Scrap 'n Stamp Canada though, so think of this more as a card idea you can make your own.


These Pull Out Fun Fold cards have been around for years and I have always wanted to make one. To put my own spin on it though, I created a Mini Slimline sized card! I didn't do a tutorial (I will have one later this month) but will list the basic measurements at the end of my post if you are curious.

Since it's a new (to me) Fun Fold with a new size - I'm counting this as the March edition to my series New Fun Folds!


The card has an aperture cut in the front and you can see through it to the inside. But when you open the card, you see that there is more to it ... the image inside is on sort of a reverse Z fold panel.


When you pull that panel to the right, another two panels are revealed. I added patterned paper to the center one and a stamped sentiment on the center one. The sentiment is from Lawn Fawns Magic Spring Messages which is a stamp set I got from Scrap 'n Stamp Canada awhile ago. Stamped in Catherine Pooler Ink, of course. The patterned paper and ephemera are by Echo Park.


I really enjoy making Mini Slimline cards, and finding ways to incorporate a fun fold into them. That being said, I also figured out the measurements for a 5 x 7" card which will be shared another day. And I will be doing this Mini Slimline one again soon! Below are my basic measurements:

Card Base: 7 x 6" - score in the centre at 3.5"

Pull out piece - 7.25 x 5.75", scored at 3.25 and 5.25"

Decorate the panels as desired (more details will be in my upcoming tutorial)


I hope you will check out the Scrap 'n Stamp Canada Blog, for a list of all the creators in the hop!


Late last year I was asked how many cards I make but I didn't have a clear number. Since many of my posts include more than a single card or project, I thought it would be fun to keep track this year. 


Card Tally for 2023
January - 53 cards
February - 56 cards

March so far - 12 Cards

Supplies:
Patterned paper - 'Spring' 6 x 6", Echo Park
Magic Spring Messages - Lawn Fawn
Blue ink - Hot Tub, Catherine Pooler
Ephemera, 'Easter' - Echo Park
Oval Stitched Rows - Divinity Designs
Stitched Circles - Divinity Designs
Corner Rounder - Creative Memories
Sequins - stash
Blue cardstock

Monday, 8 July 2019

Floating Kitty Pull Card

Hello my crafty friends

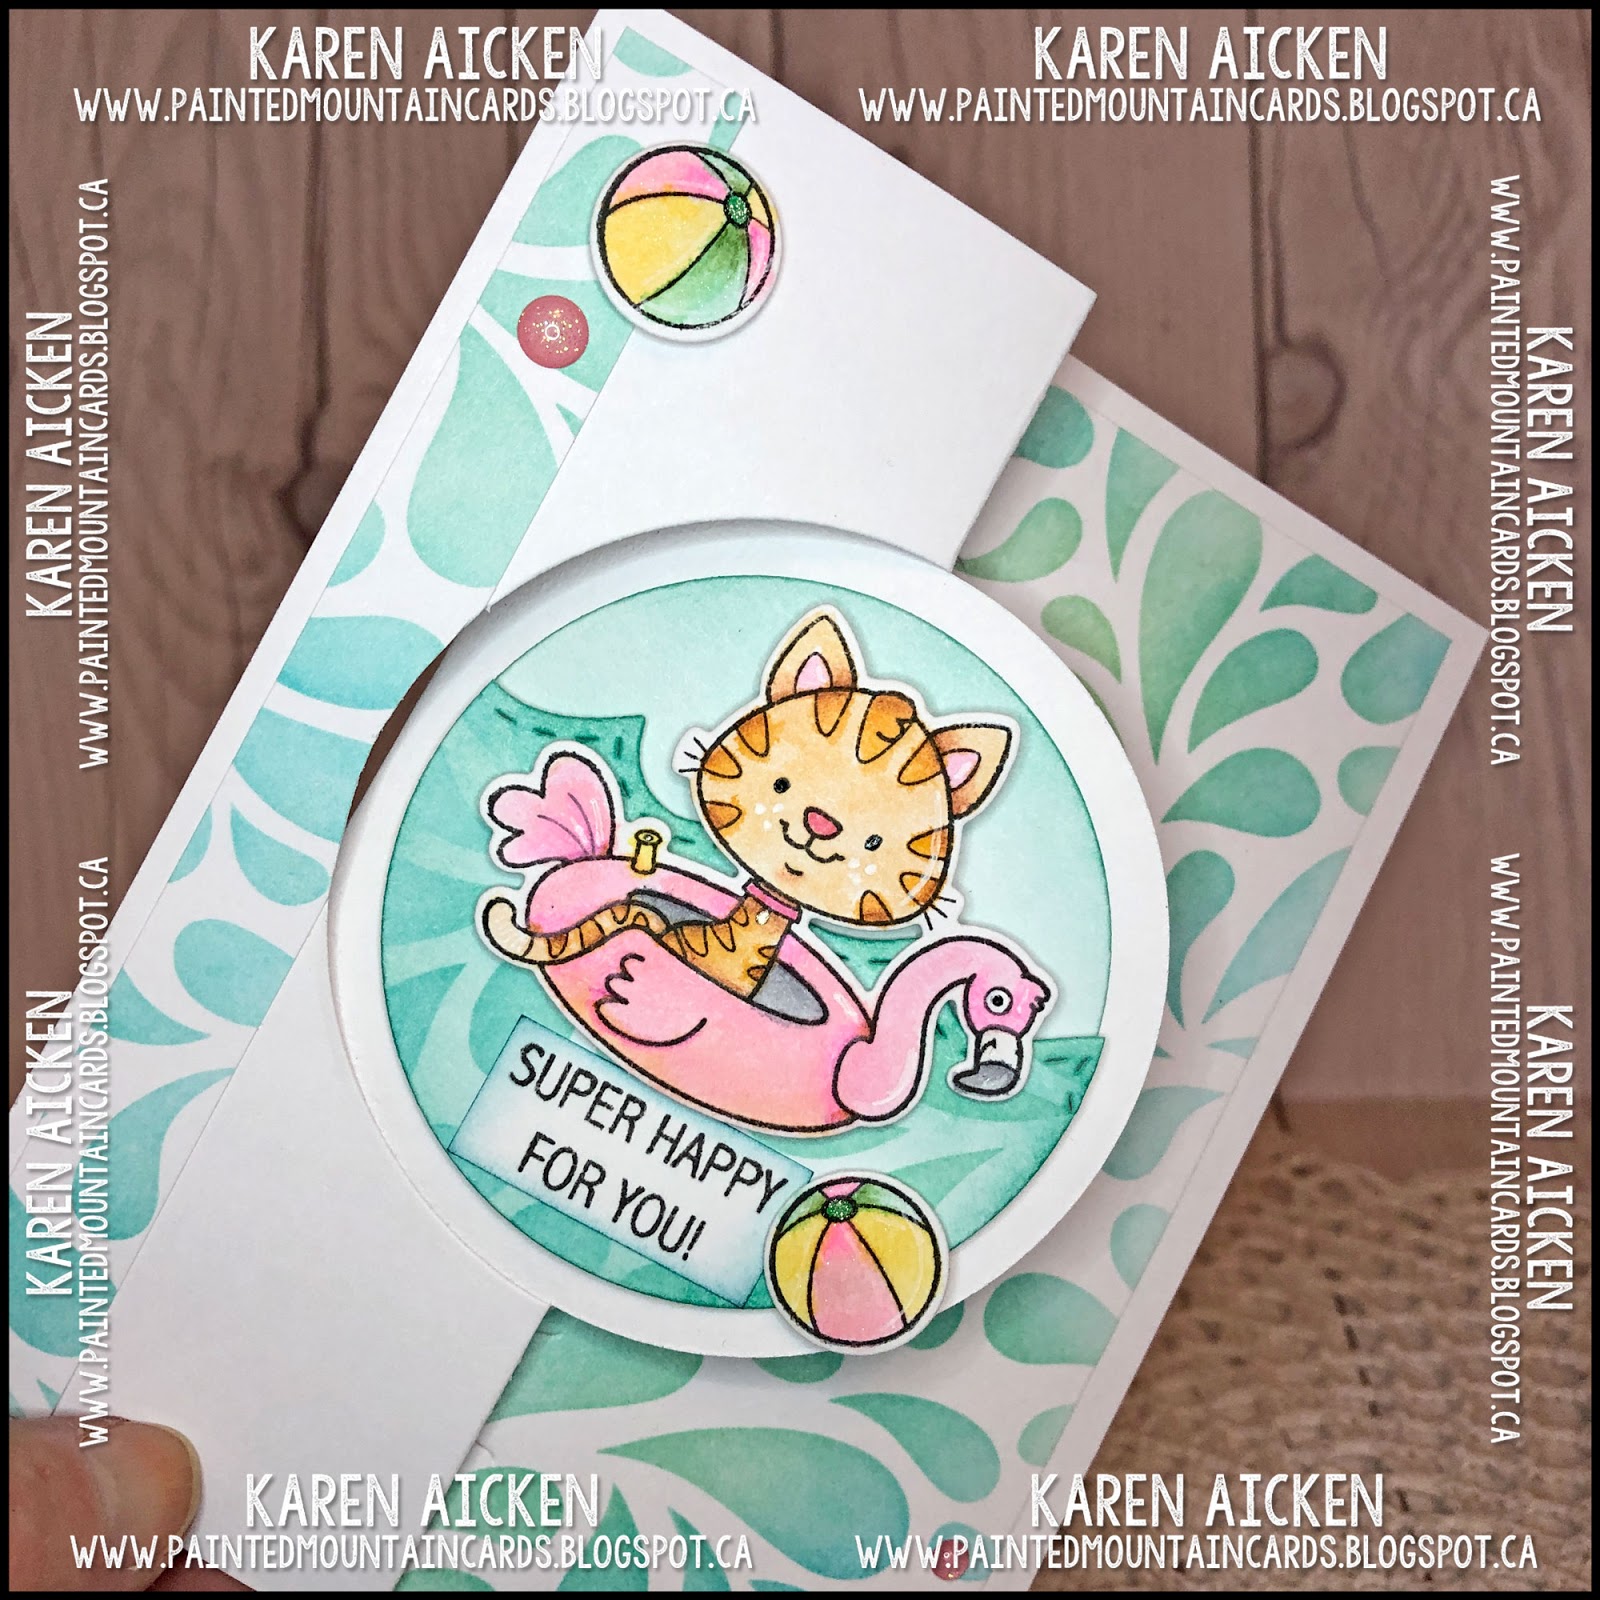
Today I'm sharing a card for the Fun Friday Challenge #117 at Your Next Stamp ...  TRIO - Use Three Of Something. All the details for the challenge can be found HERE.


I had coloured up this sweet floating kitty and three beach balls for one day of the 30 day Colouring Challenge I'm participating in on Instagram. Another day for the challenge I inked up this cool splash background - so I combined those two and one of my favourite older dies, the Spiral Circle Pull Card!


I adore the flamingo floatie! I added the three beachballs and three gumdrops for the challenge.


The notches hold the card in the closed position, but it opens easily when the recipient pulls on the sides.


Here is the inside:


I made this card for our Granddaughter Olivia. If you follow my blog, you know that Olivia (age 8) suffers from advanced Pulmonary Hypertension, which is a degenerative disease with no cure. She was diagnosed when she was three and the doctors didn't expect her to live to see four. But she is holding her own against this disease and this week she in ICU at our Children's Hospital as they are going to try a new and different medication. Which means, she will come off of the pump she has been on since she was three. Which also means she will also be able to have bath's and even swim. She is SO excited! We are all holding our breath and crossing her fingers that it all works out ... but at least if it doesn't and she crashes - she will be in the right place to get immediate help. Such an emotional time around here.

Supplies:
Just Keep Floating, stamps and coordinating dies - Your Next Stamp
Black Olive Ink - Your Next Stamp
White card stock
Marvy LePlume II markers
Sakura black glaze pen
Sakura white gel pen
Water Brush
Spiral Circle Pull Card - Karen Burniston (retired)
Splash Stencil - Taylored Expressions
Catherine Pooler inks
Chameleon Colored Pencils
1038 Tropical Scene - Karen Burniston
Circle Infinity Dies - Hero Arts
Black fine point marker
Matgcal Pastel Gumdrops - Your Next Stamp
Wink of Stella

Thanks for stopping by today

Friday, 21 September 2018

Scarecrow & Pumpkin Pull Card

Good morning friends

It's FUN FOLD FRIDAY here on my blog, and today's share uses a retired die by Karen Burniston - the Rectangle Pull Card. I always loved those Pull Card dies ... so still get them out to use now and again.


I created the background panel with Distress Oxide inks, then adhered the adorable scarecrow. This set was one of my early Lawn Fawn purchases, and I still just love it! The felt pumpkin sticker was in my stash, so I added it as well as a stamped and die cut pumpkin.


Here is a peek at the inside, with a greeting on the left and a space for us to sign our name on the right.


Supplies:
Rectangle Pull card - Karen Burniston (Retired)
Patterned paper - DCWV
Confetti card stock, off white
Felt pumpkin sticker - stash
Scarecrow, pumpkin and crow stamps - Lawn Fawn
Copic markers
Sakura white gel pen
Black and clear Sakura gel pens
Words inside - TAWS (no longer in business)
Distress Oxide inks

Thanks for stopping by today

Friday, 1 June 2018

Coffee Lovers Blog Hop Card #7 (Cactus and Coffee Spiral Circle Pull Card)

Good morning friends


It's Flip-It Friday here on my blog and today's share uses an old favourite (retired) die set to make a Z-fold card for the Coffee Lovers Blog Hop.

There were lots of random circles on my stamping table from making Circle Charm Pop-Up cards, either off-cuts or they were not needed for the card I was working on. They layered so nicely on the Spiral Circle Pull Card I decided to use several of them on my card today.


The 'hello' die is from Karen Burniston's new release, which will be shipping this week! I picked up the cactus & cup stamps last year and have been enjoying them again for the hop.


Notches hold the card closed until the recipient pulls the sides to open the card and I left the white circle blank as an area to write a note and sign our names.


I have - yet again - been amazed at the inspiration on this hop. Thank you to all the sponsors and participants - it's been a fun week!

Supplies:
Spiral Circle Pull Card - Karen Burniston (retired)
Patterned paper - Recollections
Pink, yellow and white card stocks
Cactus stamps - Newtons Nook
Water Colour Crayons - Stampin' Up
Water brush
Wink of Stella
Word stamps - Letter It (Ranger)
Enamel hearts - Doodlebug
1047 Upsy Daisy Pop-Up (banner) - Karen Burniston - shipping early June 2018
Banner punch - Stampin' Up
1052 Word Set 6 - Summer (hello) - Karen Burniston - shipping early June 2018

Thanks for stopping by today

Friday, 22 December 2017

"Fleas Navidad" Pull Card

Good morning friends

I'm kind of excited this morning, as today we are all going over to my brother's for our Christmas Eve dinner. He found out he had to work on Christmas Eve and was very disappointed as he really enjoys hosting this dinner every year. Thankfully today worked for everyone so he moved the date this year. It's our big holiday meal as Christmas Day is always at our house and very casual with nibbles and appetizers.

Onto today's share - I had been having fun with this older Paper Smooches stamp set so used it again here with Karen Burniston's (discontinued) Oval Pull Card.


The slot at the top holds the card closed, but when you pull the sides apart you see there is an arm that the mouse, cheese and gift are attached to and they slide across the inside. It's just a little slide, but movement on a card is always fun.

Couldn't resist adding a sleigh - I adore this sleigh from the Sleigh Pop-Up set! You can fill it with all kinds of things, too.


My posts for the next week will be scheduled, so I can enjoy time with friends and family.

Supplies:
Oval Pull Card - Karen Burniston (Elizabeth Craft Designs)
Patterned paper - DCWV
Red, white card stocks
Copic Markers
Black glaze pen - Sakura
Fleas Navidad stamps - Paper Smooches
White gel pen  Sakura
Stitched rectangle - Lawn Fawn
Words - Lawn Fawn
Stickles

Thanks for stopping by today

Friday, 17 November 2017

'Chill Out' Pull Card

Good morning friends

It's Flip-It Friday here on my blog, and I have a wintery pull card to share today.

I used the (discontinued) Spiral Circle Pull Card for my card base, cutting the patterned paper 2" wider than I wanted my finished card. I scored 1" down either side then folded it to the back of the card and adhered the folded strips to the back. This gives the card additional stability when the patterned paper card base isn't quite as heavy as a card stock one.


The pretty snowflake dies come with the Spiral Circle Pull Card (SCPC) and these ones have pink Nuvo Crystal Drops added to the centres.


The notches hold the closed in the closed position until the recipient pulls the sides of the card to open it, which is my favourite part of this die set.


I added some additional fussy cut embellishments -- the large mitten label inside actually started as a 6 x 4" journal card for pocket scrapbooking.


I only had these few bits and pieces left in the package, so now I can say it's used up! There is still an almost untouched letter sticker sheet remaining, but I'm not counting that.

Supplies:
Spiral Circle Pull Card - Karen Burniston, Elizabeth Craft Designs (retired)
Patterned paper etc- Fancy Pants
Nuvo Crystal Crops

Card size - 5 x 6"

Thanks for stopping by today