Monday 31 December 2018

Glittery New Year Card

Good morning friends

It's New Years Eve and I have a sparkling card to share today to celebrate ringing in a brand new year.


I love this Circle Panel background die by Your Next Stamp and use it a fair bit. I knew I wanted to use it with glitter in behind the openings so this is what I came up with.

I die cut the circle panel background from black card stock, intending to back it with the silver glitter card stock, but then felt it needed some colour. So I tried something different, spritzing a Delusions Spray over white glitter paper then adding some additional colour with Copic markers. I chose to dab the Copic colour on as the glitter looked like it could shred the marker tips.

Then I adhered a few added sequins for even MORE sparkle! I used Karen Burniston's Numbers for the year 2019, and a sparkly die cut 'celebrate'.

I am entering this in Challenge #104 Anything Goes over at Your Next Stamp. You can find all the details HERE.


A little hand lettering  & layering and my card was done.


This card is larger than an A2 card, approximately 5 x 6-1/2".


Supplies:
White card base with matching envelope - Michaels
Silver glitter card stock - Stampin' Up
Circle Background Panel die - Your Next Stamp
Dylusions Spray - Ranger
Copic markers
Celebrate die - MFT Stamps
1031 Number dies - Karen Burniston
Black Sharpie
Stickles
Large card base and envelope - Michaels
1054 Rectangles Crosshatch - Karen Burniston
Black and white card stocks
Wink of Stella
Sequins

Thanks for stopping by today

Sunday 30 December 2018

Sparkly Flip Fold Card for a New Year

Good morning friends

It's no secret that I love Flip-It Cards and have for years. When I saw this (Vintage Label Flip Fold with Layers) die set in the November 2018 Our Daily Bread Designs release, I ordered it immediately. I love how much 'real estate' you get with this large label in the centre.

For my card today, I used patterned paper with glittery embossed bits, white glitter and black glossy card stocks, and glitter dots for even more sparkle and shine.


The white glitter card stock isn't showing up in the photos, but it's VERY sparkly.


Not only does the die set come with the layering dies - look in the centre at those two small pieces. Those layering dies are also included and I don't think any other company has made layering dies for the centre section of their flip type cards. Love it!


Note, I used the layering die to cut a patterned paper piece to adhere to the back of the smaller front section. It adds just enough stability and looks good when the recipient turns the card over. I don't know why I didn't think of that before - usually I add a 1/2" or 3/4" strip of card stock to the back of that narrow side. Using the layering die makes it look much more polished.

I have actually made several cards with this die set but this latest one is the first one I'm sharing here on my blog. The others are scheduled for the coming weeks and you will be seeing this one used a lot.

Supplies:
Vintage Label Flip Fold with Layers die set - Our Daily Bread Designs
Red, black and white card stocks
Patterned paper - Creative Imagination
Cheers die - MFT Stamps
Champagne glass dies - the Stamps of Life
Glimmer card stock - Stampin' Up
Black glossy card stock - Stampin' Up
Double pierced vintage label dies - Our Daily Bread Designs
Glitter Dots - Elizabeth Craft Designs

Thanks for stopping by today

Saturday 29 December 2018

Cake Fold-Its Birthday Card

Good morning friends

Today's card uses another one of my Black Friday purchases - the Cake Fold-It's die set by Stephanie Barnard for Sizzix. You can make this a top fold or side fold card, and without the candles it easily fits into an A2 envelope. I really wanted to use the candles though, so will use an A6 envelope instead and it would still mail for a single stamp.


You can see here that I made it a top fold card.


Since it's a birthday card, I added some glitter glue to the icing and candle flames.


This will be going into one of the card bags I donate to my Mom's nursing home.

Supplies:
Pink and white card stocks
Patterned paper - Queen & Co
Cake Fold-Its die set - Stephanie Barnard (Sizzix)
Corner Chomper
Copic markers
Stickles
Word stamp inside - MFT Stamps
Nuvo Crystal Drops

Thanks for stopping by today

Friday 28 December 2018

Foiled Roses Card Trio

Good morning friends

Back in October I visited Paper Pastimes in Calgary to do a little craft shopping. I found this beautiful foiled paper by Prima and picked up a sheet of it. When I needed to make a couple of Thank You cards, I pulled it out and got to work.

I made a trio of cards, two Thank You Cards and a birthday card to donate to my Mom's nursing home.


I used the Lever Card and Lever Card Layering dies by Our Daily Bread Designs for this first card, as well as the Thank You die by Karen Burniston. The patterned paper is SO pretty and with all the foiling, so I chose not to add any other embellishments. The Thank you was die cut from foiled paper and adhered to the centre front panel.


The Thank You panel pivots to the inside as the card is opened.


I wrote my note of thanks on the white rectangle.


The second card is also a Thank You card, and this time I used the pretty scalloped card base by Stephanie Barnard from Sizzix.


Both the Thank You and the oval dies are by Karen Burniston.


For my final card, I used Raquel's sketch C4C452 to make a Birthday Card to donate to my Mom's nursing home.


Here is a peek at the inside, where I stamped the sentiment on a stitched banner piece by Pink and Main.


The gold foil heart was sitting on my stamping table from a different project.


I used the whole 12 x 12" sheet for these cards! There were a few strips leftover which were used to make bookmarks. I love that there are no leftover pieces as no way I could toss such pretty paper.

Supplies:
Lever Card die and Lever Card Layering dies - Our Daily Bread Designs
White card stock
Patterned paper - Prima
1066 Thank You - Karen Burniston
Champagne foil card stock - Stampin' Up

Card, Scallop with Flowers & Sentiments Drop-Ins - Stephanie Barnard, Sizzix
Green and white card stocks
Patterned paper - Prima
1066 Thank You - Karen Burniston
1055 Ovals Crosshatch - Karen Burniston
Seam binding
Champagne foil card stock - Stampin' Up
Sending smile stamp - Taylored Expressions

Green and white card stocks
Patterned paper - Prima
Vertical stitched stripes dies - MFT Stamps
Sketch C4C-452 (one of my favourites)
Stitched square dies - Elizabeth Craft Designs
Champagne foil card stock - Stampin' Up
Just for you die - Penny Black
Stitched fish tail banner - Elizabeth Craft Designs
Lg Fishtail banner die - Pink and Main
Words inside - Avery Elle
Gold heart (on stamping table)

Thanks for stopping by today

Thursday 27 December 2018

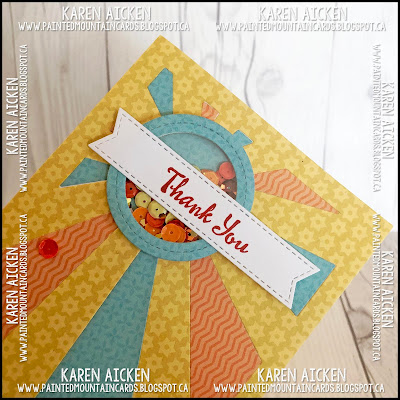
Shaker Sunburst Card Trio

Good morning friends

I may have gone a little crazy on Black Friday, and I have LOTS of new goodies to use for my card crafting. I have been a fan of Queen & Company for awhile now, but shipping to Canada is too expensive. Since we were going to be visiting Arizona last month I decided to order a couple of their shaker card kits. Which look amazing, by the way and I can't wait to start to play with them. One was an autumn kit so I have lots of time to break open that package but I doubt I'll be able to wait until next fall to play with it.

Anyhow, this sun burst background die was included in their Black Friday sale and I was so excited to add it to my collection. I love sun burst dies and have been kicking myself for not snagging the Stampin' Up one when it was in the Clearance Rack.  The rays on this die are nice and wide as it is intended to use for shaker cards. For my first time using it though, I chose to make some flat thank you cards and then I added little circle shakers to the card fronts. So fun!


I simply cut the sun burst background die three times from three different Queen & Co patterned papers. Once the base sun burst was adhered to my card fronts I simply alternated pieces and colours to complete the three background panels.


The shaker frame was cut with a stitched MFT Circle Frame die. I did two cards with the shaker at the top left and one with the shaker at the bottom right.


This is the orange one ...


... and the third, yellow card. I also added some sequins for some more sparkle.


I'm looking forward to using this sun burst die again as it was intended - as a shaker frame, with sequins and other filler inside some of the rays. But you can see how versatile it can be, as I could have simply added a cloud, sun or other embellishment instead of the shaker I chose to make.

Supplies:
Sunburst die - Queen & Co
Patterned paper - Queen & Co
White card stock
Stitched circle frames - Lawn Fawn
Acetate - Hero Arts
Sequins
Gold glitter flakes
Thank you Stamp - Petal Palette, Stampin' Up
Stitched Fishtail Banner - MFT Stamps

Thanks or stopping by today

Wednesday 26 December 2018

Black and White Thank You Stand-Up Card

Good morning friends

Well Christmas is behind us for another year. I will continue to work on my holiday cards throughout the year, but will take a break and I promise not to post any Christmas projects for at least a month or two!

Today's share is a Thank You card using some older items from my stash as well as Karen Burniston's new Thank You die.


The patterned paper has embossed sparkly bits, which is very hard to see in the photos. Here is the card as it would come out of the envelope ...


... and here it is standing up for display.


The base die cuts a little notch for the folded portion to rest against and hold it up, but I chose to add the layered strip with foam tape to catch the bottom edge of the stand-up portion. It holds it open nice and secure! I also added lots of black Glitter Dots for a little more sparkle and shine.


I wrote our note of thanks on the label inside the card.


Supplies:
Black and white card stocks
Royal Stand-Up die set - Stephanie Barnard, Sizzix
Patterned paper - My Minds Eye
1066 Thank You - Karen Burniston
Black shimmer ribbon - Stampin' Up
Glitter Dots - Elizabeth Craft Designs

Thanks for stopping by today

Tuesday 25 December 2018

Merry Christmas!

Merry Christmas 
to all of my blog friends and followers!
Even if you don't celebrate the holiday I would like to take this time today to wish you a wonderful day.

I will be spending today with family. It is a relaxed and casual day around here with lots of laughter and lots of eating and even more laughter.

I hope your day is every bit as wonderful.


Monday 24 December 2018

Christmas Double Z Fold Card

Good morning friends

I love love LOVE this suite from Stampin' Up. The patterned paper is super cute and ...  FLOCKED!!!  So the white stripes on this paper are fuzzy and you just want to touch it. There is a stamp and coordinating die set, and the dies work on the patterned paper as well as the stamps. So cool.


I made a Double Z-Fold card, in a wide A2 format. Some of the elements were fussy cut from the patterned paper and I used the dies where I could. Then I created a little scene. I like how it looks like Mrs. Claus is so pleased that Santa is having a treat and a well deserved rest.


But when you open the card, you see that Mrs. Claus is actually tickled at the little elf handing her a present!


 The scalloped border was trimmed from one of the 12 x 12" sheets in the package, and like the white apron, hats, candy and Santa's beard - the white dots are flocked.


Finally, for those who like to pin 'fronts and insides' photos to their Pinterest boards - here you go!


I added a wonky stitched circle to the back of the card, along with another die cut or two as an area for us to sign our names. Completely forgot to take a photo of that!

Supplies:
Red and white card stocks
Stamps, dies and patterned paper - Stampin' Up
MISTI - My Sweet Petunia
Words - Your Next Stamp
Nuvo Glitter Pen
Wonky Circle die - Your Next Stamp
Card size - A2

Thanks for stopping by today

Sunday 23 December 2018

Pop-Up Poinsettia Card

Good morning friends

Today's share is a Pop-Up card using my new goodies from Stampin' Up and some older patterned paper from the stash.


I backed the die cut openings with scraps of the patterned paper for a perfect colour match and added some glitter glue through the berry openings. The die cut panel was raised up on the card front with fun foam.


I added a little die cut bow, cut from white glitter paper and a couple of the fall away pine sprigs.


Inside, I used the Pop-Up platform from Karen Burniston's Explosion Pop-Up card to mount my pretty poinsettia to.

I die cut the poinsettia twice, once from red card stock and once from adhesive backed white glitter paper. I added the white glittered outline to the solid red flower, and the red outline to the white glittered flower so got two pretty blooms to use! I chose this one for my card and saved the second poinsettia for different project.  I inlaid all the glittered pieces onto the red card stock solid flower for that one.


I love this open holly die - it's just perfect for adding a little somethin' somethin'. Here it is cut from white glitter paper. Note, I saved the white fall away berries as they made cute sparkly additions to a different project.


Here is another view so you can see the Pop-Up a little better.


Supplies:
Patterned paper and Cut Apart - the Paper Studio
Dashing rectangle dies - Elizabeth Craft Designs
Peaceful Poinsettia Bundle (stamps and dies) - Stampin' Up
Stitched oval dies - MFT Stamps
Fun foam
1069 Explosion Pop-Up (pop-up platform) - Karen Burniston
Red, white card stocks
White glitter paper - Stampin' Up
Bow die - Beautiful Bouquet, Stampin' Up
Stickles

Thanks for stopping by today