Tuesday 31 August 2021

Winter Cabin Gift Card Holder


Hello!  I love to have Gift Card Holders on hand, so created one for the holidays. I used Whimsy Stamps Slimline Scalloped pocket in a different way though and I was happy with how well it worked for a Mini Slimline card! I chose the pocket die set because it came with some layering pieces and I knew it could be versatile, but now that I see how well it works for a Gift Card Holder on it's own I'm even happier with it!

I cut the pocket and decorative mat from a sheet of patterned paper, then added the sentiment stamp on the pocket. It's hard to see in the photos, but the pocket got a blast from my shimmer spray and it's so nice and sparkly!


Here is a peek at the back - this is not a folding card, it's more 'post card' style. I added some stamping and then stencilled trees along the bottom edge. The navy card stock that I used for the Gift Card base is actually a Duplex, so it's navy on the front and white flecked on the back side.

The same stencil was added to the envelope as well.

This blog uses affiliate links whenever possible. This means, that at no cost to you, if you make a purchase through one of my affiliate links that I receive a small commission from your purchase. I only link products that I own, love and use for my card making!

Additional Supplies:
Shimmer spray
Navy Duplex card stock
Sentiments on back - BYOP, Stampin' Up (retired)

Thanks for stopping by

Monday 30 August 2021

Underwater Slimline Shaker

Hello!  Today I'm sharing the Slimline shaker card I sent to a friend. I've been hoping to get together with her for ages, but things keep getting in the way. I do hope to 'sea' her soon!

This was my first time using these Slimline shaker pockets by Tonic and I am not very happy with them. The score lines are misaligned, which means there are gaps at two corners large enough for the sequins to fall through! Luckily I have the tools and knowhow to add more scoreline and miter the corners, but I should't have had to do that. I do like the quality & weight of the pockets though! 

They are also a bit of an odd size, but I did know this before I purchased and figured I'd just adjust my card base. In case you were looking at them they are 3-1/2 x 8" instead of the 'normal' slimline size of 3-1/2 x 8-1/2". I'll end up using the remaining ones as I was happy with how my card turned out in the end.


The patterned paper is from a Slimline pad by Whimsy Stamps, and I have linked everything that is available below. Before I closed up the shaker card I adhered some die cut seaweed, a seashell and a crab directly to the patterned paper panel. Then the stamped sentiment was added to layered stitched circles on the front of the shaker.


Here is a peek at the inside, where I added some stencilling on the white panel in coordinating colours. It was light enough for me to write my personal message on, even with the stencilling.


This blog uses affiliate links whenever possible. This means, that at no cost to you, if you make a purchase through one of my affiliate links that I receive a small commission from your purchase. I only link products that I own, love and use for my card making!

Additional Supplies:
Coral, green and navy speckled card stocks
Seaweed and Seashell dies - Elizabeth Craft Designs (retired)
Stencil on envy - Carabelle Studio

Thanks for stopping by

Sunday 29 August 2021

Eight Birthday Cards with Polaroid Frames

Hello!  I had been working on using up this 12 x 12" Paper Pad to make Birthday Cards for donating to my Mom's old nursing home. It probably took me about 10 days to finish the pad, but I did! This was almost 2 years ago - I created 4 x 5.25" card panels so that I could easily attach them to A2 card bases when I was ready to finish off the cards. 

It was fun using up lots of the little bits and pieces, and the striped paper I cut into strips for a pop of colour on the cards. The pad also had these polaroid style images, so I got out the Pierced Polaroid Frame from Your Next Stamp and created little frames for those images. Adding a square of transparency or acetate to the backs of the Polaroid Frames then the printed panel underneath was a fun detail and I love how they catch the light!


The interior of the cards were all done the same. I still have a dozen or so of those panels to add to card fronts as I need to top up my monthly donation cards, but for now these ones are finished.


One more look ...


This blog uses affiliate links whenever possible. This means, that at no cost to you, if you make a purchase through one of my affiliate links that I receive a small commission from your purchase. I only link products that I own, love and use for my card making!

Additional Supplies:
Patterned Paper, Stickers & Cut Aparts - Dear Lizzy, Neapolitan
Holographic circle stickers - stash

Thanks for stopping by

Saturday 28 August 2021

Hanging Plant Fold Flap Slimline

Hello! I haven't done a Fold Flap Slimline card in awhile, so that is what I did for today's card. I dug out my (retired) Hanging Plant die set and made several of them up to have on hand for future cards. I had been eyeing a similar set at Stampin' Up but decided that this one is close enough and I really don't need 'more of the same' in my craft room. Hahaha, I say that now - but if that set ends up on the clearance rack, I just might jump all over it. Anyhow, I chose two of the hanging plant embellishments I had created and added them to this card.

The pretty braided rectangle is a die set by Pink Fresh Studio (linked below) created for Mini Slimline cards. It was also the perfect size to decorate the front of my Slimline!


I added more of 'That Paper' inside ... it was a gift from a friend in the USA, and my favourite colours.  The sentiment circle is hidden when the card is closed and there is room on the white panel to sign my name when I go to send the card.


Glossy accents was added to the pot inside the card, so it looks more like a ceramic pot. 😊


... one more look ...


EDITED TO ADD:  To create the card, cut your card stock 7 x 8.5". With the 7" side across the top, score at 1.25 and 3.5". The first score creates the flap that you fold to the front of your card. You can leave it as is and decorate all the panels, but I generally adhere my flap to the front of my card at the top and bottom with thin foam tape.

This blog uses affiliate links whenever possible. This means, that at no cost to you, if you make a purchase through one of my affiliate links that I receive a small commission from your purchase. I only link products that I own, love and use for my card making!

Additional Supplies:
Scraps of card stock in various colours
Patterned Paper - Eucalyptus, Hobby Lobby
Copics
Green card stock
Subtle Embossing Folder - Stampin' Up
Washi Tape - stash
Sentiment - unknown (old, from my stash)
Sizzix Hanging planter die - retired?

Thanks for stopping by today

Friday 27 August 2021

Back To School Shadowbox

Hello and welcome to Fun Fold Friday here on my blog! This Shadow Box card idea is one I have wanted to try for a while. They have been around for a long time, in fact Dawn Griffith posted one on Splitcoast Stampers in January 2008!!  Jennifer McGuire recently posted a video on them and seeing more and more of them on social media I knew it was time to try my hand at one of these Shadow Box cards.

I like how they fold flat for mailing, then easily pop open again for display when you take it out of the envelope.


I wrote our Grandson a note on the back and sent this card on it's way to him.

This blog uses affiliate links whenever possible. This means, that at no cost to you, if you make a purchase through one of my affiliate links that I receive a small commission from your purchase. I only link products that I own, love and use for my card making!

Additional Supplies:
#110 white card stock
Patterned paper - School Days, Miss Kate's Cutables
Red card stock
Black and Red fine line markers

Thanks for stopping by

Thursday 26 August 2021

Back To School Explosion Card


Hello!  This Explosion Card is one I sent to our Granddaughter Alma for 'Back to School'. I used some patterned paper from my stash to make the folds inside, then decorated it with die cut stars that I also used as a stencil. The sentiment circle used the Double Stitched Circles from Divinity Designs, and everything that is available is linked below for you.


These cards fold down completely flat for mailing! I have been making these cards for well over 20 years, so I don't need a tutorial to do them. I had thought about filming one to share with you, then realized there are SO many out there now that I would just choose a favourite and link it for you. I'm still nursing the tendonitis in my right arm so taking a break from so much filming and video editing is helping the healing process.


Click HERE for a tutorial!

This blog uses affiliate links whenever possible. This means, that at no cost to you, if you make a purchase through one of my affiliate links that I receive a small commission from your purchase. I only link products that I own, love and use for my card making!

Additional Supplies:
Patterned paper - School Days, Miss Kates Cuttables
Black and Red fine point markers

Thanks for stopping by

Wednesday 25 August 2021

Mini Slimline Trifold Card with Roses

Hello! I am still really enjoying the floral images from The April Blessings Box at Divinity Designs. You just die cut and use - no stamping or colouring required! Today's card uses them in a Mini Slimline Trifold card that I can send for Happy Mail. The photo above shows what the card would look like coming out of the envelope.

While I didn't do a YouTube video, I did film the card opening and closing for you:

The Mini Slimline Trifold template/dies are from Taylored Expressions and I linked them below for you. I got them for my February birthday, and finally got to use them. The papers in Divinity Designs' Floral Favourites paper pad are soooo pretty. They make me happy just to look a them in the package! 😊  Karen Burniston's Word Set 10 has the 'Thinking of You' die and it fits perfectly on a Mini Slimline.


The photo above shows the card partially open, and the one below shows it fully open. You can see there is room for me to write a personal message when I go to send the card.


The roses & buds each got some sparkle using Stickles, and the butterflies were punched from scraps of white pearl card stock.


This blog uses affiliate links whenever possible. This means, that at no cost to you, if you make a purchase through one of my affiliate links that I receive a small commission from your purchase. I only link products that I own, love and use for my card making!

Additional Supplies:
Rose Card Stock
Martha Stewart Butterfly Punch

Thanks for stopping by

Tuesday 24 August 2021

Butterfly Shaker Pop Up Card


Hello! Today I'm sharing the Birthday Card I made for our daughter-in-law. Since we were hand delivering her card & gift, I didn't need to worry about how bulky the card was so pulled out my last Butterfly Shaker from Queen & Company. 

I have a walkthrough with all the details on YouTube:

Below is a closer look at the stencilled sky and shaker filler. I forgot to mention in the video, that the Happy Birthday is from Your Next Stamp's Oh Shiitake stamp set. 


Inside I used Karen Burniston's Katherine Label Pop Up, patterned paper and layered butterfly dies. 


This blog uses affiliate links whenever possible. This means, that at no cost to you, if you make a purchase through one of my affiliate links that I receive a small commission from your purchase. I only link products that I own, love and use for my card making!

Additional Supplies:
Butterfly Shaker Card supplies - Queen & Company
Card and envelope - Michaels
Patterned paper - Gilded Ink, Recollections
Black card stock
Shimmer spray
Water Color Wings dies - Stampin' Up (retired)

Thanks for stopping by

Monday 23 August 2021

White Christmas Slimline Card

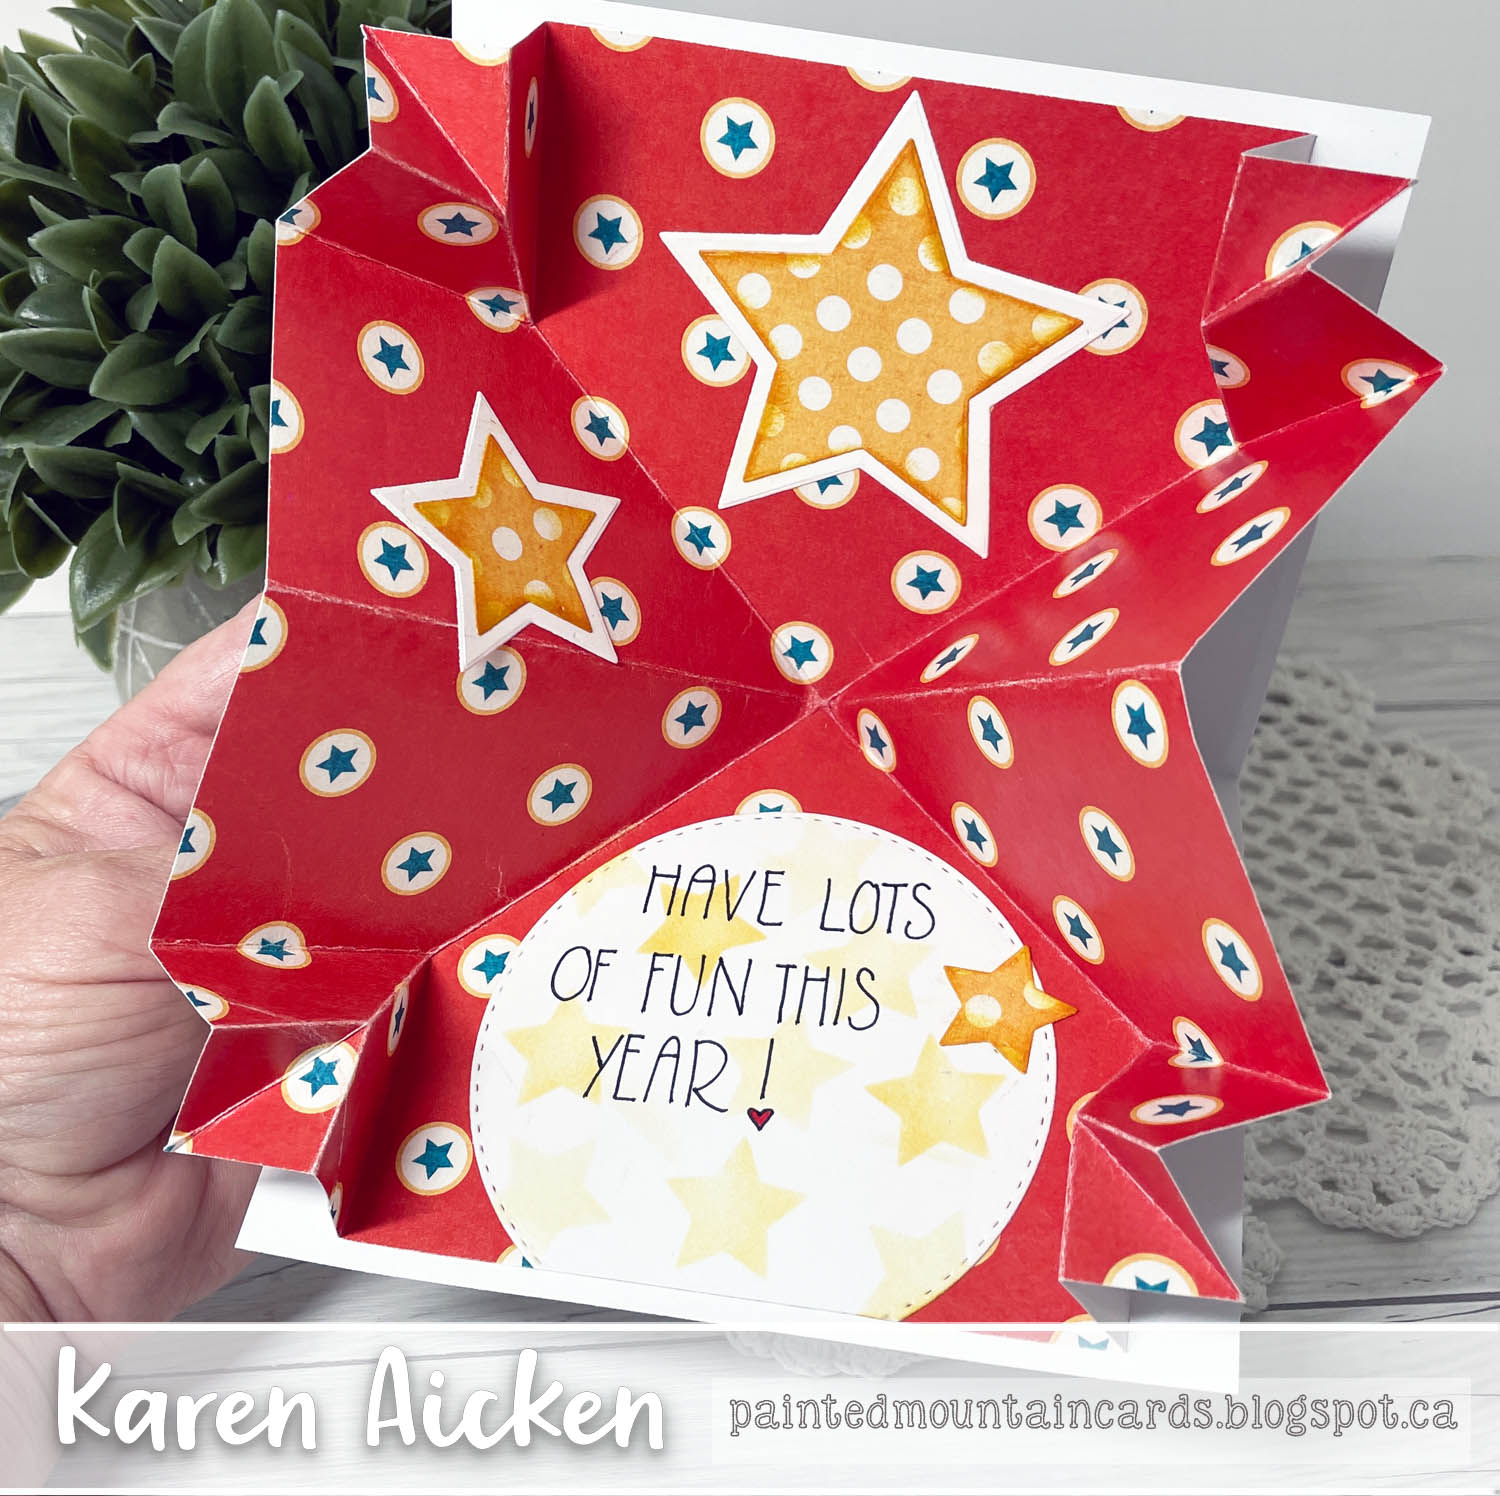
Hello!  This is a different kind of card from me, but you will be seeing it a fair bit now. Funny how your likes change over time! Last month I went to do a Design Team card share on FaceBook and saw that Rhea of R&R Scrapbooking was doing a FaceBook LIVE. I don't usually have time to watch them, but since I was still nursing the tendonitis in my right arm and had a cup of hot coffee sitting beside me - I sat and watched it.

Rhea mentioned having a Flash Sale on Creative Expressions dies, and showed a few of them as well as a lovely stack of metallic papers from Hunky Dory. Then she showed some beautiful cards she put together using one of those fancy dies and I have no idea why they grabbed me but they DID. I went right to the website and started scrolling. And 'adding to cart', ha ha.

These lovely edger dies from Creative Expressions cut on one edge only, so you can choose where on your card to do the cutting. I love having flexibility in a die like that. Because of that I knew how well they would work on Mini Slimlines and possibly Slimline cards too. Sold!

Here is the first card I made with one of the Creative Expressions Edger dies paired with metallic card stock - of course it had to be a Slimline card. While it's hard to see in the video, the white card stock is pearlized and also has a lovely shimmer.


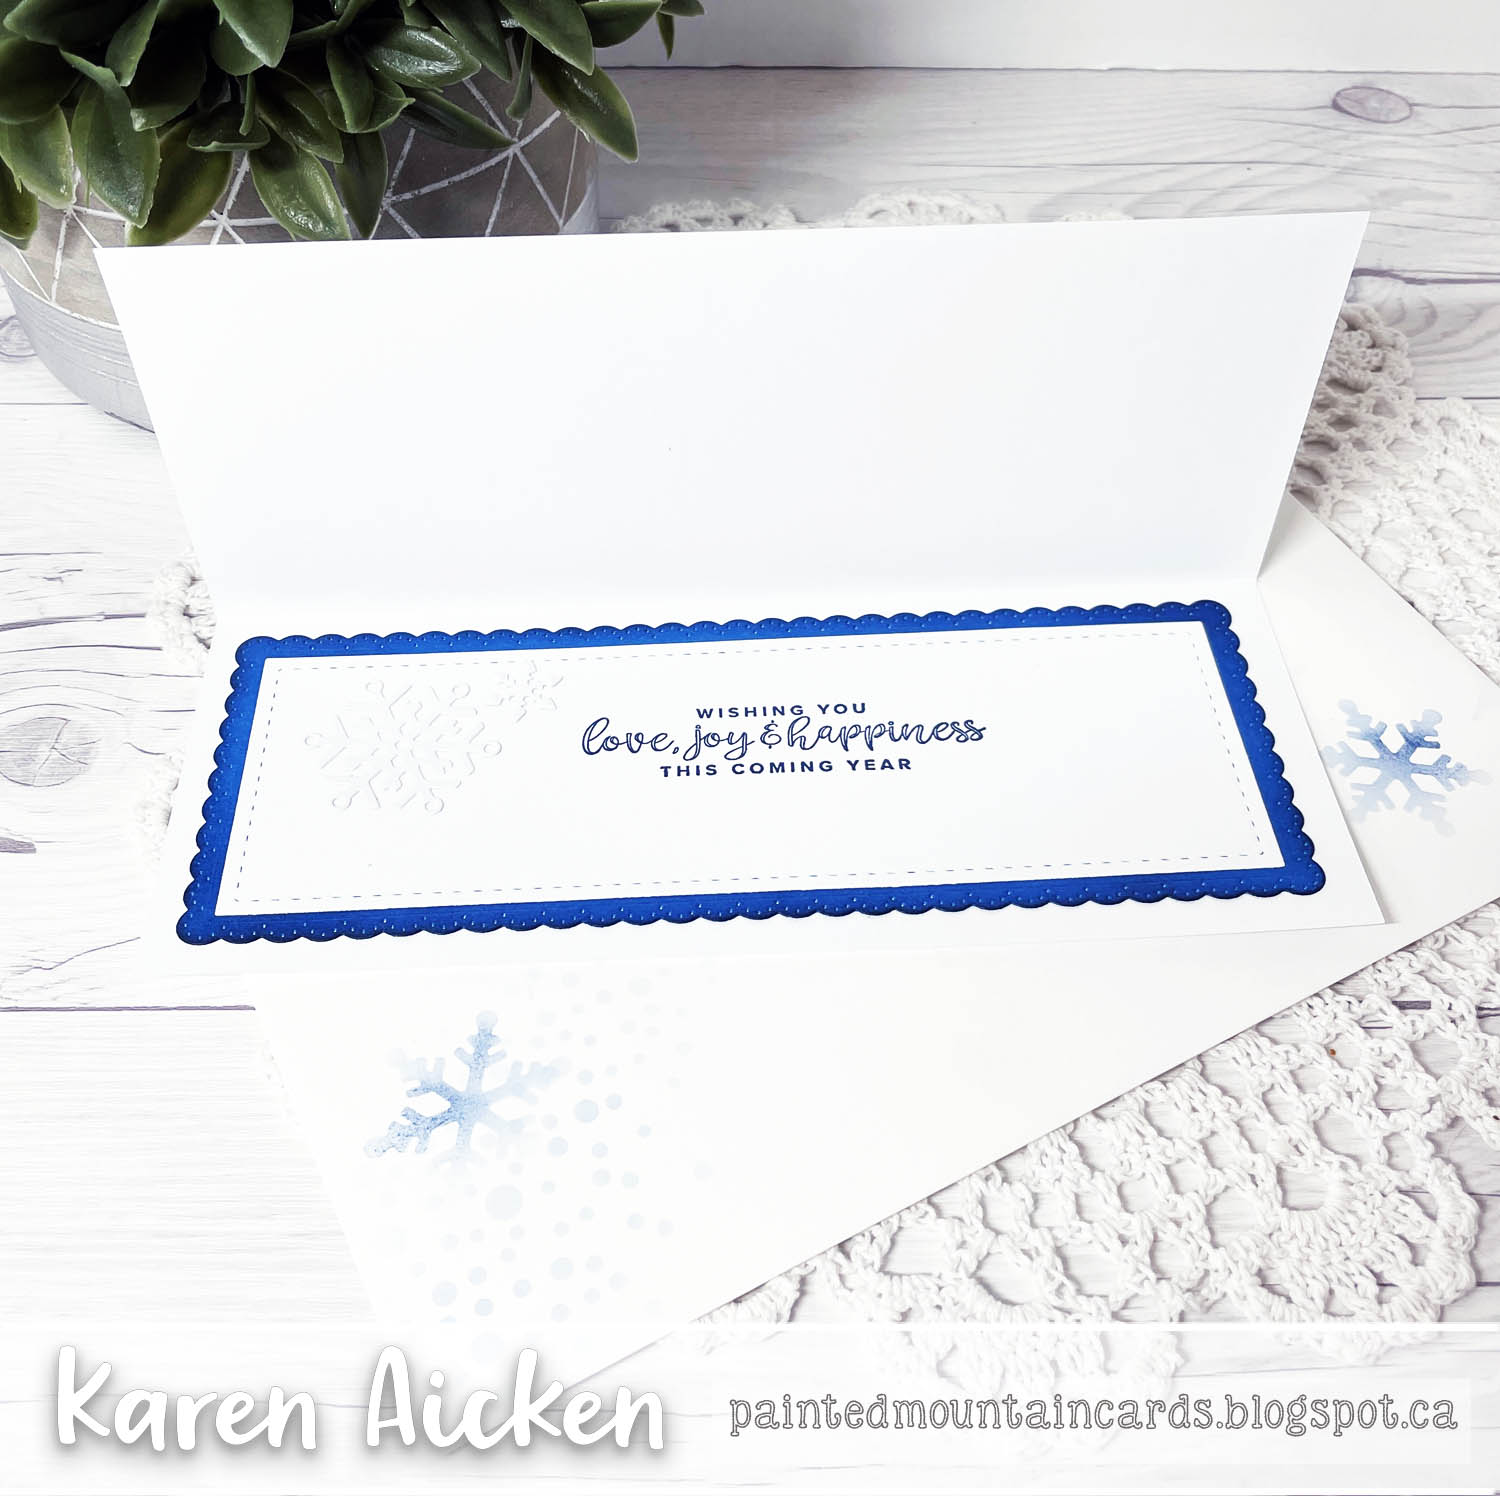
Here is a look at the inside ...


In addition to the stamped sentiment, I added a pair of die cut snowflakes also cut from white pearl card stock.


... one more look ...

R&R Scrapbooking is out of Edmonton Alberta and I love to support Canadian businesses if I can. Unfortunately I am unable to link directly to products at R&R or I certainly would! I can provide a link to her online store there - click HERE. I have tried to find a different source for the White Christmas Edger, and linked it to Ecstasy Crafts for you - another Canadian business. 

This blog uses affiliate links whenever possible. This means, that at no cost to you, if you make a purchase through one of my affiliate links that I receive a small commission from your purchase. I only link products that I own, love and use for my card making!

Additional Supplies:
Self adhesive snowflake sequins - Stampin' Up (retired)
Blue card stock
Scrap of Glitter card stock
Mirri Card Stock - Glitter Ombre, Hunky Dory
#10 White linen envelope

Thanks for stopping by 

Sunday 22 August 2021

Six Cream and Black Birthday Cards

Hello!  I have a box filled with odds and sods of card bits to pull out items to make birthday cards for donating to my Mom's old nursing home. This time poking in the box I found these black and cream printed panels - already cut to size - and the cream large label dies. If you have been doing this as long as I have, you will recognize those labels as the 'Top Note' BigZ die from Stampin' Up. It was VERY popular back in the day! 

I decided to make some cream card bases and finish off these cards, which didn't take very long at all. I stamped the sentiment and face onto each label, popped them up with foam tape onto the patterned paper and adhered everything to the card front.


Here is a peek at the inside ...


This blog uses affiliate links whenever possible. This means, that at no cost to you, if you make a purchase through one of my affiliate links that I receive a small commission from your purchase. I only link products that I own, love and use for my card making!

Additional Supplies:
Cream card stock
Patterned paper - unknown
Top Note Die - Stampin' Up (long retired)
Sentiment inside - Big Bold Sentiments, MFT Stamps (retired)

Thanks for stopping by

Saturday 21 August 2021

Mountain Trifold Card


Hello!  Last month I saw this die set on clearance - and I was like "What? A Fun Fold Card with mountains and trees? HOW did I not see this before?".  Then, I clicked 'add to cart'. Ha.

I did do it a little differently than it was designed, as the tree portion is supposed to also fold out.  I chose to pop up a double layer of them directly onto the mountains and have that flap be a single unit. After lightly sponging the clouds & mountains with dye inks & blending brushes, I added some die cut clouds and a stamped sentiment. Everything that is available is linked below.

I didn't do a YouTube video, but I did film a quick clip so you can see the card opening and closing: 


There is a stamped sentiment behind the first flap ...


Here is the card fully open ... with a few more die cut clouds, another stamped sentiment and a stamped sun. Everything got some shimmer as well. In addition to the shimmer, the mountain tops are shiny because of Glossy Accents. The card folds down to a standard A2 size!


... one more look ...


This blog uses affiliate links whenever possible. This means, that at no cost to you, if you make a purchase through one of my affiliate links that I receive a small commission from your purchase. I only link products that I own, love and use for my card making!

Additional Supplies:
Green card stock
Paper Pumpkin - the Adventure Begins
Copic markers
Happy Thoughts - Stampin Up
Black marker

Thanks for stopping by