Wednesday 31 January 2018

Pretty Floral Birthday Pop-Up Card

Good morning friends

I have a Pop-Up Birthday card to share today, that I actually made several months ago. I ended up sharing Thanksgiving, Halloween and Christmas cards before this one. I loved the pretty pearlized embossing on this patterned paper.


I combined two different word sets - the Word Set 1 Birthday and Word Set 3 Holiday, for my greeting. They are all the same font, so they work perfectly together.


Inside I used more of that pretty patterned paper, and Karen Burniston's Katherine Label Pop-Up to animate the greeting.


I made this for a friend's birthday, and she emailed to let me know how much she liked it! It's always fun to be able to make something specifically for someone special.

Supplies:
Patterned paper - K & COmpany
1003 Word Set 2 Birthday - Karen Burniston
1022 Word Set 3 Holiday - Karen Burniston
1011 Katherine Label Pop-Up - Karen Burniston
White card stock
Label dies - MFT Stamps
Words - Stampendous
Butterfly punch - Martha Stewart

Card size - 6 x 5", fits in a 5 x 7" envelope

Thanks for stopping by today

Tuesday 30 January 2018

3 Journal Card Valentine's

Good morning friends

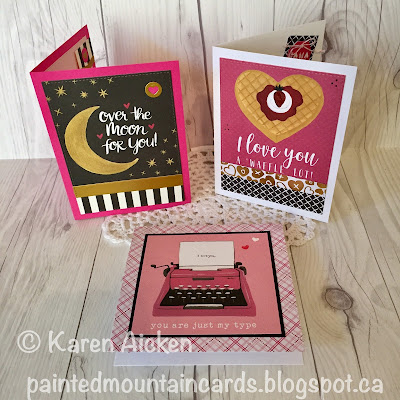
Today's share are three Valentine cards I made with a sheet of Journal cards I recently purchased. I really like using journal cards in my card making and these ones are different than I've used before.


I love the gold accents on these journal cards, so added some gold foil card stock as well.


Here is the second card - such a 'punny' card.


The third card is a square one. I added a glaze pen on all the typewriter keys so they catch the light when the card is turned. I also added cute resin stickers from Doodlebug.


Finally, here are all three Valentine's together.


I have a few more Valentines to share later this week, using Journal Cards.


Supplies:

'Just My Type' Valentine
Patterned paper - Recollections
Typewriter Cut-Apart - Carta Bella
Black fine point marker
Doodlebug resin heart stickers
Sakura Glaze Pen
Card size 5 x 5"

'Love You A Waffle' Valentine
Patterned paper & small cart apart - Recollections
Waffle Cut-Apart - Carta Bella
White card stock
Black fine point pen
Blueprints dies #29 - MFT Stamps
Marvy LePlume II markers
Bakers Twine
Glossy Accents

'Over The Moon' Valentine
Moon Cart-Apart - Carta Bella
Pink and white card stocks
Blueprints #29 dies - MFT Stamps
Gold foil card stock
small cut-apart - Recollections

Thanks for stopping by today

Monday 29 January 2018

Valentine Coffee Cup Gift Card Holders & Shaker Photo Frames!

Good morning friends

Yesterday I shared a Coffee Cup Gift Card holder, which I made using Karen Burniston's new Coffee Cup Pop-Up. Since I won't be near our grandkids on Valentine's Day, I decided to do something different this year. Usually I make sure the Grands have treat bags.

I made two Valentine themed Coffee Cup Gift Card holders, and tucked a Tim Hortons Gift Card inside each cup. I thought our daughters could take the kids to Tim Hortons and they could each get a donut and cup of hot chocolate. They turned out SO cute - but when I went to do this post I discovered that this was the only photo I took of them. What the? And it's not even a good photo! The little Coffee charms worked perfectly as decorations, and the stir stick was the perfect place to hang a little tag from. The tag is from the Tag Book Pop-Up.


You will see below each one, is a (gift card sized) family photo I took on New Years Day out at The Farm. I thought they would enjoy getting a photo with their Valentine's Coffee Gift Card but of course I wanted to dress up those photos. I used Lynda Kanase's Photo Shaker Box to make these fun shaker frames.


Since the words from the different frame sets are interchangeable, I added the vertical LOVE from the Photo Frame, Lovely die set and backed the word with a piece of black card stock to make it pop. Then I highlighted the letters with glitter glue.


I also made a little easel stand for the back, so they could stand on a shelf away from little fingers.


This is the second one ...


I packaged the Coffee Cup Gift Card Holder, and the Photo Shaker Frame with some chocolates in a cello bag, but we were in a huge rush to get going so I did not get a photo of them all done up.

Tips and Tricks
Because these are going to homes with inquisitive little fingers, I adhered the cover to the box bottom.   I know our daughters would not be thrilled having to pick up spilled confetti & sequins. Securing the lid to the box bottom is entirely optional, because they work perfectly to present a Gift Card in as well!

To create the Easel Back for the landscape orientation shaker box, I took a piece of card stock 1-1/2 x 3-1/2". It was scored at 1/2, 2, 2-1/2 and 3". You put adhesive above the first 1/2" score line and it adheres to the back of your shaker box at the top centre.  Then you form a 'W" with the other score lines, and again the 1/2" tab is adhered to the centre bottom at the back of the shaker box. Now it can stand on it's own!

Supplies:
Patterned paper - Recollections
Copic markers
Stickles
White and pink card stocks
Puffy heart sparkly stickers - Recollections
Bakers Twine
Instax SHARE SP-2 printer
Photo Shaker Box, Seasonal - Lynda Kanase (Sizzix)
Photo Frame, Lovely - Lynda Kanase (Sizzix)
Miscellaneous sequins and confetti

Thanks for stopping by today

Sunday 28 January 2018

Coffee Cup Gift Card Holder

Good morning friends

As I mentioned earlier this week, when making the Coffee Cup Pop-Up I had the idea to see if the To-Go cup would work as a stand-alone Gift Card Holder. And it does!!


The stir stick is so cute, and works perfectly as a place to dangle a little tag. This tag was cut from the Twist Panel Pop-Up - I love that all of Karen Burniston's dies work so well together. The layered flowers come from the Flower & Bee set.


In addition to the gift card, you can also slip in a little chocolate! I wrapped this one with a strip of leftover patterned paper.


This is the gift card holder from the back ...


I will be back later this week with another pair of coffee cup gift card holders, this time with a Valentine's Theme!

Supplies:
White, pink and teal card stocks
Patterned paper - Basic Grey
1040 Coffee Cup Pop-Up  - Karen Burniston
Bakers Twine
Stickles
Wink of Stella
1026 Flower & Bee - Karen Burniston
Thanks a Latte stamp - COFFEE CAFE - Stampin' Up

Thanks for stopping by today
Saturday 27 January 2018

C4C419 Opposites

Good morning friends

It's Saturday and that means a new challenge at the Crazy 4 Challenges blog. Our hostess is Frances Byrne, and our Guest Designer is  Elena Anderson . This is Frances' challenge:  Did you know that the 25th January is Opposite Day ... For our challenge this week make a card/project that has opposites on it. Think opposite colors, on the color wheel, stripes and polka dots, black and white, mirror image, etc.

I almost didn't have time to make a card for this week. Usually I'm able to work ahead but with travel and houseguests - this one almost got away from me. I really get a lot of use out of my Blueprints dies from MFT Stamps, so pulled out Blueprints #29 for my card today.

I started out with the white hearts on a red background, and the red hearts on a white background for the OPPOSITE part of the challenge. Then I went with other patterned paper in the stack to finish off the card.


Here is a peek at the inside - unfortunately the water colour bled a little. It was too late at night and the lighting wasn't good - I should have left it til the morning. Ahh well. These things happen.


While I had everything out, I went ahead and used the same Blueprints die set and some different patterned papers and stickers from my stash to make a second Valentine.


I popped the stickers up on foam tape, and went over portions with a glaze pen so they are raised and shiny.


The inside features a 'cut apart' from the same paper stack, and a butterfly sticker ...


... which has foil accents on it. The heart above the Happy is also foiled.


Finally, here is a look at the two Valentine's side by side.


Check out the C4C blog to see how the Crazies have been inspired by the challenge. We'd  love to see your take on it, so be sure to stop by the Crazy 4 Challenges blog and link up your creations. If you are uploading to an online gallery, please use the keyword C4C419.

Supplies:
Blueprints #29 - MFT Stamps
Patterned paper - Stampin' Up
Stickers - Recollections
White card stock
Blueprints #24 (Stitched circle) - MFT Stamps
Stamp - CC Designs
Marvy Le Plume II markers


Donut Valentine card supplies:
Blueprints #29 - MFT Stamps
Patterned paper - Recollections
Red & white card stock
Stickers - Pebbles
Sakura Glaze Pens


Thanks for stopping by today

Friday 26 January 2018

Shark-Love Valentine Flip-It Card

Good morning friends

It's Flip-It Friday here on my blog, and I have a fun Valentine to share today. I picked up a couple of Valentine themed 6 x 6" patterned paper pads last year, and still have lots of papers left for cards this year. I like that the sheets have foiled bits on some of them and how well they coordinate together.


LOVE this shark, which is from Karen Burniston's newest release 'Sea Animals'. Those dies will be shipping in just a couple of weeks! I thought it would make a fun Valentine, with those sharp teeth holding onto a die cut heart.


A fun Valentine for the pile.

Supplies:
Red & white card stocks
Patterned paper - Recollections
Square Flip-Its - Stephanie Barnard (Sizzix)
1037 Sea Animals (Shark) - Karen Burniston   (coming soon)
Black fine point marker
1019 Gift Card Label (hearts) - Karen Burniston
Wink of Stella
Signo White Gel Pen

Thanks for stopping by today

Thursday 25 January 2018

Pink Birthday Cake Pop-Up

Good morning friends

One of Karen Burniston's new Pop-Ups is the CAKE POP-UP. I took some time this week to make one and wow, what a clever die set. When you assemble the cake then adhere it inside your card, I bet you say WOW. When I finished this one, I showed it to our son. He opened it once and said "No Way'. Then he opened it again, looked at me and said 'this blows my mind'.  He passed it to my husband, who opened it and thoroughly examined it, handed it back and said COOL! I figure if the guys in the family are amazed and impressed, it's a pretty great die set.

Here is the front of my card:


I was happy to find these stamps in my stash, which work perfectly with the Cake Pop-Up. I stamped the greeting with black, then water coloured it with my new Marvy Le Plume II markers. I saw these markers at Creativation (CHA) this year, and was able to sit and try them out. I love them, so have added a few to my collection.

Hmmm - is that a sequin? Yes. I have tried for years, to stay off the sequin train. However, I'm interested in doing more shaker cards, so ordered a few packages of sequins for that. Now that they are in the house, I'm seeing them creep onto my cards here and there.


Here is the card as it is opening ...


This is the card opened! Once again, I didn't make a prototype, just went right into making a full card. I had this patterned paper out from a different project and I wanted to make a cake with three of the patterned papers in the stack.


Isn't this something? It is a full 3-d birthday cake, but it folds completely flat for mailing. This card will easily fit into an envelope and mail for a single stamp.


I used the included cake trim as a border at the top and bottom and the Happy Birthday die again. I mentioned you would be seeing a lot of that die.


Tips and Tricks:
I used the dark patterned paper as an offset behind the Happy Birthday and the scalloped frosting.

Instead of adding the scalloped frosting to the cake, I added glitter glue. Between the frosting and the Cake Trim dies, there are lots of ways to decorate your cake!

Supplies:
1028 Cake Pop-Up - Karen Burniston   coming soon
Patterned paper - Crate Paper
1030 - Happy Birthday - Karen Burniston   coming soon
Words - MFT Stamps
Marvy LePlume II markers
Stickles
Sequins

Card size - 4-1/4 x 4-1/2"

Thanks for stopping by today

Wednesday 24 January 2018

Blue and Yellow Birthday Cards for Seniors Secret Service

Good morning friends

Today's share is a group of nearly identical Birthday cards I will be donating to Seniors Secret Service. I have had this yellow & blue super sparkly patterned paper for ages, and I pulled out an older punch for the butterflies.


I also used one of my favourite layouts for an A2 sized card. The stamping went perfectly - even with all the multiples - because I used my MISTI.


I'm hoping to get lots more cards done for them this year!

Supplies:
MISTI - My Sweet Petunia
Stamps - MFT Stamps
White crd stock
Stitched Fishtail Banner dies - Elizabeth Craft Designs
Butterfly punch - Stampin' Up
Glitter Dots - Elizabeth Craft Designs

Thanks for stopping by today

Tuesday 23 January 2018

Hello Friend Coffee Cup Pop-Up

Good morning friends

I'm back today with another card for Karen Burniston's new release ... this time I paired the COFFEE CHARMS with the new COFFEE CUP POP-UP.  


If you follow my blog, you may recognize the floral paper - a few years ago I mistakenly ordered 30 of them instead of 3 so I'm still picking away at the stack.

Look how cute the to-go cup looks as a card embellishment rather than a charm. It's easy to snip away the charm hole piece if you don't need it to dangle.


Here is the card opened ... where you get to see this cool dimensional to-go coffee up. This die set is brilliant! There are slots at the back of the card for you to slide in a gift card. Or not! I chose to add a sentiment panel instead of a gift card, and adhered it under the gift card notches.


Look at the curve of the cup!


The HAPPY BIRTHDAY die makes another appearance here, and the stitched scalloped border is from the TROPICAL SCENE. Another die that is going to get a ton of use.


The napkin is so cool, and it even has the embossed edge that you often see in coffee shop napkins. I used paint splatter stamps to mimic the look of splashed coffee.


I thought you might like to see the back of the card, where I adhered the gift card sized sentiment panel.

While making this card, I had the idea to use the coffee cup as a stand alone gift card holder and it worked like a charm. I will share that project in a few days.

Tips & Tricks
When I make a Pop-Up card, I almost always start with the inside. This one was no exception, but as I got the coffee cup adhered, the card was having trouble staying open because of the tension between the two napkin halves. Karen Burniston has an assembly video where she mentioned using a heavier weight card stock but I found as I built up the card with paper layers etc, it started to lay flat on it's own.

This card doesn't lay completely flat because of the foam tape I used on the front embellishments. I'm ok with it but it's something you want to be aware of. If you want your card to lay open completely flat then keep the dimension to a minimum on the card front.

Supplies:
Patterned paper - Basic Grey
White, light teal, teal and pink card stocks
Copic markers
Paint swooshes stamps - Your Next Stamp
Wink of Stella
Stickles
Pink striped patterned paper - Lawn Fawn
Chalks - Stampin' Up
Sakura glitter pen
brown fine point marker
Fun foam

Card size - 5 x 5", which fits in a 5 x 7 envelope

Thanks for stopping by today