Showing posts with label Seniors Secret Service.. Show all posts

Thursday, 5 April 2018

Cupcake Shaped Birthday Card

Good morning friends

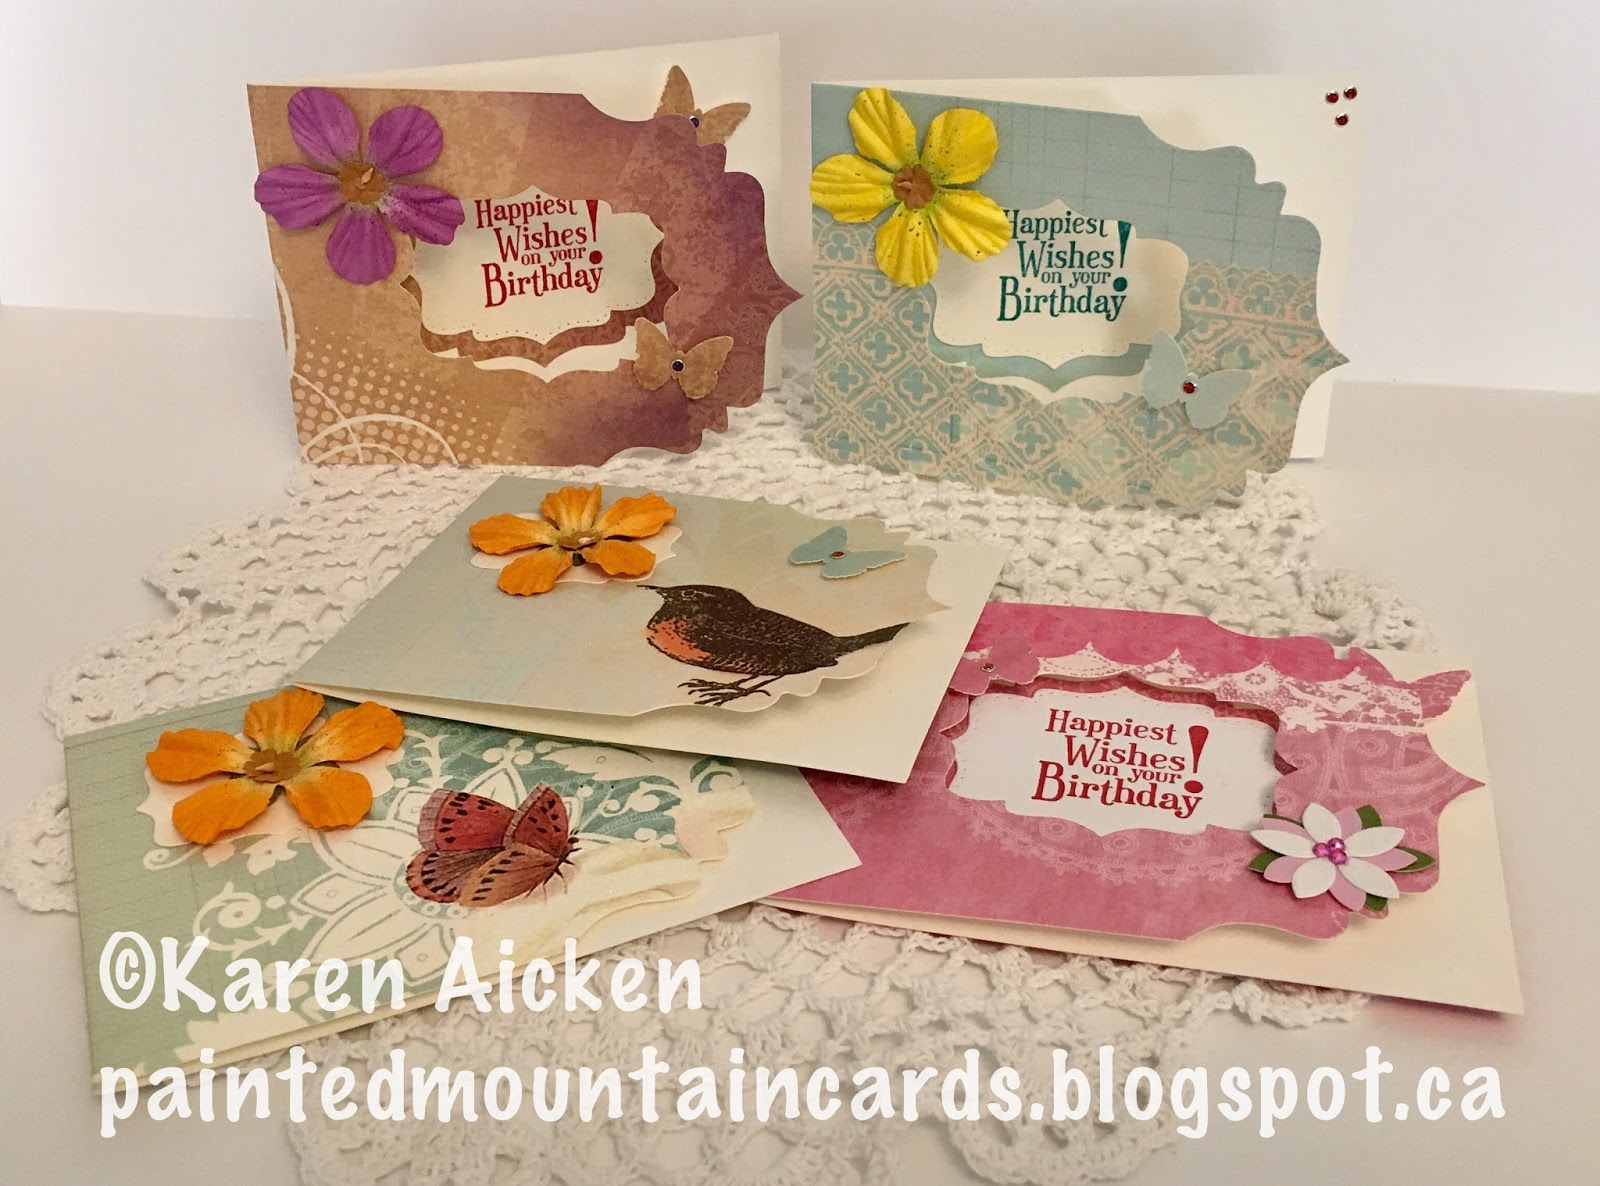
I thought this die set would work great for birthday cards for Seniors Secret Service, so I didn't have to think very hard about it when it was released last year.  This is the first card I made using the dies but I'm just now getting it posted.


Depending on where you place the fold, you can make a side fold card or a top fold card. I usually prefer a side fold card but it's nice to have the option.


I think it is going to be fun making these up with different colours and patterns.

Supplies
Cupcake shaped card die - Stephanie Barnard, Sizzix
White, pink and yellow card stocks
Patterned paper - Tailored Expressions
Stickles
Signo white gel pen
Sharpie
Words - C.C. Designs
dots - Stamps by Judith

Thanks for stopping by today

Wednesday, 24 January 2018

Blue and Yellow Birthday Cards for Seniors Secret Service

Good morning friends

Today's share is a group of nearly identical Birthday cards I will be donating to Seniors Secret Service. I have had this yellow & blue super sparkly patterned paper for ages, and I pulled out an older punch for the butterflies.


I also used one of my favourite layouts for an A2 sized card. The stamping went perfectly - even with all the multiples - because I used my MISTI.


I'm hoping to get lots more cards done for them this year!

Supplies:
MISTI - My Sweet Petunia
Stamps - MFT Stamps
White crd stock
Stitched Fishtail Banner dies - Elizabeth Craft Designs
Butterfly punch - Stampin' Up
Glitter Dots - Elizabeth Craft Designs

Thanks for stopping by today

Thursday, 11 January 2018

Ornate Edge Birthday Cards

Good morning friends

The first time I visited Arizona where we were going to be staying for longer than a few days, I went a little crazy with my craft purchases. Just a little, ha ha. That is when I discovered all the amazing BigZ dies like Flip-Its and Pop 'n Cuts. They just were not available in Canada, and I hadn't even heard of Pinterest yet. You could say I felt like I'd been living in a bubble. You could also say our vehicle weighed substantially more on the trip home because of all those big dies I bought.

This ornate edge die is one of them, and I went a little crazy making card bases with it. I must have tired of working with this one so much and these 5 card fronts were stashed in my 'In Progress Bin'. Since I'm picking away at the bin, I pulled them out and decided to finish them off as birthday cards to donate to Seniors Secret Service.


I used Karen Burniston's Katherine Label Pop-Up for the label dies, cutting windows in the front of three cards and adding stamped & matted labels to show through the opening.


It's hard to see in the photos, but all the patterned paper has glittery embossed bits on it.


I used the label that came out of the card front as the bottom mat for the stamped greeting. That way it coordinated perfectly with the pattern and colours on the front.


With the popularity of wafer thin dies, I don't know how many people choose these large clunky ones anymore. It's so much easier to store the wafer thin ones! But I have a nice collection of BigZ and BigZ XL dies and I still like to use them!

Supplies:
Sizzix Ornate Card die
Patterned paper - Recollections
Cream card stock
Butterfly punch - Martha Stewart
Glitter Dots - Elizabeth Craft Designs
Birthday stamp - Stampin' Up

Thanks for stopping by today
SaveSave

Friday, 25 August 2017

Birdie Double Z Fold Card

Good morning friends

It's Flip-It Friday here on my blog, and I have a Double Z Fold Card to share today that I made for Seniors Secret Service.


I was flipping through this Songbird paper stack and saw this sheet with sparkling birdhouses. I decided to use it and fussy cut them and a few birds for embellishments.


I like how sturdily these stand up for display, so hopefully the senior who receives it will enjoy it on their nightstand.

Supplies:
Blue card stock
Banner punch - Stampin' Up
Patterned paper - DCWV
Stamps - CC Designs
Stickles
Nuvo Crystal Drops

Thanks for stopping by today

Monday, 21 August 2017

Lighthouse Card Duo

Good morning friends

It's Masculine Card Monday here on my blog and I have a pair of masculine lighthouse cards to share today. I made one into a birthday card to donate to Seniors Secret Service, and the other has an inspirational verse inside.


I don't have many colours of the Distress Oxide inks, but I sure do love the ones I do have! I used them for the background stippling and blending. There is no reason why this lighthouse stamp set appealed to me but it really really did. These are the first cards I've made with it and I'm looking forward to more playtime for sure.


The insides are pretty much the same, other than the words stamped inside.


Supplies:
Red and white card stocks
Stamps - High Tide, Stampin' Up
Stitched Rectangle dies - Elizabeth Craft Designs
Word stamps - Stampin' Up
Bakers Twine

Thanks for stopping by today

Friday, 4 August 2017

Balloons Flip-It Birthday Card

Good morning friends

It's Flip-It Friday here on my blog and I have a Birthday Flip-It card to share today that I'm donating to Seniors Secret Service.


I really like the size of these - folded, it is a full 5 x 7".


All the decorator dies come with the set, and it was fun cutting the balloons out of different colours. You can make them any colour you wish so they always coordinate with your patterned paper or card stock.


Since I've been making several feminine cards to donate, I thought I should do one with a more masculine feel. I think this card would work well for both though.

Supplies:
White, teal, orange, yellow and blue card stocks
Patterned paper - K & Company
5 x 7 Circle Flip-It's - Sizzix
Stamp - Stampendous
Bakers Twine

Thanks for stopping by today

Thursday, 27 July 2017

Foxy Birthday Step-Card Duo

Good morning friends

Today I'd like to share two Birthday cards I made to donate to Seniors Secret Service. Both cards have a similar layout, with just the embellishments slightly different. This is what the card looks like when it's closed and ready to go into the envelope.


The fox was stamped and fussy cut, as was the hat. I added a black glaze pen to the fox's eyes & nose, and some glitter to the party hat.


Here is the card open. I added a different stamped hat on each of the centre steps.


The circle that the fox is on, is mounted to the card front with an Action Wobble. I'm thinking the senior's might like watching it bob around.


Below is the second card. Amazing how swapping out the patterned paper completely changes the look!


This time I added some hand lettering, doodles as well as a punched banner on the front edge of each step.


This circle is also mounted to the card front with an Action Wobble.


Supplies:
Red and white card stocks
Patterned paper (leftover piece) - Echo Park
Step card die - Spellbinders
Copic markers
Fox stamp- Stampin' Up
Hat stamps - Lawn Fawn
Action Wobble
Stitched circle die - MFT Stamps
Happy Birthday stamp and die - Lawn Fawn
Signo white gel pen
Black Glaze pen
Stickles

Card #2
yellow, green and white card stocks
Fitted circle dies - Elizabeth Craft Designs
Fox stamp - Stampin' Up
Hat stamp - Lawn Fawn
Action Wobble
Stitched circle die - MFT Stamp
Glaze pens - Sakura
Step card die - Spellbinders
Black fine point marker
Banner stamp & die - the Stamps of Life
Chalks - Stampin' Up
Banner punch - Stampin' Up
Nuvo Crystal Drops

Thanks for stopping by today
SaveSave

Friday, 21 July 2017

Birthday Flip-It Cards with Gold Flowers

Good morning friends

I have a large 'In Progress' bin, stuffed full with all kinds of odds & sods, half finished cards, almost done card embellishments etc. I am trying to pick away at this bin and FINISH some cards. Going through it a few weeks ago, I found 3 Flip-It base cards and patterned paper layers together in a clear envelope. Obviously I was interrupted from completing the cards so just stashed them into my 'In Progress' Bin until I could get back to them.  Well here they are, all finished and ready for me to post here for my blog's Flip-It Friday


I decorated the front squares pretty much identical, using gold foil for the flowers and green for the leaves and vine. I added some gems and bakers twine, since these cards are going into my donation box for Seniors Secret Service I don't have to worry about bulk. Volunteer's hand deliver the cards to the birthday recipients.


To keep things simple, the flip sides of all three cards are done the same as well - just different colours.


Done and done!

Supplies:
Fancy Edge Flip-It - the Stamps of Life
Pink, green, white card stocks
Gold foil card stock - Stampin' Up
Patterned papers - stash
Swirly Scribble dies - Stampin' Up
Botanical Builders stamps & dies - Stampin' Up
Bling
Banner punch - Stampin' Up
Happy birthday stamps & dies - Lawn Fawn
Butterfly punch - Martha Stewart

Thanks for stopping by today


Monday, 3 July 2017

Cacti Four Panel Pop-Up Card

Good morning friends

It's Masculine Card Monday and today's share is another one that I'm calling a 4 Panel Pop-Up. I used a patterned A2 card for the card base, adding a label, succulent and die cut pot on the front.


Here is a look at the inside. I had fun decorating the four pop-out panels, adding water colours to the cacti and succulent. I cut down a second patterned card from the package to decorate the inside.


I love Joset's Arrow dies - they are just perfect for a masculine card!


This one is going into the box to donate to Seniors Secret Service.

EDITED TO ADD: Here is the link to my first 4 Panel Pop-Up, with credit to where I first saw this style of card.

Supplies:
A2 patterned card - DCWV
White, green and teal card stocks
Stitched Rectangle dies - Elizabeth Craft esigns
Pot dies - MFT Stamps
Cactus dies - Stamps of Life
Oval stamp - Paper Smooches
Gold gel pen
Arrow - Elizabeth Craft Designs
Stitched fishtail banners - Elizabeth Craft Designs
Happy Birthday stamp - MFT Stamps

Thanks for stopping by today

Sunday, 2 July 2017

Birthday Flowers Flip-It Card and a Flat Birthday Card too.

Good morning friends

Today's share uses mostly older products from my craft room ... like the Circle Flip-Its (by Sizzix) - the one that started my flip-it craze. Also some gold Peel-Off Borders from my stash and an older stamp & punch set.


The banner stamp & die is relatively new - one of those sets that rarely gets put away because I use it so much.


Below is the card fully opened ...


This birthday card is going into my donation box for Seniors Secret Service

While I had the stamps & punches out anyhow, I used the leftover piece of patterned paper from the above card to make a second birthday card for Seniors Secret Service


I added a few Glitter Dots to the stamped & punched flowers, and a gold Happy Birthday Peel-Off.


Here is a peek at the inside ...


Supplies for Flip-It Card:
Circle Flip-Its - Sizzix (BigZ die)
Patterned paper - K & Company
Flower punches and stamps - Stampin' Up
Happy Birthday Banner - the Stamps of Life
1278 - gold border Peel-Off - Elizabeth Craft Designs
Stitched Circle - MFT Stamps
Glitter Dots - Elizabeth Craft Designs
Inside words - MFT Stamps
Pink and rose card stocks

Card size - 5 x 5" square


Supplies for flat Birthday card:
Rose and white card stocks
Patterned paper - K & Company
Mixed bunch punch and stamp - Stampin' Up
Petite Petals punch and stamp - Stampin' Up
Happy Birthday Peel-Off - Elizabeth Craft Designs
Glitter Dots - Elizabeth Craft Designs
Stamp inside - MFT Stamps

Card size - 4-1/4 x 5"

Thanks for stopping by today

Monday, 26 June 2017

Hot Air Balloon Masculine Birthday Card

Good morning friends

It's Masculine Card Monday here on my blog, and for my second post today I have a Birthday card to share using Karen Burniston's Hot Air Balloon die. As you can see, it makes a great embellishment for a card in addition to a Pop-Up card.


The papers were in my stash and I've had them for many years. Fun to break them out again. I embossed the white panel with a clouds embossing folder and lightly sponged blue on it so the raised edges would catch the ink.


This card is going into my donation box for Seniors Secret Service.

Supplies:
5 x 7" card base and envelope - Walmart
Patterned paper - K & Company
white and black card stocks
Hot Air Balloon, Pop it Ups - Karen Burniston (Elizabeth Craft Designs)
Embossing folder - Darice
Action Wobble
Black fine point marker
Stitched fishtail banner dies - Elizabeth Craft Designs
What's Up Clear Stamps, Pop it Ups - Karen Burniston (Elizabeth Craft Designs)
Staedtler markers

Thanks for stopping by today

Saturday, 10 June 2017

C4C-389 Roses Pop-Up Card

Good morning friends

It's Saturday so that means a new challenge at the Crazy 4 Challenges Blog. Our June 2017 Hostess is Joanne Grzelak,

When I saw the theme of Roses, I knew I wanted to use one of the lovely ECD Rose Peel-Off's for my card. When I pulled out the sheet I saw this negative image from a previous project so decided to use that instead of the outline piece.


Using a Transfer Sheet, I picked up all the little pieces of the negative image and transferred them onto a piece of cream card stock. It was easy to colour inside the lines with Sharpie markers, then I went over the blossom lines with a Wink of Stella pen.


Check out the Pop-Up inside. I have had these Pop-Ups for YEARS. They were on clearance at Michaels way back when and I was intrigued. When I got them home and opened the package, they were simply printed florals layered with foam tape and a label adhered to the back. I don't know what I expected, but this wasn't it. And the package went into my Embellishment Box and stayed there. 

The Pop-Up is a simple card stock strip folded into a box and adhered on one side to the back of the embellishment. I adhered it to the bottom and back of the card to create the Pop-Up card.  I should note that back when I got these, Karen Burniston was not yet designing interactive card dies.

Since there are roses in this bouquet, I decided to finally USE one of these things.


Below you can see the simple box platform and how it creates the Pop-Up. The lacy border was a test cut from another older die. Much older. I was looking through my older dies and saw this one and wanted to see what it looked like when cut. Because the die is so old I couldn't remember, ha ha.


Finally I added a Peel-Off Happy Birthday to the tag. This card will be going into the bin for Seniors Secret Service.  


Check out the C4C blog to see how the Crazies have been inspired by the challenge. We'd  love to see your take on it, so be sure to stop by the Crazy 4 Challenges blog and link up your creations. If you are uploading to an online gallery, please use the keyword C4C389.

Supplies:
Green and cream card stocks
Pop-Up Embellishment - Anna Griffith (? - I didn't keep the packaging)
Patterned paper - K & Company
Wonky stitched rectangles - MFT Stamps
2577 Happy Birthday Peel-Off - Elizabeth Craft Designs
2599 Roses Peel-Off's (negative) - Elizabeth Craft Designs
Transfer Sheet - Elizabeth Craft Designs
Sharpie markers
Wink of Stella
Seam binding
Scalloped Oval die - Elizabeth Craft Designs
Gold gel pen - Sakura
Border die - Sizzix
Nuvo Crystal Drops

Thanks for stopping by today

SaveSave