Thursday 31 October 2019

Ghosty Flip It's

Hello my crafty friends

Happy Halloween!

It's Fun Fold Friday here on my blog. Even though I didn't need another Halloween card this year, I couldn't let Halloween go by without posting a Halloween card. and since it's been too long since I've made a Flip It card, that is what I went with today. This is also for Your Next Stamp's Fun Friday Challenge #125 which is 'TRICK or TREAT'. You can find all the details for the challenge HERE.


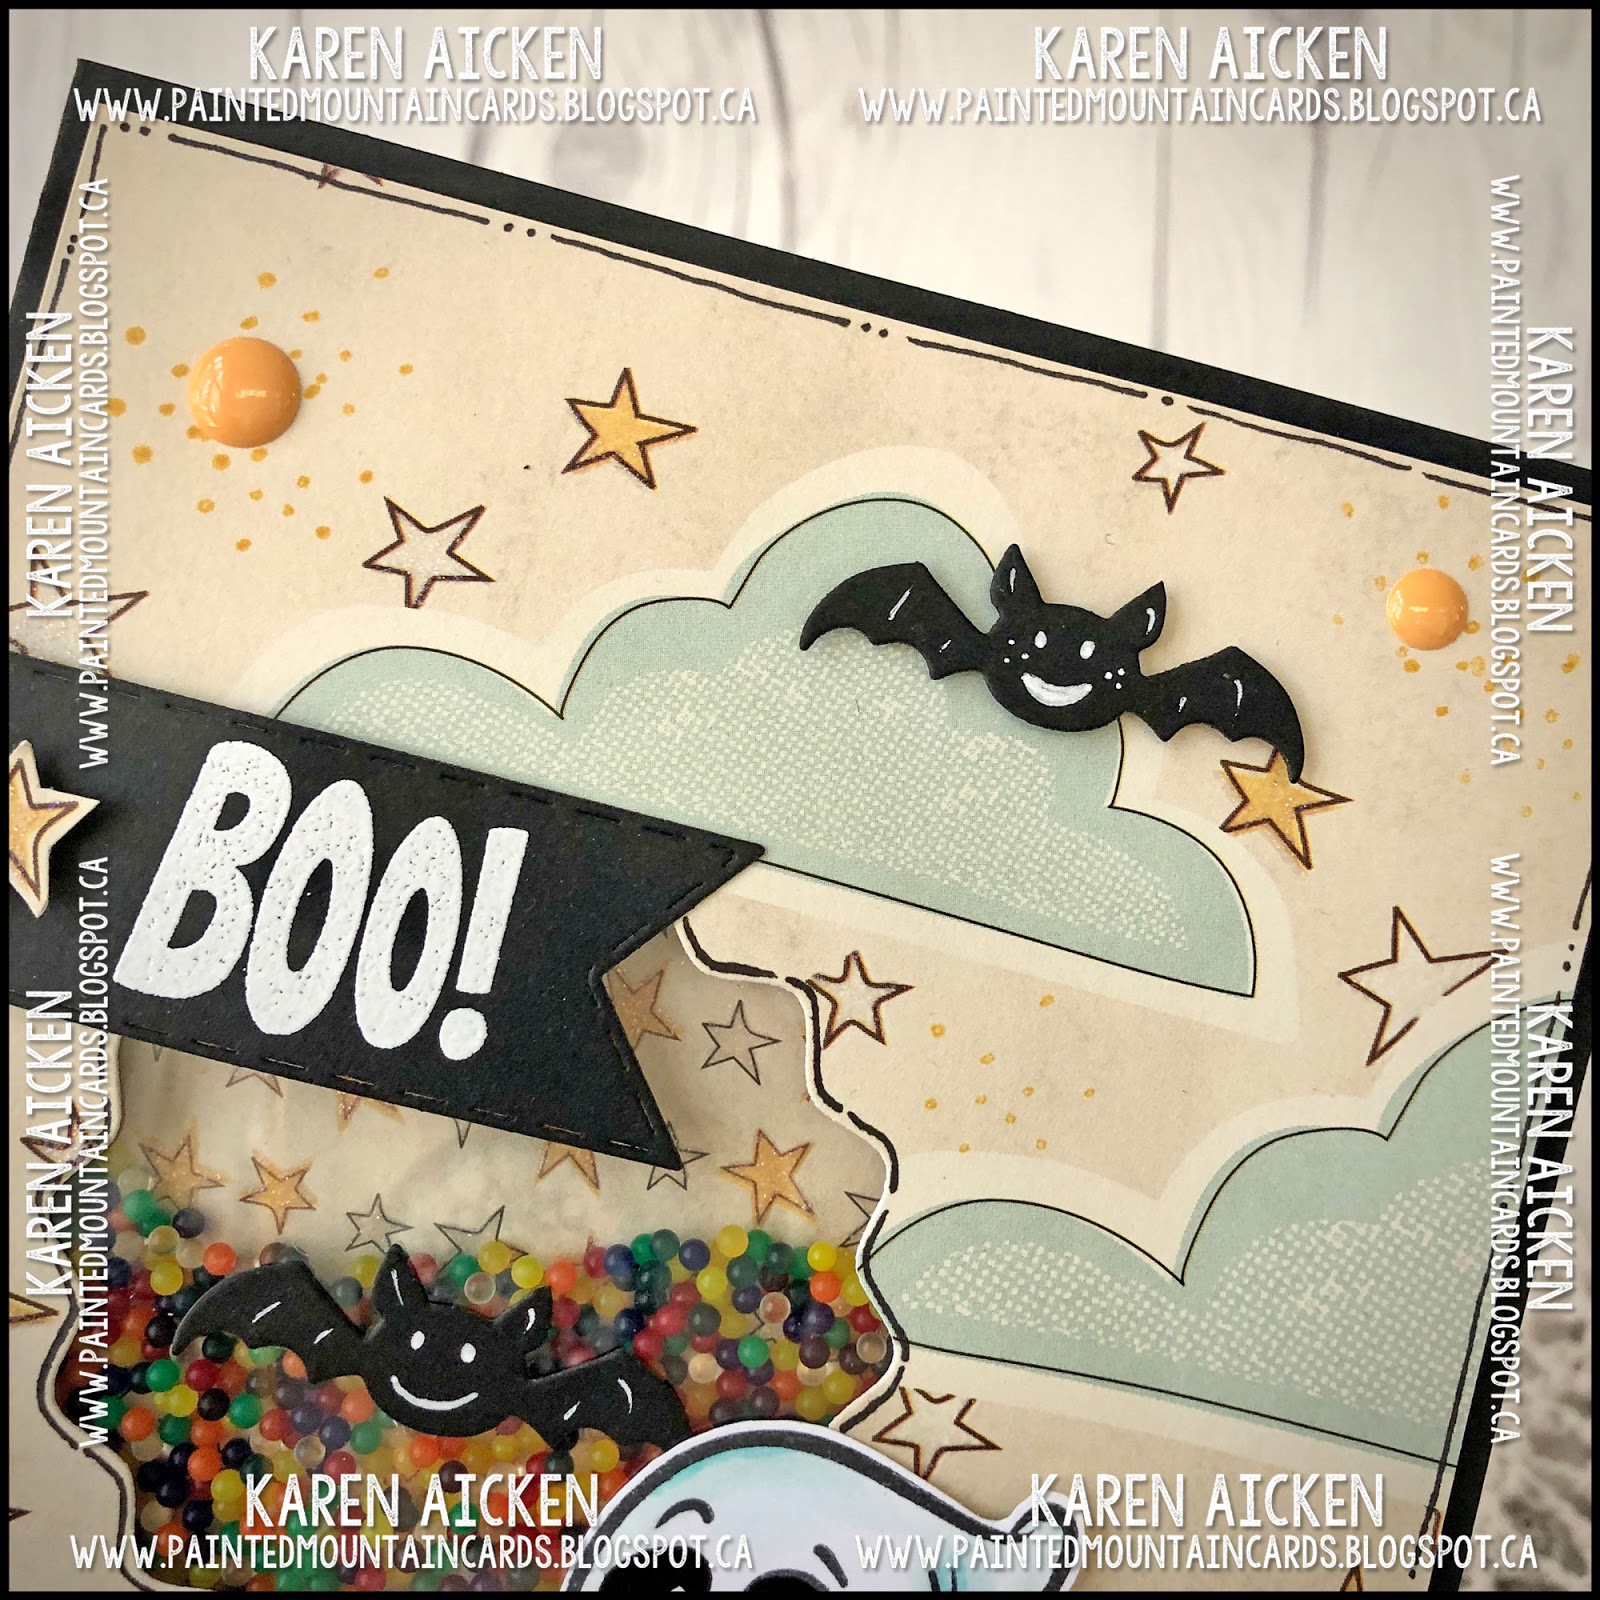
I have had this patterned paper for several years, it has a cream background and the pattern is embossed and shiny. Very pretty. You don't have to add too much to a card with there is so much texture in the patterned paper, so I stamped the ghost and 'boo' on vellum and coloured the pumpkin with Copic markers from the back side.


The black sparkle ribbon was also in my stash ...


Here is what the card looks like when it is 'flipped' open.


I embossed the greeting with clear embossing powder so it is raised and shiny like the patterned paper.


I added some YNS Gumdrops (love those things) and my card was done.

Every year we seem to get more and more children come Trick or Treating, which is fun. I love seeing the little ones all dressed up in their costumes. We live out in the country and there are no streetlights in our neighbourhood as part of a Dark Sky initiative to reduce light pollution. Oh, and there are cougars ... not a good idea to send a little one out dressed up as a teddy bear, ha ha.  So the parents drive the kids to the end of the driveways and walk the kids up to the houses. 


Hope everyone that enjoys Halloween has a safe one.


Supplies:
5 x 7" Circle Flip-its - Stephanie Barnard, the Stamps of Life
Pixie Dust Gumdrops - Your Next Stamp
Bling It On Sparkly Gumdrops - Your Next Stamp
Spooky Fun Stamp set - Your Next Stamp
Stitched Wavy Circle die set - Your Next Stamp
Black and cream card stocks
Patterned paper - Making Memories (old, from my stash)
Clear Embossing Powder
Vellum scraps
Copic markers
Sakura white gel pen
Fun Foam
Black sparkle ribbon - Stampin' Up
Black Sharpie

Card size - 5 x 7" 

Thanks for stopping by today

Wednesday 30 October 2019

Owl Shaker Halloween Card

Hello my crafty friends

Today I'm playing along with Your Next Stamp's Fun Friday Challenge #125 which is 'TRICK or TREAT'. You can find all the details for the challenge HERE.


Yesterday I made a shaker card for the challenge, and since I still had shakers on the brain, I made another one. I think yesterdays card can go to our Granddaughter Alma next year, and Ilai can have this one. Now I'm two cards ahead for 2020, ha ha. Actually I do enjoy working ahead so this is not all that unusual for me. 


I have had this owl die for years, and I thought the fall away eyes would be the perfect area for a shaker card. I added two YNS Gumdrops on top of the acetate to make the eye stand out a little more.


This Happy Halloween from Karen Burniston's Halloween Charms cuts as a single piece and that makes it so easy to adhere. I cut it twice from black card stock, then stacked them on top of each other for a nice sturdy element.


Inside I added the greeting from Your Next Stamp's Spooky Fun stamp set, which is part of their mini release for October. I love it when stamp companies include an actual greeting in their sets and not just the typical 'Happy Halloween' etc.


The patterned paper has embossed sparkly bits in it, so I clear embossed the greeting to match.


Supplies:

Owl die - Sizzix Bigz
Patterned paper - Night and Fall, Recollections
Acetate
Filler - stash
Yellow, black and cream card stocks
Sakura white gel pen
Fun foam
1058 Halloween Charms - Karen Burniston
Retro Gumdrops - Your Next Stamp
Spooky Fun Stamps - Your Next Stamp
Wink of Stella
MISTI - My Sweet Petunia
Clear embossing powder

Card size 5 x 6" which fits in a 5 x 7 envelope


Thanks for stopping by today

Tuesday 29 October 2019

Ghost & Bat Shaker Card

Hello my crafty friends

Today I'm playing along with Your Next Stamp's Fun Friday Challenge #125 which is 'TRICK or TREAT'. You can find all the details for the challenge HERE.


I was inspired by another YNS Guest Designer (Meghan Kennihan) who created a couple of cute shaker cards. So that is what I went with for my card today.


I used the new YNS Spooky Fun stamp set and several other products by Your Next Stamp, as well as the bats from Karen Burniston's Halloween Charms.


I pulled out my Copic Markers to colour in the ghost - haven't used them in a very long time. I am so happy with how it turned out!


Here is a peek at the inside.


Now the funny thing is, I didn't even need another Halloween card for this year - but I can put this in the Halloween bin for next year and I'm already ahead one card for 2020. Ha.


Supplies:

Stitched Wavy Circle Die - Your Next Stamp
Stitched Fishtail Banners - Your Next Stamp
Spooky Fun stamp set - Your Next Stamp
Retro Gumdrops - Your Next Stamp
Black Olive Ink - Your Next Stamp
Black card stock
Patterned paper - Night and Fall, Recollections
Acetate
MISTI - My Sweet Petunia
filler - stash
Copic markers
Circle die - Hero Arts
1058 Halloween Charms (bat) - Karen Burniston
Black Sharpie
Dot stamp - Stamps by Judith
Sakura white gel and black glaze pens

Card size - 5 x 6", fits in a 5 x 7" envelope


Thanks for stopping by today

Monday 28 October 2019

Fall Leaves and Pumpkins, Pop Up Card

Hello my crafty friends

Last year I purchased three sheets of 12 x 12"  patterned paper from the Dreams of Autumn collection by Bo Bunny. One of the sheets was filled with images, which I fussy cut to use as card elements. When I opened my box of fall papers last month, I saw the two sheets on top of the pile, along with the clear bag of elements and decided that I was going to work with those papers until they were gone. The idea wasn't to get as many cards as possible from the papers but more to use them up.

This is the fifth card (of 6) that I made with the papers & elements, leaving me with only a small 3x3" scrap of one print and 3 fussy elements.

For the card front I grabbed a Blueprints die set from my stash, and added some copper pearl Nuvo Drops for a little shimmer.


The Rockin' Rectangle die set by Karen Burniston is one I get a lot of use out of - it's very versatile! Here I added a fussy cut pumpkin and acorn to the platform on the right, with the greeting on the arm.


I like that this stamp set from Taylored Expressions has words in it that go beyond "Happy Thanksgiving", or "Happy Fall". This is another set I get a lot of use out of each year!


Supplies:
Burgundy, off white and yellow card stocks
Patterned paper and fussy cut elements - Dreams of Autumn, Bo Bunny
Blueprints #24 - MFT Stamps
1089 Rockin Rectangle Pop Up - Karen Burniston
Word stamps - Thanksgiving Blessings, Taylored Expressions
Stitched fishtail banner - MFT Stamps
Nuvo Drops

Thanks for stopping by today

Sunday 27 October 2019

So Cool Penguin Card Duo

Hello my crafty friends

I had been browsing Pinterest and saw this sketch by Mary's Cardz TV.  I thought it would well for the Playful Penguin stamp set, so that is what I went with for my card duo today.

After making the last two Penguin birthday cards, I still had two strips of the star patterned paper left. I went through some 6 x 6" patterned paper stacks and found this one with coordinating colours and prints so that is what I used for the rest of the sketch. In fact, the remaining pieces were partial sheets in the package so I was able to use them up too!


Each of the penguins got a green enamel heart for a little somethin' somethin'. I also added some 'wiggle' lines with a black marker.


On the inside panel I added a strip of washi tape for a pop of colour.  I didn't want to cut into another sheet of patterned paper and create more scraps, since I had just used up so many! I also like that this completely unrelated stamp works so well with the penguins!


These will both be donated to my Mom's old nursing home.

Supplies:
Teal, black and confetti card stocks
Patterned paper - Summer Bliss, Echo Park
Star patterned paper - leftover scrap
Playful Penguins - Stampin' Up
Words - Twice the Wishes, MFT Stamps
Fun foam
Sakura black glaze and white gel pens
Black pen
Washi tape
W1 Copic marker
Crayola marker
Enamel heart - Doodlebug

Thanks for stopping by today

Saturday 26 October 2019

Big Balloon Wiggle/Slider Card

Hello my crafty friends

I was looking for something different to make for our nephew's daughters birthday card, and decided to make another one of those wiggle & slider cards. It was inspired by the 'Floating Stamped Images' video by Jennifer McGuire and I liked her video in the supply list. She suggests you can use a button, bead or penny and since I know my friend 'B' uses alphabet beads for similar cards that is what I went with today. The balloon slides, spins and wiggles around on the card which will be fun for her to try when she opens her card.

The patterned paper is very sparkly, and I added the Happy Birthday cut from gold card stock for additional birthday shimmer and shine.


I made the card larger - it's a full 5 x 7 - and while it isn't heavy, it is bulky because of the double layer of fun foam on the card front. The card was being hand delivered though so I wasn't concerned about it going through the mail. Below is a peek at the inside:


I also made a quick money holder so she can go shopping to pick out something she wants. We don't live close to them and I have no idea what is on her Wish List! I used the new Chameleon Fineliners to do the writing... love how those colours blend together so easily!


Supplies:
Floating Stamped Images video by Jennifer McGuire HERE.
White card stock
Patterned paper - Baby Girl Stack, DCWV (old)
Big Balloon Die - Divinity Designs
Fun foam
Circle dies - Hero Arts
Alpha dies - Elizabeth Craft Designs
Sakura gold gel pen and pink glaze pen
1030 Happy Birthday - Karen Burniston
Gold foil card stock - Stampin' Up
Seam binding
Metallic Flower Stickers - stash
Stamp inside - Super Duper, Stampin' Up
Chameleon Fineliners

Card size - 5 x 7"

Thanks for stopping by today

Friday 25 October 2019

SPOOKY! Spinner Square Pop Up Halloween Card

Hello my crafty friends

It's Fun Fold Friday here on my blog, and I have a fun Halloween Card to share. I had actually been tidying up and putting away my Halloween papers when I spied the package of Doodlebug printed elements. I just had to make another Halloween card and chose to use Karen Burniston's Spinner Square Pop Up for the inside.

There were some smaller scraps in the package which worked perfectly for this oval grid die, and the SPOOKY is one of those Doodlebug printed elements.


Here is quick YouTube video so you can see the card in action:


I added a couple of the YNS Gumdrops and my card front was done.


Inside I stencilled a spider web onto both sides of the card inside, then assembled and adhered the Spinner Square Mechanism. I decorated the inside with a few more printed Doodlebug elements and some stickers too!


As you could see in the YouTube video, I adhered the spider with a hand made wobble spring for some more spooky fun.


The front of the card is nice and sturdy because of the grid & mat layer, so I also added a white panel to the back of my card for balance.

Note - I made my own Action Wobble inspired by Anne at Constantly Carding's YouTube Video, which you can see HERE.  I tweaked her directions a little to make it work better for me but they are surprisingly easy to make!

Supplies:
Die Grid 4 (oval) the Stamps of Life
Black, Green and white card stocks
Stickers, Elements and patterned paper - Doodlebug Designs
1042 Spinner Square Pop Up - Karen Burniston
Spider Web Stencil - Mixed Media, Stamperi
Makeup Brushes
Stitched Rectangle dies - Your Next Stamp
Home Made Wobble Spring
Wink of Stella
Spellbound Gumdrops - Your Next Stamp
Card size:  wide A2 (5.5 x 4.25")


Thanks for stopping by today

Thursday 24 October 2019

Dog and Pumpkin Halloween Card

Hello my crafty friends

I needed one more Halloween card, so of course I pulled out the new Spooky Fun stamp set from Your Next Stamp. I'm having so much fun with the two sets they released in October and being a YNS Guest Designer this month!


I added colour to the Dog & Pumpkin with Derwent water colour crayons, and moved the colour around with a water brush. I love my water colour crayons, but not the wobbly metal & plastic trays they came in. I was always nervous the tray would bend and the pencils would fall all over the floor so I bought myself a lovely zippered pencil case with flaps & elastic loops that each hold 12 pencils. There is even an elastic loop for a pencil sharpener! What a pleasure it is now to pull out these pencils, I didn't realize those wobbly trays bothered me as much as they must have.


Here is a peek at the inside ...


Thank you to Your Next Stamp for having me as a Guest Designer this month!

Supplies:
Black Olive Ink - Your Next Stamp
Dog and Pumpkin - Spooky Fun stamp set, Your Next Stamp
Happy Halloween stamp - Way Cool Monsters, Your Next Stamp
Spellbound Gumdrops - Your Next Stamp
Summer Chill Gumdrops - Your Next Stamp

Patterned paper - Doodlebug
Black, Green and white card stocks
Peel off's - Elizabeth Craft Designs (from my stash)
Black Sharpie
Derwent Water Color Pencils
Water Brush
Sakura white gel, black and green glaze pens
Circle dies - Hero Arts

Card size:  standard wide A2 (5.5 x 4.25")


Thanks for stopping by today

Tuesday 22 October 2019

Halloween Treat Bags

Hello my crafty friends

I like to do little treat bags for the Grandkids at Halloween, and this year I decided to dress up some lunch bags. They turned out so cute!

Since I was going to be seeing our middle daughter I made the ones for Ilai and Alma first. I just used patterned paper from my stash, and then decorated the bags with several Your Next Stamp products.


I used the new Way Cool Monster set, stamping the sign holding monster on water colour paper with YNS Black Olive Ink. I added colour with water colour pencils and a water brush, then added a glaze pen to his eyes, horns and toe nails. Those glossy toe nails just make me smile.


The name banners are cut from the banner that comes with the Cool Tag 1 die set. Alma (2) wants everything the same as her big brother, but I did vary the colours a little on hers.


A couple of days later I finished the bags for the other three grandkids, using the same monster stamp. The set comes with some fun sentiments, so this is a great one to use all year round! I liked the BOO! and Happy Halloween for the Treat Bags, but as you can see on Ilai's above I also used the You're Awesome.


Supplies:
Way Cool Monster stamps - Your Next Stamp
Black Olive Ink - Your Next Stamp
Cool Tag One (banner) - Your Next Stamp
Spellbound Gumdrops - Your Next Stamp
Summer Chill Gumdrops - Your Next Stamp
Kraft Lunch Bags
Patterned paper - Night and Fall, Recollections
Water color paper
Derwent Water Color pencils
Waterbrush
MISTI - My Sweet Petunia
Sakura black glaze, white gel and coloured glaze pens

Thanks for stopping by today

Thanksgiving Shaker Leaf

Hello my crafty friends

I haven't played nearly enough with the Tonic Studios Craft Kit 12 that I bought last year, so I pulled it out again for my card today. What inspired the card, is actually the filler ... it was in with the box of Thanksgiving embellishments so I knew I wanted to make a shaker card and use the filler. Actually, I was hoping to use it up - it's many years old - but there is still enough left for another shaker another year.


The leaf dies (which I love, and is why I purchased that kit in the first place) are quite large so this is a 5 x 7" card. I only used a single layer of foam tape for the shaker, as the filler is all quite flat, unlike sequins and beads.


The patterned paper has shiny embossed bits on it, and the leaf was fussy cut from one of the sheets in the stack.


Here is  peek at the inside:


Supplies:
Patterned paper - Spiced Cider stack, DCWV
Large leaf dies & Happy Autumn stamp/die - Tonic Craft Kit 12, Tonic Studios
Acetate
Filler - OLD, from my stash
Kraft and white card stocks
Catherine Pooler inks
Rectangle dies - Waffle Flower
Inside stamp - Be Full, Neat and Tangled
MISTI - My Sweet Petunia
Thick bakers twine - Stampin' Up
Nuvo Drops

Card size - 5 x 7", fits in a standard 5 x 7" envelope

Thanks for stopping by today

Monday 21 October 2019

Nautical Folded Gift Card Holders

Hello my crafty friends

Today I'm sharing a pair of Gift Card Holders I made using a wonderful patterned paper stack I found on clearance last Spring. The paper is glossy and has embossed details - just lovely stuff. For the fronts of these holders, I trimmed out two of the journal cards that were included in the paper pad.


There is a pocket on the right side to tuck a gift card into. I have made quite a few of these gift card holders using a video by Dawn's Stamping Thoughts. I will add a link to the video at the end of my post.

The 12 x 12" paper stack came with a sheet that had a big circular design with the anchor decorations in the corner. I cut the corners to fit inside the card, and added a To/From tag fussy cut from a different sheet in the stack. I saved the navy inside portion of the anchor design to use for layers on future cards.


You can see Dawn's video HERE.

Supplies:
Cream card stock
Journal Cards and patterned paper - Hey Sailor, DCWV

Thanks for stopping by today

Sunday 20 October 2019

My First 'One Sheet Wonder' Birthday Cards

Hello my crafty friends

I really enjoy working assembly line style and creating multiple cards. I always have! I have also always wanted to try a 'One Sheet Wonder' template. Originally, a One Sheet Wonder was a sheet of card stock (often letter sized) that you stamped all over with the images of your choice then cut into sections to decorate multiple cards. With the arrival of patterned papers and the 12 x 12" size, OSW's became a way to make multiple cards from a single sheet of patterned paper. Especially since there are such gorgeous prints these days!

I chose a template by Seongsook Duncan (link in the supply list) because I liked that it required a double sided patterned paper. Since this was the first time working with a OSW, I chose not to do any matting but I can see how much that would add to the cards so the next ones (and there WILL be more) I will add the matting layers.

I got eight cards from the single sheet of double sided patterned paper and then had lots of fun choosing what elements to add to keep the cards different enough to all be included in the same bag for my Mom's old nursing home. I like the residents to feel special when they receive their cards, so rarely include more than two of a single design. These ones are bright and cheery even without the matting and I am very happy with how they turned out.


These two have a die cut balloon with a bakers twine bow, and while the balloon on both is the same, the layouts are different.


These ones have a die cut party hat - in different colours and each on a different layout.


I used a shooting star die that is intended for shaker cards, but it works great for embellishments too! These two are the only ones that are very similar in design.


The final two, with punched balloons on one and a fun dog sticker on the other.


The inside of all eight cards was done the same, using the MISTI for perfect placement and no 'oopses' on any of the cards. Each was stamped two times with the blue ink for a nice bold image.


I have to say how much I liked working with this template! And of course my head started reeling with all the other cards I can make with the gigantic stack of patterned papers I have here!

Supplies:
One Sheet Wonder Template:  Seongsook Duncan, click HERE
White, orange, red, green and yellow card stocks
Patterned paper - double sided, Birthday - Scrapbook.com
Balloon die - Lawn Fawn
Party Hat die - Stampin' Up
Yellow patterned paper - scrap from my stash
Balloon Punch - Stampin' Up
Shooting Star Die - Stampin' Up
Dog Sticker - Mrs. Grossmans (Old, from my stash)
Stitched Wavy Circle die - Your Next Stamp
Fitted Hexagon die - Elizabeth Craft Designs
Dot stamp - Stamps by Judith
Black pen
Stickles
Stitched Fishtail Banner - MFT Stamps
Happy Birthday, Birthday Basics - Papertrey Ink
Words inside - Stylish Sentiments Birthday, Papertrey Ink
MISTI
Nuvo Crystal Drops

Card sizes - A2 (4 1/4" x 5-1/2")

Thanks for stopping by today