Tuesday 31 December 2019

Happy New Year Pop-Up Card

Hello my crafty friends

I have some exciting news to share in the New Year. I've known since October, but am not supposed to share any details until the middle of January. There is a BRAND NEW company that has asked me to be on their Design Team, and they will be launching at CHA in Phoenix. I'll know closer to that date when I can share more information on the company and what they offer. Meanwhile, I'm having a blast playing with their dies. (The stamps are still enroute to me).

I also have been asked to be on the Design Team of one of my favourite stamp companies, and I can officially share that news tomorrow. 2020 is going to be a creatively exciting year for sure!!!

Onto my card, I actually had this card made early in the year - but didn't want to post it in late January when I received the Happy New Year die so have been hanging onto the photos until now. I had been excited about the Happy New Year die that Stephanie Barnard came out with at the end of 2018 and cut it out of black glossy card stock for some holiday shine.


The patterned paper was given to me by a friend, and it has embossed and sparkly bits on it. The ribbon is also sparkly so I was happy with how festive the card turned out.


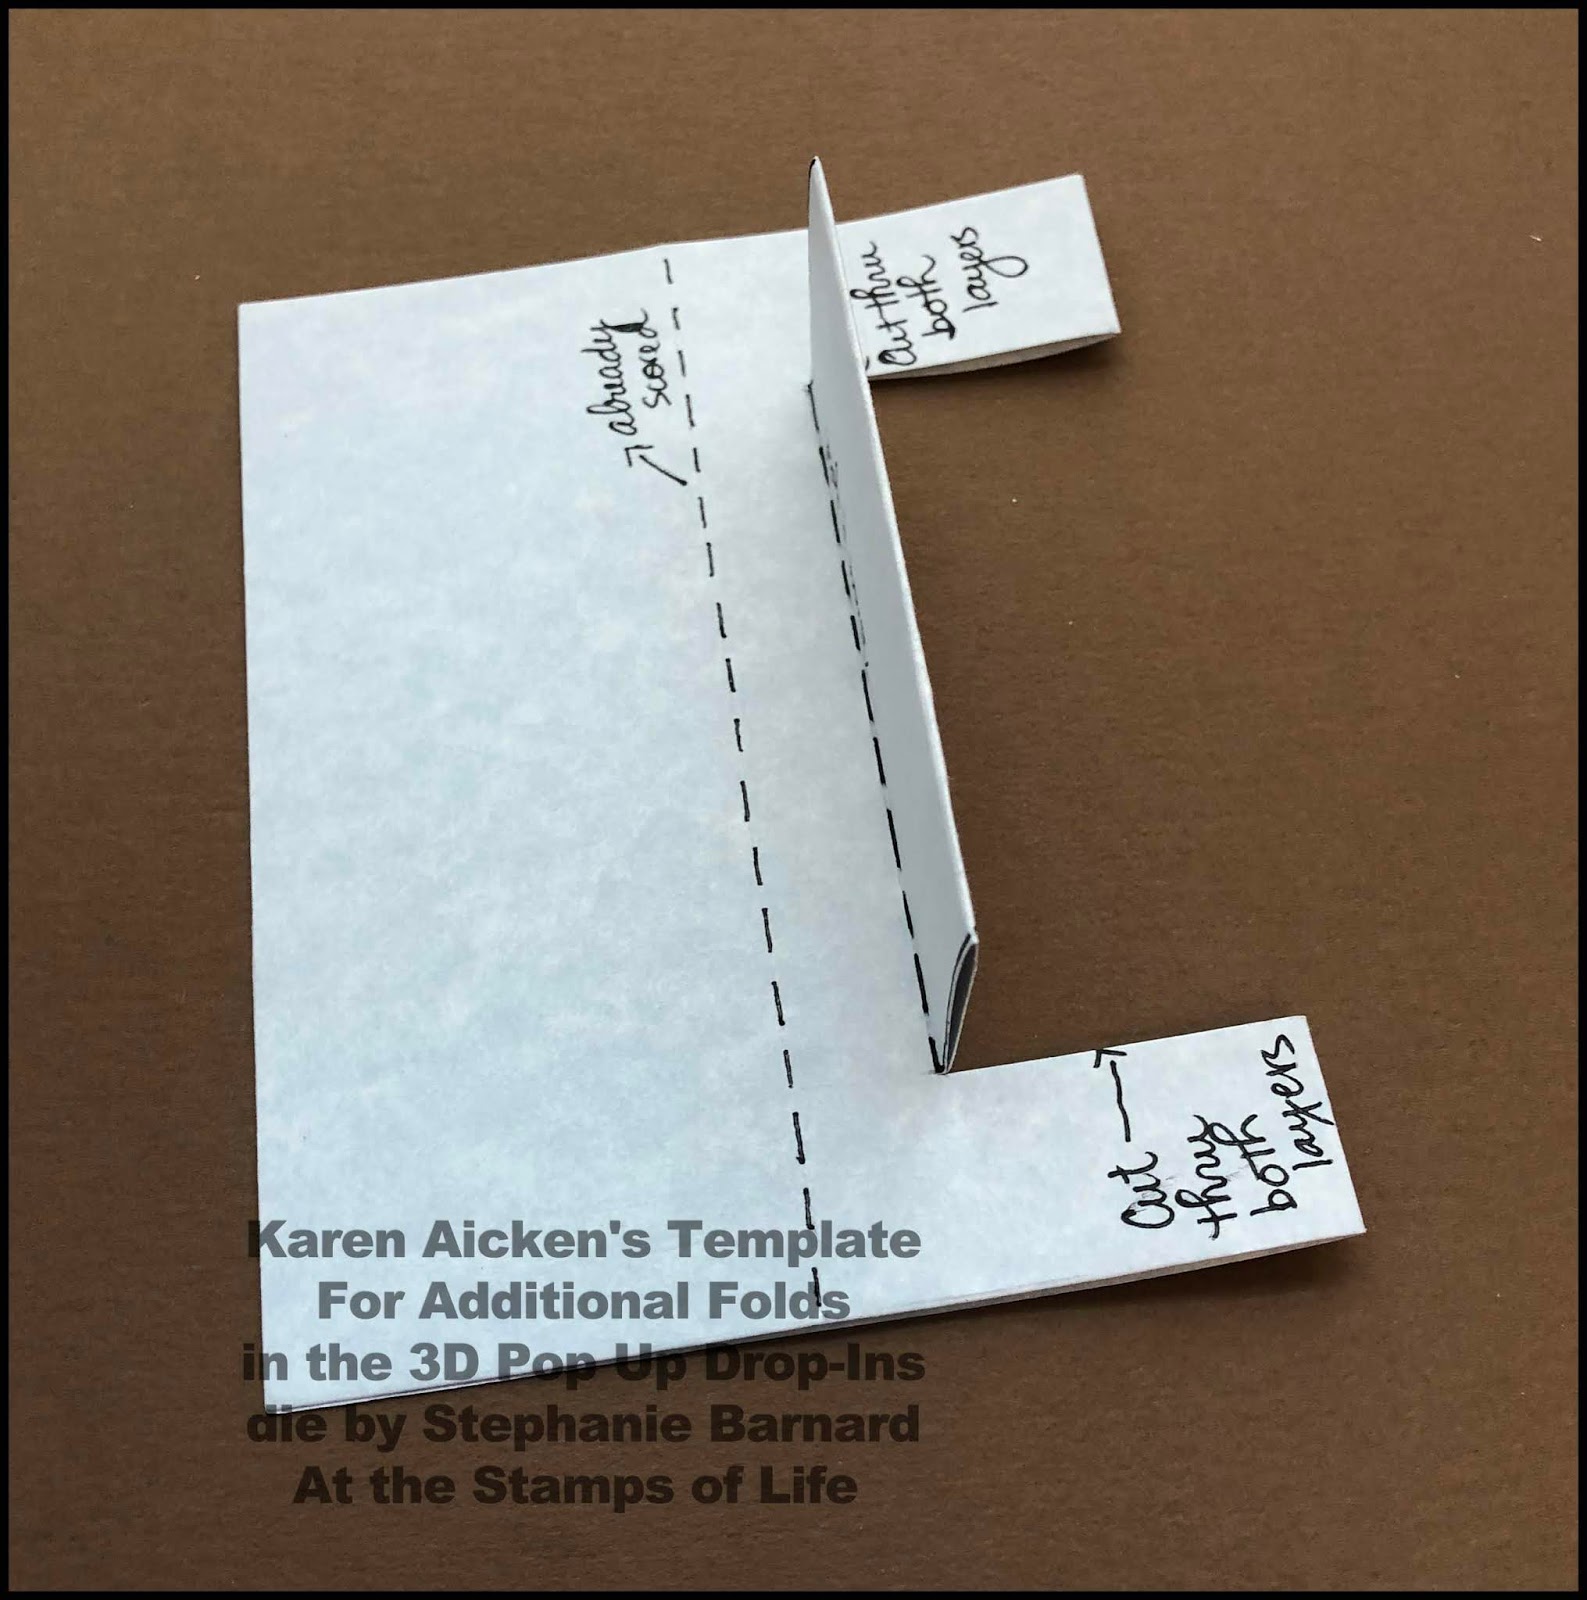
Inside I used Karen Burniston's Cupcake Pop Up and camouflaged the cupcake portion with a fussy cut firework spray.


In the photo below you can see all the sparkle in the photo.


Finally here is a side view so you can see the pop up a little better.


This will be the first year I won't be sending a Happy New Year card to my Mom, which feels strange and sad.

Supplies:
1008 Cupcake Pop-Up - Karen Burniston
1067 Celebrate - Karen Burniston
Patterned paper - Creative Imaginations
Black card stock
Red Bazill card stock
White glimmer card stock - Stampin' Up
Black sparkle ribbon - Stampin' Up
Black and silver foil card stocks - Tonic Studios
Happy New Year dies - the Stamps of Life
Scalloped rectangle - Honey Bee Stamps
Stitched Star dies - the Stamps of Life

Card size - 4-1/2 x 6"

Thanks for stopping by today

Monday 30 December 2019

Vintage Truck Birthday Card Duo

Hello my crafty friends

It's Masculine Card Monday here on my blog and today I'm sharing two birthday cards I will be donating to my Mom's old nursing home. One of the reasons I purchased the Special Delivery shaker kit from Queen & Company, is that I knew the dies would work for non-shaker cards too. I like to include some masculine as well as feminine birthday cards each month along with the generic birthday cards. 


I added small strips of acetate behind the windows to resemble glass. When I was finished, I didn't like seeing the stripes through the windshield so I added a copic coloured piece of card stock on this card, covering up the acetate.


I was able to use up all the partial sheets that were in the 6 x 6" paper pad, so that made me happy.


On this card I added a balloon to the back of the truck.


Both cards are identical inside - using one of the stamps that came with the kit.


Supplies:
Truck dies - Special Delivery kit, Queen & Company
Burgundy, black, kraft and grey card stocks
Acetate scraps
Sakura white gel pen
Copic markers
Patterned paper - Autumn Crisp, American crafts
Stitched Vertical Strip dies - MFT Stamps
Happy Birthday die - Penny Black
Stitched Nested Label dies - Stampin' Up
1069 Explosion Pop Up (balloon and swirly doo) - Karen Burniston
Copics
Stamps inside from the kit

Card sizes - Standard A2 (4.25 x 5.5")

Thanks for stopping by today

Sunday 29 December 2019

4 Panel Pop Up New Years Card

Hello my crafty friends

I love the foiled bits in this patterned paper package, so pulled it out to make a pop up New Years Card. I kept the front nice and simple, since the patterned paper is so pretty! I added the Happy New Year to a gold pearlized shadow, and a few gems for some shimmer & shine.


Here is a look at the inside with the fun pop up and gold numbers:


I like to have an extra New Years card on hand, in case we are invited somewhere in between Christmas and New Years. I generally don't add the year to these cards so that if I don't need it that year I can hang onto it until next year. When I cut the numbers from the gold shimmer card stock, I also cut a ONE. The end ZERO in 2020 is adhered with removable adhesive so I can peel that off and add the ONE if I don't need the card this year.


I loved this circle burst background die that is included with the 3D Pop Up Drop-Ins die set (which I call a 4 Panel Pop Up) and I was tickled that the Circle Burst stamps and dies from Your Next Stamp work so well with it!


Into the stash with this one for now.

Supplies:
3D Pop Up Drop-Ins - Stephanie Barnard, the Stamps of Life
Happy New Year die - Stephanie Barnard, the Stamps of Life
Navy and white card stocks
Gold pearlized card stock
Number dies - Sizzix BigZ dies by Stampin' Up
Circle Burst stamp - Your Next Stamp
Hexagon dies - Elizabeth Craft Designs]
Jelly Gems - Queen & Company
Patterned paper - Brightly Gleaming, Stampin' Up

Card size - standard A2 (4.25 x 5.5")


Thanks for stopping by today

Saturday 28 December 2019

Monochromatic Moose Birthday Cards

Hello my crafty friends!

A few months ago, I ordered what was called an 'A2 sized' card set. There were brightly coloured panels/post cards and coordinating envelopes. I thought they would be great for the cards I donate to my Mom's nursing home so ordered them. Well they are actually smaller than A2, so I was very disappointed.

But after some thought I decided not to return them. One, the price point was really good. Two, they are only 1/4" smaller than standard A2 ... so the envelopes hold a card that is 5.25 x 4". That is still easy enough to use and not too small to give the seniors. I  did know that the panels were not folded cards, and I had planned on using them as matting layers which I can still do. Especially when I realized that they are proportionate to A2 cards so my rectangle dies will still work perfectly. So, wanting a quick break from the frenzy of gift wrapping, tidying up for company etc before Christmas I ducked into the craft room and made these three cards.


They are sweet and simple - I don't often do CAS cards but that is what appealed to me when I was making them. I die cut the coloured panels with a stitched rectangle die, then punched a moose out of the lower right corner of each panel. I actually really liked the cards with the white card base showing through the moose opening but in the end I decided to add the moose pieces back into the openings with foam tape for some dimension.

I stamped the greeting and sentiment inside in coordinating colours, and die cut the greeting with a stitched fishtail banner. That was also popped up with foam tape. I tried a twine bow on the moose to dress up the card a little, but didn't like it. I added some small circles to see if Nuvo or Gum Drops would look good - they didn't. So in the end I decided to just go with the clean and simple look. The matching envelopes help elevate the cards a little.


The sentiment inside all three are the same, just stamped in coordinating colours.


Looking at these photos, if I were to make this design again I would move the greeting on the banner all the way to the right, then tie some coordinating coloured bakers twine around the left end. At least, I would have a look at doing that - no way I'm peeling up the banners on these three as they are stuck down good. Ha.

Supplies:
Card panels and matching envelopes - American Crafts
White card stock
Moose punch - Stampin' Up
Fishtail banner - MFT Stamps
Happy Birthday To You stamp - Cool Tag Sentiments, Your Next Stamp
Stitched rectangle die - Your Next Stamp
Inside greeting stamp - In and Out Birthday, Taylored Expressions
MISTI - My Sweet Petunia

Card size - 5.25 x 4"


Thanks for stopping by today

Friday 27 December 2019

3D Pop Up Birthday Card

Hello my crafty friends

Now that Christmas is over, I'm ready to play with some different papers and colours.

I get a lot of use out of the 3D Pop Up Drop-In die set from the Stamps of Life, but my preferred way to use it is with a couple of extra folds and cuts. One of my followers (Rebecca) asked if I had a template, so with this post I do have one for you. But first the card ... which is for Fun Fold Friday here on my blog.


The stickers have some sparkle on them anyhow, but I added some Stickles for some additional shine.


Here is a peek at the inside - I just love all the dimension you get with these extra folds!


I used some paper and stickers that I picked up last year (or the year before). I'm bound and determined to use up some of what I have here rather than keep adding to my stash. My room is full and it is frustrating to try to find homes for new items. Using up older stuff will give me some space again.

Now for my tutorial:

Step One - Die cut the 3D Pop Up Drop Ins die from whatever card stock or patterned paper you choose for the inside of your card. You can see more details about this die set HERE at the Stamps of Life. NOTE - this is sized to fit inside a standard A2 card with a small border around the outer edge. 

The die cuts the outer edge and scores the two side panels as shown below. I went over the score lines with a black pen so you can see them better.

NOTE - You can click on any of the photos to open them larger in a separate window.


Step Two - Line up the two outer corners and fold the panel in half. Below I show it with what would be the pattern paper design on the outside. Reverse the fold so the design is now on the inside. This starts to train the centre fold. You want to be working on the back side of your patterned paper or card stock so you don't see any pencil marks on your finished card.


Step Three - This is where you will add the additional fold lines. Keep the card in the closed position!  Now if you follow my blog you know I like things to be easy and I don't like math. So I rarely measure things, preferring to eyeball it.  I usually draw a pencil line parallel to the score line, about 1/2" away from that score line. 

NOTE -  I kept the template nice and neat for the photos, and I used a black pen so you can see the lines easier. Feel free to use a pencil and have your line go from the top edge to the bottom edge, 1/2" away from the score line. That's much easier.

Step Four - I have a 6" metal ruler that I use, and it's almost 1" wide. I usually just line that up along the bottom edge of the card, drawing a pencil line from the centre fold up to the pencil line from Step Three. Repeat at the top edge. 

NOTE - you are drawing your lines from the centre fold line, not the outer edges.


Below is the same photo as above, just in a different orientation.


Step Five - Now use scissors and cut through both layers on the two cut lines as shown below. Do Not cut past the score line you created in Step Three

Step Six - score on the line you drew in Step Three, but only between the cut lines. Do Not score above or below this line! This is important to remember if you just drew in your pencil line from the top edge to the bottom edge. You only want to score the line between your two cut lines.


Step Seven - Fold the panel you just cut upwards on the score line, then fold it in the other direction. 


 Step Eight - Carefully open up the card and turn it over to the patterned paper (or good side) and this is what you will have. The pencil lines are in behind.


Step Nine - you now have all the score lines you need, but you will need to reverse the centre fold line between the two narrow strips as shown below. In the photo above the entire centre fold line is a mountain fold. Keep the upper and lower strips as mountain folds, but make the centre area a valley fold. Honestly, it's harder to write out than it is to do it. I did the writing on the front, or good side of this 3D Pop Up Drop-In piece, the fold lines and notes from above are on the back side.


That's it! You have your 3D Pop Up Drop Ins insert with some extra folds and dimension. I made one from scrap card stock and keep it with the die set, so I don't have to think about what I did to make it work the last time. You can also make any notes you want on this template. Adhere it inside a folded card base keeping it centred so there is an even border around all outer edges. You will be adding adhesive to the two outer panels, not the centre ones we were working on. Stephanie Barnard shows you how to do this on her website HERE.  

If you want to add patterned paper to your pop up insert, simply measure each section you wish to cover and then decide on how much of a card stock border around the edge you want. Cut your pieces accordingly. I don't have measurements for you as I generally just wing it and decorate different areas each time. Often the scraps of patterned paper I have sitting on my stamping table determine where I will add patterned paper. There are lots of samples over at the Stamps of Life, and in their gallery there.

TIP:  Be careful what size of element you add to the interior centre folds as you probably don't want them to stick out of the card perimeter. Check each one before adhering permanently!

Supplies:
3D Pop Up Drop In - Stephanie Barnard, the Stamps of Life
Pink, white and yellow card stocks
Patterned paper and coordinating stickers - American Crafts
Baby powder (to brush onto the sticker backs to remove tackiness)
Stitched scalloped rectangle die - Your Next Stamp
Stitched rectangle die - Your Next Stamp
Simple Strips Birthday stamp and coordinating die - Taylored Expressions
Happy Birthday - LJD Birthday Greetings, MFT Stamps
Nuvo Drops
Stickles

Card size - Standard A2 (4.25 x 5.5")


Thanks for stopping by today

Thursday 26 December 2019

Wreath Shaker Christmas Card

Hello my crafty friends

I know that Christmas 2019 is over, but since I didn't post anything yesterday I figure I can get away with posting one more Christmas card this year.  I really wanted to play with the North Pole Shaker Kit one more time and this is what I came up with.

I used a sketch for the layout and I have to say I will likely use this one again. I really like it! Of course the sweet prints that come in the North Pole paper pad help because they coordinate so well.


In addition to the filler that came in the kit, I also added some Q & Co 'diamonds' for a bunch of sparkle.


I made several birthday cards that I will be sharing next month, and cut narrow fish tail banners from double sided patterned paper. Then I folded them in half and stapled them to the inside sentiment panel. I quite liked that look and plan on doing it more on my cards. It's a great way to get a pop of colour inside and carry the pattern through from the front. For this card, I had two small scraps that I trimmed into fish tail banners and stapled those instead.


I have several other (older) Queen & Company shaker kits that I look forward to playing with in the New Year.

Supplies:
Red confetti, white and green card stocks
North Pole Shaker Kit - Queen & Company (if not listed, then the supplies come from the kit)
'Diamonds' filler - Queen & Company
North Pole Outline Dies - Queen & Company
Seam Binding
Circle dies - Hero Arts
Scallop circle - Elizabeth Craft Designs
Simple Strips Christmas, stamp and coordinating die - Taylored Expressions
Stamp inside - Mingle All The Way, Stampin' Up (retired)
Tiny Attacher - Tim Holtz
Sketch - May 2018 Viva La Verve
MISTI - My Sweet Petunia
Copic markers
Fineline markers

Card size - Standard A2 (4.25 x 5.5")


Thanks for stopping by today

Tuesday 24 December 2019

Green & Gold Snowflake Centre Step Card

Hello my crafty friends


Merry Christmas Eve!

Today I'm sharing an elegant foiled Centre Step card I made for friends. The pretty square linen envelope is even more special because I lined it with some of the foiled patterned paper.


I have had these gold acetate snowflake elements for YEARS, and they worked perfectly on this size of card. I also added some metallic peel off border stickers and gold snowflake peel-offs. This is one shiny card!!


Here is a peek at the inside:


I would like to wish all of my followers the very best of the season, whatever it is you celebrate.


Supplies:
Center Step die - Cheery Lynn Designs
White card stock
Patterned paper - Brightly Gleaming, Stampin' Up
Gold Acetate Snowflake elements - K & Company (my stash, many years old)
Word stamp inside - Merry Christmas to All, Stampin' Up
Peel Off's - Elizabeth Craft Designs
6" Square linen envelope

Card size - 5-1/2" square, fits in a 6 x 6" square envelope


Thanks for stopping by today

Monday 23 December 2019

Furry Christmas Wishes

Hello my crafty friends

Today I'm sharing a sweet and simple Christmas card. The cute Furry Christmas image had already been stamped and coloured - I believe it was for a 30 Day Colouring Challenge I took part in earlier this year. 

The die cut snowbank scene piece was sitting beside my stamping area. I had cut it for a different card and didn't end up needing it. I popped out the top piece, then dipped and dragged it through puddles of Distress Oxide Inks. After drying it with a heat tool, I added it back into the opening which had been attached to the front of a white card base.


Hard to see in the photos, but the hat and scarf have lots of glittery goodness.  


I love having a variety of stamped sentiments all ready to go, and am so happy I invested in the Simple Strips stamps and dies from Taylored Expressions. I quickly went through the ones I had previously stamped and die cut then popped this one up with foam tape.

A fun stamped greeting inside and my cad is ready to send. Forgot to take a photo of the inside though.

Supplies
Stitched background die - Lawn Fawn
White card stock
Distress Oxide inks
Dogs and cat stamp - Furry Christmas, Simon Says Stamp
Coloured Pencils
Sakura black glaze and white gel pens
Copic markers
Stickles
Simple Strips Christmas, stamp and coordinating die - Taylored Expressions
Words inside - North Pole Shaker kit, Queen & Company

Card size - Standard A2 (4.25 x 5.5")

Thanks for stopping by today

Sunday 22 December 2019

'Merry' Card Duo

Hello my crafty friends

I have a pair of Christmas cards to share today, using up some of the bits and pieces from the Comfort & Joy patterned paper/sticker & element package I've been working on using up this year. Because I rarely post my cards in the same order I make them, on previous posts I mentioned using it up already. These two cards were made before those final ones but I chose not to re-arrange my blog posts at this busy time of year.


Grid dies are a great way to use up pretty paper scraps! 


The two elements were in the paper package, and I added some sparkle as well as Glitter Dots. The little inlaid heart/circle is from a Blueprints Die set and there is some sparkle on the white heart.


Here is a peek at the inside of the first card ...


For the second card, I used a Blueprints die set and a few more of the elements.


I love the Gumdrops (enamel dots) from Your Next Stamp and this sparkly green one was the perfect finishing touch.


Here is the inside of the second card:


Supplies:
Grid 4 (oval) - the Stamps of Life
Confetti and red card stocks
Patterned paper, elements and stickers - Comfort & Joy, My Minds Eye
Fun foam
Blueprints #29 - MFT Stamps
Sparkle paper (scrap)
Glitter Dots - Elizabeth Craft Designs
Stitched Rectangle dies - Your Next Stamp
MISTI - My Sweet Petunia
May Harmony stamp - Hero Arts 
Wishing you stamp - Christmas Messages, Stampin' Up (retired)
Words on front - Snowglobe Sentiments, MFT Stamps
FT Banners - MFT Stamps
Winter Wonderland Sparkly Gum Drops - Your Next Stamp

Card sizes - standard A2, (4.25 x 5.5")

Thanks for stopping by today