
Hello my crafty friends
Now that Christmas is over, I'm ready to play with some different papers and colours.
I get a lot of use out of the 3D Pop Up Drop-In die set from the Stamps of Life, but my preferred way to use it is with a couple of extra folds and cuts. One of my followers (Rebecca) asked if I had a template, so with this post I do have one for you. But first the card ... which is for Fun Fold Friday here on my blog.


Here is a peek at the inside - I just love all the dimension you get with these extra folds!


I used some paper and stickers that I picked up last year (or the year before). I'm bound and determined to use up some of what I have here rather than keep adding to my stash. My room is full and it is frustrating to try to find homes for new items. Using up older stuff will give me some space again.
Now for my tutorial:
Step One - Die cut the 3D Pop Up Drop Ins die from whatever card stock or patterned paper you choose for the inside of your card. You can see more details about this die set HERE at the Stamps of Life. NOTE - this is sized to fit inside a standard A2 card with a small border around the outer edge.
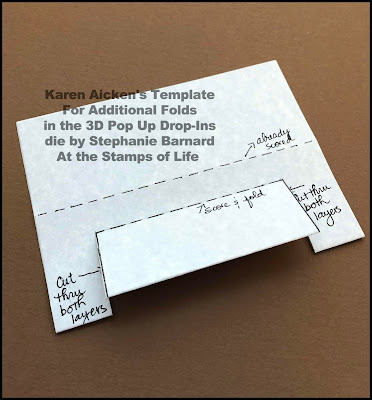
The die cuts the outer edge and scores the two side panels as shown below. I went over the score lines with a black pen so you can see them better.
NOTE - You can click on any of the photos to open them larger in a separate window.

Step Two - Line up the two outer corners and fold the panel in half. Below I show it with what would be the pattern paper design on the outside. Reverse the fold so the design is now on the inside. This starts to train the centre fold. You want to be working on the back side of your patterned paper or card stock so you don't see any pencil marks on your finished card.

Step Three - This is where you will add the additional fold lines. Keep the card in the closed position! Now if you follow my blog you know I like things to be easy and I don't like math. So I rarely measure things, preferring to eyeball it. I usually draw a pencil line parallel to the score line, about 1/2" away from that score line.
NOTE - I kept the template nice and neat for the photos, and I used a black pen so you can see the lines easier. Feel free to use a pencil and have your line go from the top edge to the bottom edge, 1/2" away from the score line. That's much easier.
Step Four - I have a 6" metal ruler that I use, and it's almost 1" wide. I usually just line that up along the bottom edge of the card, drawing a pencil line from the centre fold up to the pencil line from Step Three. Repeat at the top edge.
NOTE - you are drawing your lines from the centre fold line, not the outer edges.

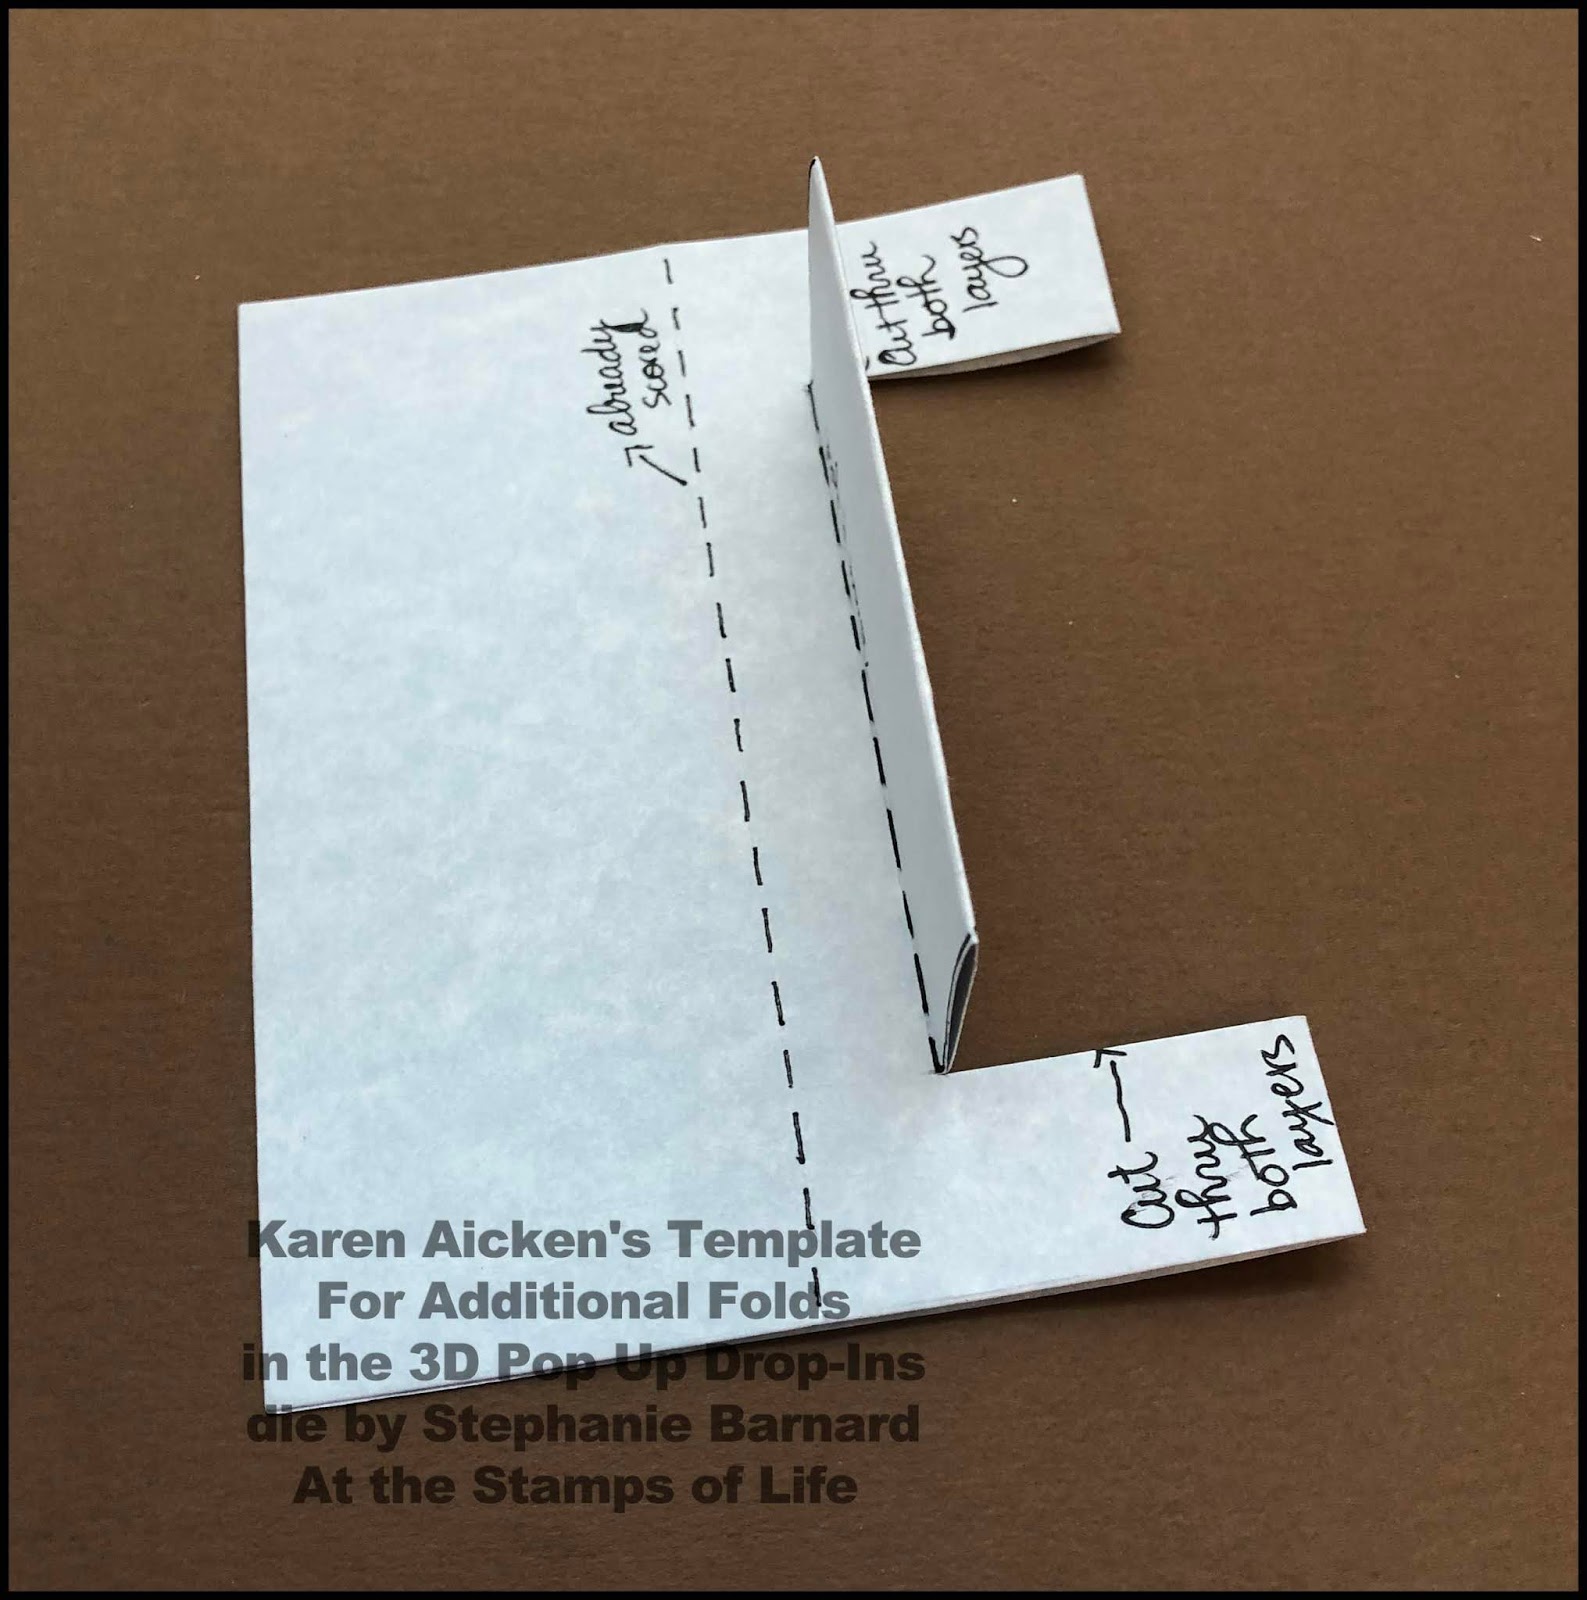
Below is the same photo as above, just in a different orientation.

Step Five - Now use scissors and cut through both layers on the two cut lines as shown below. Do Not cut past the score line you created in Step Three
Step Six - score on the line you drew in Step Three, but only between the cut lines. Do Not score above or below this line! This is important to remember if you just drew in your pencil line from the top edge to the bottom edge. You only want to score the line between your two cut lines.
Step Seven - Fold the panel you just cut upwards on the score line, then fold it in the other direction.


Step Eight - Carefully open up the card and turn it over to the patterned paper (or good side) and this is what you will have. The pencil lines are in behind.

Step Nine - you now have all the score lines you need, but you will need to reverse the centre fold line between the two narrow strips as shown below. In the photo above the entire centre fold line is a mountain fold. Keep the upper and lower strips as mountain folds, but make the centre area a valley fold. Honestly, it's harder to write out than it is to do it. I did the writing on the front, or good side of this 3D Pop Up Drop-In piece, the fold lines and notes from above are on the back side.

That's it! You have your 3D Pop Up Drop Ins insert with some extra folds and dimension. I made one from scrap card stock and keep it with the die set, so I don't have to think about what I did to make it work the last time. You can also make any notes you want on this template. Adhere it inside a folded card base keeping it centred so there is an even border around all outer edges. You will be adding adhesive to the two outer panels, not the centre ones we were working on. Stephanie Barnard shows you how to do this on her website HERE.
If you want to add patterned paper to your pop up insert, simply measure each section you wish to cover and then decide on how much of a card stock border around the edge you want. Cut your pieces accordingly. I don't have measurements for you as I generally just wing it and decorate different areas each time. Often the scraps of patterned paper I have sitting on my stamping table determine where I will add patterned paper. There are lots of samples over at the Stamps of Life, and in their gallery there.
TIP: Be careful what size of element you add to the interior centre folds as you probably don't want them to stick out of the card perimeter. Check each one before adhering permanently!
Supplies:
3D Pop Up Drop In - Stephanie Barnard, the Stamps of Life
Pink, white and yellow card stocks
Patterned paper and coordinating stickers - American Crafts
Baby powder (to brush onto the sticker backs to remove tackiness)
Stitched scalloped rectangle die - Your Next Stamp
Stitched rectangle die - Your Next Stamp
Simple Strips Birthday stamp and coordinating die - Taylored Expressions
Happy Birthday - LJD Birthday Greetings, MFT Stamps
Nuvo Drops
Stickles
Card size - Standard A2 (4.25 x 5.5")
Now that Christmas is over, I'm ready to play with some different papers and colours.
I get a lot of use out of the 3D Pop Up Drop-In die set from the Stamps of Life, but my preferred way to use it is with a couple of extra folds and cuts. One of my followers (Rebecca) asked if I had a template, so with this post I do have one for you. But first the card ... which is for Fun Fold Friday here on my blog.

The stickers have some sparkle on them anyhow, but I added some Stickles for some additional shine.

Here is a peek at the inside - I just love all the dimension you get with these extra folds!


I used some paper and stickers that I picked up last year (or the year before). I'm bound and determined to use up some of what I have here rather than keep adding to my stash. My room is full and it is frustrating to try to find homes for new items. Using up older stuff will give me some space again.
Now for my tutorial:
Step One - Die cut the 3D Pop Up Drop Ins die from whatever card stock or patterned paper you choose for the inside of your card. You can see more details about this die set HERE at the Stamps of Life. NOTE - this is sized to fit inside a standard A2 card with a small border around the outer edge.
The die cuts the outer edge and scores the two side panels as shown below. I went over the score lines with a black pen so you can see them better.
NOTE - You can click on any of the photos to open them larger in a separate window.

Step Two - Line up the two outer corners and fold the panel in half. Below I show it with what would be the pattern paper design on the outside. Reverse the fold so the design is now on the inside. This starts to train the centre fold. You want to be working on the back side of your patterned paper or card stock so you don't see any pencil marks on your finished card.

NOTE - I kept the template nice and neat for the photos, and I used a black pen so you can see the lines easier. Feel free to use a pencil and have your line go from the top edge to the bottom edge, 1/2" away from the score line. That's much easier.
Step Four - I have a 6" metal ruler that I use, and it's almost 1" wide. I usually just line that up along the bottom edge of the card, drawing a pencil line from the centre fold up to the pencil line from Step Three. Repeat at the top edge.
NOTE - you are drawing your lines from the centre fold line, not the outer edges.

Below is the same photo as above, just in a different orientation.

Step Five - Now use scissors and cut through both layers on the two cut lines as shown below. Do Not cut past the score line you created in Step Three
Step Six - score on the line you drew in Step Three, but only between the cut lines. Do Not score above or below this line! This is important to remember if you just drew in your pencil line from the top edge to the bottom edge. You only want to score the line between your two cut lines.

Step Seven - Fold the panel you just cut upwards on the score line, then fold it in the other direction.


Step Nine - you now have all the score lines you need, but you will need to reverse the centre fold line between the two narrow strips as shown below. In the photo above the entire centre fold line is a mountain fold. Keep the upper and lower strips as mountain folds, but make the centre area a valley fold. Honestly, it's harder to write out than it is to do it. I did the writing on the front, or good side of this 3D Pop Up Drop-In piece, the fold lines and notes from above are on the back side.

That's it! You have your 3D Pop Up Drop Ins insert with some extra folds and dimension. I made one from scrap card stock and keep it with the die set, so I don't have to think about what I did to make it work the last time. You can also make any notes you want on this template. Adhere it inside a folded card base keeping it centred so there is an even border around all outer edges. You will be adding adhesive to the two outer panels, not the centre ones we were working on. Stephanie Barnard shows you how to do this on her website HERE.
If you want to add patterned paper to your pop up insert, simply measure each section you wish to cover and then decide on how much of a card stock border around the edge you want. Cut your pieces accordingly. I don't have measurements for you as I generally just wing it and decorate different areas each time. Often the scraps of patterned paper I have sitting on my stamping table determine where I will add patterned paper. There are lots of samples over at the Stamps of Life, and in their gallery there.
TIP: Be careful what size of element you add to the interior centre folds as you probably don't want them to stick out of the card perimeter. Check each one before adhering permanently!
Supplies:
3D Pop Up Drop In - Stephanie Barnard, the Stamps of Life
Pink, white and yellow card stocks
Patterned paper and coordinating stickers - American Crafts
Baby powder (to brush onto the sticker backs to remove tackiness)
Stitched scalloped rectangle die - Your Next Stamp
Stitched rectangle die - Your Next Stamp
Simple Strips Birthday stamp and coordinating die - Taylored Expressions
Happy Birthday - LJD Birthday Greetings, MFT Stamps
Nuvo Drops
Stickles
Card size - Standard A2 (4.25 x 5.5")
Thanks for stopping by today
Turned out lovely and nice tutorial to boot! TFS
ReplyDeleteway cool!!! thanks for sharing!!!
ReplyDeletelove how you altered this for a brand new look :)
ReplyDeleteSo glad I found your site 😊 just learning how to make pop up cards. So much fun! Looking forward to learning more!!!
ReplyDelete