Tuesday 31 January 2023

Tropical Leaves Diagonal Z fold


I made this card for a friend for Happy Mail. I actually had the patterned paper out as I had used it for my February Sheetload of Cards ... so this is sort of a Sneak Peek of those! (The collaborators all share what they've made with the current month's Sheetload on the 2nd of each month). 

I have a walkthrough of this card on YouTube HERE:


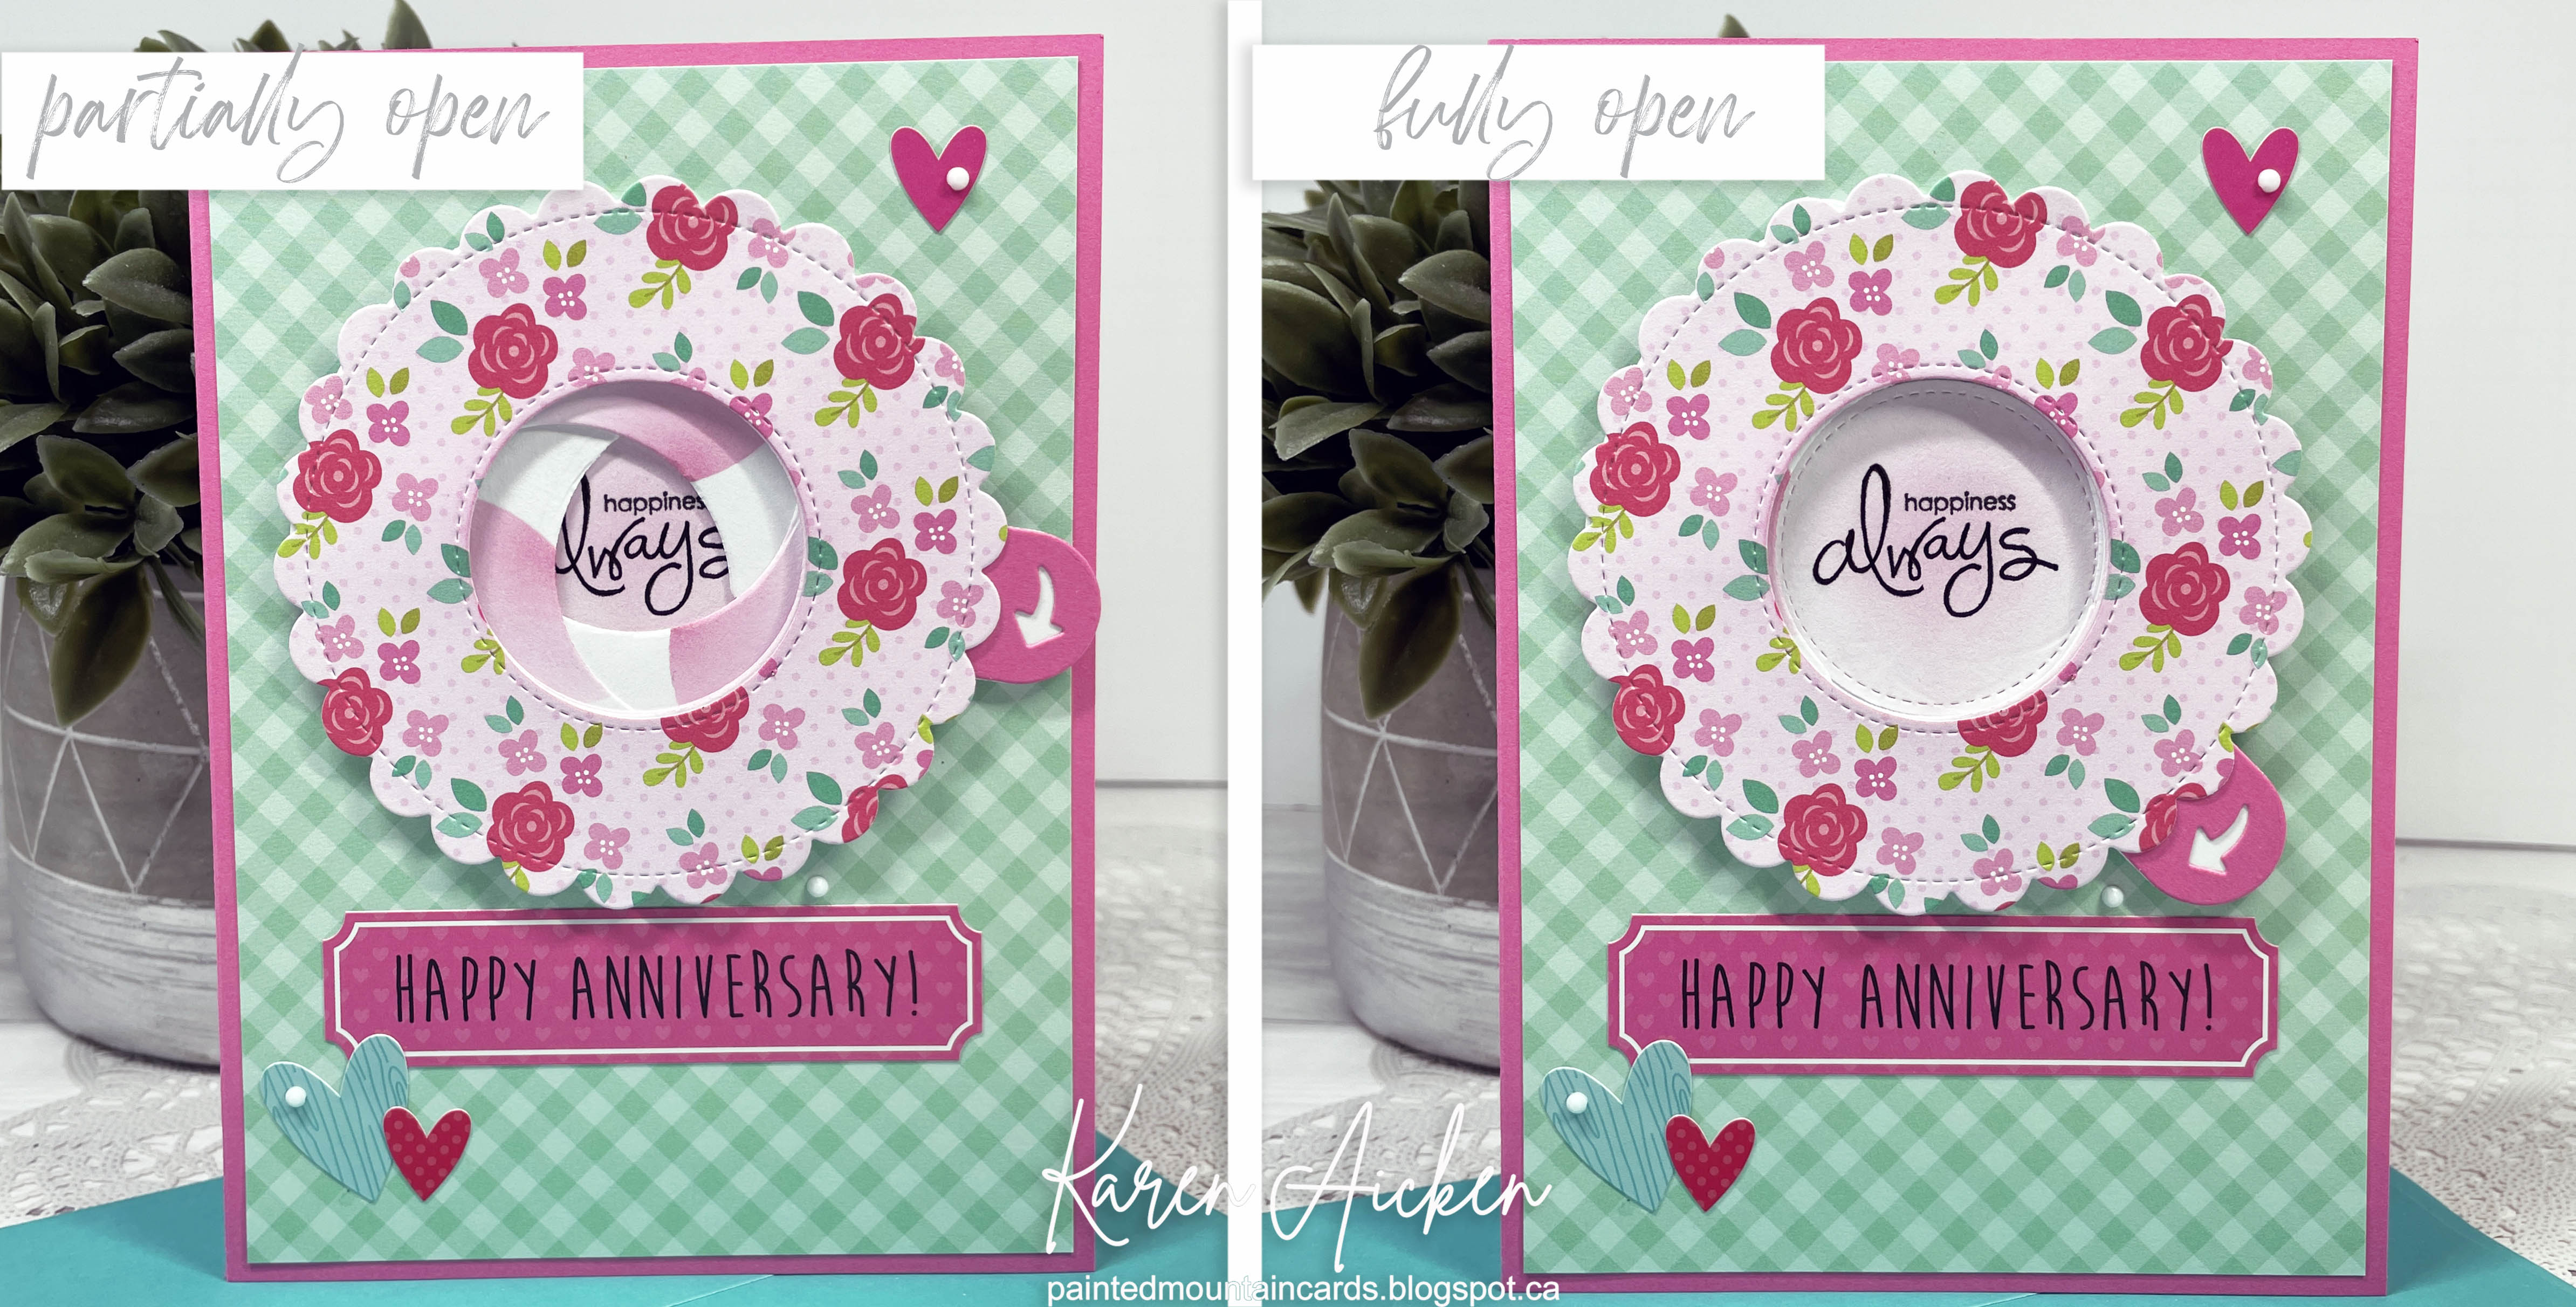
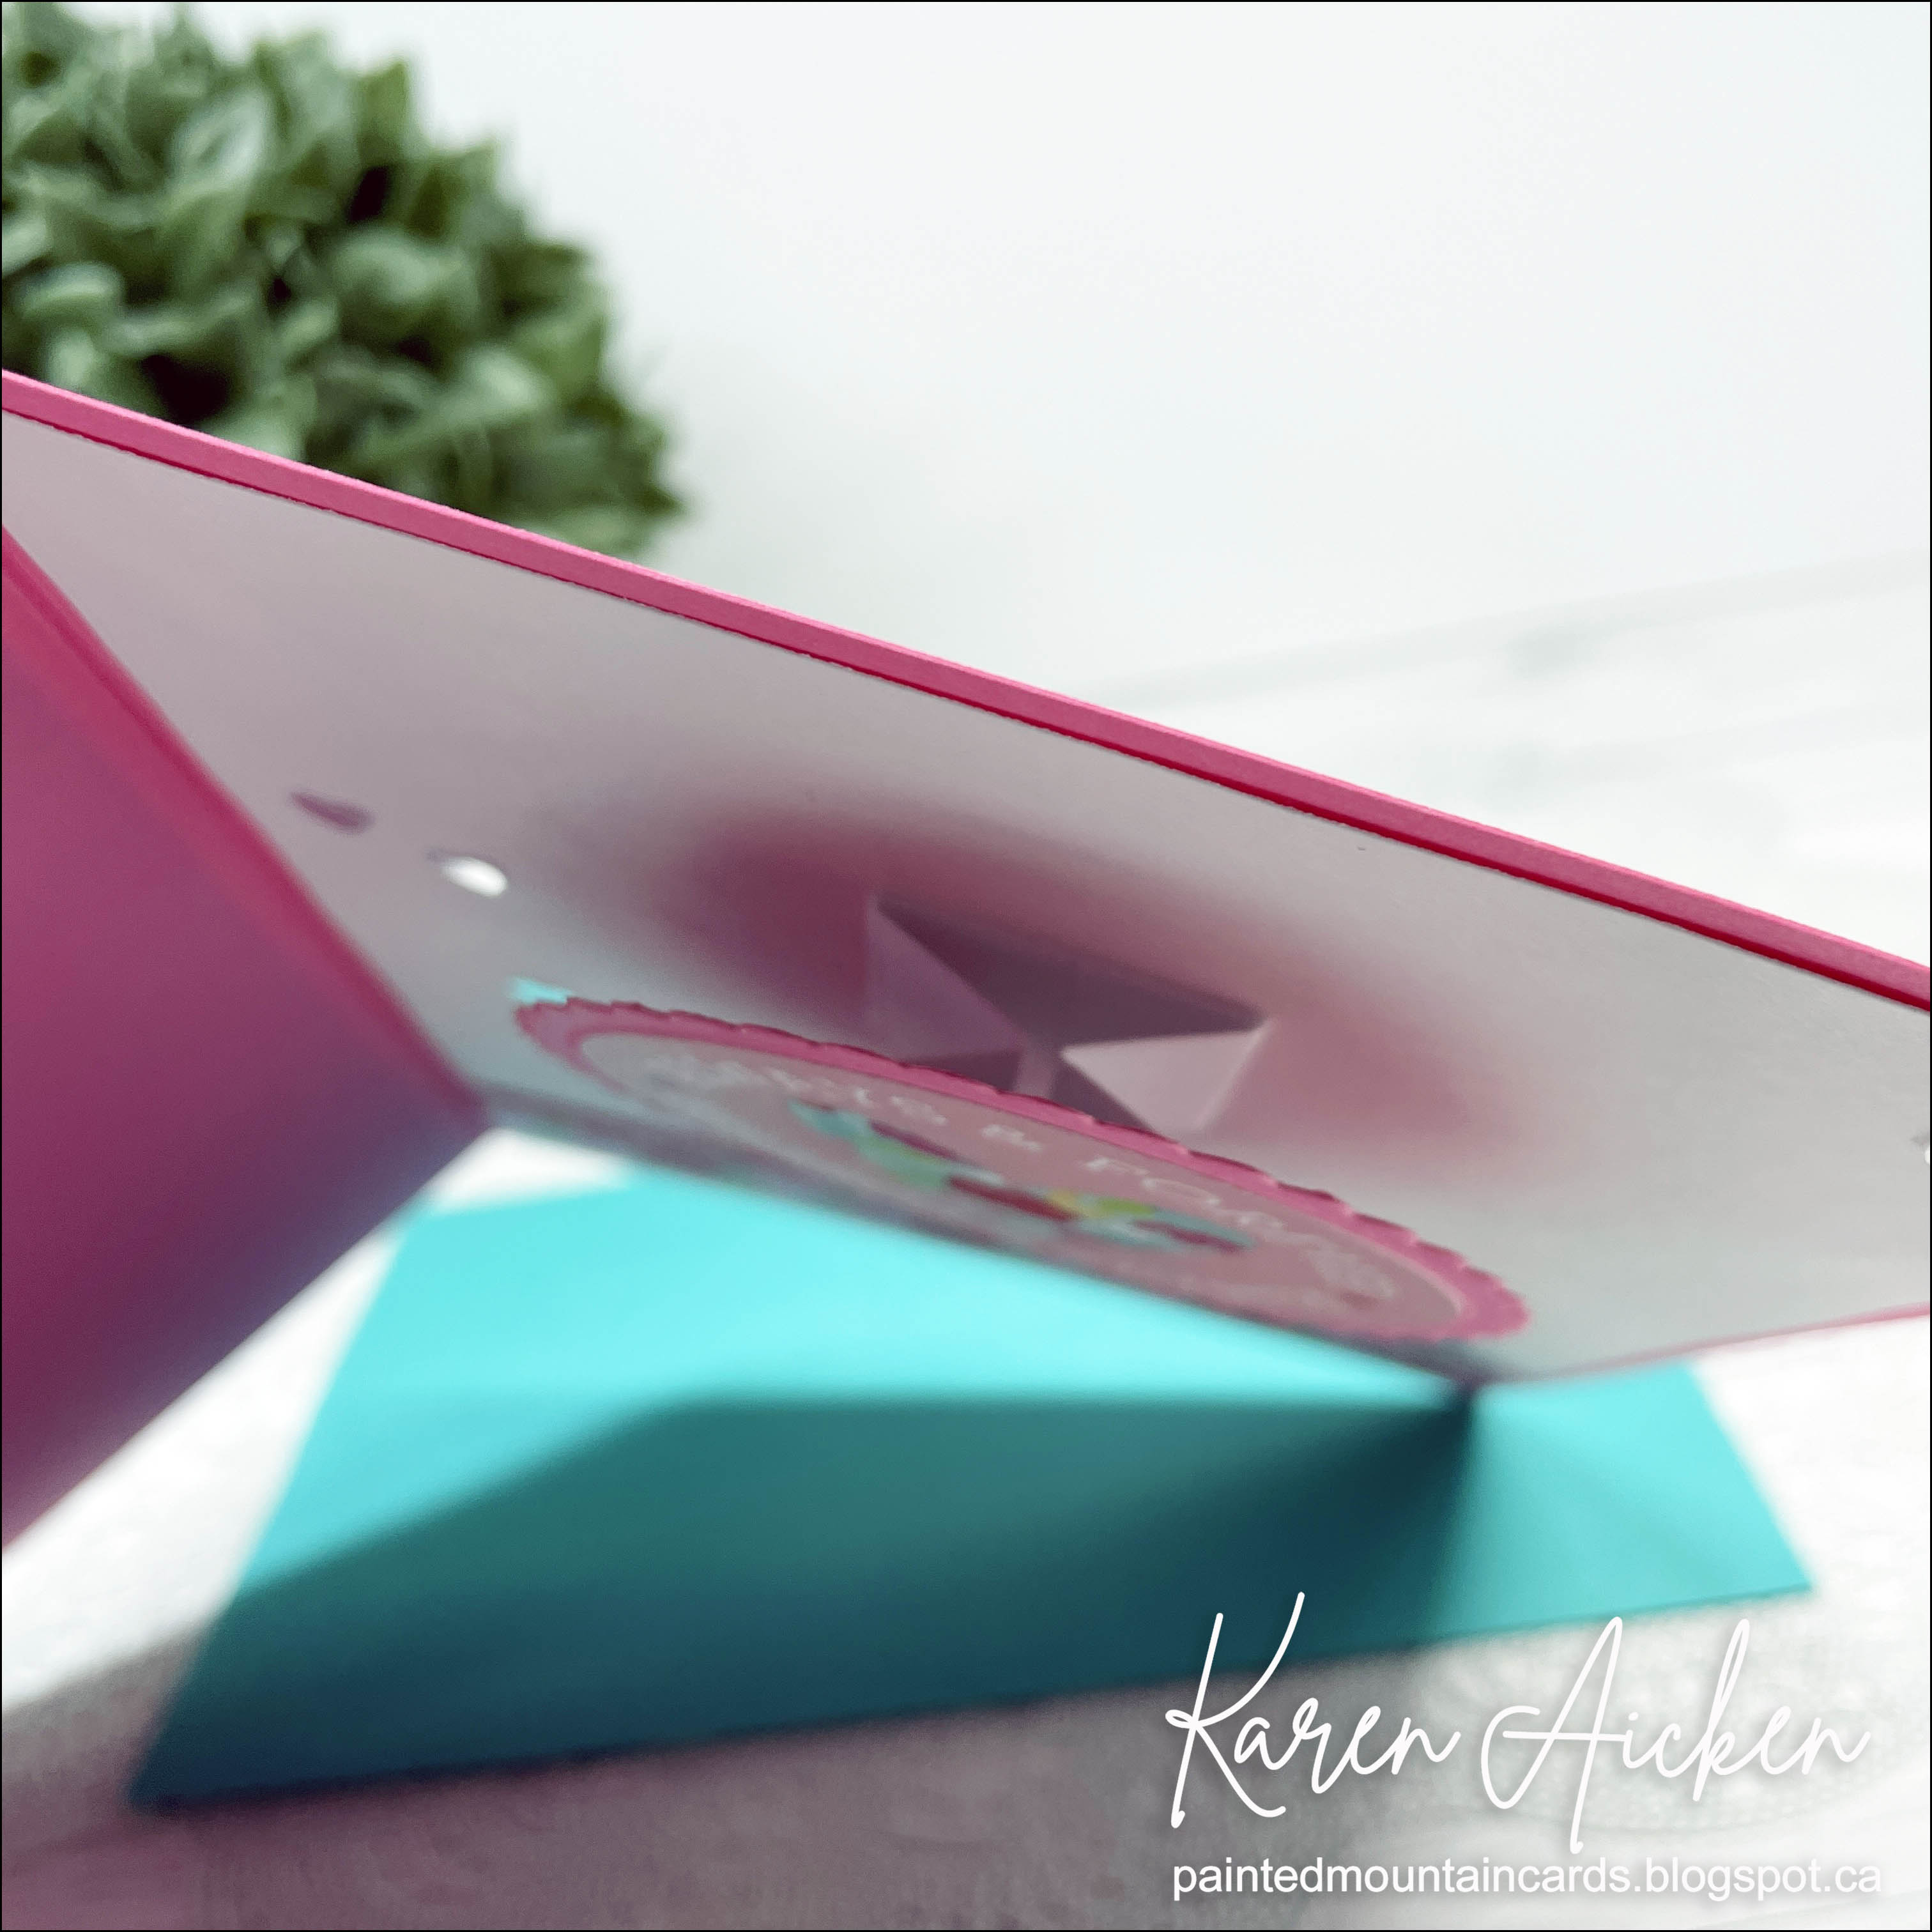
I had bought the Z Fold With Layers die set (Divinity Designs) as soon as it came out several years ago, and love to get it out. While it's probably easy enough to create this type of CARD BASE without the dies - this one comes with the layering dies so all the patterned paper pieces fit perfectly. No math or measuring required!

The only thing I am not crazy about is the name ... while it IS technically a Z Fold card, it's very distinctive with that Diagonal cut line, so I always refer to it as a Diagonal Z Fold, or Diagonal Trifold card. 😊


I added touches of gold with leaves from Karen Burniston's Landscape Scene and of course a few Pinkfresh Studios butterflies. The sentiments are by Stampin' Up and I don't know if they are still available or not.

Above is the front view, and below the back ...


Usually I add a sentiment and signing block to the inside front, but for this one I added one to the back panel along with another greeting.


Additional Supplies:
Patterned paper - Tropicool Vibes, Linda Kanase
Green 12 x 12" cardstock - Bazzill
White cardstock
Botanical Blooms - Stampin' Up 
Happy Thoughts - Stampin' Up
Biggest Wish - Stampin' Up

This blog uses affiliate links whenever possible. This means, if you make a purchase through one of my affiliate links that you pay the same amount but I may receive a small commission from your purchase. I only link products that I own, love and use for my card making and not every link below is an affiliate one! 😊


Monday 30 January 2023

Scottie Birthday Card


It's Masculine Card Monday here on my blog! I had been flipping through this older paper pad, which is by Sizzix and it's a 6 x 12" size. I was trying to decide if I liked this particular pattern or the reverse side of the paper, and realized it would make a great masculine card to donate to my Mom's old nursing home. I was also able to use up one of the leftover narrow strips in the paper pad on this 5 x 7" card.

I added the black punched Scottie dogs and the black sentiment on the front and stamped a greeting inside.


A couple of times recently, I was asked how many cards I make but I didn't have a clear number. Since a lot of my posts include more than a single card or project, I thought it would be fun to keep track this year. 
2023 Tally:  52 Cards

Additional Supplies
Patterned Paper - Fox Tails, a  6 x 12" pad by Sizzix (old, from my stash)
5 x 7 Card and envelope
White cardstock
Black cardstock
Scottie punch - Stampin' Up

This blog uses affiliate links whenever possible. This means, if you make a purchase through one of my affiliate links that you pay the same amount but I may receive a small commission from your purchase. I only link products that I own, love and use for my card making and not every link below is an affiliate one! 😊

Saturday 28 January 2023

Cheerful Flower Shaped Card


Today I'm sharing a shaped card, which is the first one in my new series "Shaped Cards". If you would like to know more about my new monthly series click ***HERE***.  This one could also qualify for the series Throwback Fun Fold Cards, as it uses an older die set from The Stamps of Life.

I got it a few years ago, when we were travelling and away from my Mom. I sent her lots of cards for Happy Mail and made a number of them with this Flower Fold-Its. By the time we got home, she had a whole bouquet of flower cards on her sofa table and it looked so cheerful. It's been far too long since I've used this die set, and that is part of the reason I started these different series.


My Mother In Law has recently moved into assisted living, and I know she will be missing her garden. I will be sending this to her to brighten her day. The sentiment is a VERY old one from Stampin' Up.


A couple of times recently, I was asked how many cards I make but I didn't have a clear number. Since a lot of my posts include more than a single card or project, I thought it would be fun to keep track this year. 
2023 Tally:  51 Cards

Additional Supplies:
Flower Fold-Its - the Stamps of Life
White cardstock
Whimsical Words - Stampin' Up (long retired)

This blog uses affiliate links whenever possible. This means, if you make a purchase through one of my affiliate links that you pay the same amount but I may receive a small commission from your purchase. I only link products that I own, love and use for my card making and not every link below is an affiliate one! 😊

Friday 27 January 2023

Magic Iris Anniversary Card


As I've mentioned in other posts this month, I am going to start running several different series, and today's card is the first in the Series: Magic IrisIf you would like more information on those plans, you can find them  ****HERE****.  

For this card I chose to make a 5 x 7" Anniversary card using older papers and stamps from my stash. Below you can see what happens when you start to slide the lever downwards ... the 'shutters' open to reveal the sentiment! 

It took me a long time to finally purchase the Magic Iris (by Lawn Fawn) and I haven't used it nearly enough. Thus the series ... by the end of the year I hope to have shared twelve different cards using this die set!


Inside, I popped up the element with one of Sam Calcott's cardstock springs. I stumbled on them back in November, and have been using them a lot since. I will link her card video below, and you can scroll through to see how she makes these springs.


If you would like to see Sam Calcott's video on these paper springs, click HERE.

I have been asked how many cards I make but I didn't have a clear number. Since many of my posts include more than a single card or project, I thought it would be fun to keep track this year. 
2023 Tally: 50 cards

Additional Supplies:
White cardstock
Sentiment on front - Whimsical Words, Stampin' Up (long retired)

This blog uses affiliate links whenever possible. This means, if you make a purchase through one of my affiliate links that you pay the same amount but I may receive a small commission from your purchase. I only link products that I own, love and use for my card making and not every link below is an affiliate one! 😊

Thursday 26 January 2023

Stencilled Snowflakes in Red and Pink


One of the new series I'll be running each month is the "12 Months of Christmas". I love working on Christmas cards and by working on them all year long I will be more than prepared by the time the holidays roll around again. This is the first share for that new series. If you'd like more information on the different series I'll be running this year, you can click ***HERE***.


In addition to the stencilling I added die cut snowflakes and bling. I love sparkle and shine on a holiday card! 


The inside of the cards were all done the same ...


The sentiments are from Pinkfresh Studios and were popped up with foam tape.


When I was doing the stencilling, I actually remember to take a photo of the finished sheets before I cut them down into panels. I had previously shared the blue/green/purple cards HERE!

I have been asked how many cards I make but I didn't have a clear number. Since many of my posts include more than a single card or project, I thought it would be fun to keep track this year. 

2023 Tally: 49 Cards

Additional Supplies
White cardstock
Burgundy cardstock

This blog uses affiliate links whenever possible. This means, if you make a purchase through one of my affiliate links that you pay the same amount but I may receive a small commission from your purchase. I only link products that I own, love and use for my card making and not every link below is an affiliate one! 😊

Wednesday 25 January 2023

Love is in the Air - Slimline Card


I still really enjoy making Slimline cards, and haven't made enough of them the past couple of months. Today I am sharing a Slimline card that I can send to a friend in February for Happy Mail.

I pulled out this heart background die from Whimsy Stamps, cutting it from Doodlebug patterned paper, I saved the fallaway hearts to add back into some of the openings with foam tape and saved the others for different projects. The tag is from the same package, and the bow is from a Stampin' Up stitched flower die set.


Inside, I used the Dotted Slimline Set 2 from Studio Katia for the layers and you can see I sprinkled a few more of the fallaway hearts. There is still room to write a personal message when I go to send the card.


A couple of times last year, I was asked how many cards I make but I didn't have a clear number. Since a lot of my posts include more than a single card or project, I thought it would be fun to keep track this year. 
2023 Tally:  45 Cards


Additional Supplies:
White cardstock
Bow - from Stampin Up's Pierced Bloom Dies
Shimmer Spray

This blog uses affiliate links whenever possible. This means, if you make a purchase through one of my affiliate links that you pay the same amount but I may receive a small commission from your purchase. I only link products that I own, love and use for my card making and not every link below is an affiliate one! 😊

Monday 23 January 2023

Mini Slimline Birthday Cards


It's Masculine Card Monday here on my blog, and today I'm sharing a set of 5 Mini Slimline cards I made to donate to my Mom's old nursing home.

 
As usual, my cards started with the patterned paper. This is an older package by Sizzix that is actually sized at 6 x 12". The papers are double sided and I had pulled it out to have a flip through to remind myself of the patterns. I was inspired to use some of the smaller pieces and also die cut some panels with a Picket Fence Studios die. Then I sat and played with the pieces until I was happy with the layouts.


The insides are all done the same, again using an older stamp set from the Stamps of Life and my MISTI. 

A couple of times last year, I was asked how many cards I make but I didn't have a clear number. Since a lot of my posts include more than a single card or project, I thought it would be fun to keep track this year. 
2023 Tally:  44 Cards

Additional Supplies
Patterned paper - Fox Tails 6 x 12" Sizzix
White cardstock
Lots of Birthday2Stamp - the Stamps of Life
Black fine point marker

This blog uses affiliate links whenever possible. This means, if you make a purchase through one of my affiliate links that you pay the same amount but I may receive a small commission from your purchase. I only link products that I own, love and use for my card making and not every link below is an affiliate one! 😊

Saturday 21 January 2023

Water Coloured Tulip Birthday Card


Back in November, I went through an older 6 x 6" paper pad and made a few 'stacks', or 'card kits' out of some coordinating papers. I used a stitched rectangle die for the largest background panel and set the stacks off to the side to work on as I felt like it. 

Little by little I ended up with nine card fronts! I did them similar to the way I do my Sheetload of Cards, doing all the paper cutting and then adhering everything to the card base. THEN I decided what to use for the sentiments and decorative elements.

I went through my binder of pre-done embellishments (made years ago when we were in the mountains for weekends) and decided what elements worked with the different papers. Then I went through my odds & ends box to see if any of the circles/ovals/labels in there would work. I was able to use up a bunch of items both from the binder and the box!! When I was finished the cards though, this one didn't really go with the rest of them so it's in it's own post. 😊 The remaining eight will be shared another day.

The tulip is a Peel-Off sticker (from Elizabeth Craft Designs) had been adhered to water colour cardstock and probably coloured with Tombow markers and a water brush. Then it was fussy cut and didn't get used for whatever project I had been working on so ... into the binder it went. And there it sat. For years. I was SO HAPPY when I saw how well the colours worked for the patterned paper! I added it to a die cut oval with foam tape, and used more foam tape to add the oval to the card front.


I added a stamped sentiment on a small fish tail banner, then added a stamped panel inside and my stash buster card was finished. This will go to my Mom's old nursing home. NOTE: I have a plastic envelope filled with stamped birthday sentiments that I can go through when card making. So I just pulled one from that envelope for the card front, and added it to a peach scrap.


I'm not even going to list the supplies used, since everything is so old and has been sitting in my craft room for years.

A couple of times last year, I was asked how many cards I make but I didn't have a clear number. Since a lot of my posts include more than a single card or project, I thought it would be fun to keep track this year. 

2023 Tally: 39 Cards

Friday 20 January 2023

Year of the Rabbit


Today I'm sharing the card I made to send to a friend to celebrate the Lunar New Year.  I pulled out some very old Chiyogami paper and this BigZ die from Tim Holtz. Since the rabbit die is a steel ruled die, it could handle the weight of the Chiyogami paper attached to white card stock with double sided tape. Once cut, I added white lines with a paint pen then gave the rabbit a blast with shimmer spray.

There was a scrap of black paper in the package, so I added it with a pair of magnets to hold the card closed. The second magnet is under the slightly popped up oval.


When you open that black flap, the Happy New Year pops up ... because I added it to Karen Burniston's new Bam Box. 


The Happy New Year was cut from gold mirrored cardstock, and I added decorative panels to the Bam Box with red mirror cardstock. A few more gems, another die cut rabbit as a signing blog and my card was finished.


A couple of times recently, I was asked how many cards I make but I didn't have a clear number. Since a lot of my posts include more than a single card or project, I thought it would be fun to keep track this year. 
2023 Tally: 38 Cards

Additional Supplies:
Chiyogami paper - my stash
Easter Elements Big Z Die - Tim H
White cardstock
Red cardstock
Happy New Year - the Stamps of Life
Small magnets - K&J Magnetics
Shimmer Spray
5 x 7" card and envelope

This blog uses affiliate links whenever possible. This means, if you make a purchase through one of my affiliate links that you pay the same amount but I may receive a small commission from your purchase. I only link products that I own, love and use for my card making and not every link below is an affiliate one! 😊

Thursday 19 January 2023

Pop Up Panel Gatefold Card for Valentine's Day


Today I'm sharing my first card in the "Series: New Fun Folds". This is a Pop Up Panel Gatefold card by Sam Calcott at Mixed Up crafts. If you follow me, you know I rarely post things in the same order I make them. While this was the FIRST card I made with this fun fold it is the second one I'm sharing. And it's the first in 2023, so I'm counting it for the first one in this new Series. 😊

The first Pop Up Panel Gatefold card I shared was for New Years (See that HERE)  Below is a quick video showing the clever folds in this fun fold card!


I started with the patterned paper and stickers from Doodlebug Designs, and added Karen Burniston's new Banners Crosshatch and her Happy Valentine'd Day. I also added some puffy heart stickers from my stash and mirrored heart confetti. The red layer on the belly band is actually red velvet paper and it's SO textural and pretty.

When you slide off the belly band, and gently fold the center back, the panel pops up and sort of wobbles because of the cardstock spring used to attach it to the center strip. So fun!


You can find Sam's beautiful cards and her tutorial HERE.  

I'll be back next month with another New Fun Fold for this series. 

A couple of times recently, I was asked how many cards I make but I didn't have a clear number. Since a lot of my posts include more than a single card or project, I thought it would be fun to keep track in 2023. 
Tally so far: 37 Cards

Additional Supplies:
5 x 7" Card and envy
Patterned paper, punch outs and stickers - Doodlebug Paper Plus Collection (from my stash)
White cardstock
Puffy heart stickers - recollections (old)
Burgundy cardstock

This blog uses affiliate links whenever possible. This means, if you make a purchase through one of my affiliate links that you pay the same amount but I may receive a small commission from your purchase. I only link products that I own, love and use for my card making and not every link below is an affiliate one! 😊

Wednesday 18 January 2023

'Wet Your Plants' Birthday Card


Earlier this week I shared a post with plant themed cards. While I had the pad out, I pulled this sheet out to make a card and used Karen Burniston's Label Charm Pop Up and Garden Charms. To make the most of the large pattern on the 12 x 12" sheet, my card is an A7 size (5 x 7").  With the Label Charm Pop Up, the design on the front label pivots to the inside when the card is opened.


Lawn Fawns Giant Happy Birthday was die cut from a brown patterned sheet in the same package as well as a dark green cardstock. Then I offset them slightly for a shadow look and adhered it to the front of the card. Two squares of the same brown print were sliced on the diagonal and adhered to each corner on the card front.


I love how the watering can dangles inside the opening. I used a jump ring to attach the charm, but you could also use twine or thread.


I have been asked how many cards I make but I didn't have a clear number. Since many of my posts include more than a single card or project, I thought it would be fun to keep track this year. 
2023 Tally:  36 Cards


Additional Supplies:
Patterned paper - Farmhouse, Craftsmart (Michaels?)
White cardstock
Water colour markers
Brass Jumpring
Alcohol Markers
Green cardstock

This blog uses affiliate links whenever possible. This means, if you make a purchase through one of my affiliate links that you pay the same amount but I may receive a small commission from your purchase. I only link products that I own, love and use for my card making and not every link below is an affiliate one! 😊


Tuesday 17 January 2023

Ice Cream Cone Birthday Cards


One of my favourite Sheetloads is the June 2021 Sheetload of Cards. Every time I use it, I am inspired to just keep creating with it. It's a 'Special Edition', and calls for 6 x 6" patterned papers instead of the usual 12 x 12". I had been going through an older package of paper by Stampin' Up and spied these four that went together perfectly. Then I was off and running and created these eight cards for my Mom's old nursing home.


If you are curious about the paper, I believe it was a paper share that was gifted to me from my then-Stampin' Up demonstrator. The papers were likely originally 12 x 12" and she cut them down to 6 x 6" to make them easier to mail to her customers.

I had one of the teal card bases sitting on my stamping table as I had just finished a different card. So I used that for one of the cards and the rest are white. The ice cream cone is a Stampin' Up punch, the cone part was punched from a Kraft print patterned paper and the ice cream from a rainbow holographic mirror card stock. Lots of fun shine on these ones!

The cards are all the same inside, and I used my MISTI for the stamping.


I have been asked how many cards I make but I didn't have a clear number. Since a lot of my posts include more than a single card or project, I thought it would be fun to keep track this year. 
2023 Tally:  35 Cards

Additional Supplies:
June '21 Sheetload
White cardstock
Blue cardstock
Teal cardstock
Patterned paper - Stampin' Up (retired)
Ice cream punch - Stampin' Up
Rainbow holographic Mirri cardstock - Hunkydory

This blog uses affiliate links whenever possible. This means, if you make a purchase through one of my affiliate links that you pay the same amount but I may receive a small commission from your purchase. I only link products that I own, love and use for my card making and not every link below is an affiliate one! 😊