Thursday 31 December 2020

December 2020 Paper Pumpkin Alternates

Hello crafty friends ...

Here I am with my last post and video for 2020! What a year this has been - I sure hope our world turns right side up sooner rather than later in 2021. 

I wish all of you a very happy and HEALTHY New Year!

My December Paper Pumpkin kit was delayed - as was pretty much everything that had to be shipped over the holidays - but it did arrive and I managed to get my YouTube video filmed and edited in time to share it in December. Ha - talk about cutting it close, right? I made a total of Thirteen cards, eight of them are for Happy Mail and will be mailed in the New Year. The remaining cards were made into Birthday Cards. I didn't NEED to make any more Birthday Cards, but the cupcake and present embellishments leaned that way and who am I to argue?

I have a walk through of all my cards on YouTube HERE.

Since I loved the bear printed embellishment the best, I made a Z-Fold card first. It turned out cute, so after I played with the Koalas and Red Panda images ... I made an additional two Bear & Bouquet Z Fold Cards. That used up all three of the floral bouquets in the kit!


All of the critters got a little Wink of Stella shimmer on their cheeks and I went over all the noses with a black glaze pen for shine.


I made the Hello Koala card first, but it was pretty heavy with all the layers. So the second Hi Koala card was made simpler and will mail for a single stamp. (I have more details in the video)


I was struggling a bit with the colours in this kit. While I loved everything individually, adding them together made me scratch my head. The Soft Seafoam green is very 'meh' and the striped decorator pieces they added had only the burgundy and soft green colours. No coral and certainly no cinnamon like the Red Panda is coloured with. I made this Z Fold card but decided not to use the kit colours for the remaining Pandas. Instead I added them on mostly white cards and was much happier with how they looked.


I had an idea for a different box pop up than the ones I have been making, and decided to try it out with the Koala's. I cut them apart so I could use one on the card front and one on the inside, and the card turned out so cute I made a second one! 

I ran out of time though, and don't have a tutorial for making these yet. I will do one in the New Year for sure, maybe even for the January Paper Pumpkin kit.


Yep - just simple cards, with with all the gold and the pop up elements - these cards make me happy and I hope will bring a smile to who I send them to. I do love pop up cards!


I added two of the present images to the outstretched arms of two Red Panda's, cut apart one of the coral card fronts and added everything together on an embossed card front for these Birthday Cards.


It's hard to see in the photo, but the eyes and noses are shiny, and the hearts, bow and Red Panda Tummy have shimmer because of a Wink of Stella pen. 


I added a large sentiment to a die cut rectangle and added one inside both cards.

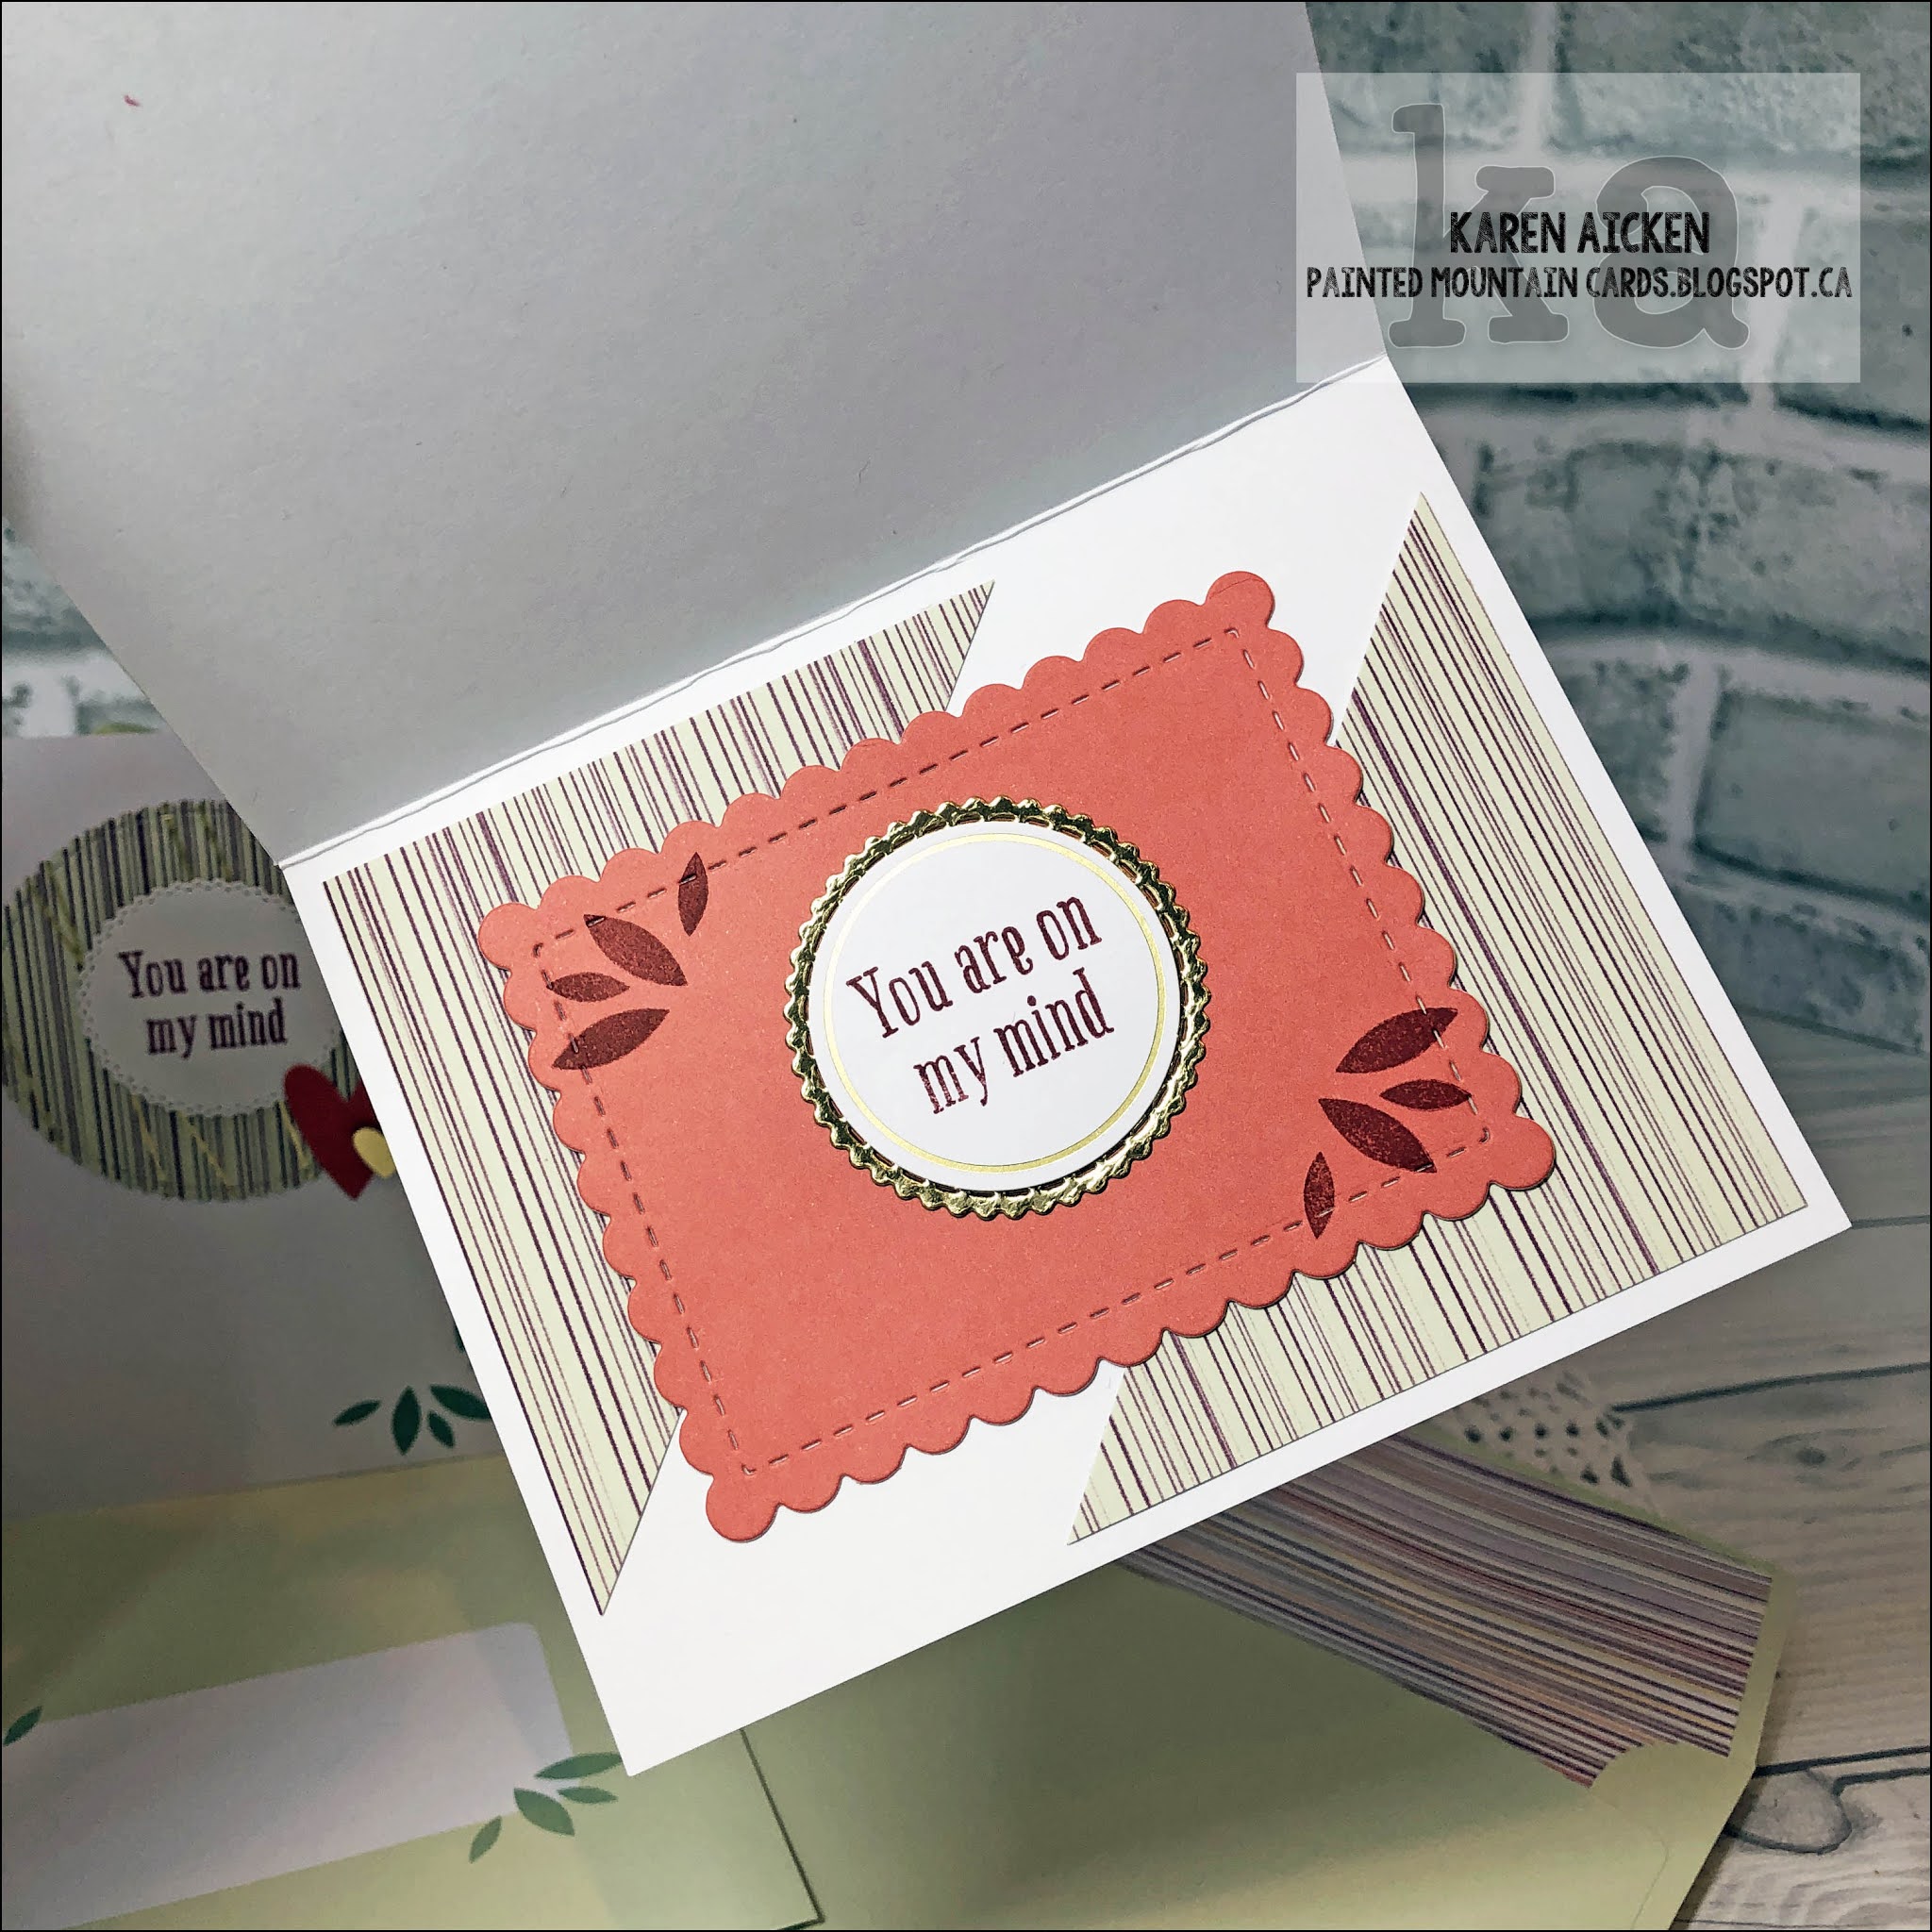
Of course I wanted to do at least one 'fancy' pop up, so pulled out the Circle Charm Pop Up die set by Karen Burniston. It's been a long time favourite of mine and works perfectly with an A2 sized card. While I don't make a lot of A2 sized cards anymore, I love the quality envelopes that come with a Paper Pumpkin kit so am happy to make A2 cards and use the printed envelopes.


The card front features a textured gold frame and a popped up cupcake. Both the cupcake and the scalloped circle have gold foiled bits as does the card front, and like the other card fronts I painted Wink of Stella inside several of the open leaves.

Below is a birds eye view of the Circle Charm Pop Up ...


Notice how the cupcake part pivots to the inside as the card opens? Love that! If you are curious how the Circle Charm goes together, check it out at karenburniston.com where Karen has an amazing assembly video.

This next card is also a Pop Up, and I added a single cupcake to one of the gold foiled labels from the kit. A punched heart on either side and some Wink of Stella for shimmer completed the card front.


Inside, I used the same idea for a Box Pop Up as I did for the Koala cards above - this is a different size and different orientation. I want to play with this idea a bit more for sure, then will do a tutorial for you.


Since this one is a Pop Up, I am adding it to my own Birthday Card stash.

Finally, a simple Birthday card that will also be donated to my Mom's old nursing home along with the two Red Panda Birthday Cards.


I didn't take a photo of the inside, but it used the same Happiest of Birthdays stamp as on the Red Panda Birthday cards above.

Whew, right? Lots of cards made but I really REALLY enjoy creating with the Paper Pumpkin kits. I pretty much only used the leaves and sentiments from the included stamp set, but will stamp out a bunch of the cute bears, Scan 'n Cut them and send them along with some punched hearts for the Grandkids to make Valentine's with. The bear is SOOOO cute and I'm really enjoying seeing what others have been making with that stamp.

Thank you for all of your views and comments this year. 
I'd like to wish you all a very Happy New Year and all the best for 2021.
***Happy New Year!***


Supplies:
December 2020 Paper Pumpkin kit - Stampin' Up
Sakura Black Glaze pen and Gold Gel Pens
Wink of Stella
Gold foil card stock - Recollections
White card stock
Scallop Stitched Nesting Circle dies - Tutti Designs
Leaf Embossing Folder - Paper Studio
Hello and Hi dies - MFT Stamps
Stitched Scalloped Die - Your Next Stamp
Thinking of You stamp - In the Pines, Stampin' Up
Tasteful Label Dies - Stampin' Up
Banners Pick a Punch - Stampin' Up
Heart Punch - Stampin' Up
Dashing Rectangles - Elizabeth Craft Designs
Happiest of Birthday's - Stampin' Up
Mini MISTI - My Sweet Petunia
1046 Circle Charm Pop Up - Karen Burniston
Awesome Birthday - Birthday Greetings, Studio Katia
Large Birthday stamp set - Technique Tuesday
Water Brush
Gold Shimmer Spray
Card size - all, standard A2 (4.25 x 5.5")

Thanks for stopping by today

Wednesday 30 December 2020

Leafy Hello Slimline Card


Hello crafty friends ...

Today's card is a special one because of the patterned paper which comes with a story. A talented paper crafter named Bette Manning had posted a LOT of cards using this beautiful patterned paper on a Face Book group called Stamp Junkies. Her cards are all beautiful and received lots of comments. Eventually everyone just started referring to this paper as 'That Paper'. It's called Eucalyptus and it's from Hobby Lobby so no way I was able to get my hands on it as we don't have a Hobby Lobby here in Canada. 

One afternoon in November I received a message from one of the group members letting me know she had purchased extra of this paper and would be happy to send me some. I was thrilled! Well when my envelope arrived, she had included more than just a few sheets. I was in tears from this RAK (Random Act of Kindness) and of course had to make a card right away. Since I share holiday cards in December though, this one had to wait until after Christmas for me to post it. Thank you THANK YOU for your generosity and kindness Marilyn W - you have no idea how your gesture lifted my spirits!

So here is my first card with That Paper, and you will be seeing it a lot in the coming months. I love leaves anyhow, and I adore the colours in this print and am thrilled with how well it works with the Stampin' Up Forever Fern bundle. 


My Slimline card features a fold back flap - this was the first time had done this on a Slimline card and I was really happy with how it works out.  This  Fold Flap Slimline layout is one you will be seeing a lot of from me in the New Year!  I've seen A2 sized cards done with this technique and the card is then held closed with a Belly Band. I didn't want a Belly Band for this card though, so my flap is held closed with thin foam tape instead. While this is the first Fold Flap Slimline Card I made, I did post one on the 24th in a Christmas theme. I rarely post my cards in the same order I make them!


Here is a peek at the inside, with some stamping, a gold Peel Off Border Sticker and a pair of stamped, die cut sprigs. Just enough room to write someone a quick note to send this card for Happy Mail!


Measurements for my Fold Flap Slimline Card:

  • Cut card stock 7 x 8.5"
  • Putting the 7" edge at the top of your scoring tool, score at 1-1/4" and 3-1/2".
  • Fold your card in half at the 3-1/2" scoreline, to form your card base
  • Fold the 1-1/4" scored edge to the front of the card.
  • NOTE:  I adhered the flap right to the card front using thin foam tape, but most of the A2 Fold Flap Cards I've seen utilize pretty patterned papers and have the card open as more of an accordion. 
  • I chose these measurements for my card as then the patterned paper layer measurements are easy to figure out. I usually make my patterned paper layers 1/4" smaller, so if that top flap on the card base is 1-1/4 x 8-1/2", my patterned paper strip is 1 x 8-1/4".
Supplies:
Patterned paper - Eucalyptus - Hobby Lobby
Card stocks - stash
Gold Border Peel Off - Elizabeth Craft Designs
Rectangle dies - Waffle Flower
Forever Fern - Stampin' Up
Shimmer Spray
Gold Foil card stock - Stampin' Up
Hello die - MFT Stamps
Charcoal Dtaradream
Vellum
Tasteful Label Dies - Stampin' Up
Gold Fever Confetti - Studio Katia
Thin gold cord
Card size: 3.5 x 8.5", fits in a #10 Business Envelope

Thanks for stopping by

Tuesday 29 December 2020

Eight Floral Birthday Cards


Hello crafty friends ...

This Spring I pulled out this 12 x 12" paper pad and decided to use it up. I have shared many of the cards I've made already, and I still have quite a few more to finish and share. I've tried to group the cards and keep similar ones together. When I was working on these cards, I did only the decorative panels, so when I'm ready to finish them off I add the panels to folded card bases then stamp the birthday sentiment inside.

While there were a couple of large floral cluster stickers on the sticker sheet in the paper pad, I die cut one of the large print papers with a stitched circle die to use those on my card fronts too.


There were two sheets of printed jars in the paper pad, and I fussy cut a number of them to use as decorative elements. 


This HELLO circle was one of the stickers included in the paper pad, and the heart bling was a 'free with purchase' from Queen & Company. They are far too bulky to go through the mail, but perfect for cards that will be hand delivered like these.


I used a couple of favourite layouts to make good use of the floral paper in the sheet and cut one of the striped sheets down into strips to use as accents on all of the cards I made with this paper pad. It's the Dear Lizzy Neapolitan pad, by American Crafts.

The llama sticker was adhered to stitched circles and popped up with foam tape.


All of the cards were done the same inside, using my MISTI to help with placement and no oopses with the stamping.


I was just stash diving, and working away on these cards, so I didn't keep a supply list. These ones are for my Mom's old nursing home and were split up into several different month's donation bags because they do look similar. I want the residents to feel special, so rarely include more than two similar designs in a single month.

I did use up the whole paper pad, which made me really happy. Then, when I was reorganizing my craft room in the late Spring ... I found a second pad. AACK! I really liked it at the time I purchased it, and apparently I bought two of them because I liked it so much. That second pad has been buried in the bottom of my patterned paper pile to deal with later. Much later. Ha.

Thanks for stopping by today

Monday 28 December 2020

Desert Scene Slimline Diagonal Trifold Card

Hello crafty friends ...

Today for Masculine Card Monday on my blog,  I'm sharing a new-to-me Slimline card format - a Diagonal Trifold card! This card was for my brother, who celebrates a December birthday and I used a couple of dies I purchased online last month. Both the cowboy silhouette and the large cactus are new and made by Paper Rose. 

I have a walk through of my video on YouTube HERE  as well.

It wasn't as easy as I thought it would be to cut the patterned paper to have even borders and I'm not sure why. It made perfect sense in my head, ha ha. Maybe I was too tired as I had been working on this late one evening when I should have been getting ready for bed. But I was inspired and wanted to keep playing!


Since I normally buy 12 x 12" patterned papers, a card like this is great to use those large patterns that would otherwise be lost on an A2 card.


Both the Happy Birthday and Go Wild are dies by Karen Burniston and I added a couple of Taylored Expression cactus dies as well. The barbed wire is an older die by MFT Stamps.


Because I like to work ahead, I have a couple more masculine cards & tags finished and planned on sharing them in the New Year for my Masculine Card Monday posts. However I was invited to join another Design Team and will be posting for them on Monday's in the New Year. I'm VERY excited about this new adventure ... and I will share more information as soon as I am allowed to. Any Masculine cards I make now, will be scattered throughout the week!

  • Measurements for my Slimline Diagonal Trifold:
  • Cut your card base to measure 8.5 x 10.5"
  • With 10.5" side at the top, mark 3" up from bottom left corner. 
  • Use a trimmer (or craft knife and ruler if you are really brave and have steady hands) to make a diagonal cut from that 3" mark at the lower left to the top right corner. Set aside the top piece for another project. 
  • Score the diagonal piece, which is still 10.5" wide, at 3.5" and 7". This gives you your trifold and the folded card size is 3.5 x 8.5".
  • NOTE: It might be easier to score your card stock at 3.5" and 7" before you make your diagonal cut.


Supplies:
Various card stocks - stash
Patterned paper - Desert Dream, Recollections
Bucking Horse die - Paper Rose
Cactus die - Paper Rose
1030 Happy Birthday - Karen Burniston
1128 Go Wild - Karen Burniston
Fence (Barbed Wire ) - MFT Stamps
Small Cactus dies - Can't Touch This, Taylored Expressions
Celebrate - Large Birthday, Technique Tuesday
Circles - stash
Taylored Expressions Blending Brushes
Card size - 8.5 x 3.5" (when folded) and fits in a #9 or #10 Business Envelope

Thanks for stopping by today

Sunday 27 December 2020

Sunshine and Cactus Slimline Card


Hello crafty friends ... 

Because of COVID we didn't get to visit Arizona in November as planned so my Slimline card today is a cactus theme and I had fun using one of my Stamploration stencils and this wonderful cactus die by Paper Rose.


The inked plant pot was given a coating of Glossy Accents so it's raised and shiny and resembles a glazed pot. The pretty rainbow sequins add another touch of sparkle to the card front. Even though the banner hangs over each side, this card still fits in a #10 Business Envelope.


Finally, here is a peek at the inside:


Supplies:
Aperture Stencil - Stamplorations
Card stocks - stash
Slimline dies - Slim Ornate Banners, Pink Fresh Studio
Taylored Expressions Blending Brushes
I-crafter Blending Brushes
Slimline Stitched Dies - Trinity Stamps
Cactus die - Paper Rose
Circle die - Hero Arts
Banners Pick A Punch - Stampin' Up
Words - Home to Roost, Stampin' Up
Sunshine stamp inside - Impression Obsessions
Fineline markers
Crystal Rainbow Confetti - Studio Katia
Glossy Accents 
Card size -  3.5 x 8.5", fits in a #10 Business Envelope

Thanks for stopping by today

Saturday 26 December 2020

Rainbow Slimline Duo

Hello crafty friends ...

I hope everyone who celebrates had a nice Christmas 😊. We have to make the best of this COVID situation with the ever changing restrictions etc, so we did what we could to make our holiday a special one.

I am done sharing Christmas cards now and ready to move onto bright, happy colours and today I'm sharing a Slimline card duo that is actually my own artwork & lettering! I was playing on my iPad and this is what I came up with. I printed two of them onto a sheet, but the spacing was off a little so I was only able to use the Crosshatch Long die on one of them.

It's a little hard to see in the photos, but I added a clear resin heart sticker to the sunshine on both cards for a little somethin' somethin'.


Inside the cards I used fun stamps because I think these cards will be perfect to send out for Happy Mail.


The clear resin hearts come in three sizes, and the largest ones are on the front. I added a small one to the right of each of the stamped sentiments as well. 

Into my stash with these two until I start back up sending Happy Mail in the New Year.

Supplies:
iPad and printer
Various card stocks - stash
1151 Crosshatch Long Rectangles - Karen Burniston
Embossed Edge Nesting Slimline Dies - Kat Scrappiness
Shimmer Spray
Clear resin heart stickers - Stampin' Up
Patterned Paper - Over the Rainbow, Recollections
Mini MISTI
Sunshine/medicine - Impression Obsession
Hug/fold - Verses

Card sizes, both - 3.5 x 8.5", and they fit in a #10 Business Envelope

Thanks for stopping by today

Thursday 24 December 2020

Snowman Mug Slimline Card

Hello crafty friends ... 

Here I am with my last holiday card of 2020 and of course I made it a Slimline card. 

If you follow me, you know that I rarely post my cards in the same order I create them. So while this is the first 'Fold Flap Slimline' card I'm sharing, it's actually the third one I've made! Since I prefer to share Christmas cards in December, the others won't be posted until after the holidays.  I have the measurements at the end of my post if you are curious.

I have seen lots of these Fold Flap cards on social media, all of them in an A2 size and held closed with a belly band. I love how this technique works on a Slimline card though! You simply fold back the right front edge of the card and decorate as desired. 

I also noticed a couple of snowman faces on die cut mugs during the Coffee Lovers Blog Hop so pulled out my Tonic Studio's shaker mug die and the i-crafter Animalopes for the eyes and nose. I didn't use the shaker cups that come with the mug though, as I wanted a card that was mailable and those shaker cups require a fair bit of extra postage. 

Here is a peek at the inside, with a stamped sentiment and embossed snowflakes at the top and bottom edges of my sentiment panel.

I just love how fine the embossed snowflakes are! I lightly inked over the top of the raised snowflakes with a blending sponge and then added a few of those iridescent snowflakes from Stampin' Up.

One more look at the card front ...


Measurements for my Fold Flap Slimline Card:

  • Cut card stock 7 x 8.5"
  • Putting the 7" edge at the top of your scoring tool, score at 1-1/4" and 3-1/2".
  • Fold your card in half at the 3-1/2" scoreline, to form your card base
  • Fold the 1-1/4" scored edge to the front of the card.
  • NOTE:  I adhered the flap right to the card front using thin foam tape, but most of the A2 Fold Flap Cards I've seen utilize pretty patterned papers and have the card open as more of an accordion. 
  • I chose these measurements for my card as then the patterned paper layer measurements are easy to figure out. I usually make my patterned paper layers 1/4" smaller, so if that top flap on the card base is 1-1/4 x 8-1/2", my patterned paper strip is 1 x 8-1/4".


Supplies:
Various card stocks - stash
Patterned paper - Holiday Bash, Recollections
Coffee Mug Die and Shaker Set - Tonic Studios
Acetate
Various shaker filler
Seam binding - Stampin' Up
White pearl card stock
Large snowflake die - Impress Rubber Stamps
Copic markers
Animalopes (eyes & nose) - I-Crafter
Stitched circles (cheeks) - MFT Stamps
Coffee Cafe (whipped cream) - Stampin' Up (retired)
Snowglobe Sentiments - MFT Stamps
Snowflake confetti/embellishments - Stampin' Up
Winter Snow embossing folder - Stampin' Up
Sentiment inside - Crazy Stamps (old, from my stash)
Card size - 3.5 x 8.5", fits in a #10 business envelope.

Thanks for stopping by today