Hello my crafty friends. One of my followers saw a post from 2019 where I created a single panel flip using Karen Burniston's Triple Flip die set and asked if I had a tutorial. At that point I did not, but today I'm sharing a tutorial on how to adapt the Triple Flip on YouTube:
If you would like to see the snowflake panel card that inspired the tutorial, click HERE.
When you pull the arm to the right, the CANADA panel flips over to reveal a buffalo plaid moose and the rest of the sentiment "Our Home And Native Land".
Below is a peek at the inside, which I decorated with stickers. While the paper package is fairly new, I still added glue to the backs of the stickers to make sure they stayed down.
This blog uses affiliate links whenever possible. This means, that at no cost to you, if you make a purchase through one of my affiliate links that I may receive a small commission from your purchase. I only link products that I own, love and use for my card making!
Any supplies I'm unable to link are listed at the very bottom of my post.
Additional Supplies: Corner Rounder - my stash White card stock - Accent Opaque Digital Super Smooth (Amazon .ca)
I have a YouTube video for you, that talks about the details and shows my card in action!
Because I am wanting to make Slimline Cards these days, I am also figuring out what dies will work on them - and that is what inspired my card today. The sweet Dolled Up Charms are part of Karen Burniston's new release and they fit perfectly on the Triple Flip Pop Up - which fits perfectly on a Slimline Card! Happy Dance!! I did make this one with a 4" height instead of the more popular 3.5" but the length is still 8.5". The card fits in a #10 business envelope.
When you pull the tab with the arrow to the right, the 3 paddles flip over to reveal the other side, which on this card was decorated with stickers from the same package as the patterned paper.
Inside I used the new Go Wild dies, which I thought worked well with the Dolled Up Charms. All the charms and the Go Wild were cut from white card stock and coloured with Copic Markers.
Finally, some details shots for you ...
*NEW RELEASE INFORMATION: The New Release was available for preorder on July 16th with shipping (in the order received) starting August 3rd.
Supplies:
1104 Triple Flip Die Set - Karen Burniston
White and pink card stocks
Patterned paper & stickers - Sweet Girl, Echo Park
Stickles
White pearl card stock
1136 Dolled Up Charms - Karen Burniston (*NEW RELEASE)
Sakura Glitter Pen
1128 Go Wild! - Karen Burniston - (*NEW RELEASE)
Copic Markers
Iridescent Butterfly embellishments - Studio Katia
Card size - 8.5 x 4", fits in a #10 Business Envelope
Today I'm sharing another interactive card using these cute woodland stickers. This time I used Karen Burniston's Triple Flip die set.
Here is a quick YouTube video for you so you can see the card in action. There are detail shots below the video. NOTE, the videos on Blogger are quite small, so if you want to see it larger, click HERE.
I added black glaze pen to their eyes and noses for some shine. I like that little detail - you just have to remember to let them sit for a bit for the glaze pen to set up or they will smear. Yes, ask me how I know that! Ha.
I didn't add much to my stash this year, but one thing I knew I wanted was the Sentiment Strips from Taylored Expressions. A whole bunch of sentiments on a single stamp, with a single coordinating die to neatly cut them into strips. Yeah!
Here is a peek at the inside:
Since I was trying to use up the papers, I picked a scrap that had these partial wreaths on it and fussy cut them out to layer on the corner of my sentiment panel.
This little guy was the last sticker on the sheet - I was able to use them up on my cards this year! Don't I love to use things up.
There were only a few scraps of the patterned paper, and a couple of the stickers and elements left. I used most of them up to make a couple of tags. I thought I was done, but when I looked at the scraps I knew I could squeeze one more card out of them. So I pulled out my grid die and finished off the scraps with a shaker card that I will share tomorrow. Now there are only two small elements left that I will add to the Christmas Embellishment bin for another day.
Supplies:
Kraft, red and white card stocks
Stitched rectangle dies - Your Next Stamp
Patterned paper and elements - Comfort and Joy, My Minds Eye
1104 Triple Flip die set - Karen Burniston
Sentiment Strips Christmas stamp and die - Taylored Expressions
Stickers - Sticko
Bakers Twine
MISTI
Inside verse - More Merry Messages, Stampin' Up (retired)
It's Fun Fold Friday here on my blog and I'm back with another card using the new Spooky Fun images from Your Next Stamp. They have released two really fun stamps sets this month and I'm SO happy to be Guest Designing for them in October. Since I have fun making interactive cards, I used the Triple Flip die set for this one.
I have more photos and a supply list after this quick YouTube video so you can see the card in action.
I broke out my water colour pencils for these images - haven't used them in a long time.
When you pull the arm the three panels flip to the left and reveal an additional three panels. On those panels I added some eyeball stickers from the Doodlebug line and a stamped BOO from the Spooky Fun set.
I used just a small piece of foam tape in the centre of the front stamped images. I love dimension on my cards, but a lot of bulk can mean extra postage. Since the Triple Flip is assembled with just a strip of narrow foam tape at the top and bottom, there is none in the centre area. So I got the dimension I like without adding any extra bulk as it will go through the mail with just the depth of a single layer of foam tape!
Here is a peek at the inside:
The Spooky Fun stamp set has lots of fun images for Halloween, so you will see me using it again this month.
Supplies: Spooky Fun stamp set - Your Next Stamp Black Olive Ink - Your Next Stamp Patterned paper and eyeball stickers - Doodlebug Purple, green and white card stocks Water colour paper Derwent water color pencils Water brush MISTI - My Sweet Petunia Sakura black and purple glaze pens, white gel pen Catherine Pooler coloured inks Circle die - Hero Arts 1104 Triple Flip die set - Karen Burniston 1056 Squares Crosshatch - Karen Burniston Peel off border sticker - Elizabeth Craft Designs (old, from my stash) 1056 Squares Crosshatch - Karen Burniston Card size - standard A2 (5.5 x 4.25")
Today I'm sharing the Birthday Card I made for our nephew's little guy who lives in Arizona. I adore Karen Burniston's Rocket Pop Up and I used it here with my Triple Flip adaptation and a vertical orientation. I am so happy with how it turned out!
When I shared my first card using the Rocket Pop Up, people noticed the background and wondered how I did it. Well I had used wide washi tape and could take no credit for creating such a pretty background. Since the washi tape can be a bit slick and I had trouble getting adhesives to stick to it, I decided to make my own galaxy background panels using Pan Pastels on white card stock. There are some 'in progress photos' below the finished card ones if you are interested.
They turned out SOOOO good! I rarely post things in the same order I create them, so the backgrounds were actually for the Designer Challenge card in September. I had one leftover panel which I used for this card. I used Stampin' Up's Shimmer Paint to spatter the background after I was finished with the Pan Pastels. On this one I also added some diluted white acrylic paint. For the DC card, I had spatters EVERYWHERE. I think I accidentally spattered a 2 foot radius - it was crazy. So for this one I spread out scrap letter sized paper, thinking that would give me enough room to keep the spatters contained. It didn't - so I think I am going to have to get a box to do any spattering in. I had a lot of cleaning up to do after I was done with these backgrounds! I also tried using a small dot stencil and my finger to rub a little shimmer paint onto the background panel. NOTE: between the chalk from the Pan Pastels and the hairspray I used to seal these galaxy panels - they were even slicker than the Washi Tape! Ha.
When you pull the tab, the rocket flips to the left and reveals a sentiment and a stitched star. That star was strategically placed to hide the slot that cuts with the Triple Flip - remember it is designed to have three paddles to flip and I only used one here.
Here is a look at the inside. The cute astronaut is on a paper spring for some additional fun.
I have had several requests to do a full YouTube video tutorial but at this point it's beyond my skill level. Instead I took a few photos to show you how I did the Triple Flip adaptation.
Below you can see how I die cut the main Triple Flip die - lining up the far right edge of the die with the panel which was cut to 4-1/4" wide - same as the width of the navy card.
I also added extra foam tape bits above and below the flipper arm to keep it from sagging ...
The small rectangle comes with the Triple Flip die set, and I cut two from navy card stock and sandwiched the paddle in between them. Below is the flipper as it would be in the closed position. It was the perfect base to adhere the rocket too! I cut two identical rockets and sandwiched them with this rectangle in between so it looks good from the front and also when you flip it over.
This is what it looks like when you pull the arm. And you can see the slot that die cuts and needed to be hidden with the stitched star.
I have a little YouTube video to show you the card in action:
It's Fun Fold Friday here on my blog and today I'm sharing another one of my adaptations to Karen Burniston's new Triple Flip die set. This time I tried using a regular A2 side fold card - up until now people have been only using it in a landscape format.
I was careful placing the die, checking placement from the back and the front of the turquoise chevron panel making sure the far left slot was off the left edge of the paper so it didn't cut. I then added just the coffee cup from the Coffee Cup Pop-Up to the 'centre' flipper, which is now the one at the far left.
To get the coffee cup, I simply trimmed off the excess that I didn't need - the folding tab and the part that wraps around to the back of the cup to attach to that folding tab. Easy peasy - if you try it yourself you will see exactly what I mean as soon as you cut the cup. I cut the cup twice, so I could sandwich the flipper paddle between the cups.
I decorated the front with the circles that are included with the Coffee Cup Pop Up, and added the Crabby til Coffee stamp to the sweet little stitched oval that comes in the new Enjoy the Ride set.
I adore the coffee beans that you can cut from the Coffee Cup Pop Up so added a trio here. I also added a couple of borders from the Border Blends Argyle, and made my scallopy border at the top and bottom using the Nature Edges Clouds. Some got a white gel pen outline and others got gold.
The words that are revealed when you pull the tab (Funny Bones from Riley & Company) are funny and very true for me! I LOVE my morning cup of coffee! There was still the slot that cuts with the die for the far right paddle, which is what I covered up with the word panel. I had to careful trimming (a scant 1/16" at a time) to get it to fit behind the coffee cup while not cutting off any of the letters. But it did work and fits perfectly.
I didn't think the inside needed another sentiment, so instead I added a fun Riley the Moose image and a die cut heart.
I have a short YouTube video for you as well, so you can see this card in action. The Triple Flip die set is really fun and proving to be versatile as well.
Supplies: Kraft, white and brown card stocks Patterned paper - Snap, Color Vibe - Simple Stories 1104 Triple Flip die set - Karen Burniston 1006 Nature Edges - Karen Burniston Sakura white gel pen Sakura gold gel pen Sakura black glaze pen W-1 Copic marker 1033 Coffee Cup Pop Up - Karen Burniston This Morning I Drank Water - Funny Bones, Riley & Company 1090 Border Blends Argyle - Karen Burniston Catherine Pooler Over Coffee Ink Crabby Til Coffee - Funny Bones, Riley & Company 1103 Enjoy the Ride (stitched oval) - Karen Burniston 1019 Gift Card Label (hearts) - Karen Burniston 1091 Border Blends Party - Karen Burniston 1054 Rectangle Crosshatch - Karen Burniston Cookie Riley - Riley & Company Chameleon Color Tone markers
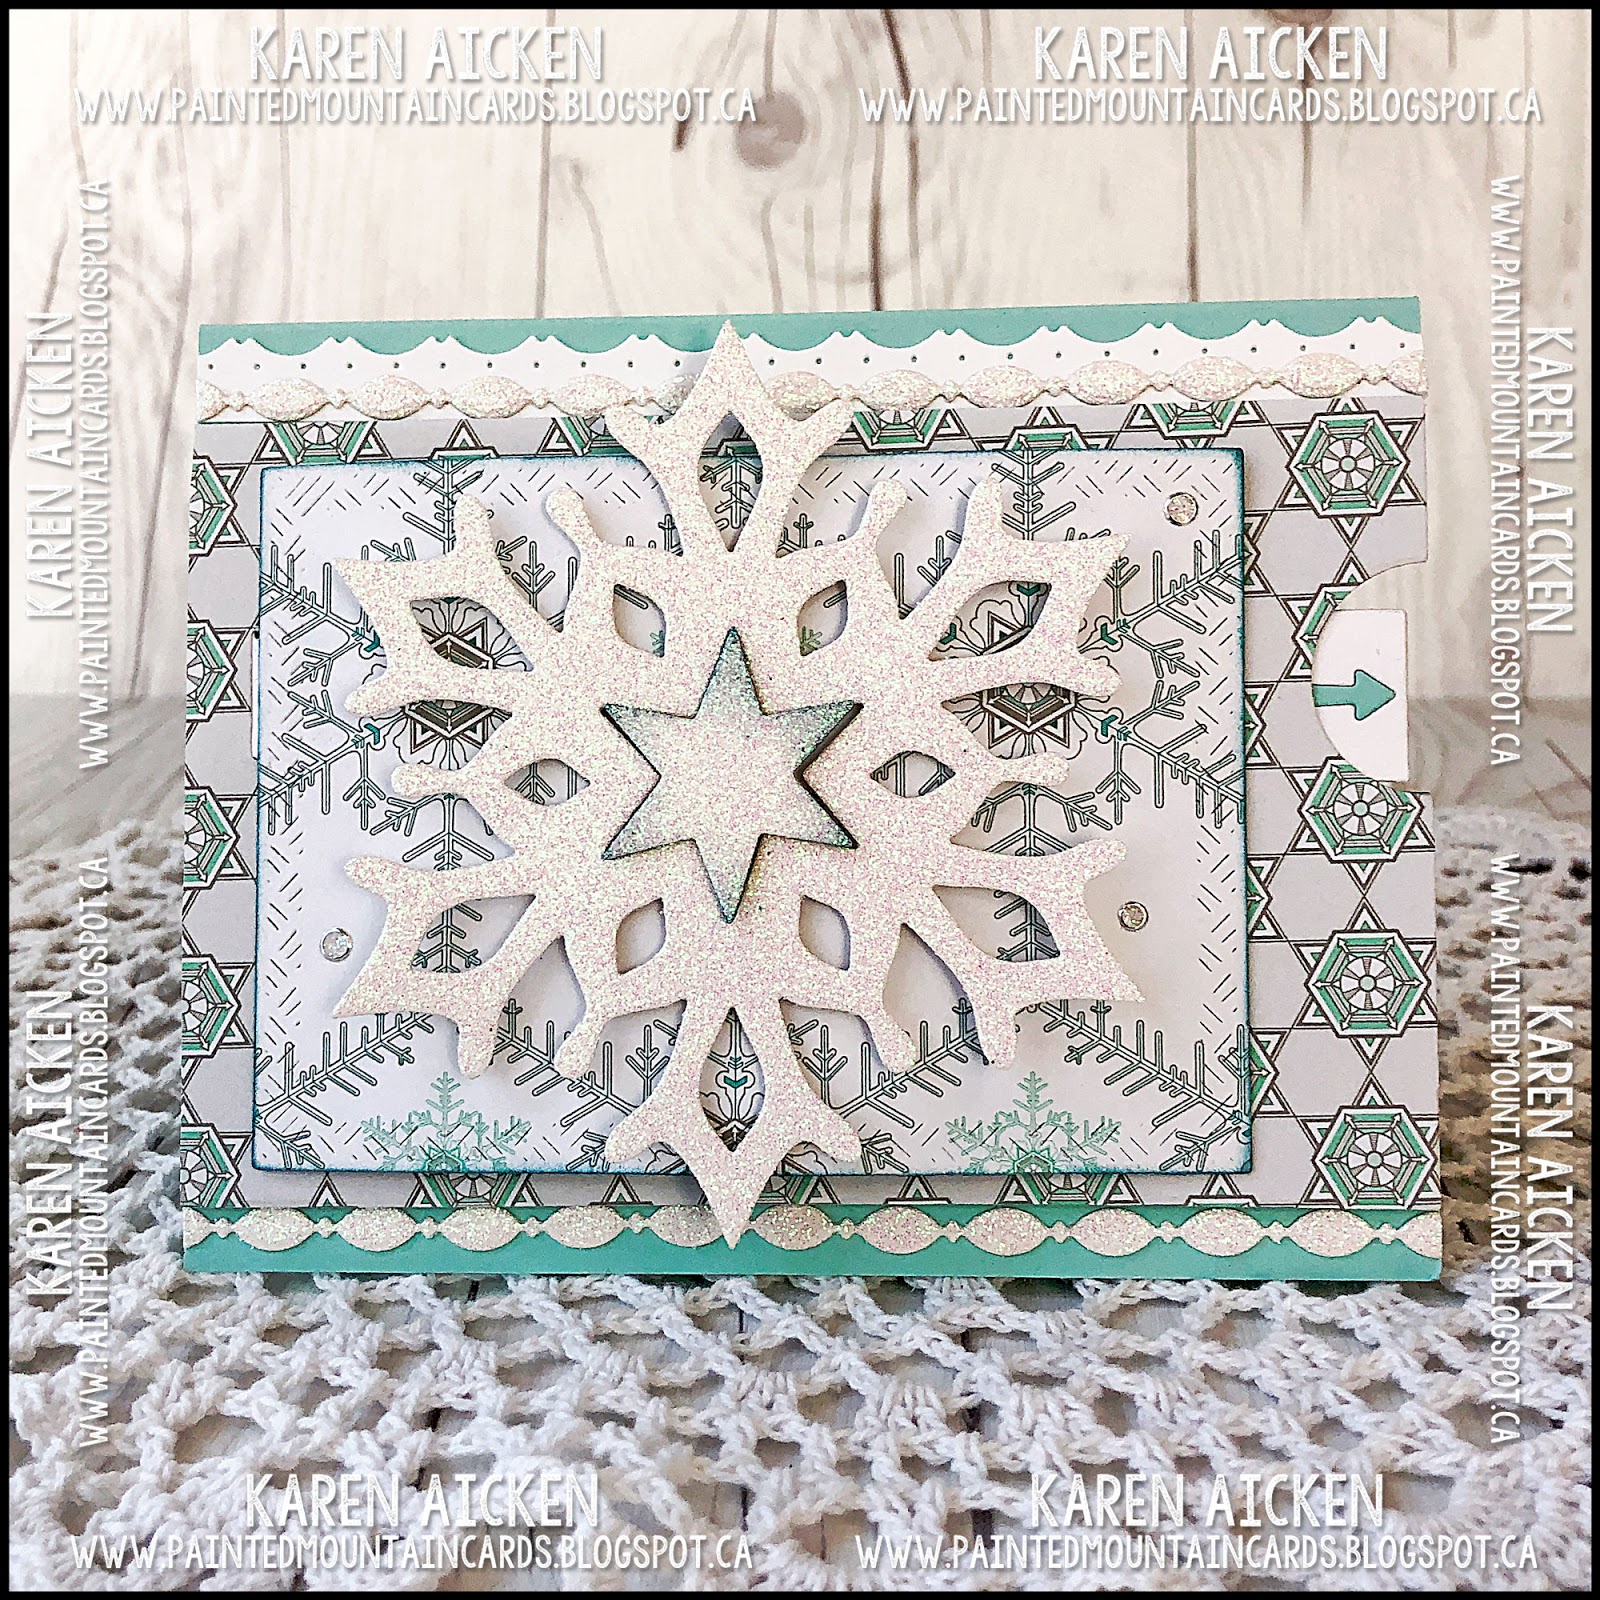
I was SO excited when this idea worked. I had been busy doing paperwork and paying bills, dealing with my Mom's estate etc when BOOM this idea popped into my head. Well actually, the first idea was to use an acetate hinge and have just the snowflake be the flipper but I went with a rectangle under the snowflake and a card stock hinge for the first one.
The new Triple Flip die set is proving to be a fan favourite, and I'm thrilled to be able to share another way for you to use your dies! I have a lot of ideas for this technique - more ideas than days, haha. Since it is still July, I can call this my 'Christmas in July' post! I have seen some pretty wonderful holiday cards this month, which is always fun.
I adapted the Triple Flip and only used one 'flipper' - the one on the far left - and attached a decorated crosshatch rectangle to that arm.
I have had these snowflake dies for many years - and I'm not even sure who made them. I die cut the largest one from really sparkly card stock and adhered it to the flipping rectangle with foam tape. I also added some sparkly borders using Karen Burniston's Border Blends dies.
When you pull the tab, the rectangle flips over to reveal a sentiment and another die cut snowflake. The sentiment rectangle covers up the remaining slots that cut with the Triple Flip die, since we only needed the one on the left.
Because the pull tab arm has to extend all the way across the width without the additional two flipper arms, there is some wobble to it and it tends to sag below the notches a little. To remedy this, I added a narrow 1/2" long piece of foam tape above and below the pull tab about where the far right slot is. That keeps the pull tab arm where it needs to be!
The card is a top folding A2, and there is another stamped greeting inside.
I also have a little YouTube Video so you can see the card in action:
I have another idea for a Triple Flip adaptation that I will share in a couple of days. So fun!
Supplies: Blue and white card stocks Patterned paper - Winter Frost, Stampin' Up (retired) 1104 Triple Flip - Karen Burniston 1054 Rectangles Crosshatch - Karen Burniston Glitter card stock - AC Moore 1091 Border Blends Party - Karen Burniston Large Snowflake dies - unknown, older from my stash Stamps on front - Verve (retired) Water brush Inside stamps - Hero Arts Glitter Dots - Elizabeth Craft Designs
It's Saturday and that means a new challenge at the Crazy4Challenges Blog. This month our hostess is Karen Ostergard! Donna K is joining us as our Guest Designer and you can find Donna's blog HERE. This is Karen's challenge for the week:
Christmas in July. Create a Christmas / holiday themed card. Note, this is my first post today. If you are looking for my Design Team Card for Lynda Kanase, scroll down as it will be available a little later this morning.
I used several new items from Karen Burniston's new release - the Triple Flip and the Happy Hour Charms. I pulled out this patterned paper stack to make my card, and saw this border image on one of the sheets. It was too perfect not to use so then I was off and running.
While it's hard to see in the photos, I die cut each of the cocktail glasses from a peachy foil card stock and I love how they catch the light. The drink portion of the dies were cut from white glitter paper for some holiday sparkle, and the tiny holly and poinsettias were fussy cut from a different paper in the stack.
When you pull on the tab, the three panels flip to the left and reveal the message "Naughty is the new Nice". Ahaha - so fun. I snipped the words from one of the journal cards in the paper stack to make them work with the Triple Flip die set.
Inside I added a matted journal card and a circle with a sticker greeting which is where we will sign our names.
I will also include a short YouTube video so you can see the card in action!
Check out the C4C blog to see how the Crazies have been inspired by the challenge. We'd love to see your take on it, so be sure to stop by the Crazy 4 Challenges blog and link up your creations. If you are uploading to an online gallery, please use the keyword C4C492. Supplies: Blue, pink and white card stocks 1104 Triple Flip - Karen Burniston, shipping mid July 2019 Patterned paper - Recollections (2018) 1110 Happy Hour Charms - Karen Burniston, shipping mid July 2019 Foil card stock - Stampin' Up Glitter card stock - Stampin' Up Enamel snowflakes - Stampin' Up 1057 Circles Crosshatch - Karen Burniston Merry Christmas sticker - the Paper Studio Gold Glitter Dots - Elizabeth Craft Designs Sakura gold gel pen
I'm back today sharing another Triple Flip card, which is part of Karen Burniston's new release. Those dies will be shipping mid July! This is a versatile interactive die set that you can change the look of depending on the decorations, colours and papers you choose.
I added some white Peel Off border stickers as well as one of the Border Blend die cuts. I like the shine from the stickers and I added lots of Stickles to the elements as well.
When you pull the arrow the three panels flip over to reveal a greeting and three different decorations.
Here is a peek at the inside, where I stamped the birthday greetings and added another one of the printed elements from the package.
I also have a little YouTube video for you to see the card in action:
Supplies: 1104 Triple Flip - Karen Burniston - shipping mid July 2019 Green and white card stocks Patterned paper and printed embellishments - Kaisercraft, Greenhouse Collection 1056 Squares Crosshatch - Karen Burniston 1090 Border Blends Party - Karen Burniston Peel-Off's - Stamp On It Live, Laugh, Love stamp - Taylored Expressions Inside stamps - The Inside Scoop, Taylored Expressions Sakura Gold Gel Pen Stickles
Today we are remembering paper crafter Joanne Grzelak, who passed away suddenly on May 25th. Joanne was very active on Splitcoast Stampers and a founding member of the Crazy4Challenges Blog, among others. We are paying tribute to her with a Blog Hop. Since Joanne loved the ocean, I went with an ocean theme for my card today.
I will link all the Blog Hop participants at the end of my post, in case you get lost along the way.
Once I coloured my images with Derwent Water Color Pencils and a water brush, I just knew I wanted to add them to the COMING SOON Triple Flip, a die set in Karen Burniston's new release.
There is some gold foiling on the border strip, I added a gold foil arrow and added some gold gel pen highlights as well.
When you pull the arm the three rectangles flip over and I went with a different colour scheme on the flip side. The adorable stamps are from Pink & Main - I bought them last year at the Mesa Rubber Stamp Show.
I made the card a top folding one, and decorated the inside with a scalloped rectangle, white signing block and a few more images.
Note - this card is also for Day NINETEEN of the 30 Day Colouring Challenge hosted by The Daily Marker.
I will also share a short YouTube video so you can see this card in action!
Supplies: Patterned paper - Craft Smith 1104 Triple Flip - Karen Burniston, SHIPPING MID JULY 2019 Kraft, white and teal card stocks Stitched scalloped rectangle die - Your Next Stamp Gold foil card stock - Stampin' Up Derwent Water Colour Pencils Water Brush Wink of Stella Stamps - Seas the Day, Pink & Main Sakura white gel pen 1027 Word Set 4 Just a Note - Karen Burniston Nuvo gold glitter pen Sakura gold gel pen Birthday Fishes stamp - Make a Fish, Waffle Flower 1054 Rectangles Crosshatch - Karen Burniston