Showing posts with label Gift Card Label. Show all posts

Tuesday, 4 February 2020

Double Pop Up Gift Card Holder/Birthday Card

Hello crafty friends ...

Welcome to Karen Burniston's February 2020 Designer Challenge, with the theme of "Theme: "DOUBLE" - make a card of any theme using a doubling technique. This could be a double Pivot Panel, a double Katherine, a double Surprise Ball, or any fun combination of two different pop-up dies."

I figured several of the DT would be using the Surprise Ball, so I decided to go a different route and will show you how to make a double pop up using the Cupcake Pop Up!

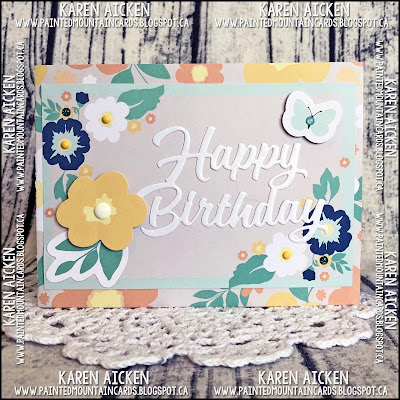
Here is the front of my card, with the Happy Birthday die on some older patterned paper/cut parts and stickers form my stash. I also added some fun Gumdrops, because apparently I am addicted to those things. I also went with a soft colour palette for this one!


(Remember you can always head to my YouTube channel HERE to see the video larger than they appear on Blogger).


Before I get to my card photos, I wanted to show you a quick photo of my in-progress pop up. I folded the inner card in half, with the pattern inside. Keeping this inner closed, I used removable tape to hold the Cupcake Pop Up on the fold, carefully lining up those alignment nubs with the fold line. After running it through my die cutting machine to cut through both layers at once and opening the inner card back up, this is what it looks like. The Gift Card label easily disguises the shape of the cupcake!


Below you can see the little cut-apart I adhered to the Gift Card Label, which you see when you remove the gift card. You could add a secret message or a stamped greeting etc to personalize the card even more.


I hope you will check out the rest of the Design Team - their blogs are linked on the right. Karen Burniston will have her project & blog post tomorrow (Wednesday) HERE.

Supplies:
Patterned paper, stickers & Cut apart - Date Night, Chickaniddy Crafts (old)
1019 Gift Card Label - Karen Burniston
1008 Cupcakea Pop Up - Karen Burniston
1030 Happy Birthday - Karen Burniston
1111 Cheers - Karen Burniston
Stitched Mini Scalloped Rectangle - Honey Bee Stamps
White pearl card stock
Retro & Emerald Ice Gumdrops - Your Next Stamp

Card size - 6 x 5.25", fits in an A6 envelope.


Thanks for stopping by today

Saturday, 21 September 2019

Wedding Box Card

Hello my crafty friends

A friend's daughter is getting married this month, and I offered to make them a wedding card to give the happy couple. I had trouble figuring out what I wanted to do - I knew it would be an interactive card, but which one? Finally I decided on a box card, since the card will likely be displayed for a little while.

I find it hard making a card for a big occasion when I don't know the people but my friend suggested maybe shades of purple with some silver. That was my jumping off point. While this is not a Karen Burniston Pop Up, I  ended up using FIVE KB dies on it. I guess that shows how truly versatile her dies can be!


Below is a video showing how the card unfolds from the envelope, and there are still shots and a full supply list following the YouTube video.


The Happily Ever After die is SO perfect for a wedding card. It cuts as a single piece which makes it nice and easy to adhere.  I cut the Lawn Fawn Box card base from a heavy pearlized white card stock, which doesn't show up in the photos but is really pretty in real life.


Both the little scalloped border on the inside supports and the bride and groom dies are from the Cake Pop Up. Which was another die set I had considered for the occasion. The 'lacy' heart is one of my favourites - an older die from Stampin' Up. I still remember how happy I was when I was able to purchase that set.


I used the stitched label from the Gift Card Label set as a place for my friends to sign their names. The press dot hearts are from the Circle Charm Pop Up.


Of course it folds completely flat for mailing. While the box card on it's own fits easily into an A2 envelope, I added the large heart at the back which makes it far too tall for that. I added some coordinating paper to line the inside & flap of a 6" square envelope instead. To me, large square envelopes just seem perfect for a wedding.


I hope you enjoyed my box card today!

Supplies:
Box card die set - Lawn Fawn
White peal card stock - Gina K (old, from my stash)
Patterned card stock - The Luxury Stack, DCWV (old, from my stash)
1032 Happily Ever After - Karen Burniston
1028 Cake Pop Up (Bride & Groom, scalloped border) - Karen Burniston
Black and white card stocks
Sakura white gel pen
Silver foil card stock - Stampin' Up
Scribble heart and Love dies - Stampin' Up
Stitched heart dies - Elizabeth Craft Designs
1019 Gift Card Label (small layered hearts) - Karen Burniston
1077 Word Set 8 Celebrate - Karen Burniston
1046 Circle Charm Pop Up (heart with press-dots) - Karen Burniston

Thanks for stopping by today

Thursday, 11 July 2019

Engagement Shaker Card

Hello my crafty friends

Today I'm sharing a card I sent to our niece and her new fiancé. Inspired by a card by Kristie Marcotte, I decided make a large shaker using an A2 shaker pouch from MFT Stamps.


I die cut several of Karen Burniston's COMING SOON Happy Hour Charms cut from gold foil card stock. I didn't add the drink layers and simply snipped off the hanging holes before adding them to my shaker. While it's hard to see in the photo I also added a beer mug in there.


Both the Congrats and the hearts come from other Karen Burniston die sets, which are listed in the supply list below. NOTE: the next time I make one of these large shakers, I will adhere some of the larger filler items to the back so not everything falls to the bottom with the sequins and metallic confetti. I added glass micro beads as well, as their weight helps everything 'shake & move' really well.


Supplies:
Gold foil card stock - Stampin' Up
1110 Happy Hour Charms - Karen Burniston (shipping mid July 2019)
A2 Shaker Pouch - MFT Stamps
Sequins, beads and filler - my stash
Stitched Frame die - Lawn Fawn
Patterned paper - K & Company
Stitched Rectangle dies - Your Next Stamp
1077 Word Set 8 Celebrate - Karen Burniston
Stitched Fishtail Banners - Your Next Stamp
1019 Gift Card Label (hearts) - Karen Burniston
Sakura gold gel pen

Thanks for stopping by today

Saturday, 12 January 2019

C4C466 Humorous Coffee Themed Card

Hello my crafty friends

It's Saturday and that means a new challenge at the Crazy4Challenges Blog. I am the hostess for January and our Guest Designer is my friend and Design Teammate Kelly Booth. Today my challenge is:  Everybody needs a smile now and then - this week lets make a humorous card!

I chose to make a coffee themed card with a funny stamp on the front.


I like the sweet size of the Coffee Charms - they fit so nicely on the Gift Card Label!


Inside I used the House Pivot Panels, a few more of the coffee charms and a die cut COFFEE word.


Below is a view of the card from the top...


Finally, for those that like to pin pics of card fronts and insides together - here you go!


Check out the C4C blog to see how the Crazies have been inspired by the challenge. We'd  love to see your take on it, so be sure to stop by the Crazy 4 Challenges blog and link up your creations. If you are uploading to an online gallery, please use the keyword C4C466.

Supplies:
1063 House Pivot Panels - Karen Burniston
1054 Rectangles Crosshatch - Karen Burniston
Patterned paper - Paper Studio
1041 Coffee Charms - Karen Burniston
1019 Gift Card Label - Karen Burniston
White and pink card stocks
Sakura white gel pen
Coffee die - Verve
1011 Katherine Label Pop-Up (oval) - Karen Burniston
Bad words stamp etc - CAS-UAL Fridays
Fishtail Banner die - Elizabeth Craft Designs

Thanks for stopping by today

Friday, 7 September 2018

Merry Christmas Evergreen Pivot Panel

Good morning friends

I used several more of Karen Burniston's new release dies for my Fun Fold Friday card today, including the bold Merry Christmas die. I get a lot of use out of the Happy Birthday one so I can see this one getting a good work-out too. Here I've cut it from both red and white card stocks then offset them to create a shadow effect.

The Merry Christmas is layered onto the Gift Card Label, and I didn't glue down the slots under the flourishes. I'm sure if I chose to, I could still slide a gift card under those slots then the Merry Christmas would be revealed when the gift card was removed.


Inside I used the Evergreen Pivot Panel die set, along with the Crosshatch Rectangles to cut the patterned paper. The little scallops are from the 'icing' that comes with the Cake Pop-Up.


I didn't want to cover up the sweet snowman on the right side of the card, so added our signing block on the left.


When I was planning this card, I intended to alternate houses and trees - but the green trees looked so nice against the white pop-up panel I ended up going with all trees.


Remember that the Pivot Panels work inside a regular card as I've done here, but they were designed to work with the Tag Book Pop-Up AND the Twist Panel Pop-Up as well.


Into the holiday card stash with this one.

Supplies:
Patterned paper - Recollections
1054 Rectangles Crosshatch - Karen Burniston
Red and white card stocks
1062 Evergreen Pivot Panel - Karen Burniston
1028 Cake Pop-Up (scalloped trim) - Karen Burniston
1019 Gift Card Label  - Karen Burniston
1065 Merry Christmas - Karen Burniston
Stickles
Sakura Black Glaze Pen

Thanks for stopping by today

Monday, 14 May 2018

Floral Birthday Card - Brutus Monroe Collaboration

Good morning friends

This week the Karen Burniston Riley Design Team is doing a collaboration with the folks at Brutus Monroe. You can see more at the Brutus Monroe BLOG, and be sure to check out my fellow teammates for their projects.

I was really happy with how this card turned out! The 'water colour' looking background was actually stamped with the Brutus Monroe Cloud Background Stamp. I used my MISTI and stamped the Cloud Background with one colour of Distress Oxide Ink. Then I rotated the card panel, cleaned off the stamp and repeated with another colour. I did this a third time and the background was done.


The pretty floral bouquet was stamped in black and water coloured with diluted Distress Oxide Inks so it would perfectly match the colours in the background.


Inside I used a couple of dies from Karen Burniston - that large Happy Birthday (which you know I love) and the Gift Card Label. It is such a great size for stamping greetings!


The Happy Birthday was die cut from white card stock, then water coloured with the same inks I used to paint in the floral image.


The same floral image was stamped over the Gift Card Label, in a light pink to tie in with the card front.  I went over the edges of the label, and the layered panel edges on the front with a gold Sharpie and added some sequins for sparkle and shine.


I'll be back tomorrow with a second Karen Burniston Riley/Brutus Monroe collaboration card.

Supplies:
Bristol Smooth card stock
White and light pink card stocks
Conservatory of Quotes floral stamp - Brutus Monroe
Zig Clean Color Markers
Water Brush
Spectrum Noir Glitter Pen
Dashing Rectangle dies - Elizabeth Craft Designs
Seam binding
Fun foam
Cloud Background stamp - Brutus Monroe
Distress Oxide Inks
Gold Sharpie marker
Sequins
Glossy Accents
Stickles
Wishing You stamp - Stampin' Up

Thanks for stopping by today

Sunday, 22 October 2017

Snowglobe Twist Circle Card

Good morning friends

I have made it my mission to use things up for my holiday cards this year. I have all kinds of bits and pieces of patterned paper sitting in a drawer, that I used on Christmas cards other years and didn't finish up the sheet. Time to use it up and make room.

This card was made with the intention of using up this berry print paper, and I did! I used Karen Burniston's Gift Card Label on the front, with her Word Set 3 - Holidays on the stitched oval. Notice how the oval slips under the gift card slits that cut with the label? The Gift Card Label die set is quite versatile!


I used the Snowman Twist Circle Pop-Up (without the snowman) and as the card is opened, the decoration twists and pops up.


Here is the card fully open. I used the flourishes from the Gift Card Label to anchor the stamped circle where we will sign our name. The graphic on the circle was so cute, I had to use it. On the lettered circle, I added the snowman hat and scarf from the Winter Animals.


The stitched clouds from the Nature Edges is great for clouds, but it also makes a great border and I've used it here on each side of the card.

One more holiday card done for the stash!

Red, blue, white and black card stocks
Patterned paper - Echo Park
Graphic - Lettering Delignts
Stitched oval dies - MFT Stamps
Stitched circle dies - MFT Stamps
'snowflake' stamp - Papertrey Ink
Stickles

Thanks for stopping by today

Sunday, 24 September 2017

Christmas Envelope Gift Card Holder

Good morning friends

As soon as I saw Karen Burniston's Gift Card Label die set, I knew I wanted to try this idea. It is not a new one - we used to make these years ago and called them 'All In One Cards'.


It is held closed with Bakers Twine, but you could also use ribbon or make a 'belly band'. I am going to try that next!


I used the Envelope Punch Board for the envelope, sizing it for a 5" square card.  I really like the punch boards, and the envelope one makes short work of creating many different sizes of envelopes (and more!).


On the inside flaps I used the large snowflake from the Winter Charms die set, snipping off the hanging hole. The Gift Card Label is adhered inside the card so it's all ready to slide a gift card into. The smaller labels are included with the Gift Card Label, as are the flourishes and hearts.


I don't have any holiday themed gift cards yet, so added this one as a place holder.


I like to have Gift Card Holders on hand for the holidays, and hope to have a nice selection of them this year all finished and ready to go.

Supplies:
Patterned paper - Stampin' Up
White card stock
Green star dream card stock
Dot stamp - Stamps by Judith
Envelope Punch Board - We R Memory Keepers
Bakers Twine
Red brush marker

Size - 5-1/4" square

Thanks for stopping by today

Sunday, 20 August 2017

Christmas Greetings Z Fold Card

Good morning friends

I have a Z Fold Christmas card to share today, using Karen Burniston's new Gift Card Label die set. I like the large size of this label shape and have used it here as the focal element instead of as a Gift Card Holder. I always enjoy finding more uses for my dies than what they were intended for.

The font is so sweet on all of the Word Sets so I was easily able to combine the Holiday and Birthday sets for my greeting. I added glossy accents to the little flourishes and red dots in the perforated dots that cut with the die, using a red fine point marker.


When the card is opened, the stamped greeting and matted labels come into view.


I used the Katherine Label label dies for the inside, as well as the stamped sentiment and holly embellishment.


I'm still plugging away with that Stampin' Up paper stack that I got from the Clearance Rack. I like the bright traditional colours paired with the graphic design. 

Supplies:
Red and white card stocks
Patterned paper - Stampin' Up
Staedtler fine point markers
Graphics - Lettering Delight
Glossy Accents

Thanks for stopping by today