Today I'm sharing my 10th card made with Paper Roses' BEE HAPPY card making kit. For this one I pulled out Karen Burniston's Circle Charm Pop Up which is another one of my favourite KB dies. I also brought in some gold foiled bee stickers from my stash and Glitter Dots for a little sparkle.
Using the included circle dies in the set, I cut one from acetate and then a second circle frame, snipping off the side tabs as I only needed the tabs for the front piece. These tabs are what connects the circles together as Karen Burniston explains in her assembly video. I added two gold foiled bee stickers and three Glitter Dots to the acetate and I like how they look like they are floating. The ephemera and sentiment were in the BEE HAPPY kit.
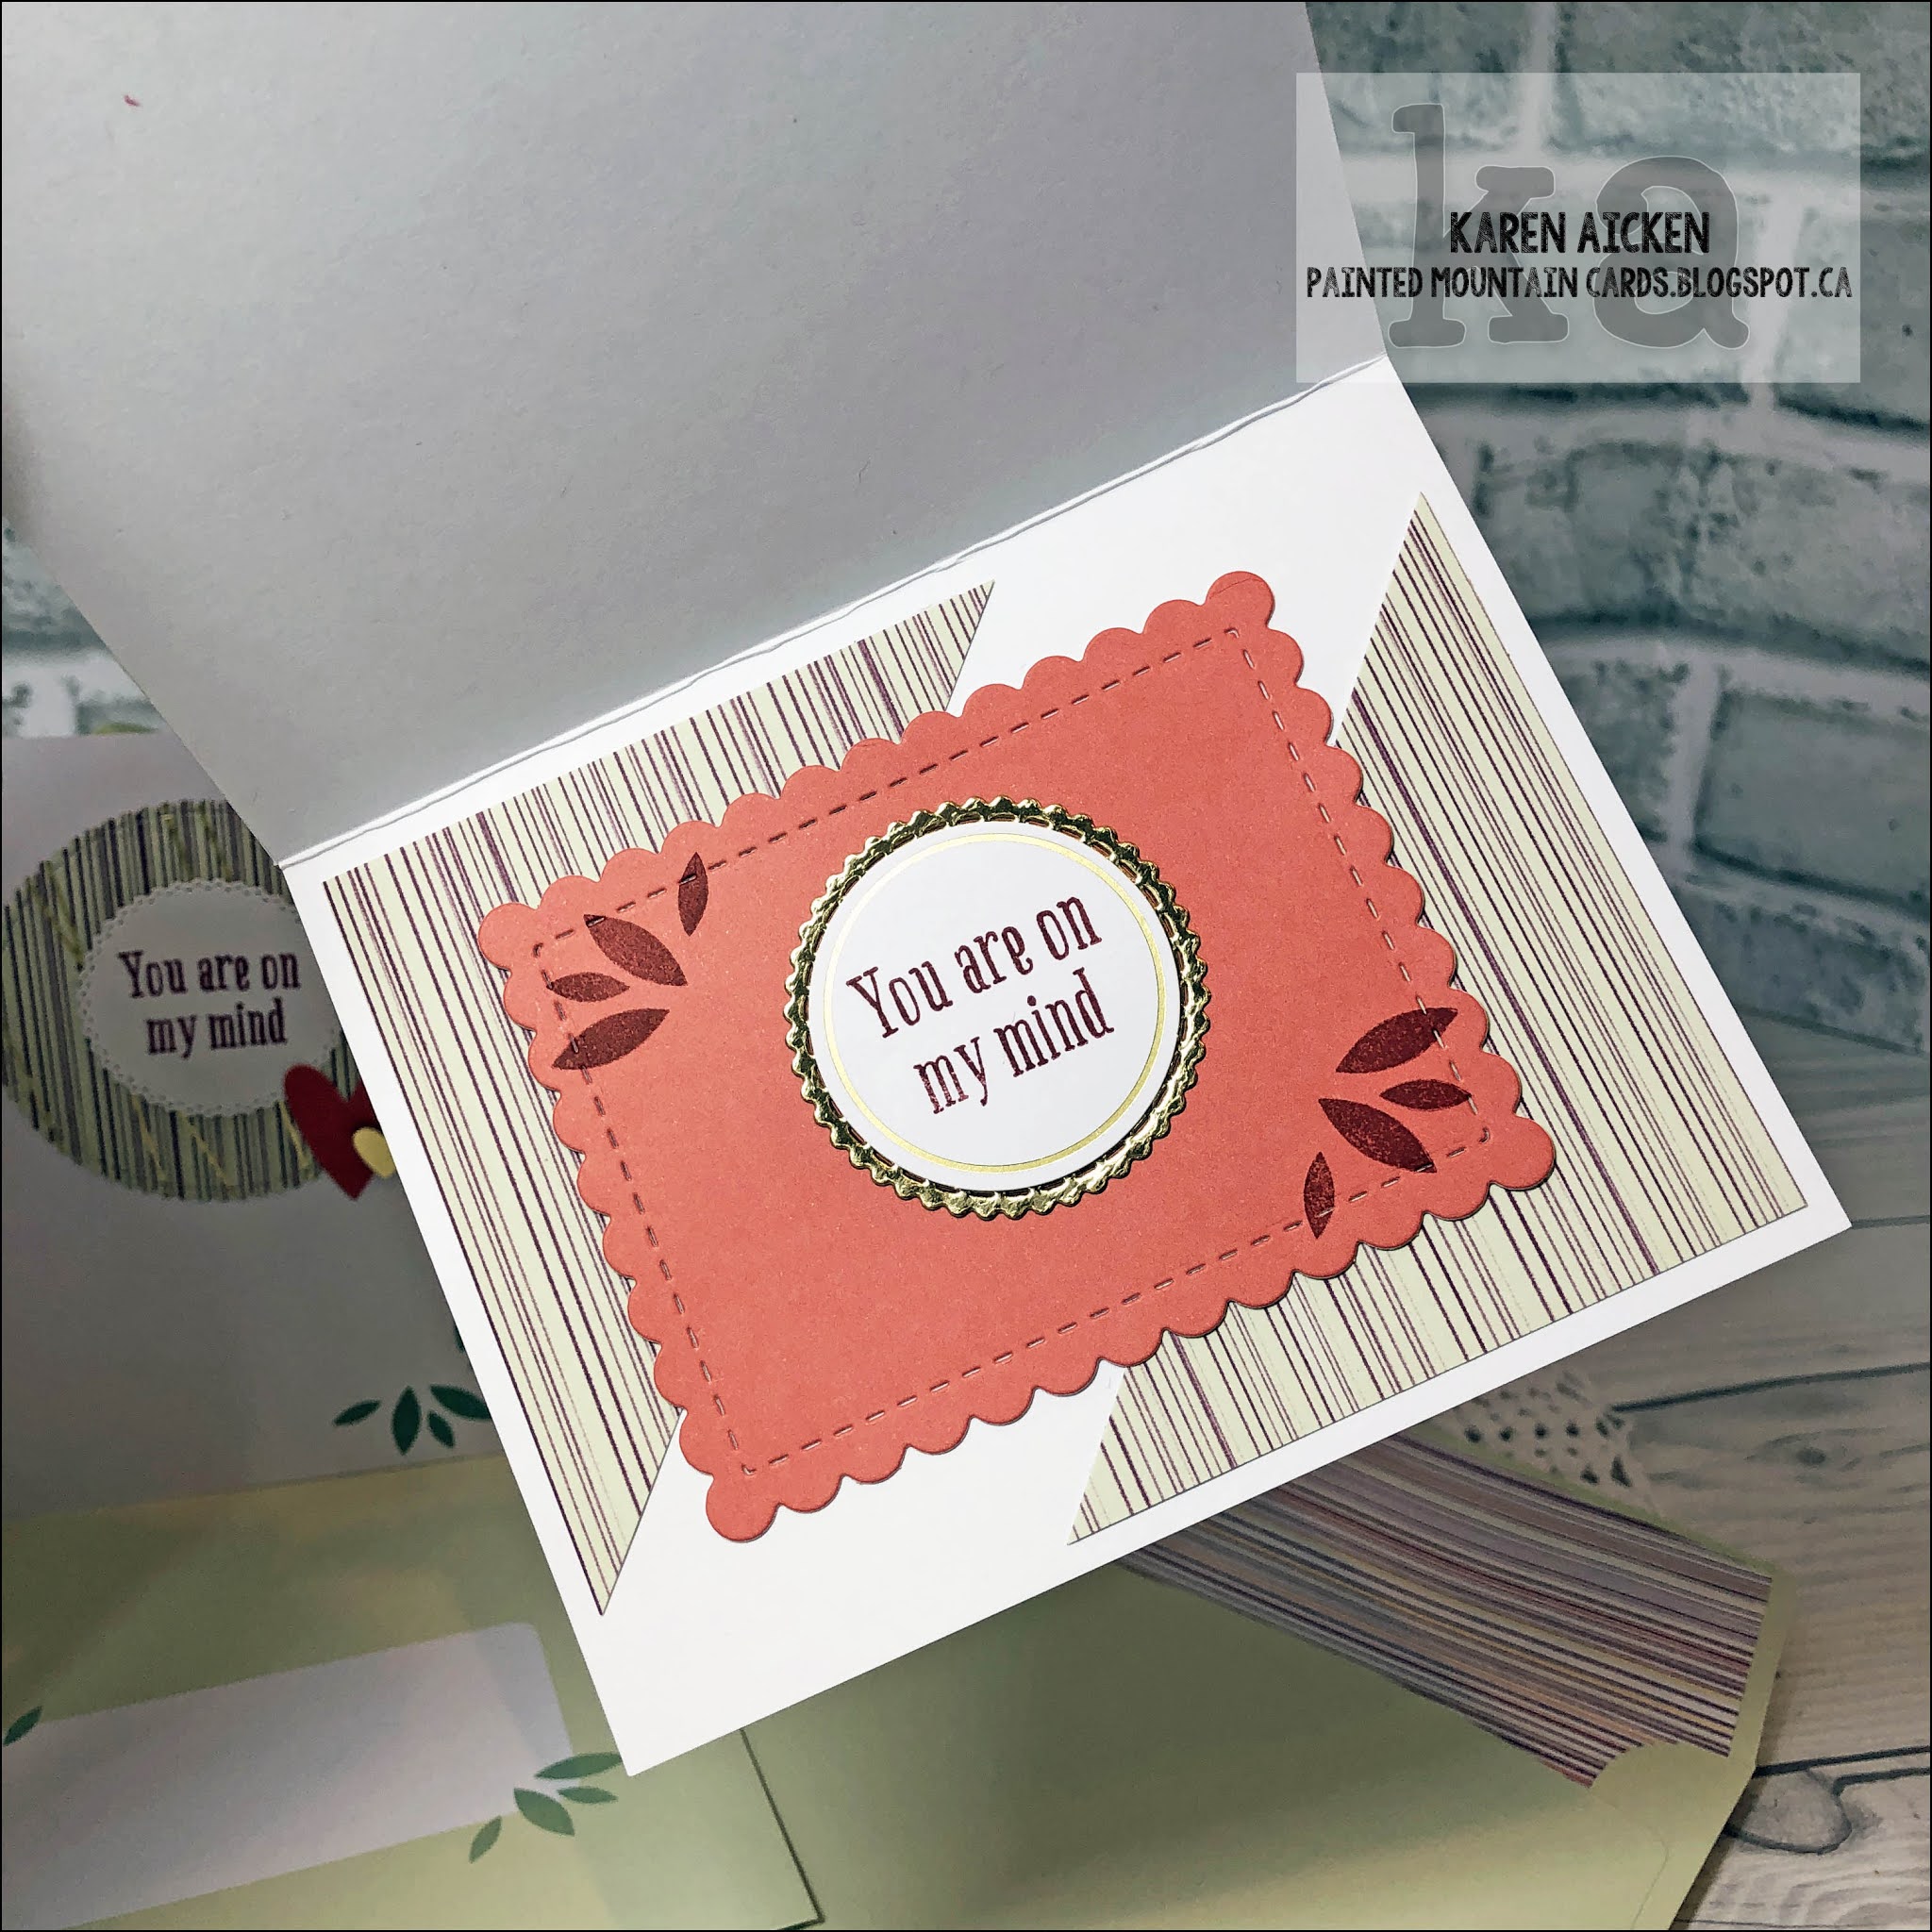
Hello my crafty friends and welcome to Fun Fold Friday here on my blog. Today I'm sharing another way to use Karen Burniston's Butterfly Collage Add-On, which was designed to go with the Heart Collage Pop Up. For my card today I just used the Add-On paired with the Circle Charm Pop Up dies and sparkly patterned paper from my stash.
Whatever you add to the front circle, pivots to the inside when the card opens. I cut the centre frame in half, and added one of the expanding butterflies to the centre. The Border Blends Trims decorate each side and there is a matted rectangle to add my personal message.
In addition to the sparkle in the patterned paper, I used pink mirror card stock and added gold peel off stickers 😊.
This card folds completely flat for mailing, and will only need a single stamp!
This blog uses affiliate links whenever possible. This means, that at no cost to you, if you make a purchase through one of my affiliate links that I may receive a small commission from your purchase. I only link products that I own, love and use for my card making!
Any supplies I'm unable to link are listed at the very bottom of my post.
Additional Supplies: Pink card stock scraps
White card stock scrap Patterned paper - Kanbon Crafts (old, from my stash) White twine Circle stickers - Dazzles
Hello my crafty friends! It's Fun Fold Friday here on my blog and today I'm sharing a card made with Karen Burniston's Circle Charm Pop Up. This is another die that I get a lot of use out of - the decoration on the card front pivots to the inside as the card is opened. If you check the labels on the right side of my blog (web version, not mobile version) you will see there are two dozen different cards made using this die set since it was released! I have a walkthrough of my card on YouTube:
The only new items I used on my card today are the mirrored heart sequins - everything else has been in my craft room for 6 months or longer. The sequins are my new favourite embellishment, as you may have noticed. As soon as I added that first one to my card, I immediately ordered 2 more packages. Ha. Yes, I linked them below for you as well as everything else that is available.
Since I went over everything in the video I will keep my comments here to a minimum. 😊
This blog uses affiliate links whenever possible. This means, that at no cost to you, if you make a purchase through one of my affiliate links that I may receive a small commission from your purchase. I only link products that I own, love and use for my card making!
Any supplies I'm unable to link are listed at the very bottom of my post.
Additional Supplies: Patterned paper, stamps Amd dies - Hand Penned Bundle, Stampin' Up (retired) Card and envy - Hand Penned Memories & More, Stampin' Up (retired)
Light pink card stock - stash
White card stock - Accent Opaque Digital Super Smooth (Amazon .ca)
Hello! Today I'm sharing four more alternate cards using the October Paper Pumpkin kit "Peaceful Christmas". I have a larger-than-A2, two Mini Slimline cards and a Pop Up card using the Circle Charm Pop Up dies by Karen Burniston. Everything that is available is linked below for you! I have a walkthrough of these cards on YouTube:
These cards are definitely better to see in a video (or in person) because photos just don't capture the sparkle and shine.
First up the larger card, with a silver foiled background panel and large iridescent snowflake.
Inside I used one of these beautiful large sentiment stamps from Crafters Companion. ❤️
Since the card above used the front of one of the printed tree card bases, I used the back of the card for the one below. I loved the print on these card bases, and knew I would be cutting them in half to get 10 card fronts instead of the five in the kit with the trees/foiled snowflakes on the back side of those card bases. The silver foiled matting layer on this one is SO pretty.
I also added the dies from the Peaceful Cabin dies, and as I said in the video - I used blending brushes and grey ink to add colour to the back layer so the openings on the front layer would show up better. The front layer also got a blast with Shimmer Spray.
Inside, I used the final remaining strip from that printed card base and a stamped sentiment.
Since I wouldn't be using one of the envelopes for the card I cut apart on the two cards above, I cut one apart to make the next two cards. The silver foiled trees from the envelope front take centre stage on this Mini Slimline card.
The stamps that were included in the October Paper Pumpkin kit are so pretty!
Finally, I made a Pop Up card using the Circle Charm Pop Up die set. Another one of my favourite and most used dies by KB!
Here is what it looks like from the top - you can see how the snowflake on the card front pivots to the inside as the card is opened.
More foiled card stock inside to continue the sparkle and shine. The foiled snowflake Peel Off stickers added another touch of shine to these cards.
This blog uses affiliate links whenever possible. This means, that at no cost to you, if you make a purchase through one of my affiliate links that I may receive a small commission from your purchase. I only link products that I own, love and use for my card making!
I found a different Silver Mirror card stock since I can't link the Mirri one I used.
Supplies:
October Paper Pumpkin kit "Peaceful Christmas" - Stampin' Up 5 x 6.5" card and envelope - Michaels Grey speckled card stock - stash
Hello - it's Fun Fold Friday here on my blog! Using a couple of the stickers from the April Paper Pumpkin Kit, I made a fun Paper Pumpkin Alternate card with Karen Burniston's Circle Charm Pop Up. I have a YouTube video with all the details:
You will notice I added an additional Pop Up inside the card using one of the rainbow stickers from the kit! I was happy with how this worked out and will be doing it again for sure.
Remember Karen Burniston has assembly videos for her pop up dies! Once you know how to assemble your die, the rest is card size, paper and colour choice as well as embellishments! You can change the look of your card every time you use the dies. :-) I always enjoy showing you different ways you can use your dies once you know how to assemble them.
The list below contains some affiliate links. If you use these links to purchase I may earn a small commission at NO extra cost to you.
Additional Supplies: April Paper Pumpkin Kit, Stampin' Up Card stocks Patterned paper - Over the Rainbow, Recollections Card size - standard A2, 4.25 x 5.5"
Hello! It's time for the April 2021 Designer Challenge and Karen Burniston challenged her Design Team to create a project around the theme of 'YUMMY'. I decided to make a Slimline Gatefold Card using the Circle Charm Pop Up and the Wine Charms ... because Wine is yummy - right? Ha.
The Circle Charm Pop Up is one of my favourite KB die sets, and I haven't used it in awhile. I have a walkthrough of my card on YouTube:
Folded, my card is 8.5 x 3.5" and surprisingly it's not very bulky! While I ran out of time to do a tutorial, I will add my measurements at the end of my post in case you are interested in making a similar card.
The card opens with the right flap first, and is actually held closed with magnets.
When you open the right side, you see the Circle Charm Pop Up and how the image on the front pivots to the inside as the card is opened.
Below is what the card looks like fully open.
I used some patterned paper from my stash - I've had it for several years so it was great to actually USE it. There is enough left for either an A2 or a Mini Slimline card so that will be next on my list so I can finish off that 12 x 12" sheet completely. I also brought in some pink foiled card stock - the shine on this is amazing!
The Happy Day comes from Word Set 12 - Anniversary. Had I made this card 4" high instead of 3.5" high, I could have added Happy Anniversary across the top edge. But I usually prefer the 3.5" width so went with the Happy Day instead.
The wine bottles and glasses were cut from white pearl card stock for a little more shimmer. And I added some gold no hole sequins too.
The hearts come from the Heart Pivot Panel - and I cut them from Kraft and more of the pink mirror card stock. All of the kraft ones were brushed with Wink of Stella because - you guessed it - more shimmer and shine!
Since there wasn't a lot of room to add a signing block, I added a white Crosshatch Long Rectangle to the back, as well as a pair of shimmery Kraft hearts, one grape bunch and a leftover pink foil frame.
To make this Gatefold Card, you will need to cut three panels. The centre panel measures 8.5 x 3.5".
The right side panel is 5 x 3.5", scored at 4-1/4"
The left side panel is 5.75 x 3.5, scored at 3/4".
Fold the side panels on the score lines and adhere the small flaps (both should be 3/4") to the back of the centre panel.
Now you have a Gatefold Slimline Card that you can decorate as desired. These measurements give enough of an overlap that you can add magnets or velcro to hold the card closed. If you would prefer a more traditional Gatefold Card where both sides meet in the middle, make both sides the same size as the right side panel.
Remember Karen Burniston has assembly videos for her pop up dies right on the product page at karenburniston.com as well as here on YouTube. Once you know how to assemble your die, the rest is card size, paper and colour choice as well as embellishments! You can change the look of your card every time you use the dies. :-)
The rest of the Design Team is sharing their projects today and you can find their blogs on the right side of my blog. Karen Burniston will have have her post tomorrow (Wednesday) on her blog.
Supplies: 1046 Circle Charm Pop Up - Karen Burniston 1137 Word Set 12 Anniversary- Karen Burniston 1078 Wine Charms- Karen Burniston 1088 Heart Pivot Panel (hearts)- Karen Burniston 1151 Cross Hatch Long Rectangls- Karen Burniston Patterned paper - Blue Fern Studios (old, from my stash) Pink foil card stock - Stampin' Up Magnets - Basic Grey Copic markers White pearl card stock Water Brush Card stocks - stash Wink of Stella pen Gold Fever Confetti - Studio Katia Card size: 8.5 x 3.5", fits in a #10 Business Envelope
Here I am with my last post and video for 2020! What a year this has been - I sure hope our world turns right side up sooner rather than later in 2021.
I wish all of you a very happy and HEALTHY New Year!
My December Paper Pumpkin kit was delayed - as was pretty much everything that had to be shipped over the holidays - but it did arrive and I managed to get my YouTube video filmed and edited in time to share it in December. Ha - talk about cutting it close, right? I made a total of Thirteen cards, eight of them are for Happy Mail and will be mailed in the New Year. The remaining cards were made into Birthday Cards. I didn't NEED to make any more Birthday Cards, but the cupcake and present embellishments leaned that way and who am I to argue?
I have a walk through of all my cards on YouTube HERE.
Since I loved the bear printed embellishment the best, I made a Z-Fold card first. It turned out cute, so after I played with the Koalas and Red Panda images ... I made an additional two Bear & Bouquet Z Fold Cards. That used up all three of the floral bouquets in the kit!
All of the critters got a little Wink of Stella shimmer on their cheeks and I went over all the noses with a black glaze pen for shine.
I made the Hello Koala card first, but it was pretty heavy with all the layers. So the second Hi Koala card was made simpler and will mail for a single stamp. (I have more details in the video)
I was struggling a bit with the colours in this kit. While I loved everything individually, adding them together made me scratch my head. The Soft Seafoam green is very 'meh' and the striped decorator pieces they added had only the burgundy and soft green colours. No coral and certainly no cinnamon like the Red Panda is coloured with. I made this Z Fold card but decided not to use the kit colours for the remaining Pandas. Instead I added them on mostly white cards and was much happier with how they looked.
I had an idea for a different box pop up than the ones I have been making, and decided to try it out with the Koala's. I cut them apart so I could use one on the card front and one on the inside, and the card turned out so cute I made a second one!
I ran out of time though, and don't have a tutorial for making these yet. I will do one in the New Year for sure, maybe even for the January Paper Pumpkin kit.
Yep - just simple cards, with with all the gold and the pop up elements - these cards make me happy and I hope will bring a smile to who I send them to. I do love pop up cards!
I added two of the present images to the outstretched arms of two Red Panda's, cut apart one of the coral card fronts and added everything together on an embossed card front for these Birthday Cards.
It's hard to see in the photo, but the eyes and noses are shiny, and the hearts, bow and Red Panda Tummy have shimmer because of a Wink of Stella pen.
I added a large sentiment to a die cut rectangle and added one inside both cards.
Of course I wanted to do at least one 'fancy' pop up, so pulled out the Circle Charm Pop Up die set by Karen Burniston. It's been a long time favourite of mine and works perfectly with an A2 sized card. While I don't make a lot of A2 sized cards anymore, I love the quality envelopes that come with a Paper Pumpkin kit so am happy to make A2 cards and use the printed envelopes.
The card front features a textured gold frame and a popped up cupcake. Both the cupcake and the scalloped circle have gold foiled bits as does the card front, and like the other card fronts I painted Wink of Stella inside several of the open leaves.
Below is a birds eye view of the Circle Charm Pop Up ...
Notice how the cupcake part pivots to the inside as the card opens? Love that! If you are curious how the Circle Charm goes together, check it out at karenburniston.com where Karen has an amazing assembly video.
This next card is also a Pop Up, and I added a single cupcake to one of the gold foiled labels from the kit. A punched heart on either side and some Wink of Stella for shimmer completed the card front.
Inside, I used the same idea for a Box Pop Up as I did for the Koala cards above - this is a different size and different orientation. I want to play with this idea a bit more for sure, then will do a tutorial for you.
Since this one is a Pop Up, I am adding it to my own Birthday Card stash.
Finally, a simple Birthday card that will also be donated to my Mom's old nursing home along with the two Red Panda Birthday Cards.
I didn't take a photo of the inside, but it used the same Happiest of Birthdays stamp as on the Red Panda Birthday cards above.
Whew, right? Lots of cards made but I really REALLY enjoy creating with the Paper Pumpkin kits. I pretty much only used the leaves and sentiments from the included stamp set, but will stamp out a bunch of the cute bears, Scan 'n Cut them and send them along with some punched hearts for the Grandkids to make Valentine's with. The bear is SOOOO cute and I'm really enjoying seeing what others have been making with that stamp.
Thank you for all of your views and comments this year.
I'd like to wish you all a very Happy New Year and all the best for 2021.
***Happy New Year!***
Supplies: December 2020 Paper Pumpkin kit - Stampin' Up Sakura Black Glaze pen and Gold Gel Pens Wink of Stella Gold foil card stock - Recollections White card stock Scallop Stitched Nesting Circle dies - Tutti Designs Leaf Embossing Folder - Paper Studio Hello and Hi dies - MFT Stamps Stitched Scalloped Die - Your Next Stamp Thinking of You stamp - In the Pines, Stampin' Up Tasteful Label Dies - Stampin' Up Banners Pick a Punch - Stampin' Up Heart Punch - Stampin' Up Dashing Rectangles - Elizabeth Craft Designs Happiest of Birthday's - Stampin' Up Mini MISTI - My Sweet Petunia 1046 Circle Charm Pop Up - Karen Burniston Awesome Birthday - Birthday Greetings, Studio Katia Large Birthday stamp set - Technique Tuesday Water Brush Gold Shimmer Spray Card size - all, standard A2 (4.25 x 5.5")