Showing posts with label Queen & Co. Show all posts

Wednesday, 5 March 2025

Bright Birthday Themed Sheetload of Cards


Things were busy in the later part of 2024 so I didn't get a chance to play with the October Sheetload of cards. But I knew I wanted to try it and after making up these cards I can't wait to play with it again. It's another one designed for 6x6" patterned papers and I've had this pad for a couple of years. 

I'm doing great at building up my Nursing Home donation card stash! Since I donate 25 birthday cards each month, when my stash is depleted I need to get working. That's why I'm sharing so many batch made birthday cards lately.


Here is a peek at the inside ... all of them are done the same. I used leftover bits and pieces in the paper package for the fishtail banners on the interiors so they coordinate but they don't necessarily match the papers on the card fronts.

Supplies used:
Patterned paper - Sweet Shop, Queen & Co (6x6")
Large Birthday - Technique Tuesday
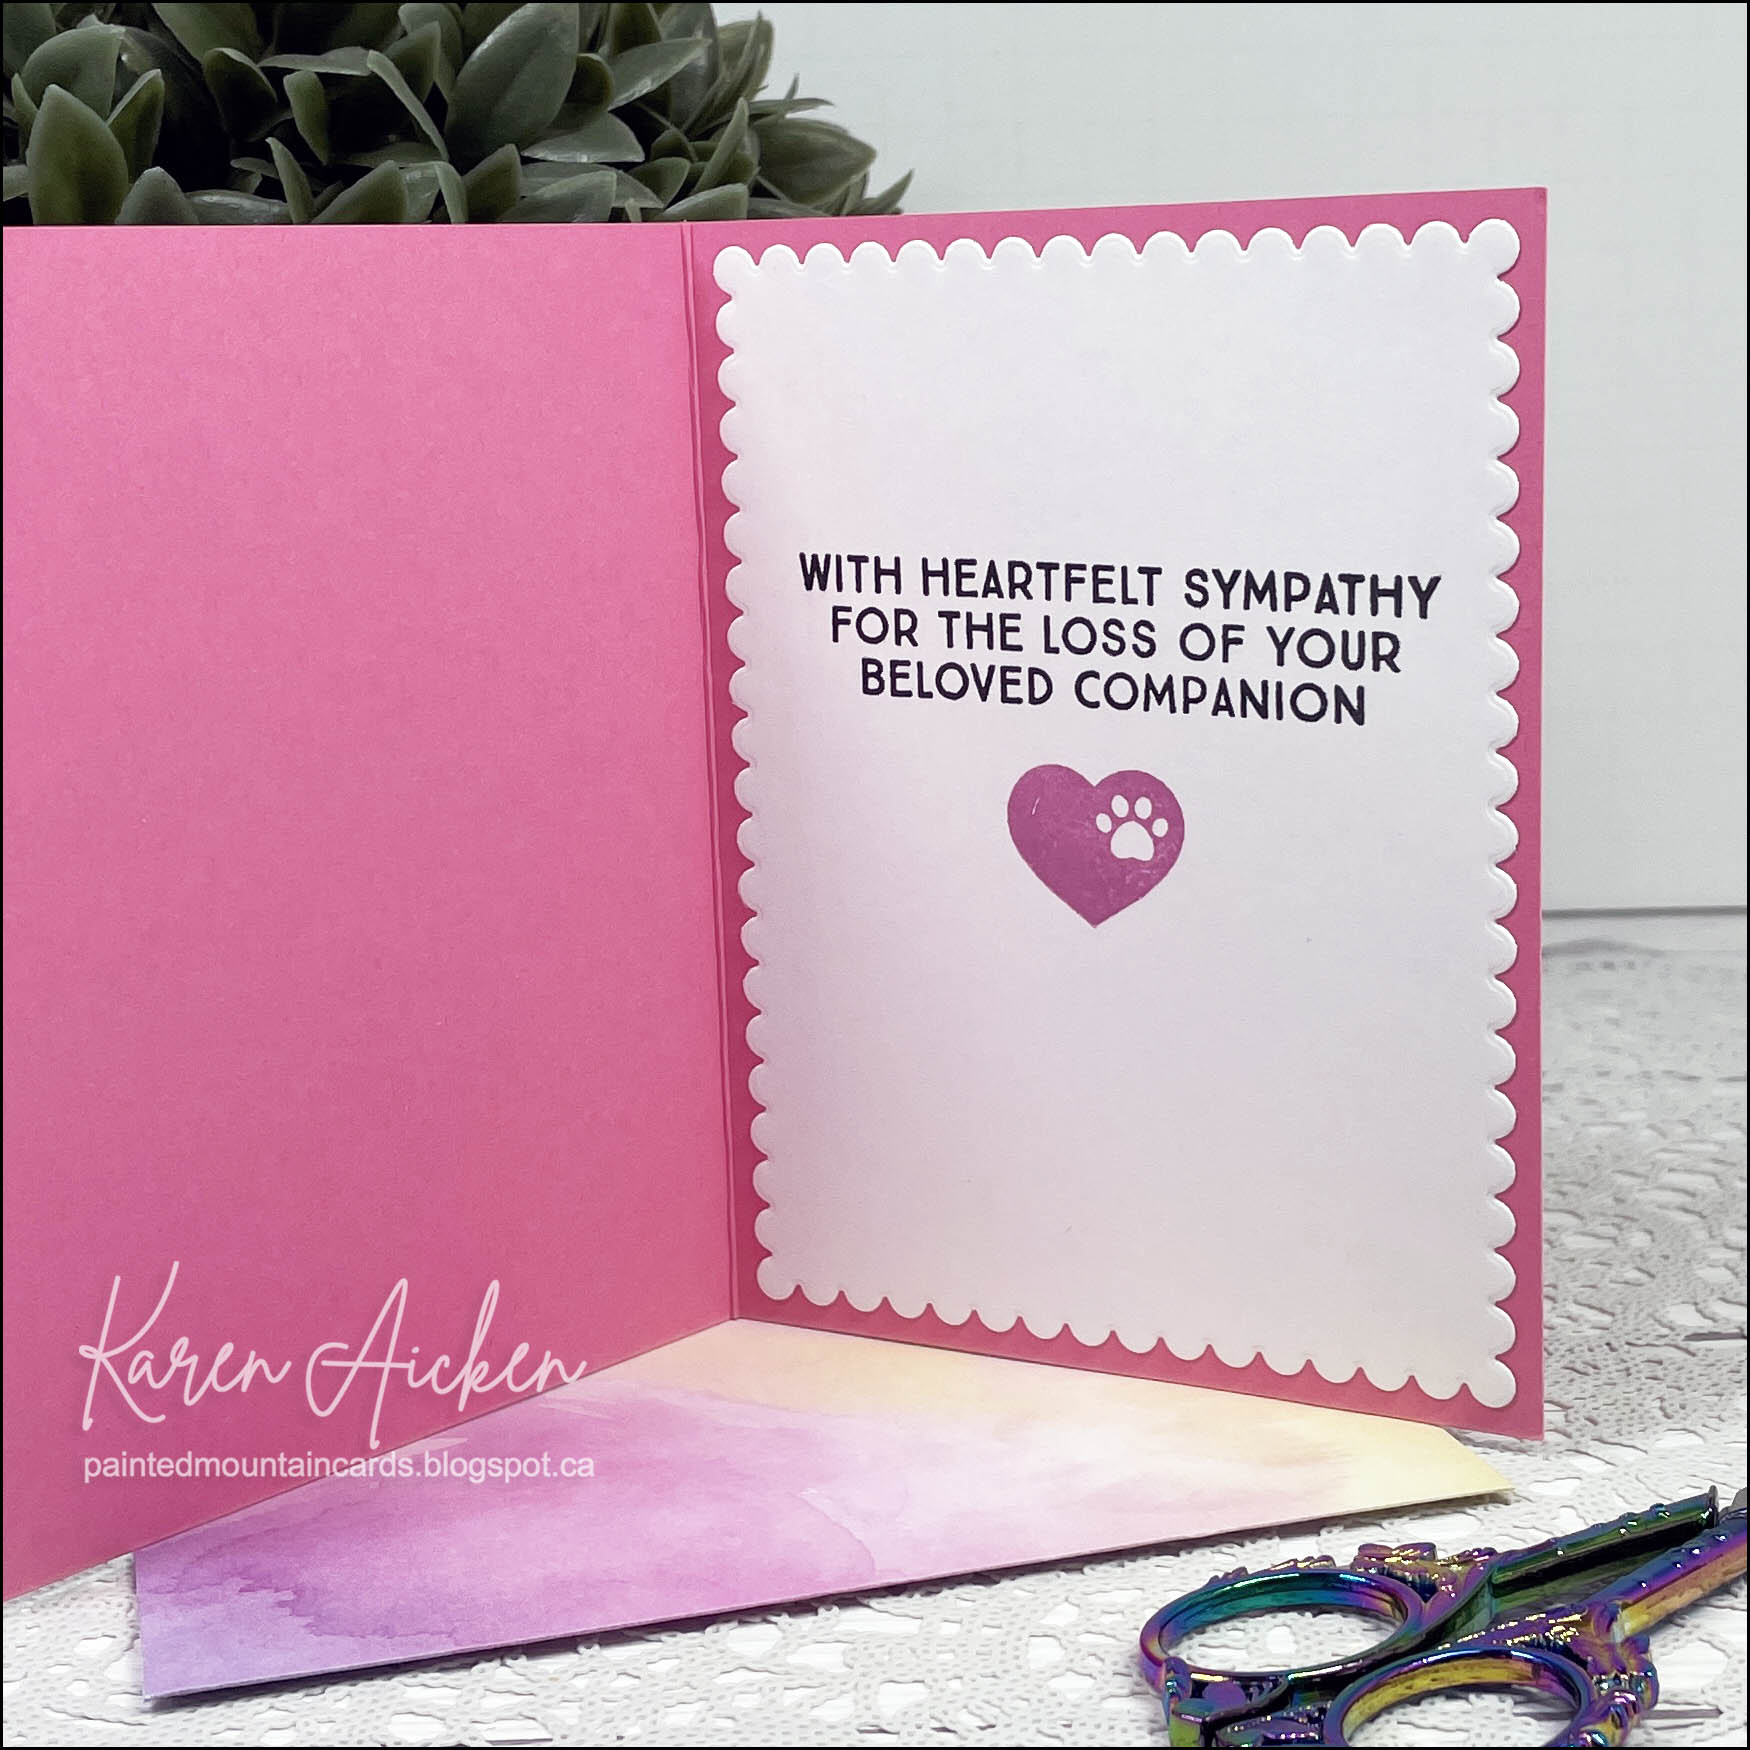
Inside - LJD Birthday Greetings (MFT Stamps)
October 2024 Sheetload of Cards - Call Me Crafty Al
NOTE - I am no longer linking the Sheetloads, as some of them have been archived for her channel subscribers and I don't want to send you on a wild goose chase. 😊

Friday, 21 June 2024

Ice Cream Z-Fold Card Trio


Welcome to Fun Fold Friday here on my blog! I had found these older ice cream ephemera pieces in a ziplock bag in my craft room so decided to pull them out and use them on my ice cream cards this year. I haven't made a Z-Fold card in awhile so that is what I did as well - they are my very favourite fun fold card to make.


When my Mom was a little girl, there was always a July parade in their town. Afterwards her dad, my Grampa, would take her to the drugstore for an ice cream soda. She continued the tradition with my brother and I, taking us for ice cream on that special day in July.  I did that with our kids too - bringing my Mom along. We always made sure she had ice cream on that day. 

Now that she has passed, we continue the tradition - raising an ice cream cone or sundae to her in a toast,  and our grandkids think it's a great tradition! I also send my family ice cream themed cards to celebrate. 


I love the Lacy Layer dies from Waffle Flower and have managed to collect most of the shapes. There are alternating scalloped & stitched/straight edge dies in each set, which is what I used for these cards.


I added Pops of Colour (glitter glaze) on each of the ice cream pieces for some shimmer and shine, and added the elements using thin foam tape. The Celebrate was stamped in grey ink onto narrow cardstock scraps then I fishtailed the ends.


Here is a look at the inside of the above card, but they were all done the same.


Supplies used:
Patterned paper - Heart Throb, Queen & Co (6x6")
Petite Prints - Doodlebug (Love Notes)
Lacy Circles - Waffle Flower
Pops of Color, Icicle - Scrapbook .com
Ice cream ephemera - unknown, from my stash
Happy stamp - Biggest Wish, Stampin' Up
Coloured pens & markers
Share a Milkshake - Stampin' Up
Catherine Pooler coloured inks


Friday, 22 March 2024

Accordion Card with Candles


Welcome to Fun Fold Friday here on my blog!

I was intrigued when Karen Burniston released two add on sets for the Fancy Label Accordion ... this Candle Add-On and a Heart Add-On. I haven't had a chance to play with the heart one yet, but shared a card earlier using the Candle Add-On inside a normal card. 


While It would work better with a three or four page Fancy Label Accordion, I chose to try it with two pages and I am happy with the inside of the card which you can see below. This was a card for a friend, and I signed my name on the white strip on the lower right side. 


The candle flames were die cut from Rainbow Holographic card stock for some shine. My friend had made several of these cards using the (very) old Sizzix Steel Ruled die so know she will enjoy this one.


One more look ...


This card was very much a trial and error since I don't plan my cards out ahead of time. Once I had the inside done I wasn't crazy about what the front and back pages looked like. That wouldn't happen if I'd added more pages, but I made it work well enough that I was happy with the card. Below is the back of the card, and I could have left off the candles and added a light coloured label to write on if I didn't want to write on that narrow strip inside.


Supplies used:
Fancy Label Accordion - Karen Burniston
Birthday Candle Add-Ons - Karen Burniston
Daisy's - Twist Flower Pop Up, Karen Burniston
Rainbow Holographic cardstock - Reco0llections
Patterned paper - 6x6" Wish Big, Queen & Company
Stamp inside - Make a Wish, MFT Stamps
Small Happy Birthday - LJD Birthday Greetings, MFT Stamps 

Thursday, 14 March 2024

Birthday Card for Diego


Last week we went to a friends house to celebrate their dog's NINETEENTH birthday! Of course I had to bring Diego a card for his birthday 😊.

Once again I used one of those rainbow dog note cards, trimmed to fit on the front of an A2 sized card that was matted with patterned paper. I used the same paper and an alphabet die set (Karen Burniston) to spell out his name. After laying out out all the pieces, I decided to add a strip of confetti printed patterned paper behind the rainbow dog one and add layered hearts.

Below is a peek at the inside:


Supplies used:
Rainbow dog note card - Amazon .com
Patterned paper - Wish Big, Queen & Company
Alpha dies - Karen Burniston
Heart dies - Heart Add Ons, Karen Burniston
White gel pen
Pawsome Birthday Sentiments - Waffle Flower
Rainbow Holographic cardstock - Recollections
Catherine Pooler coloured inks

Wednesday, 18 October 2023

Spider Web Shaker Card


When I was looking through my Halloween stamps/dies I came across this spider web die from Queen & Company. Since I had the jewelled spider stickers on my stamping table from an earlier search through the embellishment bin I had an AH-HAH moment. Ha.

But when I pulled out the spider web die, I realized it had actually been a card kit from Q&Co and there was the foam frame and transparency in there - enough for two cards! The kit had originally included enough for three cards and obviously I had made one up the year I bought it. Now I have one left that I can make next year. 😊


The spider shows up in real life because of the sparkle, but I still like how subtle it is in the photos ... extra creepy (NOT a spider fan). After cutting the web from black cardstock, I added some shimmer with Wink of Stella. 


Inside I added an ink blended panel under a white one, which was decorated with a couple of punch outs from an older Doodlebug patterned paper package. I hand wrote the 'happy' with a black pen and my card was done.


NOTE:  While the card easily fits into the envelope and isn't all that heavy - it IS bulky from the foam tape and gems. I was hand delivering it though, so all good.


Having been asked how many cards I make I thought it would be fun to keep track this year. Many of my posts include more than a single card or project and below is my tally. 

Card Tally for 2023
January - 53 cards
February - 56 cards
March - 55 cards
April - 32 cards
May - 43 cards
June - 34 cards
July - 56 cards
August - 106 cards
September - 61 cards
October so far - 33 cards

I decided to cancel the subscription that provided linked thumbnails to what products I used on my cards. It was costing me out of pocket each month, so I’m back to listing what I used.

Supplies:
Black 5 x 6.5" card base & envelope (stash)
Spider Web die etc - kit from Q & CO (old)
Jewelled spider - Recollections (old)
Black Sharpie
Various sequins & confetti - stash
Wink of Stella
Patterned paper - Doodlebug
Ephemera punch outs - Doodlebug
Catherine Pooler Inks
Blending Brushes - Taylored Expressions
Glitter Dots - Ecstasy Crafts
Mini Strips Halloween (stamp and die) - Taylored Expressions

Monday, 31 July 2023

Magic Iris Pet Sympathy Card


Unfortunately I have had to make & send a couple of pet sympathy cards this month 😢 I find these especially hard to make, as it brings back the heartbreak of losing my sweet Cooper boy last April. I will never forget watching Jasper actively searching all over for his brother - for the whole two weeks we were still in Arizona, and then coming back home to Canada with only one dog. And watching Jasper search for him here too. Heartbreaking. I completely understand what my friends and family are going through and wanted them to know I'm thinking of them.


This card is also the 7th edition to my monthly series "Magic Iris" cards - I'm getting faster at making these with practice. When you pull the lever down the shutters open to reveal a sentiment.


Inside I added a scalloped rectangle with a stamped sentiment and a stamped paw print heart.


Having been asked how many cards I make I thought it would be fun to keep track this year. Many of my posts include more than a single card or project and below is my tally. 

Card Tally for 2023
January - 53 cards
February - 56 cards
March - 55 cards
April - 32 cards
May - 43 cards
June - 34 cards
July - 56 cards

You may have noticed the affiliate thumbnails are no longer showing on my blog posts. That is because it costs money every month to share those links, and the past few months I havent made nearly enough sales to cover the cost. I would rather spend that money on craft supplies, than continue to pay out of pocket for a feature that viewers arent using.  I cancelled my subscription and will go back to listing my supplies in case anyone is curious about what I used.

Supplies:
Patterned paper - Picture Perfect, Queen & Co
Dog Sympathy stamps - Scrapbook.com
Catherine Pooler Inks
Scallop rectangle dies - Pink & Main
Critter Condolences stamps- MFT Stamps
Pawprints dies - MFT Stamps
Wink of Stella
Tiny Heart Shape Sprinkles - Doodlebug
Various cardstocks from my stash

Monday, 6 June 2022

Five End of School Cards and one Teacher Thank You


Hello my crafty friends. I was inspired by my fellow Sheetload Collaborator Yvette when she used the May Sheetload to create Teacher Thank You Cards. Since I loved the May Sheetload, and it was on my list to make our grandkids end of the year cards - I used her inspiration to create these 6 cards. 5 are A2 sized cards with a gift card pocket inside where I can tuck a little cash for them, and the 6th is a larger card that I will give to our middle daughter for one of the kids teachers. 

I apologize for the photos - I didn't realize how BUSY and chaotic they looked until I was writing the post!


I pulled out this School Days shaker kit from Queen & Company for the fun shaker elements. They are adorable and were lots of fun to make. I checked to see if it was available so I could link it for you, but it is not. In fact, so many of the products I used are from my stash there isn't much I CAN link for you with these ones!


Here is a peek at the inside - all 5 of the A2 cards are the same inside. I wrote them each a note and signed our names on the white panel. And tucked some $$ inside that pocket for them to get a summer treat.


Finally, here's the front of the teacher Thank You card....


... and the inside ...


You can find out how to download your own Sheetload of Cards (sketch and cutting guide) HERE.

This blog uses affiliate links whenever possible. This means, that at no cost to you, if you make a purchase through one of my affiliate links that I may receive a small commission from your purchase. I only link products that I own, love and use for my card making!

Any supplies I'm unable to link are listed at the very bottom of my post.


Additional Supplies:
May 2022 Sheetload - Call Me Crafty Al
Shaped Shaker Kit - School Days, Queen & Co
Fussy Apple Sticker - stash
Alcohol markers
Black fine point marker
Various shaker filler - my stash
Cardstock scraps - my stash
Star - All the Trimmings, Stampin' Up (retired)
School Days paper - Miss Kates Cutables
5 x 6.5" card & envelope - Michaels
Too Cool - Pink & Main (retired)
Sweet Sentiments - Teacher, Sugar Pea Designs (retired)
White card stock - Accent Opaque Digital Super Smooth (Amazon .ca)

Monday, 31 January 2022

Shark Valentine Card Duo


Hello my crafty friends!  These are the Valentine cards I sent off for two of our grandson's. Ilai LOVES sharks, has a whole wall in his bedroom devoted to them. Zachary also likes them and I think the boys will appreciate these grinning shark faces.

There were a LOT of delays in me getting this shark die set (linked below) in my hot little hands ... all related to COVID shipping/travel delays etc. A friend hung onto it for me for well over a year, so as soon as I was able to play with it I did - and these are the first cards I've made with the dies. 😊

The cards are 4-1/4" square, so they fit in a standard A2 envelope. I used scraps from my stash for the sharks themselves, which is always fun, and the patterned paper is from Queen & Company. I liked that there are blue hearts in the paper.


Here is a peek at the inside - both cards are the same inside since they are going to different houses. In different towns, even! The sentiments are from Lawn Fawn and Waffle Flower.


This blog uses affiliate links whenever possible. This means, that at no cost to you, if you make a purchase through one of my affiliate links that I may receive a small commission from your purchase. I only link products that I own, love and use for my card making!

Any supplies I'm unable to link are listed at the very bottom of my post.

Additional Supplies:
Scraps of coloured card stock - stash
White card stock - Accent Opaque Digital Super Smooth (Amazon .ca)
Patterned paper (6 x 6" pad) - Heart Throb, Queen & Company 

Thursday, 13 January 2022

Rainbow Bridge Mini Slimline Card


Today I'm sharing the card I made for friends who's furry kid crossed the Rainbow Bridge 😢. 


I adhered the rainbow packing tape to white card stock, then die cut it with the bone shaped backing die. The packing tape is thin, and requires patience to apply as well as an acceptance of the inevitable wrinkles or stretching. You also have to run it through your machine several times as it doesn't die cut easily. But it's the look I wanted, so I persevered. 

Because I like black with rainbow colours, I created a Mini Slimline card base from black card stock, then cut another layer with a Divinity Designs scalloped rectangle for a tone on tone look. It's hard to see in the photos.  


Inside I added a layered bone shape to add a stamped sentiment and sign our name. I also die cut a small heart from a leftover piece of the rainbow tape cardstock on the card front. The rainbow heart resin hearts are by Doodlebug,

 This blog uses affiliate links whenever possible. This means, that at no cost to you, if you make a purchase through one of my affiliate links that I may receive a small commission from your purchase. I only link products that I own, love and use for my card making!

Any supplies I'm unable to link are listed at the very bottom of my post.


Additional Supplies:
Shaped Card Kit - Bone, Queen & Company
Rainbow packing tape - Amazon .ca
White card stock - Accent Opaque Digital Super Smooth (Amazon .ca)
Dog die - Sweet Pet Collection - Amy Designs (many years old)

Monday, 3 January 2022

Dog Bone Valentine Shaker


Hello my crafty friends!  Back in 2020 this Shaped Shaker Card Kit was on sale at Queen & Co - but shipping to Canada makes purchasing from them prohibitive. However, I really REALLY wanted it. A friend in Arizona said I could have it sent to her, so I did and thought I'd just pick it up in a few months when this 'Covid situation' resolved itself. Ha - little did I know she would have to hang onto it for over a year! I was able to get it in my hot little hands though, and this is the first card I made with it. 😊❤️


Back then, I wasn't even thinking about Mini Slimline sized cards - but that is just what this one is and I have envelopes that fit it perfectly. The patterned paper is several years old and doesn't have a cover sheet - just a few loose 6 x 6" sheets in with my other Valentine pads so I'm unable to link them for you. The stamp came in the kit.

I used some cute filler from Kat Scrappiness and also a few clay hearts from my stash. Those little clay dog bones are SO cute!


Since it was a card kit - it came with a couple of shaped folded card bases and I thought I would use one for this first card. I have lots of ideas for the dies that were included in the kit, so you will be seeing more dog bone cards from me in the coming weeks! Inside, I added the fallaway patterned paper from the frame on the front and stamped a Waffle Flower sentiment. Then I added a mirrored heart for additional sparkle. Those are another supply item you will be seeing a LOT of - I am head over heels in love with them.

This blog uses affiliate links whenever possible. This means, that at no cost to you, if you make a purchase through one of my affiliate links that I may receive a small commission from your purchase. I only link products that I own, love and use for my card making!

Any supplies I'm unable to link are listed at the very bottom of my post.


Additional Supplies:
Shaped Card Kit - Bone, Queen & Co
Patterned paper - unknown (loose sheets in my stash)
Resin/clay hearts - Recollections (have had them for several years)

Tuesday, 24 August 2021

Butterfly Shaker Pop Up Card


Hello! Today I'm sharing the Birthday Card I made for our daughter-in-law. Since we were hand delivering her card & gift, I didn't need to worry about how bulky the card was so pulled out my last Butterfly Shaker from Queen & Company. 

I have a walkthrough with all the details on YouTube:

Below is a closer look at the stencilled sky and shaker filler. I forgot to mention in the video, that the Happy Birthday is from Your Next Stamp's Oh Shiitake stamp set. 


Inside I used Karen Burniston's Katherine Label Pop Up, patterned paper and layered butterfly dies. 


This blog uses affiliate links whenever possible. This means, that at no cost to you, if you make a purchase through one of my affiliate links that I receive a small commission from your purchase. I only link products that I own, love and use for my card making!

Additional Supplies:
Butterfly Shaker Card supplies - Queen & Company
Card and envelope - Michaels
Patterned paper - Gilded Ink, Recollections
Black card stock
Shimmer spray
Water Color Wings dies - Stampin' Up (retired)

Thanks for stopping by

Saturday, 3 April 2021

Mini Slimline Bookmark Cards


Hello! Today I'm sharing five Mini Slimline Cards that I'll be mailing out to our Grandkids for Happy Mail. These aren't just cards though, each one holds a bookmark on the front!

This Slimline die set by MFT peaked my interest. It was called a Slimline Slide In which I thought was interesting so I ordered it. I have no idea if I used it correctly on these cards, and it matters not - I'm really happy with it and you can see that it works perfectly for Mini Slimlines too! Win Win.

Below you can see how the die cuts slits on either side of the circle - perfect for tucking in these chipboard bookmarks. I picked these up a couple of years ago when visiting Arizona, probably from Amazon down there.. The package came with quite a few, and I enjoy using them on my cards as embellishments rather than bookmarks.


Not all of the bookmarks have a 'handle' like the unicorn ones above' but the slit is wide enough for these ones too!


The die set came with the circle die, which is what I wrote our Grandson's names on ... as well as the heart die that I added to each of our Granddaughters cards.


These cards are blank inside so I can write each of them a little love note.


Supplies:
Patterned paper - Garden Party, Pebbles
'Slimline Slide In' die set - MFT Stamps
Wink of Stella
Chipboard Bookmarks - stash (old, possibly from Amazon in the US)
Stickles
Teal patterned paper - Sweet Celebration, MFT Stamps
Blue patterned paper - Petite Patterns, Queen & Company
Rainbow packing tape
Flourish - Be Full, Neat & Tangled
Markers
Water brush
Card size - 3.5 x 6", fits in a #8 envelope

Thanks for stopping by today