Showing posts with label Simon Says Stamps. Show all posts

Wednesday, 29 May 2024

School Themed Sheetload of Cards

I have a note in my planner to make the grandkids their 'Back To School' cards in May. While the end of August sounds like it's a long way off, past experience reminds me how busy things get in the summer and I don't want to be scrambling mid August trying to get those five cards made and mailed/delivered. I decided to pull out the May 2024 Sheetload of cards and some school themed papers and this is what I came up with! I do have a YouTube video as well, which you can find here:  

As I said in the video, once I got the card fronts all done and was deciding how to decorate them I chose to only make two of them into Back To School cards. I didn't want the grandkids to all get such similar cards, so the rest of them are Teacher (and teachers aid) appreciation cards.


I adhered apple stickers to white card stock & fussy cut them out so I could pop them up with foam tape. Since so many come in a package, I added one to each card front and the inside, and will probably add one to the envelopes as well. I liked the look of the stacked washi tape with the apple stickers so each card got the same thing. The kids cards are blank and the others all have a sentiment stamped inside.


Wanting them to be a little different from each other, I decorated the eight cards with four different stamps/dies/placement.


Supplies used:
Patterned paper - School Days, Miss Kate Cutables
Yay die - the Stamps of Life
Thank you die w/ shadow - Simply Thank You, Simon Says Says
Catherine Pooler coloured inks
Label punch - Stampin' Up
Thanks stamp - Biggest Wish, Stampin' Up
Teacher Sentiments - Penny Black
Brother Label Maker
Simply Sentimental Teacher - Trinity Stamps
Apple Stickers - Amazon .ca
Washi tape - Doodlebug


Friday, 17 May 2024

Birthday Wishes Pop Up Card Duo


Welcome to Fun Fold Friday here on my blog!

I wanted to use this paper pad, and since there are two sheets of each design I made two cards. While I didn't plan on making two identical cards, I know they will be going to different people so I just went with it.  This is another one of those paper pads that has some large prints that are hard to make work with A2 sized cards. These two are 5x7" and they turned out really well. I added a die cut Birthday Wishes (and the shadow) with foam tape then a few Glitter Dot stickers for some shine.


Inside I used the Paper Frames Pop Up and decorated with some fussy cut plants from a retired Stampin' Up paper package. 


Since those plants were fussy cut and in my embellishment binder, these cards didn't take very long to create which is always a bonus.


Supplies used:
Patterned paper - Farmhouse, Craftsmart (I think I got it at Michaels a few years ago)
5x7 Nesting dies - Waffle Flower
Birthday Wishes die - Simon Says Stamp
Paper Frames Pop Up - Karen Burniston
Plants - fussy cut from Stampin' Up papers (old)
Sentiment - Little Something Sentiments, Catherine Pooler
Glitter Dot stickers - Ecstasy Crafts
5x7 Card blank and envelopes


Friday, 26 April 2024

'Celebration Mouse' Pop-Up Birthday Card

 
Welcome to Fun Fold Friday here on my blog!

I know I haven't posted much this week - it's been so busy and honestly, I'm only willing to spend so much time on the computer and then I'm done. So my blog posts had to be put on the wayside for a couple of days. I also haven't been in my craft room and unable to make anything new. 😩  Doesn't look like I'll get in there this weekend either, as we will be busy with family both Saturday and Sunday. 


Today's card is one I had envisioned when I bought the Mouse Edger die. I can't remember if it was just last year or if it was the year before - R&R Scrapbooking had a great sale on Crafters Companion dies and I picked up a number of these cute edgers. It's perfect for birthday cards and I figured I'd be able to use it for some nursing home donations cards as well. The mouse was cut from a 4.5 x 6" piece of Rainbow Holographic card stock and I wrapped narrow gold foil tape around the left edge before adhering it to a 4.75 x 5.75" sheet of patterned paper. NOTE:  I outlined the right side of the die cut with a grey alcohol marker for some definition, and lightly ink blended some orange ink around the mouse to give it more contrast from the patterned paper. The dye ink just wiped away from the holographic card stock so this was easy to do.

The Happy Birthday was cut from a different paper pad, matted with white card stock and added with thin foam tape.


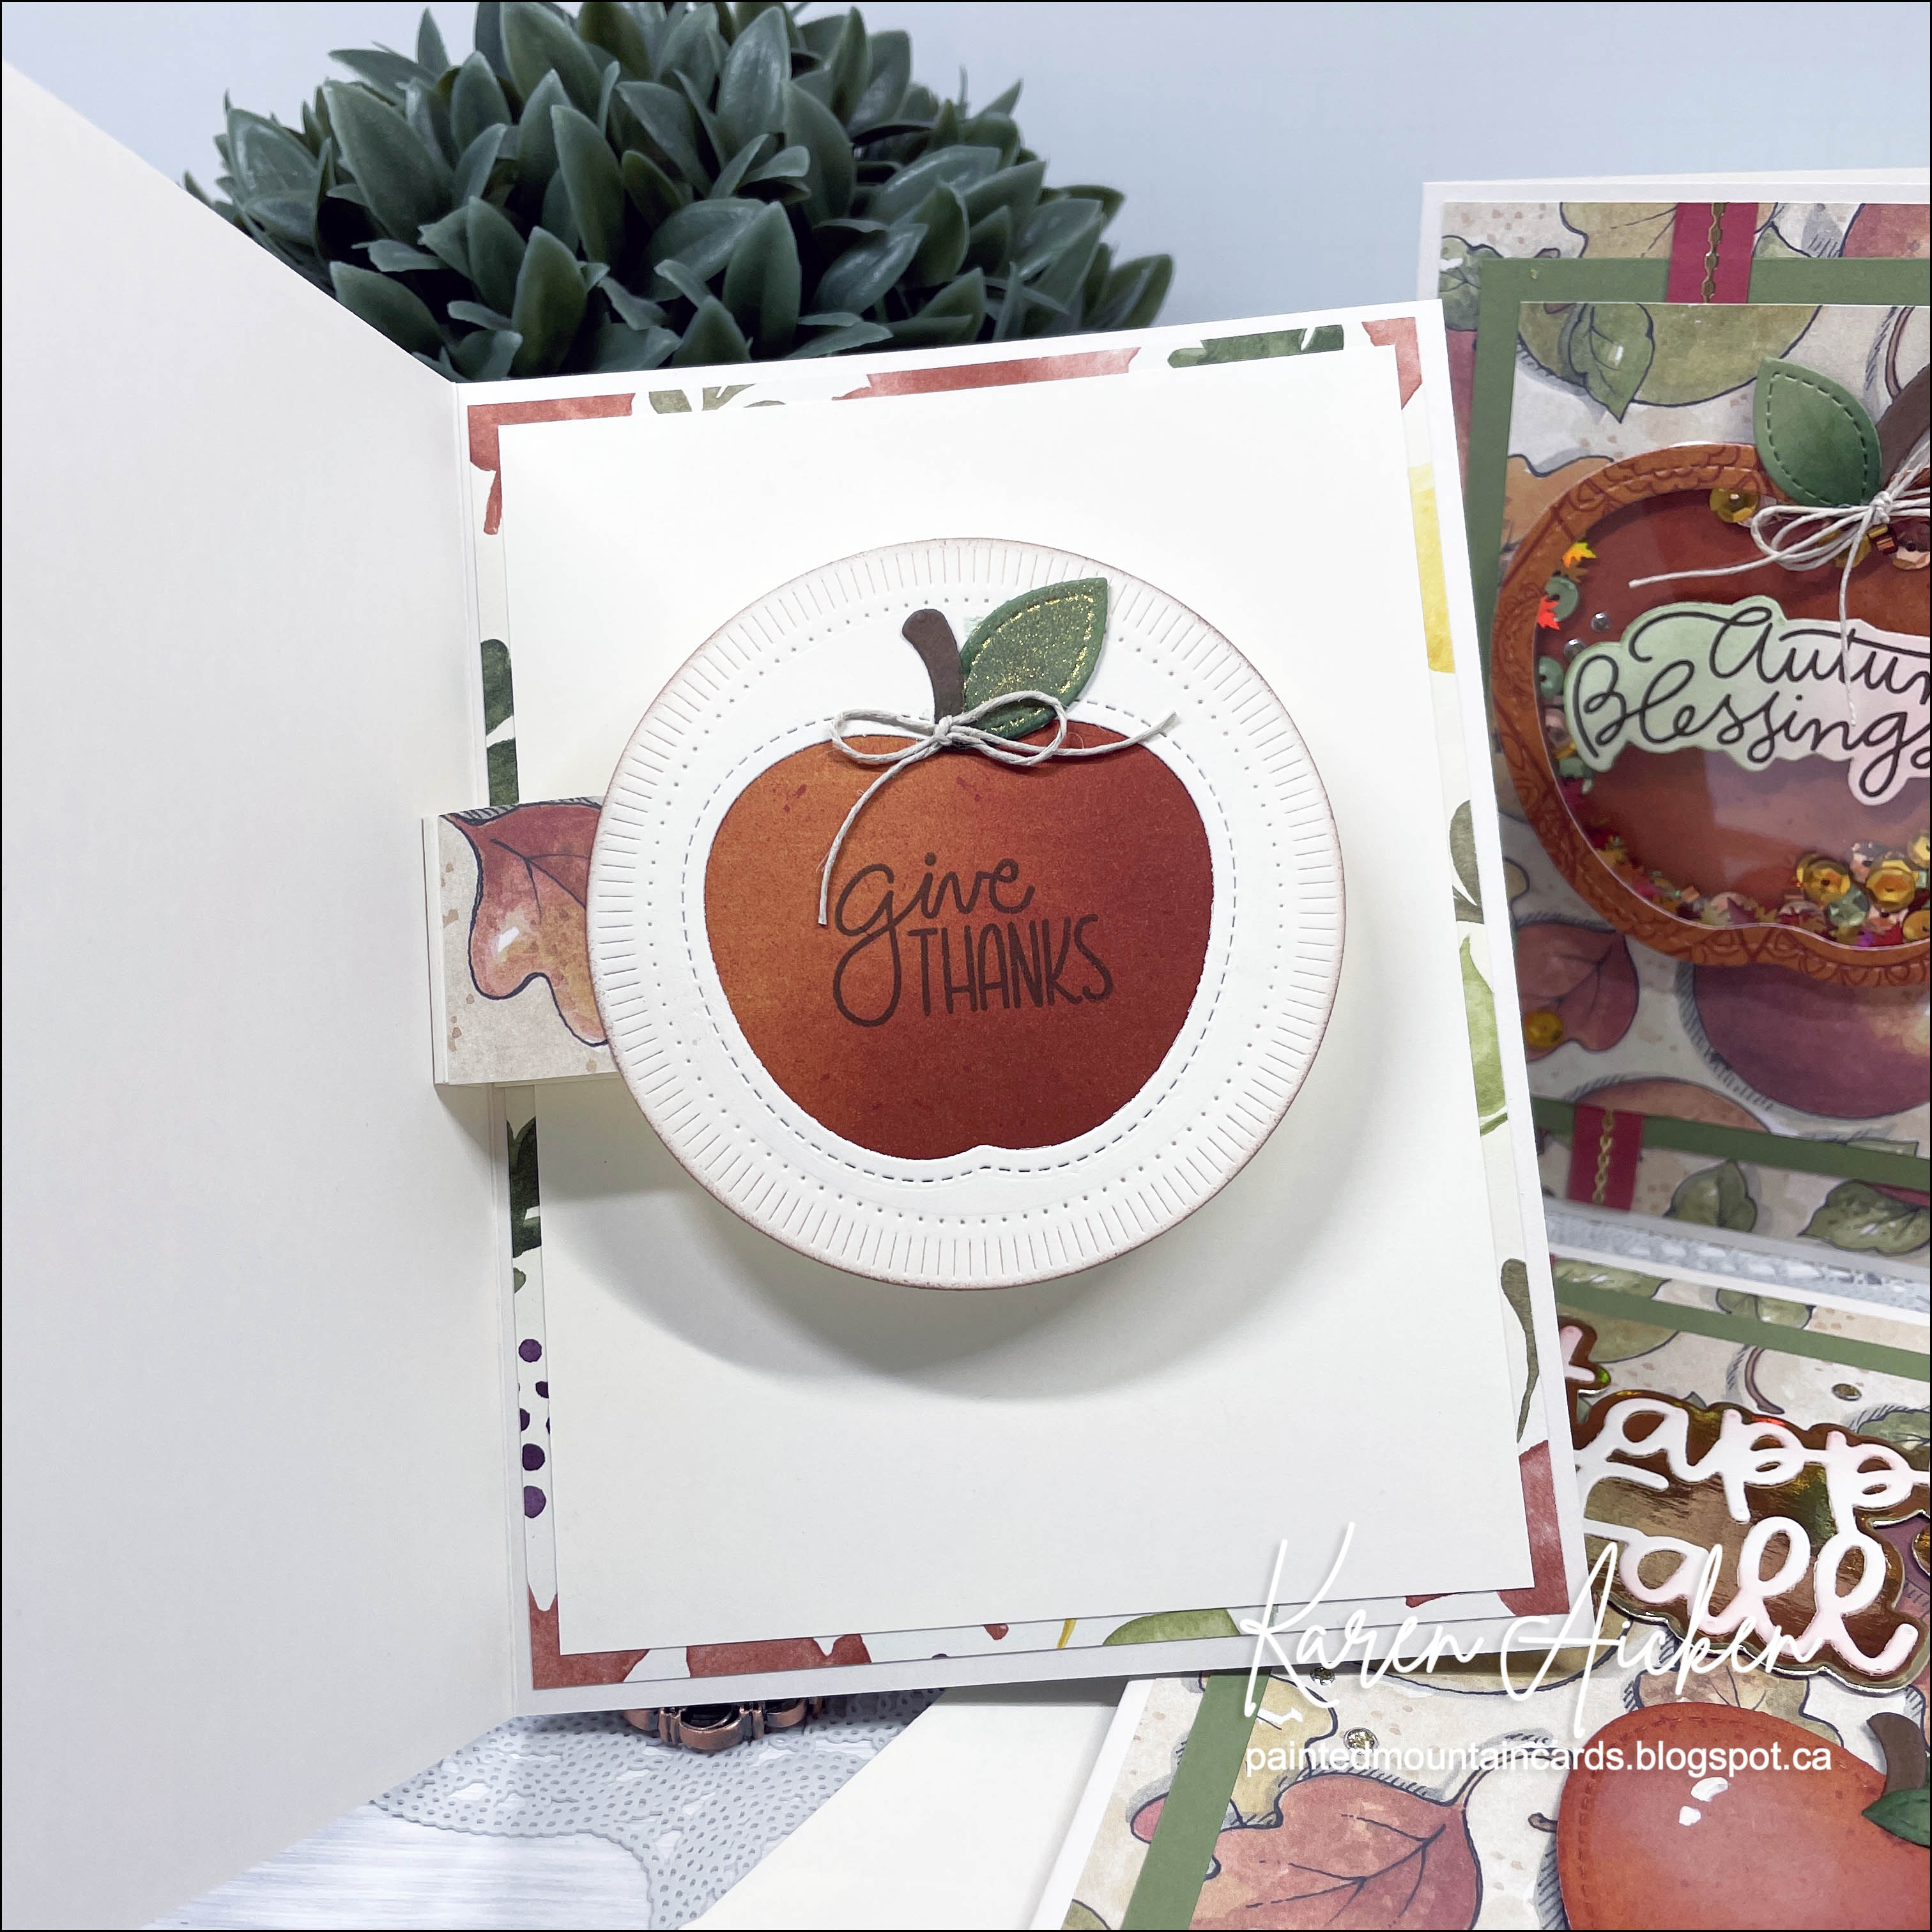
Once again, inside I used Karen Burniston's Twist Flower Pop Up - I just love how versatile this pop-up is! This time I added a gold foil scalloped circle along with a white circle and the Birthday Wishes sentiment. Cutting two 4" square sof the orange marbled paper then cutting them on the diagonal gave me some colour inside the card and I stamped a sentiment on the right side. Some gold glitter dot stickers for additional sparkle and I was finished the card.


Here is a closer look at the pop-up ...


Supplies used:
Party Mouse Edges - Creative Expressions
Twist Flower Pop Up - Karen Burniston
Rainbow Holographic card stock - Recollections
Gold foil card stock - Recollections
Patterned paper - Gilded Ink, Recollections
Gold glitter dots
Grey alcohol marker
Nuvo Drops - Tonic Studios
Double Stitched circles - Divinity Designs
Scallop Circles - Divinity Designs
Birthday Wishes - Simon Says Stamp
Inside Birthday Wishes - Honey Bee
Catherine Pooler coloured inks
Washi Tape - Doodlebug
Happy Birthday - Dancing Daisy's, Paper Boutique
Wink of Stella
5 x 7" card base & envelope

Tuesday, 23 April 2024

Rainbows & Clouds Pop Up Card


Today I'm sharing the last card made with this rainbow paper and it's a pop up. As usual, my card started with the patterned paper which was in a 12x12" package. Going through the remaining sheets, I saw one with a large rainbow across the bottom half. It was too big to use on an A2 card, or a Slimline but I thought it might work on a 5x7" card. I cut the rainbow panel down to 6.75" keeping just the rainbow. So now my sheet was 12 x 6.75" and had a large rainbow across the centre.


I cut that sheet in half at 6", giving me two pieces with a half rainbow on each ... and I trimmed the outside side down so each panel measured 4.75 x 6.75. Since there was a second sheet of this large rainbow print in the package I repeated the cutting above and had four half-rainbow panels ready to add to card fronts! In the photo below you can see how they would have fit together if I hadn't cut the sheet in half. You can see the other three cards HERE, HERE and HERE if you are curious.


The Hello Sunshine piece was fussy cut from a sheet of cut apart in the package and the cloud punch is from Stampin' Up. For the one on the front I used Rainbow Holographic card stock for even more shimmer & shine.


Inside the card I used the Twist Circle Pop Up - one of my new favourite die sets by Karen Burniston. It works in a variety of card sizes and you can animate so many things! Here I have a cluster of punched clouds along with a fussy cut rainbow from the same piece as the sentiment on the front. 

Some of the punched clouds are from the Rainbow Holographic card stock and others were punched from white and inked with blending brushes. The Paper Hugs is a die I've had for about a year and I think this is the first time I've used it - yikes. 


Supplies used:
Patterned paper & Cut Aparts - One the Rainbow, Recollections
Cloud punch - Stampin' Up
Catherine Pooler coloured inks
Twist Flower Pop Up - Karen Burniston
Rainbow holographic cardstock - Recollections
Blending Brushes
Catherine Pooler coloured inks
Paper Hugs - Simon Says Stamp
Glitter Dots - Stamp On It
5 x 7" card blank and envelope

Tuesday, 12 March 2024

March '24 Sheetload of Cards


Today I'm sharing these cards made with the March 2024 Sheetload of Cards and I have all the details on YouTube:  


Two of the 12x12" papers have sparkly bits embedded, and the other is a large sunburst completely glittered! 


I used leftover cardstock scraps for the Birthday Wishes which were backed with Rainbow Holographic Cardstock. I love the shine that gives!


The cards all have a white panel inside, with a striped paper strip and I used different coloured inks depending on what colour ink looked best with each card.


Supplies used:
Patterned paper - Over the Rainbow, Recollections
Birthday Wishes dies - Simon Says Stamp
Rainbow Holographic Cardstock - Recollections
Inside sentiment - Little Something Sentiments, Catherine Pooler
Mini MISTI


Monday, 25 September 2023

Eight Mini Slimline Cards for Thanksgiving


This year I really wanted to USE UP this older 6x6" paper pad by Lawn Fawn and today I'm sharing the final cards made with it. YAY and WHEW.  It always feels so good to use up a paper pad!

I went through my fall embellishments, and pulled out a baggie with these printed and fussy cut animal elements. I don't know where I got the file from originally as these were printed a long time ago. But since I will need five Thanksgiving cards for the grandkids, I decided to go ahead and just use up the paper and most of these elements. I'm happy with how they turned out.

The elements had been printed on glossy photo paper so they have some shine - and I punched a sprig from gold cardstock scraps on the outside and scraps of green patterned paper for the inside.


Here is a peek at the inside ...


Having been asked how many cards I make I thought it would be fun to keep track this year. Many of my posts include more than a single card or project and below is my tally. 

Card Tally for 2023
January - 53 cards
February - 56 cards
March - 55 cards
April - 32 cards
May - 43 cards
June - 34 cards
July - 56 cards
August - 106 cards
September so far - 57 cards

I decided to cancel the subscription that provided linked thumbnails to what products I used on my cards. It was costing me out of pocket each month, so I’m back to listing what I used with a few affiliate links included.

Supplies:
Patterned paper - Fall Fling 6 x 6" Lawn Fawn
Printed digital file - unknown
Cross Stitch Ovals - Tutti Designs
Sentiments - Autumn Greetings, Simon Says Stamp
Catherine Pooler Inks
Gold foil cardstock - Stampin' Up
Sprig Punch - Stampin' Up

Thursday, 14 September 2023

Three Interactive Thanksgiving Cards with Apples


I found these three card bases and the already-cut patterned paper &. mats in the "In Progress" bin. Who knows what happened that I didn't get to finish the cards, or why they've been in that bin for YEARS. But when I saw them in there I decided to finish them off. Since the apple print would match my new apple dies, I was off & running.

I have a walkthrough of my cards on YouTube


Since all the patterned paper was already trimmed and I couldn't remember my original plan I just added some narrow gold tape and gold peel off border stickers to the mix. It was fun to use my new Thanksgiving stamps as well.


This card has a simple box pop up inside for a little something extra.


Using the Stitched Apple Frames, I created a sweet shaker for another card.


I enjoyed the soft colours in this patterned paper and I'm happy to have the cards finished and ready to send!


The third card has a pop up inside using Karen Burniston's new Twist Flower Pop Up. I'm going to have so much fun with that one!


One more look ...


Having been asked how many cards I make I thought it would be fun to keep track this year. Many of my posts include more than a single card or project and below is my tally. 

Card Tally for 2023
January - 53 cards
February - 56 cards
March - 55 cards
April - 32 cards
May - 43 cards
June - 34 cards
July - 56 cards
August - 106 cards
September so far - 23 cards

I decided to cancel the subscription that provided linked thumbnails to what products I used on my cards. It was costing me out of pocket each month, so I’m back to listing what I used with a few affiliate links included.

Supplies:
5 x 6.5" ivory card blanks/envelopes - Michaels
Orange patterned paper - Basic Grey (old)
Patterned paper - Frances Meyer, from my stash
Outside In Stitched Apples - Lawn Fawn
Stitched Apple Frames - Lawn Fawn
Give Thanks Sentiments - Catherine Pooler
Truly Thankful - Colorado Craft Co
Fluted Classic Circle Dies - Spellbinders
Stitched Sentiment Strips - Kat Scrappiness
Narrow gold tape - Amazon
Happy Fall - Pink & Main
Gold mirror cardstock
Blending brushes - Taylored Expressions
Catherine Pooler Inks
Gold thread - stash
Dot stamp (my favourite!!) - Stamps by Judith
Gold Peel Off border stickers - Ecstasy Crafts and/or Elizabeth Craft Designs
White paint pen
Glitter Dots - Ecstasy Crafts
Transparency
Shimmering Fallen Leaves confetti - Kat Scrappiness
Other sequins - stash
Alcohol markers
Autumn Greetings - Simon Says Stamp
Twine
Nuvo Aqua Shimmer pen 

Wednesday, 13 September 2023

Slimline Pop Up Thanksgiving Card (& Tutorial)


I had started on this Slimline card, and decided to stop & film a tutorial for creating a simple box pop up. You can find the tutorial on YouTube:  


The lovely Quilted Leaf die is from Divinity Designs and the paper is an older 6x6" pad from Lawn Fawn. I actually managed to use it up with my Thanksgiving cards this year - yay! 


Below is the popped up element and there is still lots of room for a personal greeting. 


Having been asked how many cards I make I thought it would be fun to keep track this year. Many of my posts include more than a single card or project and below is my tally. 

Card Tally for 2023
January - 53 cards
February - 56 cards
March - 55 cards
April - 32 cards
May - 43 cards
June - 34 cards
July - 56 cards
August - 106 cards
September so far - 20 cards

I decided to cancel the subscription that provided linked thumbnails to what products I used on my cards. It was costing me out of pocket each month, so I’m back to listing what I used with a few affiliate links included.

Supplies:
Patterned paper - Fall Fling 6x6", Lawn Fawn
Gold Peel Off Border Stickers - unknown
Gold mirror cardstock - Stampin' Up
Infinity Ovals - Hero Arts
Mini Strips Harvest (stamp and die) - Taylored Expressions
Inside stamp - Autumn Greetings, Simon Says Stamp
Blending Brushes - Taylored Expressions
Gold Sequins - Studio Katia

Tuesday, 12 September 2023

Nine Sheetload Birthday Cards


Whew - I made a record number of cards last month but my nursing home stash is nice and full again. The Sheetloads help make it quick and efficient to create multiple cards while making the best use of patterned paper. I used a bunch of older items for these cards and pretty much everything is retired by now.

As usual, I create the Sheetloads as per the instructions and get the panels adhered to my card bases. Then I decide what I'm going to use to decorate them. For these cards I went through my embellishment binder and pulled out a bunch of stamped and die cut/fussy cut images that had been done many years ago at our cabin.

I was able to use up all the Birthday Farm Animals I had coloured & die cut, but didn't have enough for all nine cards. Going through the binder again I found another party dog then two butterflies. Done and done!


Below is the stamp I used inside all the cards.


Having been asked how many cards I make I thought it would be fun to keep track this year. Many of my posts include more than a single card or project and below is my tally. 

Card Tally for 2023
January - 53 cards
February - 56 cards
March - 55 cards
April - 32 cards
May - 43 cards
June - 34 cards
July - 56 cards
September so far - 19 cards

I decided to cancel the subscription that provided linked thumbnails to what products I used on my cards. It was costing me out of pocket each month, so I’m back to listing what I used with a few affiliate links included.

Supplies:
Patterned paper - Studio K (old, from my stash)
Birthday Buddies stamps - Paper Smooches (retired)
Birthday Farm Animals - Simon Says Stamp (retired)
Butterfly - from my stash, likely cut with my old Cricut
Happy Birthday - Happy Cat, Your Next Stamp
Stickles
Happiest of Birthday's - Stampin' Up
Stickers - from my stash

Friday, 14 July 2023

Double Z Fold Cards (and Tutorial!)


I have a video tutorial to share today, for creating these easy Double Z Fold cards. While technically this isn't a NEW to me fun fold, I haven't made one in many years, so I'm counting it as the 7th edition to my monthly series "New Fun Folds". It's also Fun Fold Friday here on my blog!  You can find the YouTube video tutorial HERE: 


This first one is one of my July Ice Cream cards. Having ice cream on a certain day in July is a generational tradition and I've also been sending the family ice cream cards to celebrate that day for the past 20 years or so. If you would like to read more about the tradition, I wrote about it in THIS blog post.


I added both Pops of Color and Nuvo Glaze to two of the ice cream layers, then a tiny enamel heart. The letters for JULY also got a coating of Nuvo Glaze for lots of shine.


When I was doing the tutorial, I wanted to show how easy it is to change up what you add to the front. So I made a holiday card using a cut apart (or journal card) instead of the ice cream panel. So that also means this post is my 7th edition to the monthly series "12 Months of Christmas". 😊. Talk about packing a lot into a single post, ha ha.


I was actually so happy with how these cards turned out, I can't wait to make a few more for the holidays. Could be a great way to use up some of the scraps, partial sheets and leftover stickers I have laying around. 🤔🤔🤔

This card features a matted cut-apart on the front, and a stitched snowflake on the inner centre panel. You can decorate this panel - or not - it's up to you!

Measurements - assemble as shown in the video tutorial.

Card Base:  11 x 4.25", scored at 2.75 and 5.5"

Patterned paper for card base:  two at 2.5 x 4", one at 5.25 x 4"


Smaller Card Base:  9.75 x 3", scored at 4.25 and 7"

Patterned paper for smaller card base:  4 x 2.75" and two at 2.5 x 2.75"


Embellish the front as desired. You can add other layers or use embossing folders and coloured cardstock instead of patterned paper. Lots of ways to change this one up!


Having been asked how many cards I make I thought it would be fun to keep track this year. Many of my posts include more than a single card or project and below is my tally. 

Card Tally for 2023
January - 53 cards
February - 56 cards
March - 55 cards
April - 32 cards
May - 43 cards
June - 34 cards
July so far - 19 cards

Additional Supplies:
Patterned paper (including peach) Neapolitan, American Crafts (old, from my stash)
White cardstock
Ocean tides cardstock - Papertrey Ink (my stash)
Plaid patterned paper - Oh Canada, Flannel Shirt (Photo Play)
Cut Apart - Winter Meadow (Photo Play)
Shimmer Spray

This blog uses affiliate links whenever possible. This means, if you make a purchase through one of my affiliate links that you pay the same amount but I may receive a small commission from your purchase. I only link products that I own, love and use for my card making and not every link below is an affiliate one! 😊

Friday, 30 June 2023

Ice Cream Cone Platform Pop Up Card


Not only is it Fun Fold Friday, this is the 6th edition to my monthly series "Platform Pop Up Cards". I added the stamped & die cut 'COOL' to the front, and the ice cream cones are dies by Simon Says Stamp.  The pink puffy pieces are from a SU milkshake set. I stamped the sentiment on a scalloped rectangle and added it to the back with room for a personal message.


Every July I send my kids & brother an ice cream themed card to honour my Mom. When she was a little girl, her Dad (my Grampa) would take her for an ice cream soda after a July parade in their town. She continued the tradition with my brother and I, even though we didn't go to a parade. On a certain day in July we would all go for ice cream. I continued the tradition with our kids, and now our grandkids too. 

When my Dad passed away, I made sure to take Mom for her ice cream or we would deliver it to her on that day. Often our family can't all be together on that day but we all make sure we have ice cream and say CHEERS to my Mom. I have been sending them an ice cream themed card in July for many years as well, and this will be one of the ones I send out this year.


I love how this card folds flat for mailing in a 5 x 7" envelope.


Having been asked how many cards I make I thought it would be fun to keep track this year. Many of my posts include more than a single card or project and below is my tally. 

Card Tally for 2023
January - 53 cards
February - 56 cards
March - 55 cards
April - 32 cards
May - 43 cards
June - 34 cards

Additional Supplies:
White cardstock
Brown cardstock scraps
Shimmer spray
Share a Milkshake - Stampin' Up
Sentiment - ConeDish, Stamps of Life (retired)

This blog uses affiliate links whenever possible. This means, if you make a purchase through one of my affiliate links that you pay the same amount but I may receive a small commission from your purchase. I only link products that I own, love and use for my card making and not every link below is an affiliate one! 😊

Sunday, 19 March 2023

Stashbuster Pop Up Cards for Easter


As I have mentioned in other posts, I am making an effort to USE UP a bunch of my Easter supplies ... stickers, ephemera, pre-stamped and coloured images. Just stuff that has been hanging around for toooo long. I have made a big dent in it too ... and next year I will be able to purchase some new goodies for the season.

Today's cards are stashbuster cards and I made them all into pop ups too. I have a walkthrough of the cards on YouTube:  


This card was actually the last one I created, and used up some of the leftover papers etc from  the other six cards 😊.


I have had this patterned paper for several years, and have both the 12 x 12" AND the 6 x 6" pads. They must have been a screaming deal, ha ha. So I used one of the 6 x 6" pieces to create the explosion inside and decorated it with the cut-aparts from the smaller pad as well.


For the other six card fronts I used an older Sheetload sketch, February 2020. I used the paper layout only, not the 'nested string' etc that was shown on the sketch. 

The Peeps on the card below were in the little bin of pre-done embellishments I have ... initially they were made using this same paper pad and I had done enough for two cards. Glad to have used them up this year.


This card used a sweet sticker and a die cut word. It was done so long ago I didn't even remember who makes the Easter die, but I found it on Simon Says Stamp. It was also in that little bin.


Inside that card I used another sticker onto a stitched oval and that was added inside with one of Sam Calcotts paper springs. I'll link her video below if you want to watch it to see how she uses them.


This cute Riley the Moose image was also in the bin ... all coloured and everything. I guess I must not have needed any more Easter cards the year I coloured it so into the bin it went. 


For the inside of that card I used Karen Burniston's Little Twist Pop Up, but without the accordion folded panel that normally goes across the arms. There is less bulk and I always like showing you different ways you can use your dies. I also used her Easter Charms, cutting them from pastel mirrored card stock scraps.

NOTE:  I cut the bunny charm on the back side of the mirrored card stock to get the reverse image. 😊


Here is a link to Sam Calcotts video where she shows her paper springs Here is a link to the February 2020 Sheetload of cards video

Having been asked how many cards I make I thought it would be fun to keep track this year. Many of my posts include more than a single card or project and below is my tally. 

Card Tally for 2023
January - 53 cards
February - 56 cards
March so far - 32 Cards

Additional Supplies:

February 2020 Sheetload

Patterned paper, 12 x 12" and 6 x 6" pads: Springtime, Authentique

White cardstock

Sentiments - Old, some from my computer

Riley in basket - Riley & Company

Coloured pencils, blending stump and Gamsol

Bunny Stickers, old, stash

Ephemera - Easter, Echo Park

Chicks - Your Next Stamp

Alcohol Markers

Peeps - older card kit from Simon Says Stamp

Stickers - stash ($ Store?)

Gems - leftover from a Stampin' Up card kit

Easter Greetings - Michaels

Joules boutique  bunny sticker


This blog uses affiliate links whenever possible. This means, if you make a purchase through one of my affiliate links that you pay the same amount but I may receive a small commission from your purchase. I only link products that I own, love and use for my card making and not every link below is an affiliate one! 😊