Showing posts with label Tonic Studios. Show all posts

Wednesday, 6 September 2023

Leaf Shaped Card


Today I'm sharing the 9th edition to my monthly series "Shaped Cards". I pulled out a very old kit - it's from 2018 - because a couple of the leaf dies in it are quite large and work well for a shaped card. The patterned paper is also old and has been in my stash for years. I pull it out every fall and use a little bit of it so it's taking forever to finish off the pad.

The stickers and sentiment were in my Fall bin, and who knows how long they have been in there. I believe I used my Scan 'N Cut to cut them out back when I first got the machine.


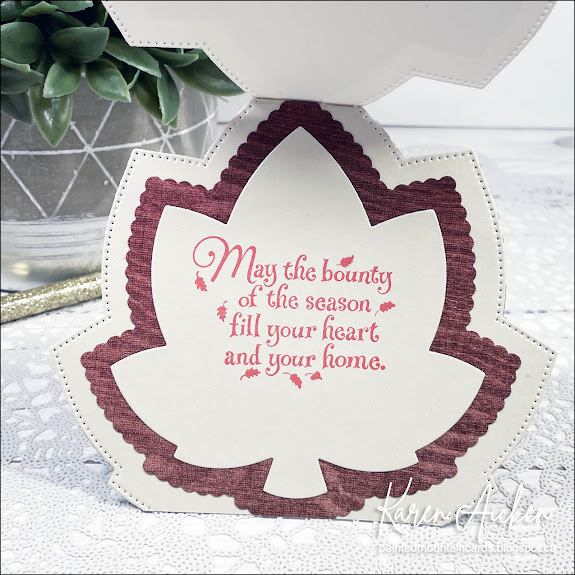
Here is a peek at the inside ...

I cut a second large leaf and scored it about 1/2" down from the top of the leaf and added adhesive above that score line. Then I lined up the front with the back and held them down together until the adhesive set. I also trimmed off a little bit from the bottom edge so it would be straight and that way the card stands for display.


I had thought this would fit in a 5 x 7" envelope, but it was a little too big. However, I have some envelopes from Hallmark cards as they used to sell packages of their leftover envelopes. It fit perfectly in one of those or I would have just made an envelope for the card.

Having been asked how many cards I make I thought it would be fun to keep track this year. Many of my posts include more than a single card or project and below is my tally. 

Card Tally for 2023
January - 53 cards
February - 56 cards
March - 55 cards
April - 32 cards
May - 43 cards
June - 34 cards
July - 56 cards
August - 106 cards
September so far - 7 cards

I decided to cancel the subscription that provided linked thumbnails to what products I used on my cards. It was costing me out of pocket each month, so I’m back to listing what I used with a few affiliate links included.

Supplies:
Patterned paper - Spiced Cider Stack, DCWV (old)
Leaf dies - Tonic Studio's Kit #12, 2018
Autumn stamp - unknown, cut with Scan & Cut
Stickers - stash
May the Bounty stamp - possibly Hero Arts (old)
Gold Mix Gems - Spellbinders


Wednesday, 30 August 2023

Pop Up Wedding Card


When we heard the daughter of very good friends was getting married, I offered to make their  wedding card for the happy couple.  It was a very small wedding, on a beach in Tofino which is on the northern shores of Vancouver Island. It's truly a magical place so I pulled out a bunch of things from my craft room for this card. I have listed them at the end of my post.


I started with a white panel stamped with a scenic stamp with ocean and trees. Perfect for the backdrop of their wedding! The panel was lightly coloured with inks and blending brushes. The golden panel on the front is actually embossed with leaves ... also perfect for the wedding setting. The bride and groom are nature lovers, who spend a lot of time outside hiking, biking etc. I have had this embossed cardstock for YEARS (hoarding it, ha ha) and this was the perfect opportunity to crack into the package.  


Since I finally have some new goodies in my craft room I wanted to use my new Forest Window which gave me the trees for the front of my panel and then I added some acetate behind the window and created a shaker that was mounted to the card front.  I also wanted to use this truck die set, which I've had since 2018. 😊  I had also purchased the add on, which is where the Mr & Mrs came from on the back of the truck. The engagement & wedding ring were tucked inside the back of the truck for a bit of whimsy.


Inside I used the Paper Frames Pop Up and more from the Wedding Charms dies (both by Karen Burniston) along with some creamy pearl cardstock and more of the embossed leaves. The sentiment stamps are long retired but they worked perfectly on the little labels in the centre of the pop up.


My friend is a master seamstress, and she made her daughters wedding dress. It was just exquisite with hand sewn lace all down the gown. I loved that the wedding dress charm has the emboss feature so I could make it look 'lacy'.


Finally, champagne glasses to toast the newlyweds!


Whenever I give someone a card made with the Paper Frames Pop Up, they turn it over to view it from the top or bottom ... so here is a top view for you.


It's always nice to create a card that will be hand delivered and not worry about bulk or extra postage.

Having been asked how many cards I make I thought it would be fun to keep track this year. Many of my posts include more than a single card or project and below is my tally. 

Card Tally for 2023
January - 53 cards
February - 56 cards
March - 55 cards
April - 32 cards
May - 43 cards
June - 34 cards
July - 56 cards
August so far - 104 cards

I decided to cancel the subscription that provided linked thumbnails to what products I used on my cards. It was costing me out of pocket each month, so I’m back to listing what I used with the linked supplies being affiliate links.

Supplies:
5 x 7" Card blank and envelope
Truck dies - October 2018 Large Die of the Month & Add On - Spellbinders
A7 Double Stitched Frame dies - Honey Bee Stamps
Pearlized cardstocks - from my stash
Golden Leaves A4 Embossed Cardstock - Tonic Studios (old)
Gold and Silver mirrored cardstock - Stampin' Up and Hunkydory
Black glossy cardstock - Tonic Studios
Acetate
Blending Brushes - Taylored Expressions
Stamps inside - Petite Pairs, Stampin' Up (old)
Various sequins and beads from my stash


Wednesday, 27 October 2021

Space Themed Mini Slimline Pop Up Card


Hello!  I had just received an order from R&R Scrapbooking out of Edmonton, and in it was this Galaxy metallic card stock pack. I had to dig in and make a card right away, so got out the Space Charms from Karen Burniston. I have a walkthrough of this Mini Slimline card on YouTube as well: 

The lower space ship was attached to the card with a Mini Action Wobble so it bobs and wobbles around. So fun! The 'Thinking of You' is from Word Set 10 and I also added some gold glitter dot stickers to resemble stars.


Inside, I created a pop up with one of the dies in the Street Lantern Pop Up. It was a little short for this vertical orientation, so I added the off-cut piece from the panel on the left. I adhered that to the pop up arm and that extended it just enough for me to dd my space ship, alien and circle.


This blog uses affiliate links whenever possible. This means, that at no cost to you, if you make a purchase through one of my affiliate links that I may receive a small commission from your purchase. I only link products that I own, love and use for my card making!

Supplies:
Mirri Card - Starry Galaxies, HunkyDory
Coloured card stock scraps
Fine point black pen
Black sharpie


Sunday, 11 April 2021

Napkin Fold Card


Hello! Today I'm sharing a Fun Fold card using the new Napkin Fold Card With Layers from Divinity Designs. I have a walkthrough of my card on YouTube as well: 


The card is held closed with a Belly Band; another die set from Divinity Designs. I bought it since I like to make fun fold cards and sometimes they like to spring open on their own. This one comes with score lines (and layering dies!)  so it works well for those thicker fun fold cards. I added stamped and layered roses (My World stamp and Die combo) to a Double Stitched Circle, and a black Scalloped Circle. Then I added the Best Wishes, which is from the Celebration Word Dies. 

I die cut the largest layer of triangles from a pink mirror card stock so that is what I used for the Best Wishes as well. I love the sparkle and shine this gives!  I also went over the roses with a Wink of Stella pen.


Below is what the card looks like open - this is definitely one that's better to see in action! I have already started another Napkin Fold card - it's such a cool fold and I couldn't wait to play with it again.

Click HERE to go to the Divinity Designs Blog

Click HERE to see Divinity Design's Napkin Fold Card tutorial.


Thanks for stopping by 

Monday, 22 June 2020

Chameleon Record Card - You Rock


Hello crafty friends ...

Today for Masculine Card Monday here on my blog,  I'm sharing a card I made to show the versatility of the Chameleon Fineline markers. These things are sooo cool! For example, you take the lid off the yellow marker and add the orange marker lid for a few seconds. Then you add the red marker lid for a few seconds When you go to write, the colour flows from the red through orange before returning to the original colour. 

I had just received this fun record die set from MFT so that is pretty much what inspired my card. Note, I made this card in the Spring of 2019 but didn't get it posted so am sharing it now.


I used the markers to write 'you rock' on one stitched card stock strip, and then drew a plaid on a second one. The Fineline markers coordinate with the Chameleon Color Tone and Color Tops so I used those to colour the record label and banner.


Inside I added a stitched panel with marker colour outside the stitched line and a die cut word. The other words were done with the Chameleon Fineline markers!


Supplies:
Sketch - C4C 475, Crazy4Challenges.
The Bee Paper Company, marker paper
Stitched vertical stitched strip dies - MFT Stamps
Chameleon Color Tones markers
Chameleon Color Tops
Chameleon Fineliners
White, black card stocks
Black glossy card stock - Tonic Studios
Nuvo Crystal Drops
Record die - MFT Stamps
Silver for card stock - Stampin' Up
AWESOME and FANTASTIC dies - Verve (retired)
Fishtail banner die - MFT Stamps
Stitched rectangle dies - Elizabeth Craft Designs

Thanks for stopping by today

Thursday, 7 May 2020

Slimline Mother's Day Succulent Card.


Hello crafty friends ...

I had mentioned to Karen Burniston that I was going to figure which of her dies would work for a Slimline card. Well, first, I had actually initialized the conversation asking her to consider making some specific Slimline Dies but meanwhile I was going to see which other ones would work well. She suggested the Circle Frame Pop Up, which is one of my favourites. I didn't add the frame for the charm instead adding a layered & folded circle in between the two pivoting circles.

Remember you can always see my interactive cards on my YouTube Channel HERE


Since I love to create interactive cards but I'm also loving the Slimline card format, I was really happy to see how well the Circle Charm Pop Up worked! The card front has a panel of succulent patterned paper, and the centre circles have layered succulents where were also fussy cut from a sheet in the patterned paper. It was cool to discover that it wasn't a sheet of random succulents, but instead different succulent layers which can be fussy cut and layered similar to Paper Tole.


I added the Love You and sequins cut from pink mirror card stock. The sequin dies are included with the Rockin Rectangle die set, also by Karen Burniston.


I apologize for the photos ... there was so much white and everything kept looking blown out. On the left side of the card, is a stamp that says Happy Mother's Day. The border along the inside bottom is actually a sticker that came from the same patterned paper package.


This card was sent to my Mother In Law for Mother's Day.

Supplies:
Pink and white card stocks
Patterned paper and border sticker - Greenhouse Collection, Kaisercraft
1046 Circle Charm Pop Up - Karen Burniston
Slimline Stitched - Trinity Stamps
Dotted Scalloped circles - Elizabeth Craft Designs
Pink mirror card stock - Tonic Studios
1083 Word Set 9 Love - Karen Burniston
1089 Rockin' Rectangle (sequins) - Karen Burniston
Quick Critters - Taylored Expressions
Scalloped Square - Queen & Company
Happy Mother's Day - Brimming with Love Sentiments, Taylored Expressions

Card size - 3.5 x 8.5", fits in a #10 Business Envelope

Thanks for stopping by today

Tuesday, 31 March 2020

Sparkling Gold Gift Pivot Panels Pop Up Card

Hello crafty friends ...

I'm back today with another card that was made and sent to Hochanda as a sample for them to show on air. If you are unfamiliar with Hochanda, it's a UK Craft Shopping Program and Karen B & Tanya were going to be presenting on air. They decided to stay in the USA though because of the Corona Virus, and the lovely Paula Pascual did the presenting for them.


Remember you can see all my interactive cards on my YouTube Channel HERE!


I put a lot of thought into my Hochanda samples, wanting to use more elegant papers & embellishments that also had some shimmer for the TV lights. I didn't make any A2 sized cards either, since that is a North American size and not one often made overseas.


The beautiful gold glitter card stock was perfect for this pink and gold foil patterned paper, but not wanting to waste what was going to be hidden by the paper, I used a craft knife to cut a rectangle from the centre of the gold glitter paper to save for a different project.


As you can see, I used the Gift Pivot Panel, and while I added a Happy Birthday to the front this could easily be a Wedding or Anniversary card too! The white is a pearlized card stock to add some more shimmer.


Supplies:
Pink card stock
Gold foiled pink patterned paper - Michaels
Fine Gold Glitter card stock - Michaels
Craft Knife
1115 Gift Pivot Panels - Karen Burniston
White pearl card stock
Twine
Ribbon
Seam binding
1046 Circle Charm Pop Up (circles) - Karen Burniston
Gold mirror card stock - Stampin' Up
1030 Happy Birthday - Karen Burniston
Pink mirror card stock - Tonic
1024 Cat and Dog (tiny heart) - Karen Burniston

Card size - 6.5 x 5", fits in a 5 x 7" envelope

Thanks for stopping by today

Thursday, 21 November 2019

Leaf Shaped Thanksgiving Card

Hello my crafty friends

Last year I purchased 3 sheets of 12 x 12"  patterned paper from the Dreams of Autumn collection by Bo Bunny. One of the sheets was filled with images, which I fussy cut to use as card elements. When I opened my box of fall papers, I saw the two sheets on top of the pile, along with the clear bag of elements and decided that I was going to work with those papers until they were gone. The idea wasn't to get as many cards as possible from the papers but more to use them up.

This is the sixth and final card made with the papers & elements!


I used the large (older) leaf dies from Tonic Studios to make my shaped card with the layers, and added a die cut Happy Thanksgiving and a stamped greeting inside.


Scored 3/4" from top point on back piece and adhered the front and back together by putting adhesive ABOVE that score line.


The card stands on it's own for display, which I really like.


The patterned paper all gone but about a 3 x 3" piece of the green knit, and 3 fussy cut elements (large fox, two large pinecones). I have put them in the bin for next years fall cards. And I'm happy to say I made it through the entire fall season without purchasing a single fall item ... no stamps, stickers or patterned paper. Woot! While the US is gearing up for their Thanksgiving, ours is long past and I am concentrating on holiday and birthday cards now.

Supplies:
Brown, yellow, off white and burgundy card stocks
Patterned paper - Dreams of Autumn, Bo Bunny
Leaf dies - Tonic Craft Kit #12, Tonic Studios
Words inside - Thanksgiving Blessings, Taylored Expressions
Happy Thanksgiving - the Stamps of Life
Nuvo Shimmer Pen

This card is larger than the standard A2, but easily fits in a 5 x 7 envelope for mailing!

Thanks for stopping by today

Tuesday, 22 October 2019

Thanksgiving Shaker Leaf

Hello my crafty friends

I haven't played nearly enough with the Tonic Studios Craft Kit 12 that I bought last year, so I pulled it out again for my card today. What inspired the card, is actually the filler ... it was in with the box of Thanksgiving embellishments so I knew I wanted to make a shaker card and use the filler. Actually, I was hoping to use it up - it's many years old - but there is still enough left for another shaker another year.


The leaf dies (which I love, and is why I purchased that kit in the first place) are quite large so this is a 5 x 7" card. I only used a single layer of foam tape for the shaker, as the filler is all quite flat, unlike sequins and beads.


The patterned paper has shiny embossed bits on it, and the leaf was fussy cut from one of the sheets in the stack.


Here is  peek at the inside:


Supplies:
Patterned paper - Spiced Cider stack, DCWV
Large leaf dies & Happy Autumn stamp/die - Tonic Craft Kit 12, Tonic Studios
Acetate
Filler - OLD, from my stash
Kraft and white card stocks
Catherine Pooler inks
Rectangle dies - Waffle Flower
Inside stamp - Be Full, Neat and Tangled
MISTI - My Sweet Petunia
Thick bakers twine - Stampin' Up
Nuvo Drops

Card size - 5 x 7", fits in a standard 5 x 7" envelope

Thanks for stopping by today

Thursday, 27 September 2018

Leaf Shaped Card

Good morning friends

My card share today has lots and lots of texture - from the sparkly embossed oak leaf patterned paper, to the stitching on the leaf dies to the heat embossing. There is also vellum with sparkly bits embedded!


I loves leaf dies, and trees - well most nature image images appeal to me. So when I saw the Tonic Studio Craft Kit #12 I knew I had to purchase it. It's actually from a monthly subscription, but while I enjoy most of the Tonic Craft Kits I see - they ship from England and the value is just not there for me. Especially if it ends up being a month that I'm not keen on the theme that month! I am thrilled that I could get this as a 'one time purchase' though and I will use everything that was included in the kit. And I LOVE everything that was included in the kit!

The leaf shaped dies are large - a lot larger than A2. But they are perfect for making shaped cards like this. Banners, gift bag decorations - all kinds of uses for these larger dies. This card still fit in a 5 x 7" envelope for mailing.

I nested two of the leaves together to get the gold leaf shaped frame, and die cut several of the tiny leaves to adhere under the vellum panel.


Inside I added a smaller die cut leaf to give me the white space for my stamped greeting and for signing.


To make it a folding card, I die cut the same pierced leaf from brown card stock and added a score line about 1-1/4" from the top point. Adhesive above the score line to attach the back to the front and the card is done. Oh, and I did trim off a little from the bottom edge at the back only - this allows the card to stand on it's own. with the curve of the leaf it rocks otherwise.


With all the shimmer and shine on this card, I'm saving it to send to my Mom for Thanksgiving as it will be pretty on the bulletin board in her room at the nursing home.

Supplies:
Leaf dies - Tonic Studios Craft Kit #12
Embossing Powder - Copper Blush - Tonic Studios Craft Kit #12
Hello Autumn stamp - Tonic Studios Craft Kit #12
Patterned paper - Recollections
Brown and white card stocks
Copper foil card stock  - Stampin' Up
Metallic flecked vellum - stash
Happy Thanksgiving - Simon Says Stamp
Card size - approx 5-1/2" 'square'.

Thanks for stopping by today