Tuesday 31 May 2022

Plant Themed Flip-Its Card


Hello my crafty friends!  A friend sent me a few 6 x 6" sheets of plant themed patterned paper and this sheet was my favourite. I finally broke down and USED it (instead of hoarding saving it) and this is the card I came up with. I have a walkthrough of my card and the dies used on YouTube HERE:   


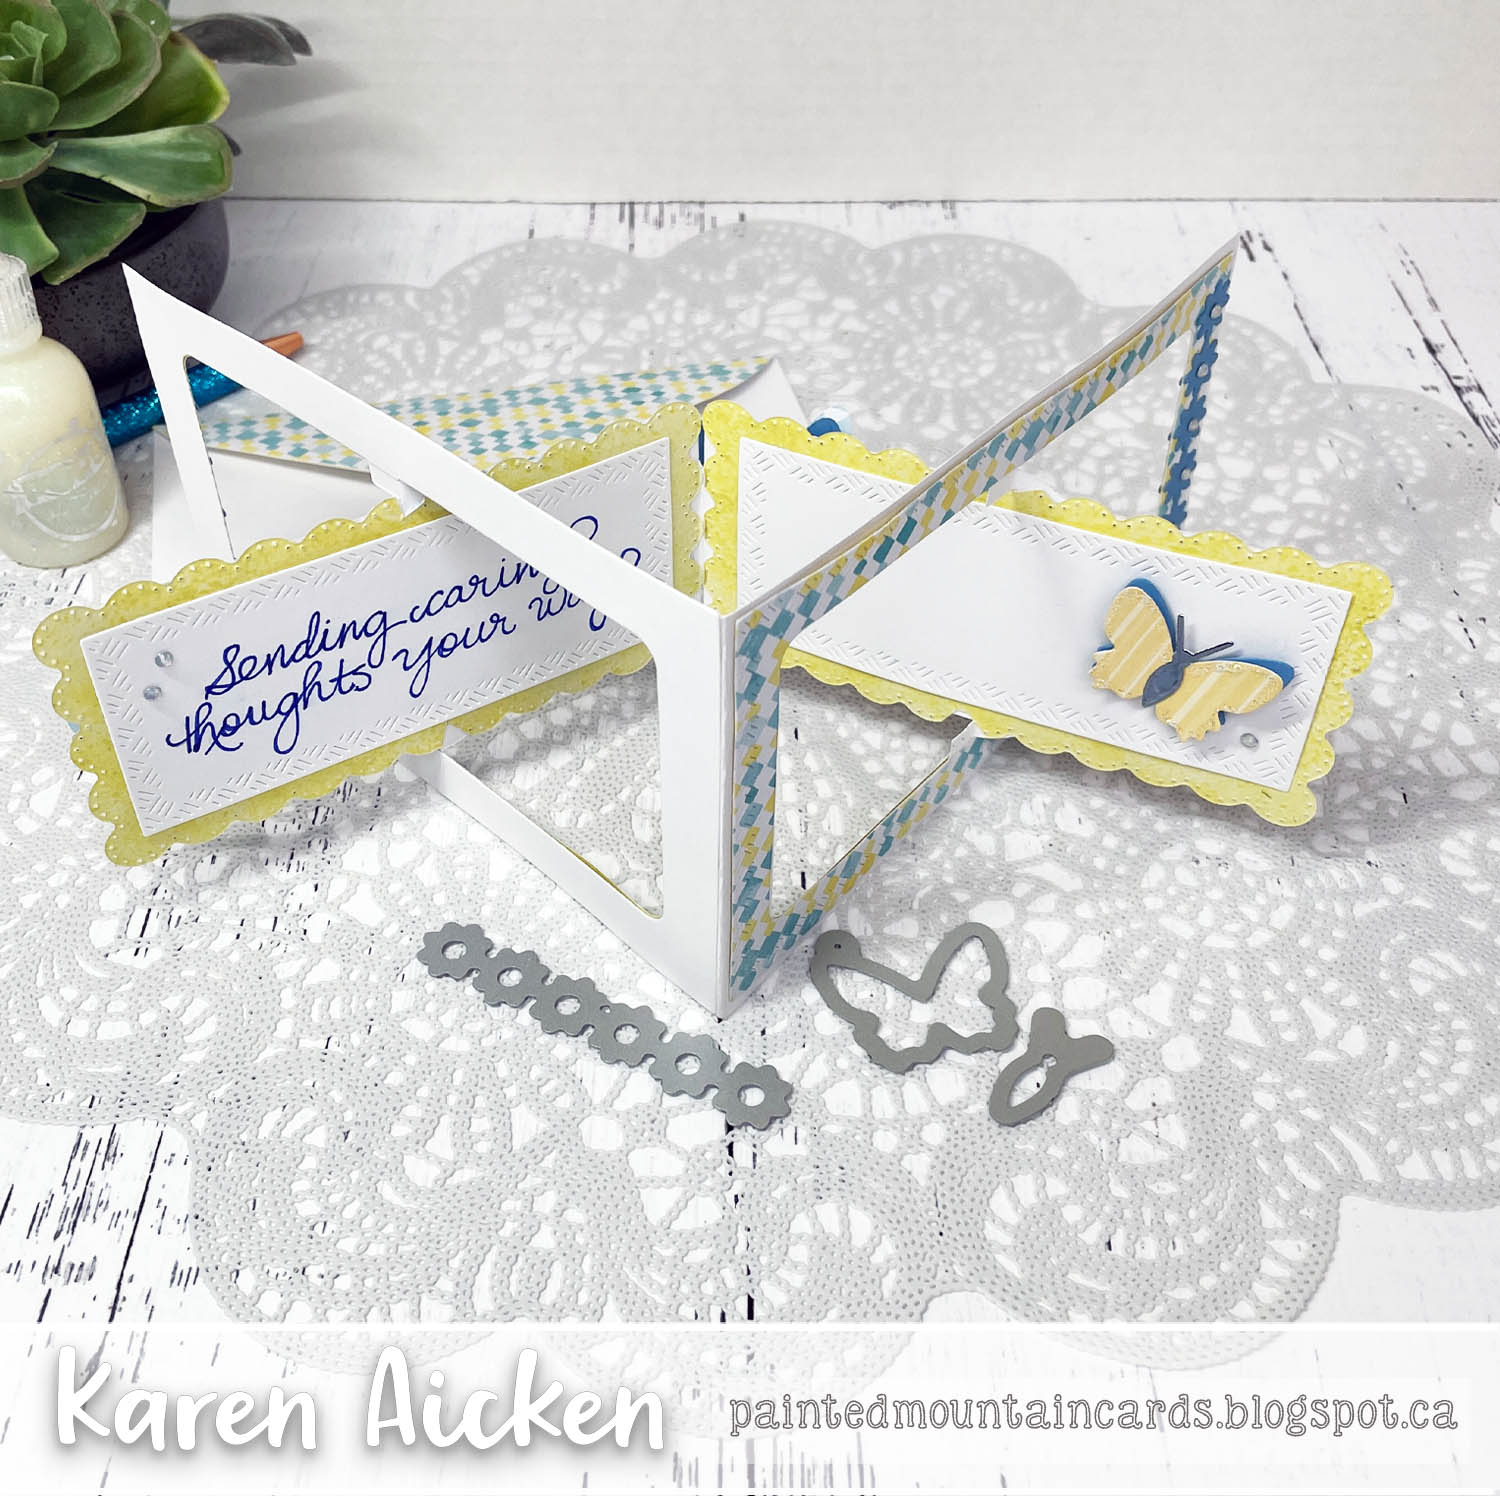
The Diamond Flip-Its Plus creates an extra flap on the side which makes it even more fun. I added a fussy cut plant on the front (cut from patterned paper) and a stamped sentiment on the flip side. When you open the flap, there is lots of room to write a personal message when I go to send the card out for Happy Mail!


Below is the card fully open. I was happy to see how well Karen Burniston's new Short Rectangles Crosshatch fit inside!  I also got to pull out the plant stamps I got for my Birthday as they worked so well with the papers. 😊


This blog uses affiliate links whenever possible. This means, that at no cost to you, if you make a purchase through one of my affiliate links that I may receive a small commission from your purchase. I only link products that I own, love and use for my card making!

Any supplies I'm unable to link are listed at the very bottom of my post.


Additional Supplies:
Plentiful Plants suite (papers, stamp and dies) - Stampin' Up
Patterned paper inside - Artistry Blooms, Stampin' Up (retired)
Leafy patterned paper on the front - unknown (it was a gift)
White card stock - Accent Opaque Digital Super Smooth (Amazon .ca)
Bic metallic marker

Monday 30 May 2022

Second Round, May Sheetload of Cards


Hello my crafty friends and welcome to Masculine Card Monday here on my blog. As with most of my cards, the patterned paper was the inspiration. I had the printed Sheetload on the counter above the drawer where I store my 6x6" paper pads. When I opened the drawer to put something else away, I spied this paper pad from Pink & Main ... looked at the Sheetload sheet ... and I was off and running! This is my second May Sheetload card batch ... you can find my first cards HERE.

I was happy to make another set of Birthday cards for my Mom's old nursing home, have some with a more masculine feel, and use up some of these older patterned papers. Win Win Win!


Here is a peek at the inside ... all of them were done the same, using my Mini Misti so the stamping went quickly and mistake free.


You can find out how to download your own Sheetload of Cards (sketch and cutting guide) HERE.

This blog uses affiliate links whenever possible. This means, that at no cost to you, if you make a purchase through one of my affiliate links that I may receive a small commission from your purchase. I only link products that I own, love and use for my card making!

Any supplies I'm unable to link are listed at the very bottom of my post.


Additional Supplies:
Banner punch - Stampin' Up (retired)
White card stock - Accent Opaque Digital Super Smooth (Amazon .ca)
Grey/blue cardstock - stash
6 x 6" Patterned paper pad - Be Brave, Pink & Main (retired)

Saturday 28 May 2022

Birthday Cake Shaped Card Duo


Hello my crafty friends. Today I'm sharing a card duo combining a new die set with older stamps for this fun shaped card duo.

I enjoy making shaped cards, and when I saw this new Birthday Cake die from Honey Bee (linked below) I could immediately see it's versatility. It fits in a standard A2 envelope, is quick and easy to make and I think it would even make cute Gift Card Holders! There is a coordinating stamp set as well, but since I had the older MFT sentiment stamp sets that refer to cake I opted not to get the Honey Bee one. Yet. 😉


For the first card, I cut the inner cake rectangles (which is a single die - YAY!) from some alcohol inked looking paper, inked the edges then stamped each layer with Happy Birthday.  I added tiny pink glittery stickers on the icing portion and then some of the larger ones onto the stamped oval.


Here is a peek at the inside of the first card ...


For the second card, I used a dot stamp from Taylored Expressions (from their Sweet Scoop stamp/stencil set) on the icing, and cut the cake portion from a background I made a couple of years ago using Colorbursts spritzed with water.


Below is the inside of the second card. I'm so happy that these older stamp sets will get lots of use again, and look forward to making more of these cards. They will be fun for my nursing home donation cards as well, as they stand nicely for display.


This blog uses affiliate links whenever possible. This means, that at no cost to you, if you make a purchase through one of my affiliate links that I may receive a small commission from your purchase. I only link products that I own, love and use for my card making!

Any supplies I'm unable to link (like the retired stamps I used) are listed at the very bottom of my post.


Additional Supplies:
Circle stickers - Stampendous (old, from my stash)
Patterned paper - Guilded Ink, Recollections
White card stock - Accent Opaque Digital Super Smooth (Amazon .ca)
Grey alcohol marker
Get your Cake On - MFT Stamps (retired)
Big Birthday Sentiments - MFT Stamps (retired)
Sweet Scoops stamp/stencil duo - Taylored Expressions
Colorbursts, Magical Shakers etc (water colour powders)

Friday 27 May 2022

Slimline Diagonal Trifold with Poppies


Hello my crafty friends and welcome to Fun Fold Friday here on my blog. Today's card started out as more of an experiment than anything else but I'm thrilled with how well it worked out!  I started with this pretty double sided 12 x 12" patterned paper (retired) and cut it down to 8.5" long. Then I scored down the 12" side at 4" and 8", which gave me a Slimline sized trifold card. The finished (folded) size of my card today is 4 x 8.5" and it fits in a standard #10 Business Envelope for mailing.

The next step was to create the diagonal cut at the top. Opening the trifold card flat, I made a small pencil mark 4" down from the top on the left side. I lined that 4" mark at one end of my trimmer, and the top right corner of the paper at the other end of my trimmer and cut ... presto!

I used some Mini Slimline dies to cut the inside rectangles, cut an oval for the card front, then pulled out some older poppy elements from my stash. The butterfly is from an very old punch, but the HOORAY is only a few months old. 😊  It's from a Mini Slimline die set by Picket Fence Studios, and I linked it below. 


Below is what the card looks like opened. While is is only patterned paper and not overly heavy at that - the additional cardstock layers really help keep the card nice and sturdy. I think that is the part that made me the happiest as I'm not a fan of 'wussy' cards.


Now I do have the Slimline die set by Divinity Designs to create this type of card AND it has all the layering dies. It's called the Slimline Z Fold and I'll like it below as well. If you follow me, you know how much I enjoy layering dies. I'll also add their A2 sized set (which I also have).  But I just wanted to see if this would work for a quick card and it did. 

This blog uses affiliate links whenever possible. This means, that at no cost to you, if you make a purchase through one of my affiliate links that I may receive a small commission from your purchase. I only link products that I own, love and use for my card making!

Any supplies I'm unable to link are listed at the very bottom of my post.


Additional Supplies:
Butterfly Punch - Stampin' Up (retired)
Patterned paper - Flower & Field, Stampin' Up (retired)
Poppy elements - Stampin' Up (retired)
White card stock - Accent Opaque Digital Super Smooth (Amazon .ca)

Thursday 26 May 2022

Birdhouse Birthday Cards


Hello my crafty friends!  A few months ago I had this older 6 x 6" paper pad out to make a Sheetload of Cards and realized that there were only a few full sheets left in the package. I decided to USE IT UP and here are two of the cards I made with those last few patterns. 

The cards are based on the January 2022 Sheetload of cards, which in turn was based on a Mojo Monday sketch. The birdhouse pieces are actually cut aparts from a sheet in the package!


This blog uses affiliate links whenever possible. This means, that at no cost to you, if you make a purchase through one of my affiliate links that I may receive a small commission from your purchase. I only link products that I own, love and use for my card making!

Any supplies I'm unable to link are listed at the very bottom of my post.


Additional Supplies:
January 2022 Sheetload of Cards
Patterned paper & Cut Aparts, Spring Fling - Pebbles (retired)
Stitched Ovals - MFT Stamps (retired)
White card stock - Accent Opaque Digital Super Smooth (Amazon .ca)
LJD Birthday Greetings - MFT Stamps (retired)

Wednesday 25 May 2022

Mini Slimline Pop Up Card Duo


Hello my crafty friends!  This pair of Mini Slimline cards are based on the April 2022 Sheetload of cards. I finished them in early April but couldn't share them because I used some of Karen Burniston's new release. We could't share our projects until May 9th so I hung onto the photos until now. 

First of all, I LOVED the April Sheetload, as it was for Mini Slimline cards. But when I discovered that the Pivot Panels fit inside this fold? I was SO excited. Below you can see the inside of both cards.


I used papers, cut aparts and stickers from Echo Park's 'Summer' line and this Sheetload uses 6 x 6" papers. The card front (which is shorter than the card back) has one of the prints and the inside has a coordinating print. You can see both as the card comes out of the envelope. Now that April 2022 Sheetload was hugely popular and I knew I'd make it often. But if I can make a Mini Slimline, a Fun Fold AND a Pop Up? That's just a winning combination in my books. 😊


The Flower Pivot Panel is what I used inside, as well as the Border Blends: Trims. The dragonflies are from the new Flutter Charms.


Love the dragonflies ... they have both a solid and a detail layer. 


The second card uses the same dies as above, but also the Happy Birthday and Happy Birthday Shadow.


Here is a closer look at the inside of the second card ...


Find out how to download the April 2022 SheetLoad of Cards HERE

Karen Burniston has assembly videos for all of her pop up dies including this one. If you have the die, then you have probably already checked out her video tutorial so I don't attempt do 'reinvent the wheel' by doing another assembly one. I prefer to show you different ways you can use those same dies since people love to see a variety of looks! Here is the link to the Karen Burniston website, which includes the assembly videos: Once you know how to assemble your die, the rest is card size, paper and colour choice as well as embellishments! You can change the look of your card every time you use the dies. 😊

This blog uses affiliate links whenever possible. This means, that at no cost to you, if you make a purchase through one of my affiliate links that I may receive a small commission from your purchase. I only link products that I own, love and use for my card making!

Any supplies I'm unable to link are listed at the very bottom of my post.


Additional Supplies:
April 2022 Sheetload of Cards
Hello cardstock scraps
Charcoal Stardream cardstock scraps
Shimmer Spray
White card stock - Accent Opaque Digital Super Smooth (Amazon .ca)

Tuesday 24 May 2022

Mermaid Pop Up Card


Hello my crafty friends!  Today I'm sharing the Birthday Card we gave to our Granddaughter. This is a sparkle-heavy card, with lots of bling and perfect for her 11th Birthday. I have all the details on YouTube:   


Using papers, cut aparts and stickers from the same paper package (linked below) made the card fairly easy to complete. The front has one of the 4 x 6" cut aparts dressed up with Stickles and bling, and I tied the patterned paper panel with seam binding before attaching to the card front.


Here is a peek at the inside, with a pop up platform. I have a tutorial on how to make these on YouTube HERE if you are interested in learning how to do it.  


It was heartwarming to see her face when she opened this card - I know she loved it. 😊


This blog uses affiliate links whenever possible. This means, that at no cost to you, if you make a purchase through one of my affiliate links that I may receive a small commission from your purchase. I only link products that I own, love and use for my card making!

Any supplies I'm unable to link are listed at the very bottom of my post.


Additional supplies
5 x 6.5” Card and envelope - Michaels
Seam binding
White card stock - Accent Opaque Digital Super Smooth (Amazon .ca)

Monday 23 May 2022

Mini Slimline Accordion for Father's Day


Hello my crafty friends and welcome to Masculine Card Monday here on my blog. Today I'm sharing a Father's Day card using several different dies by Karen Burniston. The card base uses the new Landscape Rectangle Accordion, and I made it a 2 Page card with an additional solid page.

While it was fun, and something I wanted to try - I'm not too crazy about the solid page with a two page accordion. It works SO much better with a three page, as you can see HERE. But sometimes you have to try things out ...


The solid panel gives you space to decorate and add a signing block. I pulled out some older papers from my stash which always makes me feel good to use up.


The white area makes a great signing block...


The Hooray die cut was outlined with a grey marker after adhering it to the card, to create a shadow.


Below is the top view ...


***NOTE:  To create the solid back panel, cut cardstock to 6.5 x 3.5". Score 1/2" down the short left edge. Add adhesive to the 1/2" flap and adhere it to the end of your accordion, then add your decorative panels. This helps hide the seam.***

This blog uses affiliate links whenever possible. This means, that at no cost to you, if you make a purchase through one of my affiliate links that I may receive a small commission from your purchase. I only link products that I own, love and use for my card making!

Any supplies I'm unable to link are listed at the very bottom of my post.


Additional Supplies:
Brown cardstock
Patterned paper - 6 x 6" pad from Studio Calico (discontinued)
White card stock - Accent Opaque Digital Super Smooth (Amazon .ca)

Friday 20 May 2022

Sympathy Accordion Card


Hello my crafty friends and welcome to Fun Fold Friday here on my blog!  Today I'm sharing a sympathy card made with Karen Burnisotn dies, combining the new release with previously released sets.  I have a walkthrough of my card on YouTube:   


This card was actually sent to Karen B to show in her classes. Students love to see lots of ideas for using the different sets and the Design Team likes to be sure she has new things to show. 😊

The With Sympathy fits perfectly on the new Landscape Rectangle Accordion, and it was die cut from a blue mirror card stock. I added layered butterflies from the new Flutter Charms, and the Thinking of You comes from Word Set 10 Thinking Of You. It was die cut from blue and from white card stock, and the two were layered together with the blue layer off-set a little for a shadow look.


The pretty scalloped rectangles are from the new Short Rectangles Crosshatch, cut from the double sided patterned paper. I adhered the scalloped pieces to the back of the inner accordion panels so the pattern shows through on the front side and the paler, yellow pattern is on the back. NOTE  -- I did snip away the scallops from the hinge portion of the accordion so they didn't impede the hinges.  Then I layered another of the Short Rectangles Crosshatch on top, cut from white card stock. The sentiment was handwritten and I added another layered butterfly on the right side. 


The layered butterflies were created by die cutting the solid butterfly twice. Once from blue card stock and once from a coordinating patterned paper scrap. They were layered together with a little thin foam tape just in the centre so the wings have some lift. The butterfly body was cut from a scrap of the blue mirror card stock and finally, the top layer was outlined with Stickles.


This blog uses affiliate links whenever possible. This means, that at no cost to you, if you make a purchase through one of my affiliate links that I may receive a small commission from your purchase. I only link products that I own, love and use for my card making!

Any supplies I'm unable to link are listed at the very bottom of my post. 

Since I couldn't link the blue mirror card stock I used on this one, I linked others that I also have and would work just as well.


Additional Supplies:
Blue fine point marker
Patterned paper - Water Colours, Sizzix (retired)
Blue card stocks - stash
White card stock - Accent Opaque Digital Super Smooth (Amazon .ca)

Thursday 19 May 2022

Mini Slimline Floating Panel Card & Tutorial


Hello my crafty friends.  I pulled out some older items from my craft room for these three Mini Slimline cards, and decided to make them pop up cards. I also did a tutorial on this 'floating panel' technique and you can find it and more details in my YouTube video:   


All three cards are for different occasions. I have a Birthday card, a thank you card and one uplifting card to send out for Happy Mail. After stamping and punching the mason jar & stems, I added different flowers from the April 2021 Blessings Box from Divinity Designs.


Below is what the inside of the Birthday card looks like...


Next up is the Thank You Card. The patterned paper is an older paper pad that I had found at Michaels. Using the Mini Slimline dies, I was able to place them on the paper and make the best use out of the different colours/patterns.


The floating panels fold flat to write a personal message, so you aren't trying to write in mid air. 😊


Finally, the third card. I loved the gold veining on this patterned paper sheet - wish they all had it! I matted the sentiment banner with gold foil card stock to compliment the gold.


Here are the measurements for the pop up platform:   4.5 x 1.5", score at  .75, 2.25, and 3"


This blog uses affiliate links whenever possible. This means, that at no cost to you, if you make a purchase through one of my affiliate links that I may receive a small commission from your purchase. I only link products that I own, love and use for my card making!

Any supplies I'm unable to link are listed at the very bottom of my post.


Additional Supplies:
Patterned paper - Guilded Ink, Recollections
Happy Thoughts - Stampin' Up
Jar of Flowers - Stampin' Up
Mason jar punch - Stampin' Up
Alcohol markers
White card stock - Accent Opaque Digital Super Smooth (Amazon .ca)
Seam binding - Stampin' Up