Showing posts with label Gift Card Dress Up. Show all posts

Monday, 15 September 2025

Father’s Day Card/Gift Card Holder


It’s Masculine Card Monday here on my blog, and since I didn’t get it shared back in June I’m sharing a Father’s Day card/gift card holder. We were pressed for time so I combined the two and our son-in-law was still quite pleased with it.

I cut a black card stock panel to 6.5 x 4.5”, then centred the Grassy Grove and die on that. I added scenic patterned paper in behind then wrapped a narrow gold tape around the bottom edge. The panel was secured it down to the 5 x 7” card base leaving an even white border. The stamped sentiment was popped up with foam tape and I added a couple of glitter dots for some subtle sparkle. Finally, I added a stamped and die cut deer from the Grassy Grove set.


I used a gift card pocket die inside, which comes with the layering piece. I just moved the layering die around on a patterned paper scrap until I liked what I saw. The large Treat Yourself is a stamp I’ve had for a couple of years and I love how bold it is.


Supplies used:
Patterned paper - Water Colour Landscapes 1.1, Paper Rose
Grassy Grove (stamps and dies) - Stampin’ Up
5x7” card and envelope
Happy Celebrations - Studio Katia
Glitter Dots
Gift Card Pocket - MFT Stamps
Treat Yourself - Pigment Craft Co

Monday, 16 June 2025

Father’s Day Card/Gift Card Holder


It’s Masculine Card Monday here on my blog!  Father’s Day really snuck up on me this year so I was scrambling to get cards made. But I did it - with a few days to spare! In the interest of saving time, I made two of the cards with gift card pockets inside and I think they turned out cute. I’ll share the second one another day - this one was made for our son-in-law. It’s a 5x7” card and the leafy die cut frame ended up working perfectly for the 6x6” patterned paper I wanted to use!

The Happy Father’s Day was done with my Brother Label Maker and attached to a 1/2” strip of white card stock then popped up with foam tape. Since I was hand delivering them I didn’t need to worry about them being too bulky to go through the mail.

This family is going on a 9 - 12 month sabbatical in August, so there really isn’t anything they want. They are busy getting rid of things, so I added cash into the pocket so he can treat himself to several nice coffee’s as they get ready for this big adventure.


Supplies used:
5x7” card and envelope
5x7” Foliage Frame, Kat Scrappiness
Patterned paper - Watercolour Landscapes 1.1, Paper Rosse
Gift Card Pocket - MFT Stamps
Best Gift Ever - MFT Stamps
Brother Label Maker

Sunday, 25 February 2024

Cute Little Gift Boxes!


I loved the Candy Hearts Box die set by Karen Burniston when it was released back in December, but didn't get it until recently. Definitely not in time to use it for Valentine's Day but I LOVE boxes and Gift Card Holders so I had to play with it right away. The die comes with basic shape dies so you can create a window in the front of your box and back it with acetate, and some cute candy heart dies as well. I have a walkthrough of my first play with the die set on YouTube!   


I LOVE how versatile this die set is going to be - and when I cut it out of double sided paper I was even happier with it. The floral boxes will be for Mother's Day and I'm looking forward to decorating them. For the blue marbled box I added a stitched rectangle with notches cut in the top with scissors to hold a bracelet.


I made this as a gift for a friend, and will be adding her name to the fishtail banner.


Supplies used:
Patterned paper - Guilded ink - Recollections
Stitched Rectangle #2 dies - Pink & Main
Ephemera - Woodland Stories, Little Birdie

Wednesday, 20 December 2023

Our Groomer's Christmas Card & Gift Card Holder


When I saw this sheet of cut-aparts (Photo Play) I knew I had to buy a sheet. I love the colours with the fun dog images and the 'spa day' one was just too perfect for what I had in mind.

Since Jasper had a grooming appointment last week, I wanted to bring the groomer a holiday card that included a Gift Card. They always do such a good job with Jasper and he looks totally handsome when he comes out. Not like the 'homeless Sheltie' look he has going in, ha ha.


First up is the Gift Card Holder. I used the measurements in my Gift Card Holder Tutorial (click HERE) and some patterned paper that matched the card. The purse/dog was fussy cut from another cut apart on the sheet and popped up onto the scalloped oval with foam tape. I stamped WOOF! on the oval to fill up some of the white space and the front was done.


Inside, there is the pocket for the Gift Card, and one more WOOF!. We wrote a personal message onto the inside oval.


After matting the 4 x 6" cut-apart onto pink patterned paper, I stamped a sentiment on a fishtail banner and adhered it over the words that were printed on the cut-apart. Then I created an infinity shaker with a transparency and filler that resembled bubbles from a bubble bath.


I stencilled on the card front from the upper left to the lower right corner, and also added stencilling to the envelope.


Here is a peek at the inside. The dog on the spa towel was fussy cut from one of the 3 x 4" cut-aparts on the sheet and I added Nuvo Glaze to the cucumber slices on his eyes. Too funny.


Having been asked how many cards I make I thought it would be fun to keep track this year. Many of my posts include more than a single card or project and below is my tally. 

Card Tally for 2023
January - 53 cards
February - 56 cards
March - 55 cards
April - 32 cards
May - 43 cards
June - 34 cards
July - 56 cards
August - 106 cards
September - 61 cards
October - 51 cards & 5 Tags
November - 46 cards
December so far - 19 cards (& 16 simple tags)

I decided to cancel the subscription that provided linked thumbnails to what products I used on my cards. It was costing me out of pocket each month, so I’m back to listing what I used.

Supplies:
Cut aparts - Pampered Pooch, Photo Play
Pink patterned paper - - Pampered Pooch, Photo Play
5 x 7" card blank and envelope
Outside sentiment - Encircled in Warmth, Stampin' Up
Catherine Pooler inks
Blending sponge - Ranger
Transparency
Bow Wow Stencil - Photo Play
Blending Brushes - Taylored Expressions
Snowflake peel offs - Ecstasy
Nuvo Glaze
Stitched oval dies- MFT Stamps
Scalloped stitched oval dies - MFT Stamps
Woof - Dog Happiness, Frantic Stamper
Blue patterned paper - Countdown to Christmas, MME (old!)

Monday, 27 November 2023

Gift Card Holders (& Tutorial)


After many years of making the same type of Gift Card Holders (see that tutorial HERE) I decided to change it up and even managed a video tutorial!  There are lots of this type of Gift Card Holders out there, but I didn't like how deep the pocket was for a lot of them. That is why I came up with my own measurements and wanted to share. These will fit in a standard A2 envelope.


The first pair uses double sided patterned paper. One has a large snowflake on the front and the other is a 3 x 4" red foil cut apart.


Below you can see the pockets on the left side where you would add the gift card.


This next pair was done with one having a cardstock base and the other from patterned paper. This patterned paper wasn't nearly as sturdy as the first pair so I added a printed panel inside to help with that.


The pockets and sentiments are revealed when you open the holders.


This one was quick and easy and just features pretty patterned paper along with a die cut oval on the front.


Finally, one made with gold foiled patterned paper that I inked with blending sponges and dye inks. The card I made to go with this Gift Card Holder will be up on my blog tomorrow. 😊


Gift Card Holder by Karen Aicken

Base is 10.25 x 4.25"

Score at 2 and 4.75". Be mindful of paper direction! 
Turn it and look at where the score lines will be before scoring

Patterned paper - One at 5.25 x 4" (this goes on the inside right)

One panel at 2.5 x 4"  (this is for the front left)

  One at 1.75 x 4"  (this is to cover the pocket)


Having been asked how many cards I make I thought it would be fun to keep track this year. Many of my posts include more than a single card or project and below is my tally. 

Card Tally for 2023
January - 53 cards
February - 56 cards
March - 55 cards
April - 32 cards
May - 43 cards
June - 34 cards
July - 56 cards
August - 106 cards
September - 61 cards
October - 51 cards & 5 Tags
November so far - 42 cards

I decided to cancel the subscription that provided linked thumbnails to what products I used on my cards. It was costing me out of pocket each month, so I’m back to listing what I used 

Supplies:

Snowflake Gift Card Holder:
Patterned paper - Peaceful Prints, Stampin' Up (old)
Double Stitched Circle dies - Divinity Designs
Large Snowflake die - Impress (old)
Corner Rounder
Project Life Journal Card & Banner Sentiment
Giftable Greetings - MFT Stamps
Peel off Snowflakes - Ecstasy Crafts

Masculine Gift Card Holders:
Patterned paper - unknown
Stitched Ovals - MFT Stamps
Treat Yourself & dies - Pigment Craft Co
Catherine Pooler Inks
Blending Brushes - Taylored Expressions
Gorgeous Grunge - Stampin' Up
Trucking Along & punch - Stampin' Up

Simple Winter Gift Card Holder
Giftable Greetings - MFT Stamps
Braided Oval die - Pinkfresh Studios

Gold Foiled Gift Card Holders
Patterned paper - Holiday Bash, Recollections (old)
Inverted Scallop Circles - Pinkfresh Studios
Short Rectangles Crosshatch - Karen Burniston
Word Set 12 Anniversary - Karen Burniston
Narrow gold tape - Amazon
Mirrored hearts - Kat Scrappiness
Gold foil cardstock
Blending brushes - Taylored Expressions

Friday, 24 November 2023

60th Anniversary Card and Gift Card Holder


It's Fun Fold Friday here on my blog and today I'm sharing a card and gift card holder that a family member asked if I could make for them. I was happy to do so ... and since the couple celebrating their 60th Anniversary love to spend time in the Muskoka's this is what I came up with.


I used several different dies by Karen Burniston, including the Label Charm Pop Up for the card. The scenic paper was a good match but since it was a special occasion I also wanted some sparkle & shine. That came from the rainbow holographic cardstock.


I have had the Pop Up Gift Card Holder for several years and I still get a lot of use out of it. This time I turned it so the gift card slides in from the bottom and their personal message would be revealed when the gift card was removed. 


Having been asked how many cards I make I thought it would be fun to keep track this year. Many of my posts include more than a single card or project and below is my tally. 

Card Tally for 2023
January - 53 cards
February - 56 cards
March - 55 cards
April - 32 cards
May - 43 cards
June - 34 cards
July - 56 cards
August - 106 cards
September - 61 cards
October - 51 cards & 5 Tags
November so far - 36 cards

I decided to cancel the subscription that provided linked thumbnails to what products I used on my cards. It was costing me out of pocket each month, so I’m back to listing what I used with a few affiliate links included.

Supplies:
5 x 7" card and envelope
Rectangle and Labels Crosshatch - Karen Burniston
Mini Alpha & Numbers - Karen Burniston
Numbers - Karen Burniston
Word Set 8 Celebrate - Karen Burniston
Word Set 12 Anniversary - Karen Burniston
Word Set 17 Congrats - Karen Burniston
Rectangle Crosshatch - Karen Burniston
Cheers - Karen Burniston
Corner rounder punch
Adirondack chair die - Colourful Seasons, Stampin' UP
Flat gem stickers - Dazzles
Patterned paper - Scenic View - Reminisce
Rainbow Holographic cardstock - Hunkydory
Forest Trees - Echo Park
Pop Up Gift Card Holder - Lynda Kanase, Sizzix (old)

Friday, 6 October 2023

Pop Up Gift Card Holder


It's Fun Fold Friday here on my blog and today I'm sharing a Gift Card holder I made - back in August! Thought it was time I shared the pics instead of hanging onto them in the file. 

The die set is from Stampendous and it creates the layers, envelope front and pop up. You can combine the front panel die with the envelope front to complete the envelope, and then cut it again to decorate the front of your card. It's smaller than a 'regular' Mini Slimline, sized at 3 x 6". 


I like the pop up surprise when you open the Gift Card Holder, and that you can decorate it for many different occasions. I have used this set frequently in the past year but usually don't end up taking photos to share here on my blog. 


I pulled out an older 6 x 6" paper pad for this Gift Card Holder and since there were several partial sheets and leftover strips in the package ... I used several of them to decorate the card rather than cutting into full sheets.

NOTE:  This is not the gift card we included, rather one I use as a photo prop. 😊


Having been asked how many cards I make I thought it would be fun to keep track this year. Many of my posts include more than a single card or project and below is my tally. 

Card Tally for 2023
January - 53 cards
February - 56 cards
March - 55 cards
April - 32 cards
May - 43 cards
June - 34 cards
July - 56 cards
August - 106 cards
September - 61 cards
October so far - 15 cards

I decided to cancel the subscription that provided linked thumbnails to what products I used on my cards. It was costing me out of pocket each month, so I’m back to listing what I used with a few affiliate links included.

Supplies:
Patterned paper - Picture Perfect 6 x 6", Queen & Company
Gift Card Holder dies - Mini Slim Die Set, Stampendous
Narrow Gold Washi Tape
Peel off stickers - stash
Alcohol markers
Catherine Pooler Inks
Treat Yourself - Pigment Craft Co

Thursday, 27 July 2023

Eight 'Candle' Gift Card Holders


While I haven't had any new Paper Pumpkin boxes in awhile, I do have several that I purchased from subscribers who didn't want theirs that month. One of those is this Candle Gift Card Holders from February 2017! I pulled out the box to make them all up & I have a walkthrough of these Slimline sized Gift Card Holders on YouTube:  


The white insert came with the slots to insert a Gift Card.  You can see a word through the window, and when you pull the tab the words change to reveal a full sentiment. When you pull it fully out, there is an additional sentiment that remains in the window!


The kit came with enough supplies to create nine, but I messed one up. I kept that one to use for the pockets I added to some of them and the final leftover piece was die cut to create a gift tag. The cute Scottie dog was punched from white card stock and added at the bottom.


Having been asked how many cards I make I thought it would be fun to keep track this year. Many of my posts include more than a single card or project and below is my tally. 

Card Tally for 2023
January - 53 cards
February - 56 cards
March - 55 cards
April - 32 cards
May - 43 cards
June - 34 cards
July so far - 54 cards

You may have noticed the affiliate thumbnails are no longer showing on my blog posts. That is because it costs money every month to share those links, and the past few months I havent made nearly enough sales to cover the cost. I would rather spend that money on craft supplies, than continue to pay out of pocket for a feature that viewers arent using. It saddens me that so many people dont bother going to blogs anymore, choosing instead to quickly view a card on social media. ðŸ˜¢ I cancelled my subscription and will go back to listing my supplies in case anyone is curious about what I used.

Supplies:
February 2017 Paper Pumpkin, Many Happy Birthday's - Stampin' Up
Catherine Pooler Inks
Corner Rounder - Creative Memories
Personal Sentiments - Waffle Flower
Various cardstocks
Tag - Nested Hexagons, Pinkfresh Studios
Yellow bakers twine
Stickles
Scottie punch - Stampin' Up

Wednesday, 5 July 2023

Happy Summer Flip-Its Card


Today I'm sharing the final 'End of School Year' cards made for our Grandkids. This one is for Olivia, who will be going into Grade 7 in the fall. Isn't that amazing? She is still holding her own against Pulmonary Hypertension, and considering the Dr's didn't think she would make it to 4 years old ... we are constantly amazed, honoured and grateful for our beautiful granddaughter.


I used an older die for this card, as it is also the 7th edition to my Monthly Series "Throwback Fun Fold Dies". I have checked and this one is no longer available, but the Rectangle Flip-it's is and I will link it below for you. The only difference is the accessory dies that come with the two sets, and of course this one has the separate die to cut notches into the front rectangle to hold a gift card. This one is the Gift Card Flip-Its but I didn't use the notches.


I pulled out a really old 12 x 12" paper package, and used the stickers that were included as well. There is room for us to write our personal message on the reverse side of the front, center rectangle.


I also wanted to slip the grands a little cash to use on their summer adventures, but time was short  and I was already running late since they have been out of school almost a week already. So I pulled out this older die from Papertrey Ink. It die cuts this little folder that would hold a gift card, but it worked for cash too! I tucked each one into their card envelopes.


The notches cut with the die, which holds the gift card/cash from slipping out of the top, and the second one holds the flap closed. I have used this die LOTS over the years! NOTE:  I checked and it is no longer available.


When I was finished with the card and the cash envelopes, I decided I wanted to just FINISH up with the leftover papers & stickers as it's been hanging around in my craft room for too many years. I made eleven Birthday cards to donate to my Mom's old nursing home and I'll be sharing those later this month.

Having been asked how many cards I make I thought it would be fun to keep track this year. Many of my posts include more than a single card or project and below is my tally. 

Card Tally for 2023
January - 53 cards
February - 56 cards
March - 55 cards
April - 32 cards
May - 43 cards
June - 34 cards
July so far - 3 cards

Additional Supplies:
Gift Card Flip-Its - the Stamps of Life
Patterned paper & stickers - Paradise Beach, Echo Park
White card stock
Gift card/cash pocket die - Papertrey Ink (long retired)
Yellow cardstock - Bazzil

This blog uses affiliate links whenever possible. This means, if you make a purchase through one of my affiliate links that you pay the same amount but I may receive a small commission from your purchase. I only link products that I own, love and use for my card making and not every link below is an affiliate one! 😊

adddddddddddddddd

Wednesday, 24 May 2023

Mug Gift Card Holder

Today I'm sharing the 5th edition to my monthly series "Shaped Cards". This mug shaped card die is from Trinity Stamps and I have had it for quite awhile. The card fits in a standard A2 envelope, and also comes with a gift card insert. 

One of our daughters asked for a Gift Card for Mother's Day, so this is the one I made for her. Since it was going to be hand delivered I was able to add the ribbon bow and chipboard elements without worrying about bulk and extra postage.


NOTE:  I cut a slit in the fold of the card, and that is where I threaded the ribbon through to tie onto the front panel. That way it would decorate the front AND the inside!

Having been asked how many cards I make I thought it would be fun to keep track this year. Many of my posts include more than a single card or project and below is my tally. 

Card Tally for 2023
January - 53 cards
February - 56 cards
March - 55 Cards
April - 32 Cards
May so far - 38 Cards

Additional Supplies:
Patterned paper - Patio Party, American Crafts (my stash)
Scrap of brown cardstock
Stitched heart die - Elizabeth Craft Designs
Sheer ribbon - stash
White cardstock
Chipboard elements - Stamperia (stash)

This blog uses affiliate links whenever possible. This means, if you make a purchase through one of my affiliate links that you pay the same amount but I may receive a small commission from your purchase. I only link products that I own, love and use for my card making and not every link below is an affiliate one! 😊

Tuesday, 10 January 2023

Wintery Gift Card Holder


I haven't purchased many crafting supplies these past few months, but I did order this Gift Card Holder die set by Stampendous at the end of October. I love making Gift Card Holders and this die set is pretty cool. They call it a Mini Slimline but their Mini Slimline size is 3 x 6". If this had been just a card die it would have been a hard pass for me, but since it was for a Gift Card Holder I went for it. And I'm really enjoying it!

For the card base, you simply fold a 6 x 6" piece of patterned in half. Ha. I think I will start rounding the corners using a punch, which is a detail I thought of after I made up a couple of these to give out over the holidays.

The die set creates the layering pieces AND the little envelope as well as a pop up to hold the gift card. Since I'm still playing with the collection sent to me by Scrap 'n Stamp Canada, I used those papers, stickers and ephemera for this one. 


Below is what the front of the envelope looks like. 


You can see the pop up inside, that creates a pocket in the fold to hold a gift card.


I was asked how many cards I make but I didn't have a clear number. Since a lot of my posts include more than a single card or project, I thought it would be fun to keep track this year. 
2023 Tally: 20 Cards


Additional Supplies:
White cardstock

This blog uses affiliate links whenever possible. This means, if you make a purchase through one of my affiliate links that you pay the same amount but I may receive a small commission from your purchase. I only link products that I own, love and use for my card making and not every link below is an affiliate one! 😊

Saturday, 3 December 2022

A Canadian Christmas Video Hop

Hello my crafty friends! I've been dropping hints about an upcoming Video Hop by Scrap 'n Stamp Canada, and today is the day the creators are sharing their projects! 

I have a tutorial for creating a pair of Gift Card Holders and also a Fun Fold card on YouTube


There are a lot of cut aparts included in the paper package, so I wanted to show you some different ways to use them. They can really help you make fun projects in very little time and everything coordinates with the papers!


The photo above shows the fun fold card and the two Gift Card Holders. Below you can see one of the Gift Card Holders open, with the pocket to add the gift card into.


You will also have seen a number of cards I've already created with this paper package, the coordinating solids, the enamel dots and ephemera. I even used it for my December Sheetload of Cards, which posted yesterday! Everything is available at Scrap 'n Stamp


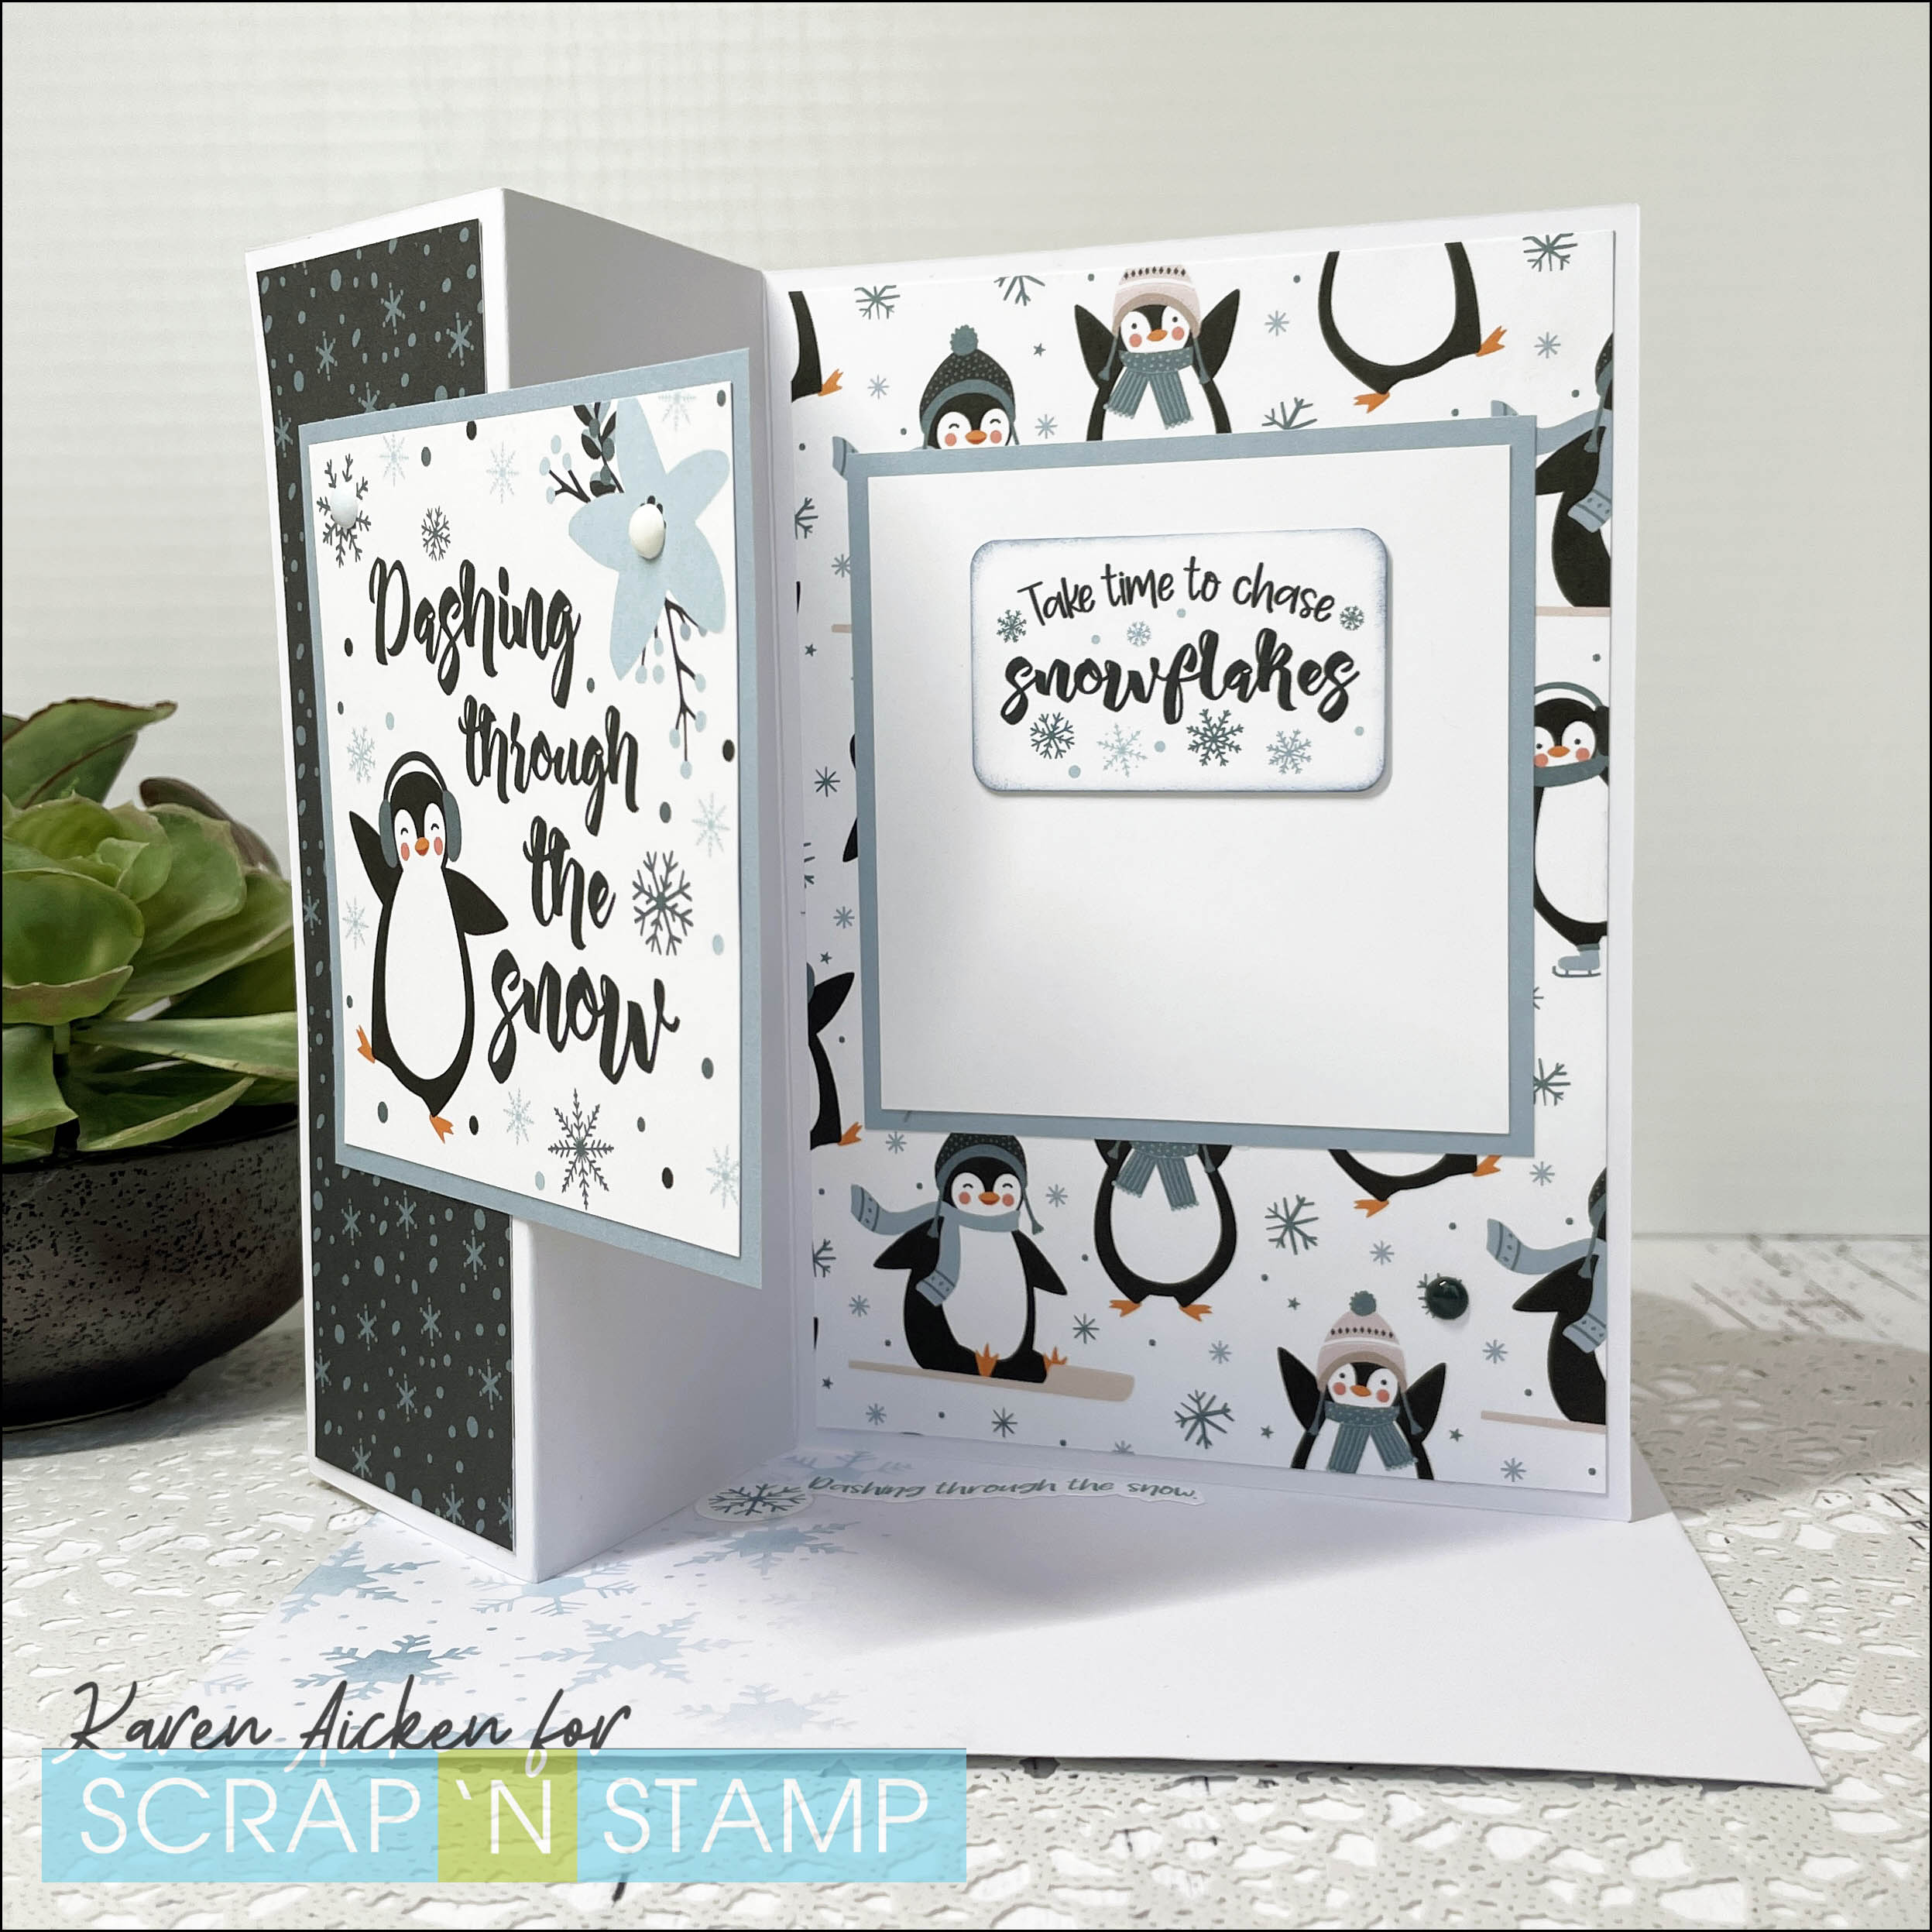
Next up is the 5 x 7"  Z-fold card using another one of the included cut aparts.


Inside is one of the ephemera pieces as the sentiment and still lots of room to write a personal greeting.


You should have arrived here from the talented Candice!

I believe I'm the last creator on the hop - so the next stop is the Scrap 'n Stamp Blog:


Scrap 'n Stamp is giving away THREE $100 gift certificates to their webstore. The hop and comment period will run from 9:00am EST on December 3, 2022 through 11:59pm EST on December 10, 2022. Winners will be announced on the Scrap 'n Stamp Blog December 12, 2022. The more people comment, the higher their chances of winning! _____________________________________________ DISCLAIMER: Being on a Design Team, I receive supplies to use in some of my projects. My opinion is always my own, and if I am promoting a product it is because I truly like it and not because it was gifted to me.