Friday 29 April 2022

Hummingbird Birthday Pop Up Card Duo


Hello my crafty friends and welcome to Fun Fold Friday here on my blog. Last fall I had picked up a few of these edger dies from Creative Expressions and since I have really enjoyed them I couldn't resist buying this hummingbird one recently as well. While I made Birthday cards today, I think this die will work for several different occasions and plan on making some into sympathy cards for my stash. 

Now, in the photo above, you can see one of the issues with trying to photograph mirror card stock.  While it is actually a soft pink and matches the papers really well, it looks like a rose gold in that photo. 

I did some scoring onto the Giant Happy Birthday die cut and turned it into a pop up! I have done this before but I looked through my blog and can't find the post. 😬  I'll do a tutorial for you hopefully next week! It's another fun way to use these giant word dies from Lawn Fawn. These cards are larger than A2, they are almost 5 x 7" made using a card and envelope set that I picked up at Michaels a few years ago.


Below is a better photo of the pink mirror cardstock - and you can see that the colour matches much better than in the first photo! Those mirror heart sequins catch the light as well and are SO pretty. You also get a better look at the texture and shimmer in the pearlized purple cardstock.


I've had these sweet hummingbird stamps for years - I stamped directly on a scrap of the patterned paper then die cut the hummer.Metallic markers adds some additional sparkle and shine, but that just doesn't show up in photos. I used gold, green, blue and purple Bic metallic markers and really liked the effect. 


*** Edited to add that I entered these cards into the latest challenge at Seize The Birthday, as the challenge coordinator saw them on IG and suggested that they worked perfectly for the theme! 


This blog uses affiliate links whenever possible. This means, that at no cost to you, if you make a purchase through one of my affiliate links that I may receive a small commission from your purchase. I only link products that I own, love and use for my card making!  Note, since I cannot link the patterned paper I used, I will link another lovely package that I also have in my craft room and use frequently. 

Any supplies I'm unable to link are listed at the very bottom of my post.


Additional Supplies:
5 x 6.5" Card & Envelope set - Michaels
Patterned paper - Guilded Ink, Recollections
Bic metallic markers
Alcohol markers

Thursday 28 April 2022

Rainbow Hearts Birthday Card Duo


Hello my crafty friends.  These cards have actually been finished for a couple of months, but I'm just getting a chance to share them now. I had been working with this Heart Background die from Studio Katia and spied the diagonal striped patterned paper. I wondered how the heart background would work with it and these two cards are the result of that wondering!

I popped the fallaway white hearts from the first card into the openings on the second card using foam tape.


Inside I added a narrow fishtail banner for a pop of colour, as well as a stamped greeting.

This blog uses affiliate links whenever possible. This means, that at no cost to you, if you make a purchase through one of my affiliate links that I may receive a small commission from your purchase. I only link products that I own, love and use for my card making!

Any supplies I'm unable to link are listed at the very bottom of my post.


Additional Supplies:
White card stock - Accent Opaque Digital Super Smooth (Amazon .ca)


Wednesday 27 April 2022

Potted Plants - Another Sheetload of Cards


Hello my crafty friends. A friend had sent me some plant themed 6 x 6" patterned papers so I paired them with the Potted Plants bundle from Stampin' Up set and used the June 2021 Sheetload of Cards. Instead of alternating the centre strip pieces though, I used the same patterns on each card. I love how you can use the Sheetloads as a jumping off point and make them work for you. 


Here is a peek at the inside - I did them all the same. 


I'll be donating these cards to my Mom's old nursing home!


This blog uses affiliate links whenever possible. This means, that at no cost to you, if you make a purchase through one of my affiliate links that I may receive a small commission from your purchase. I only link products that I own, love and use for my card making!

Any supplies I'm unable to link are listed at the very bottom of my post.


Additional Supplies:
Green card stock - stash
Patterned paper - unknown (gift from a friend)
White card stock - Accent Opaque Digital Super Smooth (Amazon .ca)
Plentiful Plants stamps and dies - Stampin' Up
June 21 Sheetload of Cards for Sketch
Stitched Oval dies - MFT Stamps (retired)

Tuesday 26 April 2022

Anniversary Tower Pinwheel Card

Hello my crafty friends. I hadn't made a Tower Pinwheel card in quite a while, so decided to create one for our eldest daughter and her hubby for their Anniversary. I pulled out that retired patterned paper, stickers etc that I have been working with and have a walkthrough of my card on YouTube - these cards are as much fun to play with as they are to make!  

The first photo above shows each of the 4 decorated panels, and below is what the card would look like coming out of the envelope ...


If you would like to see a tutorial on how to make a Tower Pinwheel card in various sizes, I highly recommend Linda's video HERE .


Here is a link to the Label for other Tower Pinwheel cards here on my blog:  

This blog uses affiliate links whenever possible. This means, that at no cost to you, if you make a purchase through one of my affiliate links that I may receive a small commission from your purchase. I only link products that I own, love and use for my card making!

Any supplies I'm unable to link are listed at the very bottom of my post.


Additional Supplies:
Patterned paper, stickers etc - Flower Market, Carta Bella (retired)
White card stock - Accent Opaque Digital Super Smooth (Amazon .ca)

Monday 25 April 2022

Slimline Shaker Birthday Card


Hello my crafty friends!  It's Masculine Card Monday here on my blog and today I'm sharing the birthday card I made for a friend.  I added a shaker to the front for a little somethin' somethin', with a fun sentiment inside the shaker window.


Since this is a dog loving fellow - I added a 3D dog sticker from my stash. The stamped dancing man was coloured with alcohol markers and I added some puffy dots too.


Here is a peek at the inside where I added strips of patterned paper, a stamped greeting and a smiling face. Remember you can click on the photos to open them up larger ... but the sentiment inside reads:  "Hope your birthday is just like you ... totally freaking awesome". 😊


 This blog uses affiliate links whenever possible. This means, that at no cost to you, if you make a purchase through one of my affiliate links that I may receive a small commission from your purchase. I only link products that I own, love and use for my card making!

Any supplies I'm unable to link are listed at the very bottom of my post.


Additional Supplies:
Dog sticker - Paper Studio
Blue marker - fine
Puffy Dots - Pebbles
Blue cardstock - my stash
Corner Rounder - Creative Memories
Alcohol Markers

Friday 22 April 2022

Joyful Peony Birthday Z-Fold Card Duo


Hello my crafty friends. It's Fun Fold Friday here on my blog and today I'm sharing a pair of Z Fold cards I made for my stash. There are a bunch of Birthday's coming up and I wanted to get ahead of them. I started with the printed card bases, patterned paper & coordinating envelopes from Stampin' Up then added some different items from my craft room.

The Joyful Peony is a stamp, layering stencil and die set from Pinkfresh studio - it's not new to my craft room by any means - but I love getting it out to play with. I added the colour with Catherine Pooler inks and small blending brushes, die cut the image and added it to a layered oval. It's such a nice big element and would easily fill the front of an A2 card. These ones are larger ... 4-1/4 x 6-1/4", sized I'm sure to add a 4 x 6" photo to the front.


Another oval was adhered to the inside back with a stamped sentiment.


I am LOVING this sentiment set, which IS new in my craft room. But it's been getting a real workout the past few months!


This blog uses affiliate links whenever possible. This means, that at no cost to you, if you make a purchase through one of my affiliate links that I may receive a small commission from your purchase. I only link products that I own, love and use for my card making!

Any supplies I'm unable to link are listed at the very bottom of my post.


Additional Supplies:
Patterned Paper, printed card & envelope - Hand Penned suite, Stampin' Up (retired)
Oval dies - Dees Distinctly 
White card stock - Accent Opaque Digital Super Smooth (Amazon .ca)

Thursday 21 April 2022

Tropical Plant Birthday Card Duo


Hello my crafty friends. I had another play with the Plentiful Plants stamps/dies which were a Birthday Gift from our eldest daughter.  I started with an A2 printed card from a boxed card& envelope set. These note cards are usually printed on the front and back, so I will cut them in two pieces to use with my own white card bases. That way I get two cards from a single one of the boxed cards. For these cards I used the Divinity Designs Double Stitched Rectangle die to cut the cards apart so there is a nice stitched border around each panel.

The first card has gold gel pen highlights and a gold puffy sticker as well as a gold mirror die cut strip. Both the oval on this first card, and the circles on the second were leftover from other projects and sitting on my stamping table.


The black cardstock is actually recycled stamp packaging -- these ones from an old ECD stamp set (or maybe a die - it's been in the scrap envelope for many years). I like the subtle shine it gives.


Both cards are the same inside ...


One of these cards has already been mailed to a friend, and the other is in my stash waiting for another friend's birthday to get closer. 


 This blog uses affiliate links whenever possible. This means, that at no cost to you, if you make a purchase through one of my affiliate links that I may receive a small commission from your purchase. I only link products that I own, love and use for my card making!

Any supplies I'm unable to link are listed at the very bottom of my post.


Additional Supplies:
Boxed cards - Paper Studio (old, from my stash)
Plentiful Plants stamps & dies - Stampin' Up
Scraps of card stock - stash
Black card stock - scraps of ECD Packaging
Puffy Dots - Pebbles
White card stock - Accent Opaque Digital Super Smooth (Amazon .ca)

Wednesday 20 April 2022

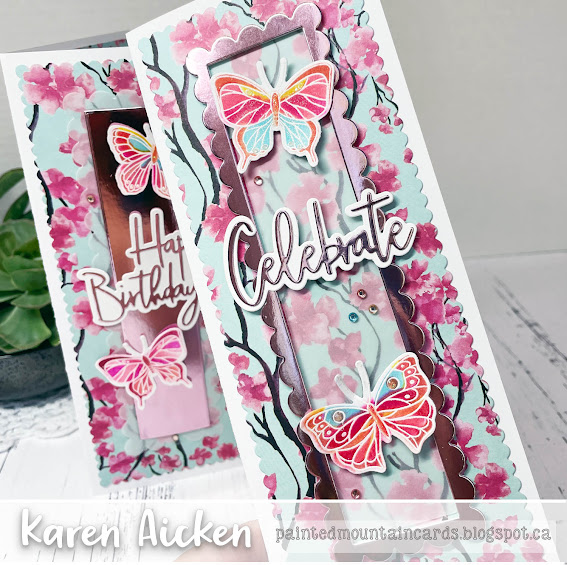
Slimline Cherry Blossom Birthday Card Duo


Hello my crafty friends!  Today I'm sharing a pair of Slimline Birthday Cards that started out with this cherry blossom patterned paper. I have had it for several years - it came in a package of other prints that I just LOVE, but this one? Not so much. I thought I'd see if I liked it better on a Slimline card, but ... nope. Still not a fan. 

The scalloped rectangle frame was cut twice - once from vellum and once from pink mirror cardstock. Then I alternated the pieces on each card. The white embossed butterflies were coloured with the coordinating layering stencils and I added die cut words with their shadows.  Oh, and I did add a little detailing to the butterflies with alcohol markers. The words were cut from the same pink mirror cardstock. 

Since the frames were popped up with thin foam tape, I nestled some coordinating bling around the different elements. So the cards are nice and sparkly at least!


Below are pictures of the inside of both cards, with a little stencilling, stamping and a punched butterfly. I also added another layer of the cherry blossom paper as I figured I'd use as much as I could on these two cards. 


This blog uses affiliate links whenever possible. This means, that at no cost to you, if you make a purchase through one of my affiliate links that I may receive a small commission from your purchase. I only link products that I own, love and use for my card making!

Any supplies I'm unable to link are listed at the very bottom of my post.


Additional Supplies:
Patterned paper - Park Lane, Paper Studio (old, from my stash)
Shimmer Spray
Butterfly stencil - unknown (old, from my stash)
White card stock - Accent Opaque Digital Super Smooth (Amazon .ca)

Tuesday 19 April 2022

Mini Slimline 'Scrapbuster' Birthday Card


Hello my crafty friends. Today's Birthday Card was all about using up bits and pieces leftover from various other cards. Everything seemed to coordinate and I was happy with how it turned out!

Below you can see the different layers on these 3D stickers. I gently pulled them apart and replaced the foam tape with my thin foam tape so there is still lots of dimension but the sticker is not as bulky as it was when it came out of the package.


Here is a peek at the inside, where I used the final scraps to make a cluster of fishtail banners. The butterflies were created using a (very old & long retired) punch and stamp set from Stampin' Up. 


I loved using up so many leftovers for this card, probably because I liked each of the elements on their own enough to buy them in the first place and they worked together so well. 😊

This blog uses affiliate links whenever possible. This means, that at no cost to you, if you make a purchase through one of my affiliate links that I may receive a small commission from your purchase. I only link products that I own, love and use for my card making!

Any supplies I'm unable to link are listed at the very bottom of my post.


Additional Supplies:
Patterned paper (floral) - Park Lane, Paper Studio (old from my stash)
Mint dot patterned paper - Paper Studio
3D floral stickers - Paper Studio
Butterfly stamp and punch set - Stampin' Up (retired)
White card stock - Accent Opaque Digital Super Smooth (Amazon .ca)

Monday 18 April 2022

Happy/Hoppy Spring Mini Slimline Card


Hello my crafty friends! It's Masculine Card Monday here on my blog and today I'm sharing a Mini Slimline for our Grandson for Passover.  The Giant Happy Spring die cut was inked with daubers and Catherine Pooler inks, added to a white off-set layer for a shadow, and then white gel pen highlights were drawn on. The cute frog is from Karen Burniston's Bayou Animals and I coloured inside the fly wings with a white gel pen.

Inside the card, I added another frog and pair of flies - I know he is going to get a bigger kick out of the fly's than the rest of the card, ha ha. I hand lettered Happy Passover and a simple message inside as well.


This blog uses affiliate links whenever possible. This means, that at no cost to you, if you make a purchase through one of my affiliate links that I may receive a small commission from your purchase. I only link products that I own, love and use for my card making!

Any supplies I'm unable to link are listed at the very bottom of my post.


Additional Supplies:
Green cardstock scraps
Fineliner markers - Chameleon
White card stock - Accent Opaque Digital Super Smooth (Amazon .ca)
Cloud patterned paper - Doodlebug, Flower Box (OLD - stash)
Friday 15 April 2022

Vintage Truck Pop Up Mother's Day Card


Hello my crafty friends. Today is Fun Fold Friday here on my blog and I'm sharing the pop up Mother's Day card I made for my Mother-In-Law. Vintage trucks like this always make me think of her, as she grew up on a working farm that had old trucks around. I have a walkthrough of my card on YouTube HERE:  


 I kept the front nice and simple, because all the fun is on the inside! 


The (retired) patterned paper is a package I've had for several years and I've been working at using it up. the 12 x 12" package included a 12 x 12" sheet of stickers, and a couple of the pages had cut-aparts. The truck is one of the included stickers, so I adhered it to white card stock for stability then fussy cut it out. Then I added two box platforms so the truck would pop up and the boxes were hidden behind each wheel. I didn't to a tutorial for this one, but I do have a video for creating a Simple Box Pop Up and you can find that HERE

I fussy cut several of the potted plants from a different sheet in the package and added them to the truck bed and added lots of sparkle with the Pops of Color. The banner uses more of the included stickers. I also added the Crosshatch Labels by Karen Burniston - they are such a great shape for sentiment blocks!

This blog uses affiliate links whenever possible. This means, that at no cost to you, if you make a purchase through one of my affiliate links that I may receive a small commission from your purchase. I only link products that I own, love and use for my card making!

Any supplies I'm unable to link are listed at the very bottom of my post.


Additional Supplies:
Patterned paper, stickers etc - Flower Market, Carta Bella (retired)
Shimmer Spray
Butterfly punch - Stampin' Up (retired)
Blue cardstock
White card stock - Accent Opaque Digital Super Smooth (Amazon .ca)