Sunday, 31 May 2020

Succulent Explosion Pop Up Slimline Card


Hello crafty friends ...

I talk about some of the details for this pop up card on my YouTube video HERE:


This card just makes me happy. One, it's a Slimline card which is a format I'm really enjoying because it's so different than the A2 cards I've been making for over 30 years. (Gasp). Two, it has succulents on it which I also love. Three, I was able to combine a pop up die set by Karen Burniston to make this a pop up card. Win Win Win!


The front was quick and easy, but has lots of sparkle and shine from the Glitter Dots, the Peel Off gold corners and the gold foil shadow for the Hello die.


I used the Explosion Pop Up for the inside, and I really like how well these cards stay open for display.


More sparkle and shine inside, with gold gel pen highlights, gold Peel Off border stickers, and I also added two more gold Peel Off corners on either side of the pop up step.


Supplies:
Patterned paper - Succulent Serenity, Lynda Kanase (retired)
1069 Explosion Pop Up - Karen Burniston
Sage green and white card stocks
Gold Peel Off border stickers - Elizabeth Craft Designs
3-d Succulent & banner - Greenhouse Collection, Kaisercraft
Sakura gold gel pen
Slimline Stitched Rectangle - Trinity Stamps
Hello Friend stamps and dies - Pink & Main
Gold foil card stock - Stampin' Up
Scalloped Stitched Nesting Circles - Tutti Designs
Stitched Circle (in with the patterned paper from a different project)
Gold Gitter Dots - Elizabeth Craft Designs
Stamp on back of card - Riley & Company

Card size - 8.5 x 3.5", fits in a #10 Business Envelope

Thanks for stopping by today

Saturday, 30 May 2020

Hunting Taco’s Card


Hello crafty friends ...

I talk a about the details of this card in my YouTube video HERE:


Yes, I made another Slimline card. I am really enjoying this format, and the challenge of coming up with ways to make them interactive. It's also fun to have such a different size of 'canvas' to lay out stamps, dies and embellishments.


Everything but the card base and tree trunk was done with white card stock, inked with both the  Taylored Expressions and i-crafter Blending Brushes. The clouds and tractor/hill were die cut from the white panel and inked, then inlaid back in like a puzzle.


Inside I used the Katherine Label Pop Up by Karen Burniston, adding the fun Hunting for Taco's stamp from Riley & Company.


I also added some inked clouds and fun banners - which are from the Dress Up Riley Camping set.


Ahahaha - that Funny Bones stamp just cracks me up.


Supplies:
Hunting Riley - Riley & Company
White and kraft card stocks
Catherine Pooler Inks
Chameleon Markers
Sakura Black Glaze and White Gel Pen
Kraft card stock
1097 Farm Edges - Karen Burniston
1045 Outdoor Scene - Karen Burniston
Copic Markers
1011 Katherine Label Pop Up
Dress Up Riley Camping Accessories (banner) - Riley & Company
Dress Up Riley Farm Accessories (chicken, branch, smoke puff) - Riley & Company
i-crafter blending brushes
Taylored Expressions Blending Brushes

Card size: 3.5 x 8.5”, fits in a Standard #10 Business Envelope

Thanks for stopping by today

Thursday, 28 May 2020

"May the Horse Be With You" Card


Hello crafty friends ...

It's time for a new Challenge at Your Next Stamp - 
the Fun Friday Challenge #140 has a theme of Sparkle & Shine!

The Fun Friday challenges come with two chances to win prizes!!
Comment on the YNS BlogInstagram or Facebook pages for a chance to win a free stamp set. Comment on all three to increase your chances, but comments must be left by June 3rd 2020. The winner will be announced on June 5th on the YNS Blog.

More details about the prizes at the end of my post.

This card has a lot of shimmer and sparkle to it, and it's difficult to capture that in the photos.  I started off by making a navy blue Slimline Card and used the Falling Stars Die to cut the stars from a navy panel. I backed the opening area with gold glitter card stock so it shines through the star openings.


I couldn't resist the Show Ponies set when it was released - Olivia (granddaughter) and Hannah ('Daughter in law') love horses. Hannah's Mom has a horse and often takes Olivia for riding lessons, which just thrills all of us.

I added extra shimmer & shine to this horse with both a gold gel and black glaze pens. I pulled out my very old Rub Ons, and rubbed the grass piece with a blue metallic one, and then the upper hills with a gold. Ha - you should have seen my finger tip when I was finished all that rubbing! I didn't think the colour would come off for days. (It did, ha ha). Then I added a 'moon' cut from the glittered card stock with a circle die.


Inside I used the Falling Stars die once again, this time cutting them from a white panel and rubbing the opening with gold Rub Ons. I added one more sparkly pony to the bottom but there is still lots of room to write a message.


I adhered some of the navy fall away stars back onto the card front, rubbing them with copper Rub Ons. While it may look dark and blobby in the photos, it's quite pretty in real life.


The Fun Friday Challenge #140 runs through June 11 2020 at midnight. One random participant will win a $15 gift certificate to the Your Next Stamp store.  If YNS stamps or dies are the focal point then the winner receives an additional $5 gift certificate for a total of $20!!  The winner will be announced on the YNS Blog the Sunday after the challenge closes. Check it all out on the Your Next Stamp blog HERE. 

Supplies:
Falling Stars Die - Your Next Stamp
Black Olive Ink - Your Next Stamp
Show Ponies - Your Next Stamp
Show Ponies Die Set - Your Next Stamp
Double Pierced Hills Die Set - Your Next Stamp
Grass Tuft Die - Your Next Stamp
Stitched Rectangle Die Set - Your Next Stamp

Navy confetti card stock
Navy and white card stock
Slimline Stitched dies - Trinity Stamps
Gold Glitter Card Stock - American Crafts
MISTI - My Sweet Petunia
Sakura black glaze and white and gold gel pens
Washi Tape
Copic Markers
Metallic Rub Ons - Craft T
Circle Dies - Hero Arts
Gold embossing powder

Card size - 3.5 x 8.5"

Thanks for stopping by today

Teacher Thank You Shaker


Hello crafty friends ...

Today I'm sharing another Teacher Thank You Card made for the Grandkids to give their teachers at the end of the school year. Teachers are still working, doing their classes by Zoom or video lessons but I wasn't sure if cards would be needed this year or not.

I used the fun School Days Shaker Kit from Queen & Company for this card. I just adore the schoolhouse from the kit. Actually I really like everything in the kit! Todays card uses a sketch and patterned paper from my stash as well as some primary coloured enamel dots.


Inside I added a stamped greeting and a non shaker crayon using dies & stamps from the kit, joining the two together with a penned line.


Still unsure if these cards will be needed by the Grandkids this year, but if not then I will just hang onto them until next June. Surely the world won't still be upside down.

Supplies:
Green, white and red card stocks
Patterned paper and Cut Aparts, Back To School, Echo Park and Photo Play
Dashing Rectangle dies - Elizabeth Craft Designs
Sketch - Mojo Monday 353
School Days Shaker Kit - Queen & Company
School Days Outline Die - Queen & Company
Various sequins and beads & filler
Sakura White Gel Pen
Stitched Oval Die - MFT Stamps
Enamel Dots - Doodlebug
Black Pen

Card size - Standard A2, 4.25 x 5.5”

Thanks for stopping by today

Wednesday, 27 May 2020

Hello Slimline Card


Hello crafty friends

Today I'm sharing a Slimline card I made to send to a friend. I'm sending out a lot of Happy Mail while we are all staying home. Even though things are slowly starting to open up here in Alberta, life is far from normal and people are still staying home a lot.

I die cut a stitched oval, stamping it with pretty SU floral images. I pulled out the i-crafter Love Bug die set for the pretty butterflies. The HELLO was a 'free with purchase' die from MFT and it's such a great size!


Inside I added two more of the i-crafter butterflies, and there is lots of room to write a short note on the white panel.


I found some vellum #10 Envelopes when I was reorganizing my craft room - look how pretty the card looks in a vellum envelope! I will just attach a label to the front for a crisp, readable area to write the address.


Supplies:
White, blue and pink card stocks
Patterned paper - Pocket Blossom, DCWV
Slimline Scalloped dies - Trinity Stamps
Slimline Stitched dies - Trinity Stamps
Beautiful Friendship stamp set - Stampin' Up
Stitched Oval die - MFT Stamps
Sakura white gel pen
222003 Love Bugs - i-crafter
Wink of Stella
Stickles
Black Pen

Card size - 3.5 x 8.5", fits in a standard #10 business envelope

Thanks for stopping by today

Tuesday, 26 May 2020

Llama Trifold Slimline Card


Hello crafty friends ...

Today I'm sharing another Slimline card ... this one has a bit of a twist to it! It's a Slimline Trifold Card, with windows!

I talk about some of the details in my YouTube video HERE!


I loved this sparkly plaid patterned paper - it's so cheerful! The fun Llama stamp set is from a Taylored Expressions set I picked up earlier this year and I just love the characters in it. 


Such a perfect sentiment to go with the Llama one, right? Especially with the Llama is peeking out a window!


When you open the card, you can see that it's a Trifold card, with a second window and a stamped greeting.


Finally, here is what the card looks like fully open.


There is a signing block with a tiny Llama sticker below the stamped Llama. I created the rainbow sky behind the Llama using the i-crafter Blending Brushes.


Supplies:
White card stock
Patterned paper - The Sorbet Stack, DCWV
Reverse Scallop with Optional Stripes - Your Next Stamp
Stitched Square Die Set - Your Next Stamp
Cloud mask - All Night Media
Blending Brushes - i-crafter
Copic Markers
Sakura white gel and black glaze pens
Look Who's Talking stamp & die set - Taylored Expressions
Dashing Rectangle dies - Elizabeth Craft Designs
Markers - Local King Rubber Stamps
Stitched circle die - MFT Stamps
C'mon Get Happy stamp set - Taylored Expressions
Tiny Llama stickers - American Crafts
Enamel Dots/Gumdrops  - Echo Park & Your Next Stamp
Enamel Hearts - Doodlebug Designs

Card size - 4 x 8.5", fits in a #10 Business Envelope

Thanks for stopping by today

Monday, 25 May 2020

Black and Gold Masculine Birthday Wiper Card


Hello crafty friends ...

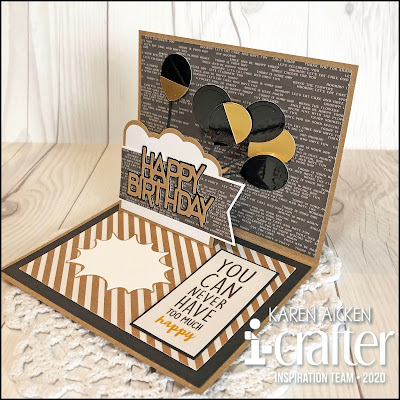
It's Masculine Card Monday here on my blog and today I'm sharing a fun Wiper Card that was actually made in November as a show sample for i-crafter's launch at  Creativation in January.

The card front uses a couple of i-crafter dies - the Happy comes from the Zip Gift Tag (January release), and the cool 'splat' die is from the Comic Word die set which is also part of the May release.


I backed the 'happy' with gold foil card stock and outlined the 'splat' with a gold gel pen. It's subtle in the photos, but I also outlined the decorative panel on the front with a gold gel pen. I do this a lot but often forget to point it out. The metallic in the gel pen catches the light and it's a nice effect.


Remember you can always see my interactive cards in action HERE, on my YouTube Channel!


I offset the Wiper Insert on this card, moving it all the way to the left and only using one arm instead of two. You can see the card I made with both arms loaded with balloons on my blog post HERE if you are interested.


I used neutral colours with pops of gold, and the sentiment was a cut apart in the 6 x 6" paper pad I was using for the card. The balloons were cut from both gold foil and black glossy card stocks and I was SO happy with how they looked when they were all assembled and adhered into the card.


I really like this layered Happy Birthday Die, and can see getting lots of use out of it. It's a great size and has a unique font.


I was happy that it was going to be a booth sample, but even more pleased when Lynda shared it again in her May Release Preview Video. When I make a show sample, I make sure the cards are nice and sturdy and also use lots of adhesive. They are handled a LOT and you want them to hold up well. Obviously this one did, as shown in the video which you can see HERE if you are interested in seeing the entire May i-crafter release.

Supplies:
222054 Happy Birthday Wiper Insert - Lynda Kanase, iCrafter
222041 Comic Words - Lynda Kanase, iCrafter
222010 Zip Gift Tags (happy) - Lynda Kanase, iCrafter
Kraft, white and black card socks
Patterned paper - Spring Fling, Pebbles
Rectangle dies - Hero Arts
Black Mirror card stock - Tonic Studios
Gold foil card stock - Stampin' Up
Word - Cut apart from the patterned paper above
Sakura gold gel pen

Card size:  Standard A2, 4.25 x 5.5"

Thanks for stopping by today

Sunday, 24 May 2020

Pop Up Floral Slimline Card with Butterflies


Hello crafty friends ...

Below is my YouTube video with some details on how I created the card. You can always find my YouTube videos HERE on my YouTube Channel. I'd love to have you subscribe!


I'm excited to share this Slimline card with you today, because it's also a pop up card. I am really liking the Slimline format, but since I also like to make interactive cards I was really happy with how well this worked out!


I used sparkly patterned paper from K & Company, adding extra sparkle and shine with Glitter Dots. Gold Peel Off Corners, and gold Stickles on the pretty YNS Butterflies.


In the photo below you get a better idea of how sparkly the paper is!


Finally, here is a peek at the inside. To make it easier (I don't like math), I cut the patterned paper inside to the same dimensions as the Slimline Card (7 x 8.5") and did all my scoring & added the extra folds and cuts to make it dimensional. When I was happy with that, I simply trimmed off each side and a bit off the top so it would fit inside the card with an even border all the way around. Otherwise, I would have had to figure out the measurements for each scoreline as well as the perimeter.


As I mentioned in the video - this is something I've done before with an A2 card die that I have, and because people have asked how I did that I expect they will also want to know more on how to make it work for a Slimline Card too.

You can see my photo tutorial on how to add the additional folds & cuts HERE,  
and HERE is the link to the Paper Springs video I used. 

The patterned paper I used for my card today is double sided, so I did the markings on the back side (the pattern I wasn't going to have show). In the photo below, you can see the centre fold is on the left  so I'm making the two cuts from the fold up to the vertical line I drew parallel to the inside folds and cutting through both layers at the same time. This is the area that becomes inverted when you attach this piece inside your folded card! NOTE: If you click on the photo it will open up larger in a separate window.


Supplies:
Patterned paper - K & Company
Pink and awhile card stocks
Stamp on back - Riley & Company
Bristol Smooth Card Stock
Gold embossing powder
Zig Clean Color Markers
Water Brush
Nuvo Glitter Pen
Gold Stickles
Simple Strips Background - Taylored Expressions
Simple Strips die - Taylored Expressions
Beautiful Butterflies - Your Next Stamp
Beautiful Butterflies Die Set - Your Next Stamp
Peel Off Photo Corners
Glitter Dots - Elizabeth Craft Designs
White pearl card stock
Hello & There dies - MFT Stamps
Pink vellum
Stitched Scalloped oval die - MFT Stamps
Paper Spring
Butterfly punch - Martha Stewart

Card size - 3.25 x 8.5", fits in a standard #10 Business Envelope

Thanks for stopping by today

Saturday, 23 May 2020

'Rainbow Coffee Cup' Pop Up Card


Hello crafty friends ...

Today I'm sharing another coffee themed card for the Coffee Lovers Spring & Summer Blog Hop!


Remember you can always see my interactive cards in action, HERE on my YouTube Channel!


This time I chose to make a Slimline card, and made it a Pop Up with Karen Burniston's Katherine Label Pop Up! Of course I started with kraft card stock,  then added some rainbow striped patterned paper and a scalloped rectangle. The rainbow of To Go Coffee Cups has been on my list of cards to make for a long time, and a Slimline format seemed the perfect way to do that in a different way than you can do with a standard A2 card.


I used Karen Burniston's Coffee Charms, snipping off the hanging hole and cutting them from a rainbow of card stocks from my scrap bin. A few sparkly Gumdrops were added for some sparkle and shine.


Inside, the rainbow continues! I used Karen Burniston's Alpha to die cut the letters for COFFEE, inking the white card stock letters with the i-crafter Blending Brushes. I used them to add some definition to the crab as well. As I mentioned in the YouTube video, I outlined the letters with a fine point black pen so they stood out more from the background.


On the Katherine Label piece I added the large crab from Ocean Animals holding another To Go Coffee Cup, and a fun stamp from Riley & Company.


Be sure to check out all the inspiration along the Coffee Lover's Blog Hop - it's always so much fun to see everyone's creations!

Supplies:
1041 Coffee Charms - Karen Burniston
1011 Katherine Label Pop Up - Karen Burniston
1068 Ocean Animals - Karen Burniston
1055 Ovals Crosshatch - Karen Burniston
1053 Alphabet - Karen Burniston
Card stock
i-crafter Blending Brushes
Wink of stella pen
Slimline Scalloped die - Trinity Stamps
Striped patterned paper, Really Rainbow, Purple Posies - Lawn Fawn
Stitched Rectangle die set - Your Next Stamp
Black pen
Sakura white gel pen
White Sugar and Sparkle Gumdrops - Your Next Stamp

Card Size:   3.5 x 8.5", fits in a standard #10 envelope

Thanks for stopping by today

Friday, 22 May 2020

Interactive Card Duo for the Coffee Lover's Blog Hop


Hello crafty friends ...

Your Next Stamp is one of the sponsors for the Coffee Lover's Blog Hop so I wanted to make a card to share using YNS products. As you can see, I ended up making two! I have more information on how to be entered to win a YNS prize at the end of my post!!


{{{I have a YouTube Video showing more details on the cards, which you can also find HERE.}}}


I've had this coffee themed paper for a couple of years - it's a retired pattern from SU. While I tend to hoard special papers like this that I know I can't get any more of - this time I didn't hoard and actually used some of it to line the envelope flap. That adds such a nice touch to a card, don't you think?


I started out by cutting the YNS Photo Booth Panel Die from a woodgrain paper and decided to make a shaker card. The mugs and to-go cups were fussy cut from a different patterned paper in the package, and I thought it would be fun to add a different face stamp from the Oh Shiitake stamp set to each of the 4 squares.  Some sequins and filler and my shaker element was finished.

The fun sentiment is from the Washi Tape Sentiments, a YNS stamp set that is always on my stamping table because of the great sentiments included. I die cut the caffeine sentiment with the Washi Tape Sentiments die, and adhered it over the centre section of the Photo Booth Panel.


Here is a peek at the inside with a Funny Bones stamp, more fussy cut elements and one more stamped face.


When I was finished the card, I had the woodgrain fallaway pieces from the Photo Booth Panel Die on my stamping table. Hmmmmm - then I turned them over (the patterned paper is double sided) and the brown and white coffee print seemed like the perfect print to make a second card. I simply die cut one more Photo Booth Panel from white card stock and inlay at the print pieces into the openings.


I added some YNS Gumdrops, then pulled out a couple of (non YNS) coffee themed sets from my stash to finish it off.


The Scalloped oval was adhered to the card panel with an Action Wobble so it bobs and wobbles around. So fun!


Finally, here is a peek at the inside of the second card:


I hope you will check out the Coffee Lover's Blog Hop. There is a TON of inspiration and lots of prizes to be won as well! Since Your Next Stamp is a sponsor, leave a comment on their blog post for a chance to win the fun Coffee Cart stamp set! You can find the Your Next Stamp Blog HERE.

Supplies for Shaker Coffee Card:
Photo Booth Panel Die Set - Your Next Stamp
Oh Shiitake (faces) - Your Next Stamp
Washi Tape Sentiments - Your Next Stamp
Washi Tape Sentiments Die Set - Your Next Stamp
Various sequins and filler from my stash
Copic markers
White card stock
Sakura black glaze pen
Patterned paper - Stampin' Up (retired)
Acetate
Bakers Twine
Coffee verse inside - Riley & Company
Large card and envelope - Michaels
Card size - 5 x 6.5"


Supplies for Action Wobble Coffee Card:
Photo Booth Panel Die Set - Your Next Stamp
Stitched Rectangle Die Set - Your Next Stamp
White Sugar & Sparkle Gumdrops - Your Next Stamp
White, kraft and light tan card stocks
Patterned paper - Stampin' Up (retired)
Scalloped Stitched Nesting Circles - Tutti Designs
Coffee word die - Verve (retired)
Word Stamp on front - Coffee Talk, CAS-UAL Friday's
Coffee beans stamp - Coffee & Tea, Karen Burniston (retired)
Action Wobble
Inside Words - Hot Coffee, CAS-UAL Friday's
Wink of Stella
Card size - Standard A2, 4.25 x 5.5"

Thanks for stopping by today