Thursday, 30 January 2020

Space Themed Heart Flip Valentine Card

Hello crafty friends ...

It's Fun Fold Friday here on my blog and I have a fun Flip card to share today. This is also a reminder for you to play along with the Fun Friday Challenge #131 at Your Next Stamp, which is SHARE THE LOVE. You can find all those details HERE.

Because I'm on the YNS Design Team, I'll officially be participating in the bi-weekly Fun Friday Challenges, which means my Fun Fold Friday posts will now be alternate Friday's to the challenges.


The video's on Blogger are quite small so if you would like to see them larger, click HERE for my YouTube channel.


It's no secret I enjoy making masculine cards and cards for boys, and I think the YNS Space Boy stamp set works really well for a Valentine card for boys! The little aliens are pretty cute too.  Here I paired the Space Boy stamps and dies  with the YNS Half Heart Flip die set to make this card.


The Stripe-tastic Heart die set is sized to match the Half Heart Flip perfectly, so I added one cut from white inside, and stamped the sentiment on it. The white heart is hidden when the card is in the closed position.


Be sure to check out the Fun Friday Challenge #131 "Share The Love"!!

Supplies:
Half Heart Flip die set - Your Next Stamp
Stitched Rectangle die set - Your Next Stamp
Stripe-Tastic Heart die set - Your Next Stamp
Space Boy stamp set - Your Next Stamp
Space Boy die set - Your Next Stamp
Black Olive Ink - Your Next Stamp
Patterned paper - Moda Scrap, Elizabeth Craft Designs
Neenah white card stock (for the stamping)
Blue and white card stocks
Copic markers
Sakura white gel and black glaze pens
Mini Action Wobble

Card size - standard A2 (4.25 x 5.5")

Thanks for stopping by today

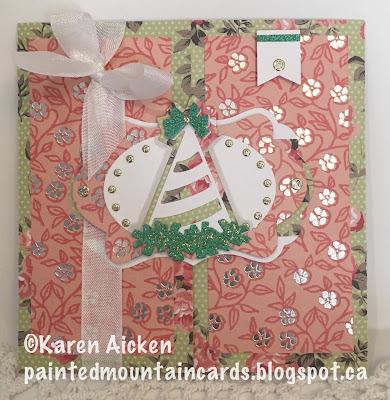
Party Hat Gatefold Card

Hello crafty friends ...

Today I'm sharing a Gatefold card that was actually made awhile ago and I just realized I hadn't posted it.


I used a party hat die and lots of glitter dots, and there is silver foiling on the patterned paper.


Inside I added another party hat, a stamped greeting and fancy die cut corners.


The card was done so long ago, I no longer have the supply list for it.


Thanks for stopping by today

Wednesday, 29 January 2020

Trifold Maze Valentine Card for i-crafter

Hello crafty friends ...

For my i-crafter Inspiration Team post today, I have a fun Trifold Window card to share. The new Heart Maze is a fun die set, and I hope you've been enjoying what the team has been creating with it. Since I've been doing a number of Trifold cards lately, I thought the large size of the maze die would work well with a window Trifold and I'm so happy with how this card turned out!

Note - for information on purchasing products from i-crafter outside of the USA, see the end of my post.

Below you can see the card as it looks when it comes out of the envelope, with a circular window showing a maze through it.


The videos are quite small on Blogger, so if you'd like to see it larger, please check out my YouTube channel HERE.


The windows have acetate sandwiched between the opening and the patterned paper layer so they really do look like a window. The patterned paper has lovely gold foiled bits too.


When you open the card, you then see the maze is shaped like a heart and there is a second heart shaped window. I used the coordinating die included with the Heart Maze to cut this window. The adorable key and lock dies are also included and I kept the fallaway hearts from the key to decorate the card further.


Since there is a coordinating stamp set, I used that for the greeting on the left panel. This is the Valentine card I'll be giving my hubby.


Finally, when the card is fully open you see that there is also a gold key adhered to the second acetate window.


I did a lot of outlining with a gold gel pen throughout the card - I like how this makes images POP and it's something I do a fair bit.


Right now, i-crafter is still set up as a company that only sells to people in the USA. Even myself, who is on the Inspiration Team, cannot purchase from them directly! Lynda continues to work on changing that, but meanwhile we just received the news that Simon Says Stamp will soon be carrying the i-crafter line!!! Huge news, people!  AND it means more than reasonable shipping to Canada and to many other places across the globe. Woo hoo!

Supplies:
222031 Heart Maze - Lynda Kanase, i-crafter
222032 Amaze Me stamps - Lynda Kanase, i-crafter
Black and white card stocks
Patterned paper - Recollections (several years old)
Black square envelope
Circle die - Hero Arts
Acetate
Gold foil card stock - Stampin' Up
Bling It On Sparkly Gumdrops - Your Next Stamp
Sakura gold gel pen

Card size - 5 x 5", fits in a 5 x 7" envelope for mailing if desired, or a square envelope which would require extra postage or can be hand delivered.

Thanks for stopping by today

Tuesday, 28 January 2020

Blue Sympathy Card Duo

Hello crafty friends ...

I had this paper pad out for a different project, and had a quick flip through before I put it away. This blue foiled blue patterned paper caught my eye and I thought it would make a pretty sympathy card.

I ended up using the whole 12 x 12" sheet, and made two sympathy cards for my sadly depleted stash.


The pearlized 3-d Flowers have been in my embellishment bin for several years, but combined with the Oyster Grey Nuvo Drops, I think they made a nice addition.


Inside, I stamped a verse and a leaf sprig and also added a large scalloped border to bring some of the pretty paper inside as well.


I still want to have several more sympathy cards made ahead so you will be seeing more in the upcoming weeks.

Supplies:
White card stock
Patterned paper - K & Company
Scallop with Gifts 3D Drop Ins - Stephanie Barnard
Flower elements - K & Company
Scallop border - Seasonal Layers, Stampin' Up
Ovals - Hero Arts
Stamps - Verve (retired)

Card size - Standard A2 (5.5 x 4.25")

Thanks for stopping by today

Monday, 27 January 2020

Moose & Evergreen Pivot Panel Birthday Card

Hello crafty friends ...

Today for Masculine Card Monday, I'm sharing the card I made for my Brother-in-Law's Birthday.


The video's on Blogger are quite small - you can always see them larger on my YouTube channel by clicking HERE.


I'm really happy that I got this moose punch - it is perfect for masculine cards! I added one of the Simple Strip Birthday banners, and matted it with white.


Inside I used Karen Burniston's Evergreen Pivot Panel, cutting the trees from scraps of the Buffalo Plaid patterned paper.  This is an easy card to duplicate, if you would need a quick card. The words on the left panel (another Simple Strip Birthday) reads:  Another Year Closer To Velcro Shoes. Hahaha.


The white fishtail banner is where we will sign our names. Even though this is a masculine card, I thought it needed a little somethin' somethin' so added shiny black border Peel-Off stickers from Elizabeth Craft Designs. I have quite a few of them in my stash, and it's fun to get them out and use them!


Even though this card folds completely flat and would mail for a single stamp, I get to hand deliver it this year!

Supplies:
Kraft, Charcoal and Black card stocks
Buffalo plaid patterned paper - Carta Bella
1062 Evergreen Pivot Panel - Karen Burniston
Peel Off border stickers - Elizabeth Craft Designs
Moose punch - Stampin' Up
White embossing powder
Simple Strips Birthday stamp and die - Taylored Expressions
Layered Fishtail banners - MFT Stamps
Fitted Hexagon and Stitched Hexagon dies - Elizabeth Craft Designs
Cool Tag Banner Sentiments (Let's Celebrate) - Your Next Stamp

Card size - 5-1/2 x 5"

Thanks for stopping by today

Sunday, 26 January 2020

Valentine Truck Shaker Card

Hello crafty friends...

One of the reasons I purchased the Special Delivery Shaker Card kit last fall, was that it will work all year round. Today I'm sharing a Valentine card made with the kit ...


I added some filler from my stash, as well as the cute red plastic hearts that come with the kit. The patterned paper was a partial 12 x 12" sheet that was sitting on my stamping table and I was able to use another chunk of it for this card. The stitched heart die also comes with the kit.


Here is a peek at the inside, stamped in two colours with the help of my MISTI.


Supplies:
Special Delivery kit, by Queen & Company, unless specified below.
Patterned paper - scraps from my stash
Black, kraft, white and red card stocks
White and burgundy shimmer card stocks
Extra shaker filler - my stash
Stitched Rectangle Die set - Your Next Stamp
Sketch - SC314
Foundation dies - Queen & Company
Washi Tape
Puffy heart stickers - Recollections
1045 Outdoor Scene (clouds) - Karen Burniston
MISTI - My Sweet Petunia
Card size - Standard A2 (5.5 x 4.25")

Thanks for stopping by today

Saturday, 25 January 2020

Pop Up Butterflies Sympathy Card

Hello crafty friends ...

Today I'm sharing the sympathy card I made for friends ...


The videos are quite small on Blogger, so if you'd like to see it larger, please check out my YouTube channel HERE.


The white card stock used is pearlized and shimmery ... so pretty! Inside I used the Train Pivot Panel and decorated the bump outs with punched butterflies.


The die cut With Sympathy fit just perfectly on the area where the train engine and first train car would normally go.


Whenever I give someone one of these cards, they turn it over to look at it from the top. So I'm adding a top view photo for you.


Supplies:
Blue card stock
White shimmer card stock
1106 Train Pivot Panel - Karen Burniston
Butterfly Punches - Stampin' UP
Rounded rectangle dies - Hero Arts
With Sympathy stamps and die - Avery Elle
Scalloped border die - Simon Says Stamps
Sorry for your loss stamp - Sorry For Your Loss, Stephanie Barnard - the Stamps of Life
Stitched Fishtail Banner die - Your Next Stamp

Card size: Wide A2 (5.5 x 4.25")

Thanks for stopping by today

Thursday, 23 January 2020

Fun Friday Challenge #131 "Share the Love"

Today I have a card for Fun Friday Challenge #131 at Your Next Stamp. The theme is   "Share the Love - however you want to interpret this. Could be a Valentine, something you love - get creative!".


The Fun Friday challenges come with two chances win prizes!! Comment on the YNS Blog, Instagram or Facebook pages for a chance to win a free stamp set. Comment on all three to increase your chances, but comments must be left by January 29th. The winner will be announced on January 31st on the YNS Blog.
 See more details about the prizes at the end of my post today.

I love using grid type dies to help with paper scraps - when I opened this 6 x 6" Valentine paper package again this year, I was surprised by the number of scraps in the bag. So I pulled out the YNS Photo Booth Panel Die and used up a bunch of those scraps for my card front. I used the YNS Stripe-Tastic Heart dies for the centre area as a place to seat the cute heart-holdiing-dog, and added some YNS Gumdrops to the upper left corner.


This little dog just makes me smile. I picked up the YNS 'Love and Hugs' stamp set last year for Valentine's Day. There are coordinating dies available which are on my wish list, but for this card I fussy cut the dog from the white card stock. Normally I would add glossy accents or a glaze pen to his nose, but I wanted that red heart to have all the emphasis.


Here is a peek at the inside, where I cut two small foiled scraps with a YNS stitched fishtail banner die and stapled them to the stitched white panel. I also added a small heart die cut from a scrap to the lower right.


The Fun Friday Challenge #131 runs through February 6th at midnight. One random participant will win a $15 gift certificate to the Your Next Stamp store.  If YNS stamps or dies are the focal point then the winner receives an additional $5 gift certificate for a total of $20.  The winner will be announced on the YNS Blog the Sunday after the challenge closes. Check it all out on the Your Next Stamp blog HERE.

Supplies:
Patterned paper - Valentine's Day, Recollections
Red glitter card stock - Stampin' Up
Black, white and red card stocks
Neenah white card stock for stopping
MISTI - My Sweet Petunia
Copic markers
Wink of Stella
Sakura white gel pen
Tiny Attacher (small stapler) - Tim Holtz


Thanks for stopping by today

Chinese New Year Card

Hello crafty friends

Today I'm sharing a fun card I sent to a friend for the Chinese New Year.


The video's on Blogger are quite small - remember you can always see them larger on my YouTube channel HERE.

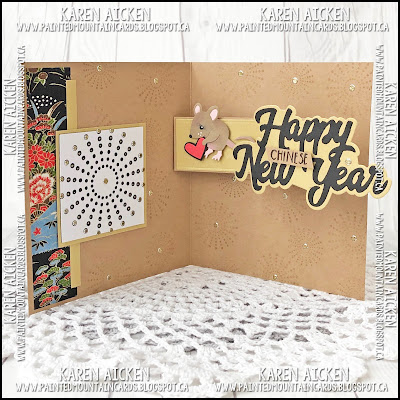
I don't have any rat stamps or dies, but I thought this cute mouse from Karen Burniston would work instead, and I had fun positioning the mice around the die cut numbers.


Inside, the Happy Chinese New Year is animated with Karen Burniston's Rockin' Rectangle .


I stamped the YNS Circle Bursts randomly around the kraft interior, and added one Circle Burst die cut backed with gold. Oh, and there are sparkly glitter dots added as well - this card has much more sparkle than you can see in the photo.


I would say that  Rockin' Rectangle die set is one of my favourite KB die sets - it's so versatile! And I generally use it in the standard format, but when you change up the orientation you get a completely different look.


Supplies:
Kraft, pink and black card stocks
1061 Christmas Animals - Karen Burniston
Coloured pencils - Prismacolour
Black pen
Sakura black glaze, white gel and gold gel pens
Chalks - Stampin' Up
Q-tip
Origami paper - VERY old, from my stash
Alpha - Sizzix BigZ (old)
Gold shimmer card stock
1078 Rockin' Rectangle Pop Up - Karen Burniston
Happy New Year die - Stephanie Barnard, the Stamps of Life
Flat Sequins - the Rabbit Hole 
1011 Katherine Label Pop Up (hearts) - Karen Burniston
Circle Burst stamp and die - Your Next Stamp
Glitter Dots - Elizabeth Craft Designs

Card size - 5 x 5.5", fits in a 5 x 7" envelope

Thanks for stopping by today

Wednesday, 22 January 2020

Accordion Shaker Zip Gift Card Holder

Hello crafty friends

While we wait for the brand new i-crafter blog to get up and running, today I'm sharing my Inspiration Team project here on my own blog.

I like gift card holder dies, so when Lynda Kanase came up with this Zip Gift Tag die I thought it was very cool. For my project today, I combined it with a shaker element in an accordion card format which is sure to make your gift card a little more special!


The video's on Blogger are quite small, but if you click over to my YouTube Channel you can view it larger or even full screen! Click HERE to go to the video.


Below is the Gift Card Holder fully open - the shaker is on the left, the Zip Gift Tag is in the centre, and a signing block is on the right.


The 'For You' die is included with the Zip Gift Tag and here I cut it from a fishtail banner that is backed with black card stock to make the words pop. NOTE - you add the gift card to your project BEFORE you adhere the Zip Gift Tag! The recipient pulls back the zipper to access their gift card.  


I wrote 'pull back' with a glaze pen.


Since people like to know what size my cards are, I generally post that and the end of the supply list. This time however, I forgot to measure it! This project was on display at the i-crafter booth at CHA and I was in a time crunch to get it in the mail.


Supplies:
222010 Zip Gift Tag - Lynda Kanase, i-crafter
222045 Heart Hands Wiper Insert (Heart & Love dies) - Lynda Kanase, i-crafter
White, red and black card stocks
Acetate
Sequins and Seed Beeds - my stash
Rectangle dies - Hero Arts
Seam binding
Black marker
Fishtail banner - MFT Stamps (easy enough to cut & notch by hand)
Patterned paper - Doodlebug Designs (double sided & I used both sides)
Sakura white gel, clear glaze and black glaze pens


Thanks for stopping by today

Tuesday, 21 January 2020

Woven Basket Box Card for a 99th Birthday

Hello crafty friends ...

Today I'm sharing the birthday card I made for a friend's Mother, who is turning 99 this year! I chose Karen Burniston's Woven Basket Box Pop Up to make this lovely 3-D card that folds completely flat for mailing.

I have a short video for you so you can see the card in action. You can see the video larger or even full screen, by checking it out on my YouTube Channel HERE.


Since it had been awhile since I'd made one of these, I went to the website to re-watch the assembly video. At the end of the video, Karen B features cards from the Design Team and I really liked the one Kelly Booth had made with the flaps on the outside of the basket, and a ribbon bow tucked inside. That was my inspiration for how I assembled this one.


The photo above and the photo below both show the Woven Basket in the flat, folded position.


I added a lot of dimensional bling, since the card was being hand delivered. If you kept the flower centres flat the card would likely mail for a single stamp.


I added the numbers to an acetate strip after the card was assembled, and never thought to also check that it would still fit in a 5 x 7" envelope. Nope - I had adhered it too high. Rather than pull it off and re-attach lower, I found this Hallmark envelope in my stash - 8-1/4 x 5-3/4.  A card stock panel was adhered inside envelope to stabilize it and give the flowers support while the card is in the envelope.


Supplies:
1080 Woven Basket Box Pop Up - Karen Burniston
Kraft, green, pink and white card stocks
Make up brushes
1026 Flowers and Bee - Karen Burniston
1059 Autumn Elements - Karen Burniston
Bling - Queen & Company and Recollections
1030 Happy Birthday
Copic Marker
Sakura black glaze and white gel pens
Stickles
1104 Triple Flip (scalloped rectangle) - Karen Burniston
1031 Numbers - Karen Burniston
Acetate
Craft wire
Seam binding
Washi Tape
Card size - 6 x 5.5"

Thanks for stopping by today