
Hello my crafty friends
I did something a little different, using a bunch of Karen Burniston dies to create a Diorama with a beach theme. I've listed all the supplies used at the end of my post, and took photos to give you a quick tutorial as well. But first - here is the front of my card:

The ocean scene is layered and dimensional, and yes -it folds completely flat for mailing.

2. Cut 2nd largest rectangle from the Crosshatch Rectangles, centred between top and bottom edges and both score lines. Yes, my cutting pads are well used. :-) Save the fallaway piece to decorate for the back of the diorama.


3. Cut two strips of card stock, 6-1/2 x 2" and score 1/2" from each end. Mountain fold each end. Now centre one of the waves from the Tropical Scene die set between the fold lines of one of the 2" deep strips. Position it almost right at the top edge but be sure it will cut all the waves - don't move the die so far up it on the 2" strip that the cutting line is off the top edge. Die cut. Repeat with the other wave die and the second 2" strip, this time 1/4" to 1/2" down from the top edge. Note - the wave dies will not cut the entire 6-1/2" width, so just finish cutting each piece with scissors at the ends as shown below.

4. Cut a 5-1/2 x 4-1/4" panel and die cut the island from the Tropical Scene die set, placing the island die towards the top right side. Finish the left edge with the included stitched sand/hill die. If you trim a scant 1/16" off each side edge of this piece, the card will fold easily and not bind at the score lines.
5. Adhere the island to the centre back panel with bottom edges even as shown above I added small bits of foam tape to the palm trees but the rest was adhered with wet glue. Note: In my photo, I had already added colour to my piece because I forgot to take the tutorial photo before I added the colour.
You can see that the waves will give you two different heights and depth to your diorama.

6. Adjust the waves as needed by trimming the (straight) bottom edges slightly until you are happy with the look.
7. Assemble the rest of the diorama. I did not take photos of the assembly because there are plenty of diorama card video's on YouTube already. I mainly wanted to show you the steps I used in photos so you could see how I used the KB dies to cut my layers. If you are not familiar with making a diorama card, then watching a video or two before you start will help it all make sense. If you are familiar with them, then you would only need the photos above.
8. Decorate back as desired. The photos of the back of my card are further down the post.
I cut all the pieces from regular white card stock then added colour by dipping and dragging the die cut pieces through puddles of Distress Oxide Inks and setting aside to dry. I didn't use heavyweight white card stock or water colour paper so there was lots of warping and a little stretching. I was OK with that, I just re-shaped the pieces with my fingers once everything was dry.

My friend and teammate Kelly Booth often adds wiggly eyes to her characters, so she inspired me to add them to my sea critters. The words were stamped on the fishtail banner from the Word Set 5 Royalty die set and I added it to the top edge with foam tape. There are also gold gel pen highlights and I added clouds and a sun after assembling the diorama.

By using the same measurements I did, you make a diorama that fits in a 5 x 7" envelope. Just be sure that nothing hangs over the right edge of your diorama! My crab legs are at the right edge, or it wouldn't fit in the envelope. It's fine of the mermaid hangs over a little on the left, as you can see below.

Note - after my diorama was assembled and I was tidying up I found the top edge of one of the wave panels so decided to dip and drag it in more of the Distress Oxide inks and adhere it to the bottom back of the front frame when it was dry. I like how it pulls in some of the greens from the turtle and palm tree.
Below is the back of my card:
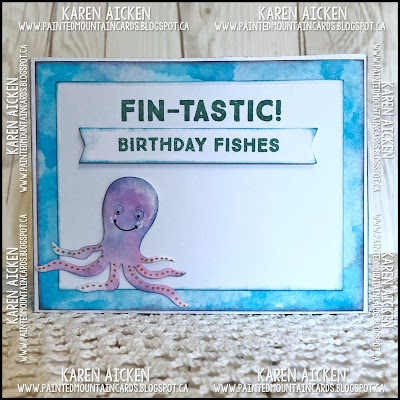
This Octopus is so fun - he makes me grin. I added gold gel pen dots to his tentacles.

I hope you enjoyed my card today! Our dies are an investment and I enjoy showing you different ways you can use them.

The rest of the Karen Burniston Design Team is linked on the right - be sure to check out what they have come up with for the challenge. There is always a ton of inspiration from the team. Karen Burniston will have her blog post tomorrow (Wednesday) on her blog.
Supplies:
White card stock
1037 Sea Animals - Karen Burniston
1068 Ocean Animals - Karen Burniston
1036 Princess & Mermaid - Karen Burniston
1038 Tropical Scene - Karen Burniston
1054 Rectangles Crosshatch
1034 Word Set 5 Royalty (fishtail banner) - Karen Burniston
1045 Outdoor Scene (clouds) - Karen Burniston
Distress Oxide Inks
Spray bottle
Wiggly eyes
Sakura white gel pen
Sakura gold gel pen
Stamps - Waffle Flower
Welcome to our Designer Challenge, where Karen Burniston gave us the theme:
"BEACH DAY!" - celebrate the sea with a tropical card.
I did something a little different, using a bunch of Karen Burniston dies to create a Diorama with a beach theme. I've listed all the supplies used at the end of my post, and took photos to give you a quick tutorial as well. But first - here is the front of my card:

1. Cut two panels measuring 8-1/2" x 4-1/4" and score 1-1/2" from each end. Mountain fold both side panels on the front piece at the score lines and valley fold both side panels on the back piece at the score lines. You will have something that looks like the photo below, and it also shows you how the side panels will be adhered together when you go to assemble the diorama. The back piece will slide into the front piece and be adhered together along each side edge.

2. Cut 2nd largest rectangle from the Crosshatch Rectangles, centred between top and bottom edges and both score lines. Yes, my cutting pads are well used. :-) Save the fallaway piece to decorate for the back of the diorama.


3. Cut two strips of card stock, 6-1/2 x 2" and score 1/2" from each end. Mountain fold each end. Now centre one of the waves from the Tropical Scene die set between the fold lines of one of the 2" deep strips. Position it almost right at the top edge but be sure it will cut all the waves - don't move the die so far up it on the 2" strip that the cutting line is off the top edge. Die cut. Repeat with the other wave die and the second 2" strip, this time 1/4" to 1/2" down from the top edge. Note - the wave dies will not cut the entire 6-1/2" width, so just finish cutting each piece with scissors at the ends as shown below.

4. Cut a 5-1/2 x 4-1/4" panel and die cut the island from the Tropical Scene die set, placing the island die towards the top right side. Finish the left edge with the included stitched sand/hill die. If you trim a scant 1/16" off each side edge of this piece, the card will fold easily and not bind at the score lines.
5. Adhere the island to the centre back panel with bottom edges even as shown above I added small bits of foam tape to the palm trees but the rest was adhered with wet glue. Note: In my photo, I had already added colour to my piece because I forgot to take the tutorial photo before I added the colour.

6. Adjust the waves as needed by trimming the (straight) bottom edges slightly until you are happy with the look.
7. Assemble the rest of the diorama. I did not take photos of the assembly because there are plenty of diorama card video's on YouTube already. I mainly wanted to show you the steps I used in photos so you could see how I used the KB dies to cut my layers. If you are not familiar with making a diorama card, then watching a video or two before you start will help it all make sense. If you are familiar with them, then you would only need the photos above.
8. Decorate back as desired. The photos of the back of my card are further down the post.
I cut all the pieces from regular white card stock then added colour by dipping and dragging the die cut pieces through puddles of Distress Oxide Inks and setting aside to dry. I didn't use heavyweight white card stock or water colour paper so there was lots of warping and a little stretching. I was OK with that, I just re-shaped the pieces with my fingers once everything was dry.

My friend and teammate Kelly Booth often adds wiggly eyes to her characters, so she inspired me to add them to my sea critters. The words were stamped on the fishtail banner from the Word Set 5 Royalty die set and I added it to the top edge with foam tape. There are also gold gel pen highlights and I added clouds and a sun after assembling the diorama.

By using the same measurements I did, you make a diorama that fits in a 5 x 7" envelope. Just be sure that nothing hangs over the right edge of your diorama! My crab legs are at the right edge, or it wouldn't fit in the envelope. It's fine of the mermaid hangs over a little on the left, as you can see below.

Note - after my diorama was assembled and I was tidying up I found the top edge of one of the wave panels so decided to dip and drag it in more of the Distress Oxide inks and adhere it to the bottom back of the front frame when it was dry. I like how it pulls in some of the greens from the turtle and palm tree.
Below is the back of my card:

This Octopus is so fun - he makes me grin. I added gold gel pen dots to his tentacles.

I hope you enjoyed my card today! Our dies are an investment and I enjoy showing you different ways you can use them.
The rest of the Karen Burniston Design Team is linked on the right - be sure to check out what they have come up with for the challenge. There is always a ton of inspiration from the team. Karen Burniston will have her blog post tomorrow (Wednesday) on her blog.
Supplies:
White card stock
1037 Sea Animals - Karen Burniston
1068 Ocean Animals - Karen Burniston
1036 Princess & Mermaid - Karen Burniston
1038 Tropical Scene - Karen Burniston
1054 Rectangles Crosshatch
1034 Word Set 5 Royalty (fishtail banner) - Karen Burniston
1045 Outdoor Scene (clouds) - Karen Burniston
Distress Oxide Inks
Spray bottle
Wiggly eyes
Sakura white gel pen
Sakura gold gel pen
Stamps - Waffle Flower
Thanks for stopping by today
Such a fun beach themed card
ReplyDeleteThis is so creative, Karen! I love how soft the colours turned out with the distress oxide inks and how everything works together! Thanks for the inspiration!
ReplyDelete