Monday, 30 November 2020

Dog Themed Slimline Card with Pop Up

Hello crafty friends ...

It's Masculine Card Monday here on my blog and today I'm sharing a Slimline card that is also a pop up. I have a walk through on YouTube that goes over all the details:

I'm working on a set of dog themed Birthday Cards and since I loved the dogs on this patterned paper, I fussy cut a bunch of them to use for cards.


Inside I added some heat embossed sentiments, more patterned paper and I used one of Karen Burniston's Mini Pops dies for the pop up 'arm'.


All the dogs have shiny eyes and noses because of a black glaze pen. 


While this is more of a masculine card, it could be given to any dog lover!


Supplies:
Card stocks - stash
Patterned Paper - Playful Pets, Stampin' Up
Sakura Black Glaze Pen
Stitched Nested Label Dies - Stampin' Up
1146 Mini Pops - Karen Burniston
Pawprints - MFT Stamps
Bone - "Puppy", Echo Park
Simple Strips Woof - Taylored Expressions
Simple Strips Birthday - Taylored Expressions
Simple Strips die - Taylored Expressions
Sakura white gel pen
White embossing powder
Pawprint Stamp - Treats4Cookie, the Stamps of Life
Nuvo Drops
Circle die - Hero Arts
Card size - 3.5 x 8.5", fits in a #10 Business envelope

Thanks for stopping by today
Sunday, 29 November 2020

Pop Up Gnome Christmas Card

Hello crafty friends ...

I have a bin called 'In Progress" and when I was poking around I found this card that had been started but never finished or even assembled. So got out a few dies from my stash and got it finished. I have a walk through of this card on YouTube as well. 

I added some layered poinsettias and the Simon Says Gnome. Both gnomes have glossy accents on their noses.

The Pop Up inside was created with the 3D Drop Ins die at the Stamps of Life and I used a YNS die to cut the scalloped square from the centre.I also added another gnome inside.


Since I went over all the details in my video, I'll keep my comments to a minimum here.


Considering this had been sitting in the bin for who-knows-how-long and I can't remember what my original idea was, I was really happy with how this card turned out!

Supplies:
3D Pop Up Drop Ins - Stephanie Barnard, the Stamp software Life
Patterned paper - unknown
Gnome die - Simon Says Stamp
Reverse Scallop Square with Optional Stripes - Your Next Stamp
Card stocks
Snowflake embellishments - Stampin 'Up
Copic marker
Glossy Accents
Shimmer Spray
Poinsettia die - Impression Obsession
Stitched Square die set - Your Next Stamp
Simple Strips Christmas - Taylored Expressions
Simple Strips die - Taylored Expressions
Glitter Dots - Elizabeth Craft Designs
Season of Cheer - Jar of Cheer, Stampin' Up (retired)
Wreath Builder Die Set (small poinsettia) - Stampin' Up
Circle - stash, already cut and not used
Card size - Standard A2 (4.25 x 5.5")

Thanks for stopping by today

Saturday, 28 November 2020

More November Paper Pumpkin Projects


Hello crafty friends ...

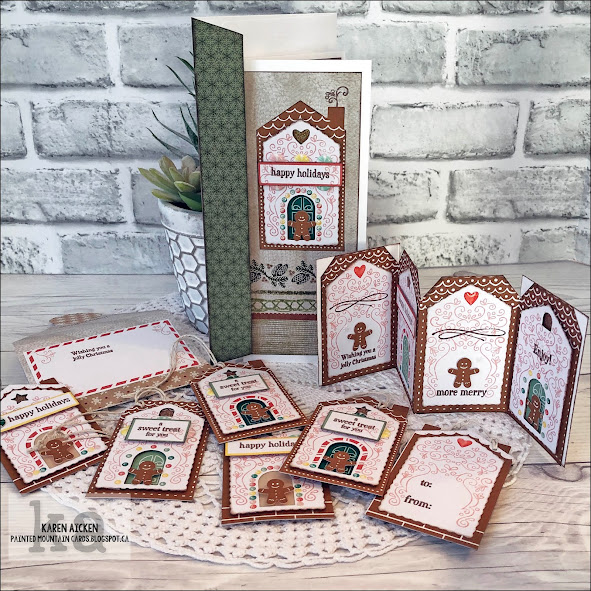
Today I'm back with the rest of my projects from the November 2020 Paper Pumpkin kit from Stampin' Up. There is another Slimline Card, an Accordion Card, and six tags and I have a walkthrough on YouTube as well! 


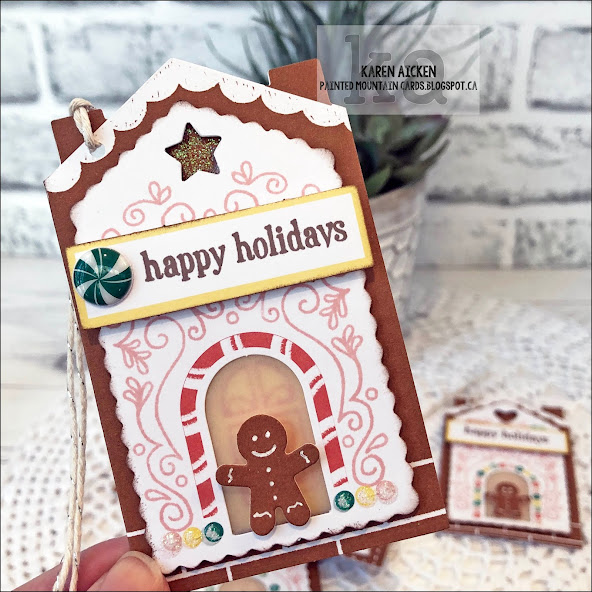
First up are the tags. I didn't need anymore holiday tags because I have SO many leftover from other years. But I couldn't resist making these up and have already added three of them to gifts for Porch Visits. They were Easy Peasy and they are SO nice and sturdy. {I love a sturdy tag.}


I made them the same as everyone else, trimming off the flap that you would use to make the Gift Card Pocket. I did add some Nuvo Drops for some dimension and sparkle!  I also put some vellum in behind the white scalloped doorways on the Gingerbread Houses with the yellow doors because I wasn't a huge fan of that yellow and coral combination. The adorable Gingerbread men are from the Winter Charm set by Karen Burniston and I simply snipped off the hanging holes and used a white gel pen for details.


The resin hearts are clear, so I added colour with a Copic marker before adhering them to the backs of the tags.


Next I made this little Accordion Card! It needed an envelope so I used an Envelope Punch Board to create one. While the card JUST fits into one of the included envelopes you would have to tear it to remove the card. So I trimmed the front off of one of those ones and adhered it to my hand made envelope and added a stamped greeting too.  I used the Punch Board measurements for a 3 x 4.5" card and adhered the sides/bottom together with the accordion card inside so there would be lots of room for the card.


The envelope seal was created by adding strips of Washi Tape to a scrap of white card stock then I die cut it with a fancy edge circle die.


Here is the front of my Accordion Card, using sparkly patterned paper and the large Gingerbread Man from Karen Burniston's Winter Charms.The card stock covers measure 2.5 x 3-7/8", with the patterned paper measuring  2.25" x 3.5".


Here is the card displayed open. I attached two of the Gingerbread house pieces together and then trimmed off the remaining flap from the house on the right. The small Gingerbread Man from the same charm set as above worked so perfectly in the doorways!


Below is the card from the back and where we will sign our name. As I said in the video, this is not a card that would go through the mail, but will be fun to attach to a box of chocolates that we will be delivering to a friends front porch over the holidays.


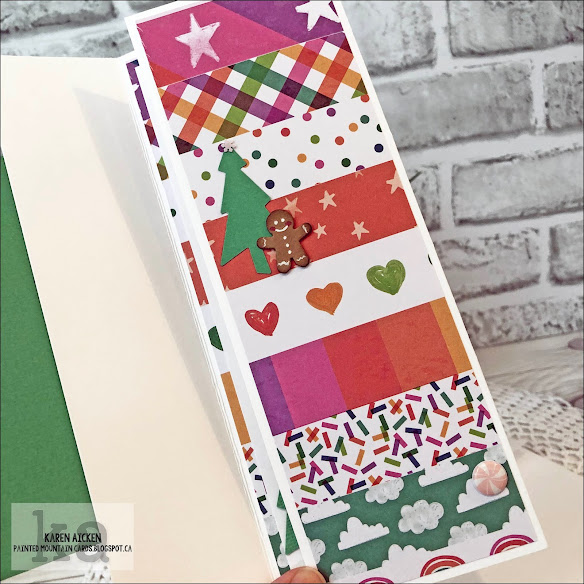
Then, all I had left was the front of one Gingerbread House and one scalloped piece ... so I made a Slimline Card!


I snipped the puffy Candy Dots in half and tucked them under the sentiment piece.


Inside, the greeting comes from the October Paper Pumpkin kit.


So the November Paper Pumpkin came with enough supplies to create fifteen pocket gift card holders with envelopes.

This is what I made with the kit:

  • Three Pocket Gift Card Holders
  • Two Gift Card Holders with a strip inside to hold the Gift Carad
  • Two single sided tags
  • Six Sturdy Double Sided Tags
  • Two Slimline Cards
  • One Accordion Card with Envelope

I just love how you can customize these kits and create all kinds of alternates. 


Supplies:

Unless indicated below, everything came from the November 2020 Paper Pumpkin Kit

Six Double Sided Tags 
Mini MISTI - My Sweet Petunia
Resin hearts - Stampin' Up
Copic Marker
Nuvo Drops
1018 Winter Charms - Karen Burniston
Stickles
Sakura white gel pen
Vellum scraps
Shimmer Spray
Twine with silver thread

Accordion Card
1018 Winter Charms - Karen Burniston
Sakura white gel pen
Card Stocks
Patterned paper - Winter Wonderland, Recollections (old)
Nuvo Drops
Shimmer Spray
White pearl card stock
Words on front & flourish - Merry Christmas to All, Stampin' Up (retired)
Green circle (in my stash)
October 2020 Paper Pumpkin (greeting on back)
Snowflake embellishments - Stampin' Up
Envelope Punch Board - We R Memory Keepers
Washi tape - Recollections
Tasteful Label dies - Stampin' Up


Slimline Card
Patterned paper - Winter Wonderland, Recollections
1018 Winter Charms - Karen Burniston
Banner Pick A Punch - Stampin' Up
October 2020 Paper Pumpkin (greeting inside)
Torn paper mask
I-crafter Blending Brushes
Nuvo Drops

Thanks for stopping by today
Thursday, 26 November 2020

Christmas Doggie Window Card

Hello crafty friends ...

It's time for a new Challenge at Your Next Stamp - 
the Fun Friday Challenge #153 with the theme:   Just for You - create a card with someone specific in mind and let us know who (this is basically anything goes!)

The Fun Friday Challenges come with two chances to win prizes!!
Comment on the YNS BlogInstagram or Facebook pages for a chance to win a free stamp set. Comment on all three to increase your chances, but comments must be left by December 2nd 2020. The winner will be announced on December 4th 2020 on the YNS Blog.

More details about the prizes at the end of my post!

I have a walk through of my card on YouTube as well: 

Our dogs need vaccinations about mid December each year, so I like to bring a gift of David's Tea and chocolate to the office along with a dog themed Christmas card. That is who this card is for! I used the new Crazy For Christmas for the fun dog that you can see through the scalloped 'window' from the front of the card.


When you open the card, you see the full dog and the holiday greeting. I used the scalloped circle from the Peek A Boo Doors to die cut my scalloped window. then I laid the die back into the opening and traced around the outside edge with a gold gel pen.


The Fun Friday Challenge #151 runs through December 10th 2020 at midnight EST. One random participant will win a $15 gift certificate to the Your Next Stamp store.  If YNS stamps or dies are the focal point then the winner receives an additional $5 gift certificate for a total of $20!!  The winner will be announced on the YNS Blog the Sunday after the challenge closes. Check it all out on the Your Next Stamp blog HERE. 

As well, Your Next Stamp is having a Black Friday SALE!!!  The sale codeYNSBF2020 is valid until Dec 3rd at midnight EST
 Please read the guidelines below for our Black Friday sale…

  •  1. You must enter the code - No refunds for orders placed without the discount code
  • FREE Shipping does not apply during this sale. If your order is over $75 (in the US or Canada) you will see a flat rate shipping charge of $10. The more you order the more you will save!
  • Discount applied to YNS in stock items only
  • 2. Grab the code - YNSBF2020
  • 3. SHOP! SHOP! SHOP!


Supplies:
Crazy for Christmas - Your Next Stamp
Crazy for Christmas Die Set - Your Next Stamp
Black Olive Ink - Your Next Stamp
Little Peek A Boo Doors (Scalloped Circle) - Your Next Stamp
Stone Grey Ink - Your Next Stamp
Bling it On Sparkly Gumdrops 
- Your Next Stamp
Card & Envelope - Michaels
Mini MISTI - My Sweet Petunia
Patterned paper - Joyous Noel, Stampin' Up (retired)
Sakura gold gel pen, Black glaze pen and white gel pens
Water brush
Copic markers
Wink of Stella
Card stocks - Various, stash
Gold pearl card stock
White pearl card stock
Crinkly white seam binding - Stampin' Up
Card size - 5 x 6.5", comes with coordinating envelope

Thanks for stopping by today

Holly Shaker Card for Christmas

Hello crafty friends ...

Today I'm sharing another shaker card using Karen Burniston's new Holly Pattern Plate. I also used the new Slim Frames for my die cut sentiment. To get the red mat around the outside of the frame, I die cut the frame another two times from red and snipped those two in half. Then I adhered the red layers behind the frame making sure I had an even border on the outer edges.


Inside I added a Merry Christmas die cut along with a plaid patterned paper and a Crosshatch Rectangle (both dies by Karen Burniston).


There is a lot of sparkle on this card - perfect for the holidays. Because the Pattern Plates are designed to fit perfectly on an A2 card, I needed a frame around the outer edge for a place to add my thick foam tape. Nesting two of the Crosshatch Rectangles together works really well for a frame and I could use the fallaway piece from the centre on another project.


Supplies:
White Pearl card stock
1149 Holly Pattern Plate - Karen Burniston
1054 Rectangles Crosshatch - Karen Burniston
Acetate
Various shaker filler - stash
Green patterned paper - Where the Heart Is, My Minds Eye
Other patterned papers - Countdown to Christmas, My Mines Eye
1050 Slim Frames - Karen Burniston
1022 Word Set 3 Holiday - Karen Burniston
Stickles
1065 Merry Christmas - Karen Burniston 
Card and envelope set - Michaels
Card size - 5 x 6.5", fits in the included envelope

Thanks for stopping by today

Wednesday, 25 November 2020

Dog Themed Joy Fold Card

 Hello crafty friends ...

I loved this patterned paper from Stampin' Up - especially the cute dogs that can be fussy cut and added to cards. That is what I did with this card which is a Fun Fold Card ... it's a Joy Fold Card. I haven't made a Joy Fold Card in awhile, so it was fun to use the different patterned papers for this type of card.

I have a walk through and quick tutorial on my YouTube video:

The front flap stays in the closed position because I tucked the upper left corner under that little banner but it opens easily.

The 'Yappy Birthday To You' was added as well as another fussy cut dog. That one was on the edge of the paper and not a full image, but adding it to the bottom of my inner panel allowed me to use what would otherwise have been put in recycling.


I went over the dogs eyes and noses with a black glaze pen for a little shine. I didn't add any shimmer spray (!!!) to keep this a masculine card although it could easily go to any dog lover.

Some quick measurements for you:  

  • Cut your card base 8.5 x 4.25"
  • Score 3" from left edge
  • Cut your Inner card 8 x 3" and score in the centre at 4"
  • Decorate your panels before adhering them together as shown in the video.


Supplies:
Card stocks - stash
Patterned paper - Playful Pets - Stampin' Up
Sakura Black Glaze Pen
Wink of Stella
Stitched Oval die - MFT Stamps
Simple Strips Woof - Taylored Expressions
Simple Strips Die - Taylored Expressions
Banners Pick A Punch - Stampin' Up
Just for you - Birthday Blowout, Poppy Stamps
Resin heart - Stampin' Up
Card size - Wide A2, 5.5 x 4.25"

Thanks for stopping by today

Tuesday, 24 November 2020

Eight Ivory and Black Birthday Cards


Hello crafty friends ...

I'm back today sharing another Sheetload of cards! Today's cards use the February 2020 Sheetload from the Call me Crafty Al YouTube channel. These sketches & cutting guides are free for subscribers to her channel and I love them for making my nursing home donation cards! I really enjoyed this particular Sheetload and this is the third round of cards I made using it. 


Once again I changed up the sketch, which is the great thing about sketches. You can make them work for you! I have had this patterned paper package for probably 10 years, so there were lots of partial sheets in there. I used the cutting guide to use up a lot of them.

Half of the cards have a gold foil strip and gold embossed greeting, and the others have a black card stock strip and the same sentiment stamped in black ink.

The insides were all done the same with the help of my Mini MISTI ...


I like having some masculine cards each month, as well as feminine and generic. Since these are all so similar, I will only be putting two in each month's bag. I like the residents to feel special so rarely include more than two of a design in a single month.

Supplies:
February 2020 Sheetload of Cards, Call me Crafty Al (YouTube)
Tailored Tag Punch - Stampin' Up
Vellum (partial sheets and scraps)
Large Fishtail Banner Dies - Pink & Main
1/2" Quick Strips - Stamp Market
Gold Foil Card Stocks - Stampin' Up
Mini MISTI - My Sweet Petunia
Perennial Birthday - Stampin' Up
Gold Embossing Powder

Card sizes (all) - Standard A2 (4.25 x 5.5")

Thanks for stopping by today

Sunday, 22 November 2020

Egg Nog Holiday Slimline Card

Hello crafty friends ...

Today I'm sharing a fun Slimline card for the holidays, using the Happy Eggnog stamps from Your Next Stamp. The stamp sets featured in this series are also on sale!


I also made a 'Lift Flap' feature in the centre using the Little Peek A Boo Doors die set.  I have a walk through of my card here on YouTube 

Such fun images, right? The stamp set comes with little faces, so I added them as well.


I knew I wanted to separate the sentiment onto two fishtail banner strips, so I cut the stamp apart! It was easy to do, and they will quickly line up on a stamping block or my MISTI if I want to use them together another time.

The Little Peek A Boo Doors die set actually die cut a perforation and the idea is that you pull up and tear away the perforations to reveal a sentiment or image etc. I chose to cut along the perforation marks before adhering it to my card, so it's more of a 'Lift Flap" card. Just another way you can use these dies!

Finally, here is a peek at the inside, where I added another image from Happy Eggnog Season and also a sentiment from the Cozy Christmas stamp set. The border stickers came in the paper pack, and I did use glue to adhere them since they are so old there wasn't much 'stick' left on them.


One more look at the card front ...


Supplies:
Little Peek A Boo Doors Die Set - Your Next Stamp
Happy Eggnog Season - Your Next Stamp
Black Olive Ink - Your Next Stamp
Believe in the Magic (Cozy Christmas) - Your Next Stamp
Card Stocks - Various, stash
Patterned paper & border sticker - Basic Grey (OLD, stash)
Ohuhu Markers
Mini MISTI - My Sweet Petunia
I-crafter Blending Brushes
Sakura white gel pen and gold gel pen
Shimmer spray
Stickles
Water brush
Banners Pick A Punch - Stampin' Up
Gold foil card stock - Stampin' Up
Card size - 3.5 x 8.5", fits in a #10 Business Envelope

Thanks for stopping by today

Five Gift Card Holders, Two Tags and One Slimline Card!


Hello crafty friends ...

I got my November 2020 Paper Pumpkin kit on Tuesday evening which was perfect timing as I was getting a Christmas parcel ready to take to the post office and I needed a Gift Card Holder. This kit makes FIFTEEN cute pocket Gift Card Holders with coordinating envelopes ... see what I mean about perfect timing?

I also did a YouTube Video with a walkthrough of my first November 2020 Paper Pumpkin Projects!  I have a lot of photos, mostly for other Paper Pumpkin subscribers who love to see what everyone does with their kits. I won't be offended if you just quickly scroll by and move on with your day. 😉


Now I make a lot of Gift Card Holders, so I don't need fifteen more - but the fun thing about Paper Pumpkin is you can make all kinds of things other than the suggested projects and Stampin' Up is very generous with their supplies. So I only made five Gift Card Holders, three as per the instructions with the little pocket and two that open like a card with a strip to hold the gift card. I will share the rest of my November 2020 Paper Pumpkin projects in a week or two.

This was the first one I made ... those puffy Candy Dots are just ADORABLE! I added lots of Stickles too, because ... well ...  you know me and sparkle. I also gave these white panels a blast with my shimmer spray.


Below is the back side of the Gift Card Holder. How cute are those coordinating envelopes?


I did two nearly identical ones and then this one with the 'more squarish' rectangle on the front.


For the next two, I cut off the side tab that you would use to create the pocket and that left me with a little Gingerbread House Shaped card! I decorated it with the stamps that were included but also pulled in an MFT stamp set for the envelope front and the sentiment stamped on the bordered rectangle.


I sacrificed one of the envelopes so I could use the striped paper on the inside to create my little strip that is glued to the inside of the Gift Card Holder with two flaps that fold underneath the Gift Card.


Below you can see what it looks like with the gift card removed. While the windows on the stamped house look blurry in the photos ... it's actually the light reflecting on the gold Nuvo Shimmer Pen glitter. 


Next, I made two tags by cutting two of the Gingerbread House pieces in half so I could use the back sides only.  Now the puffy Candy Dots would have been SO cute on these tags, but I am trying to use up these candy cane border stickers so I snipped two from one of the borders and glued them down instead. We were also doing a porch drop off of my kids & Grandkids' December First Gifts this week and these two tags are going on the white gift bags for our son and his girlfriend. The cute Candy Dot would be lost on him and I wanted the tags to match.


I used one of the Gingerbread House fronts (from the tags above) to create this BRIGHT and cheery Slimline Trifold card! Check out the little Gingerbread Man standing in the doorway. 


I used the Winter Charms by Karen Burniston to create the Gingerbread Man, and since I didn't have any of the same coloured card stock as in the Paper Pumpkin kit, I die cut the Gingerbread Boy charm from an area of the Gingerbread House that would be hidden by the white scalloped layer! Now this is a charm, but I snipped off the hanging hole so I would just have a Gingerbread Boy as he didn't need to hang in the doorway. 😊


I love those puffy Candy Drops, and I cut three different colours in half and added them at the top of the stamped label. Both the label and sentiment are from a retired SU set and not from the Paper Pumpkin kit.  The cute little tree beside the doorway is also from the Winter Charms and a SU iridescent snowflake hides the hanging hole. I also added two punched trees behind the house - the snow hill was sitting on my stamping table from a different project so it worked out perfectly for this card.

When you open the left side, you see another Gingerbread Man and a punched tree along with one of the puffy Candy Dots.


Finally, when you open the right flap the greeting is revealed, along with some more stamping etc!


For those of you who want to make one of these Slimline Trifold cards, here are the measurements. Since I talk about making these in other videos,  this is just a quick measurement guide.
  • Cut your card base 8.5 x 8.5".
  • Score 2" from the left side and 3" from the right side. This gives you your 3.5 x 8.5" Slimline card when it's folded.
  • My decorated panel on the front measures 3 x 5".
  • I cut my patterned paper layers 1/4" smaller, so if the left flap is 2 x 8.5", then my patterned paper (or DSP if you are a SU customer/demonstrator) is cut 1/4" smaller at 1.75 x 8.25".


Supplies: Unless listed below, everything came in the November 2020 Paper Pumpkin Kit from Stampin' Up


Gift Card Holders 1, 2 & 3 
Mini MISTI - My Sweet Petunia
Shimmer Spray
Stickles
Clear heart resin sticker - Stampin' Up

Gift Card Holders 4 & 5
Extra stamps - Gifting Fun, MT Stamps
Banners Pick A Punch - Stampin' Up
Card stocks 
Gold Nuvo Shimmer Pen
Wink of Stella
Clear heart resin sticker - Stampin' Up
Copic marker
Stickles

#6 - Slimline Card
Patterned paper - Over the Rainbow, Recollections
Card stocks
1018 Winter Charms - Karen Burniston
Sakura white gel pen
Stickles
Copic markers
Snowflake embellishments - Stampin' Up
Double Pierced Hills - Your Next Stamp
Snowflake embossing folder - Cuttlebug
Stamps on front - Merry Christmas to All, Stampin' Up (retired)
Torn mask and
I-crafter blending brushes
Tree punch - McGill??
Greeting inside - October 2020 Paper Pumpkin

#7 and 8 - Tag duo
Candy cane embellishment - trimmed from long K & Co border sticker I've had for years. 
Bakers Twine

Thanks for stopping by today