Friday, 31 August 2018

Circle Charm Card For A Friend

Good morning friends

For Fun Fold Friday here on my blog, I'm sharing a pretty Circle Charm Pop-Up Card.


There is lovely sparkle from the metallic dot stickers, added on either side of the large frame and on each of the punched butterflies.


The heart from the front pivots inside as the card is opened, and there is an additional spinning heart in the centre and a die cut 'hello friend' on the right hand circle. I wrote my message on the white fishtail banner.


The Circle Charm Pop-Up is fairly easy to put together, and you get lots of dimension as you can see from the top view of the card shown below. Yet it all folds completely flat for mailing in a standard A2 envelope.


Supplies:
Pink and white card stocks
Patterned paper - K & Company
Twine - Stampin' Up
More Chalk Sayings 2 Stamp - the Stamps of Life
Stickles
Butterfly punch - Stampin' Up
Metallic gem stickers - Stampendous
Stitched fishtail banners - Elizabeth Craft Designs

Thanks for stopping by today

Thursday, 30 August 2018

Back to School Card Trio

Good morning friends

Today's share are the cards I made for three of our Grandkids as they head back to school next week. The other two are in a combination day care/pre-school year round so I didn't make them a card.


First up is the card for Ethan, who loves BLUE.  I have been having a lot of fun with background dies lately, and paired this Circle Panel die from Your Next stamp with one of my Colorburst backgrounds. The cute boy stamp is also from Your Next Stamp.


The cards all have a little hand lettering inside to personalize them even more ...


Next up is Zachary's card - he loves green and black. I used these way-cool layering stripe dies from Pink and Main for the background, cutting the widest one from green card stock. The narrowest die was cut from white and the middle thickness die was cut from black. When you stack each of the die cuts on top of each other, you get this great dimensional background!


The backpack bear is also from Pink and Main. I added glaze pen on sunglasses and nose so they are nice and shiny, and Wink of Stella on his belly - just couldn't help myself. I used the Brutus Monroe cloud background for the clouds, and the 'enjoy'  & stitched clouds are by Karen Burniston


Inside I included a couple of the offcuts from the striped background, hand lettering and the sunglasses stamp.


Finally, here is Olivia's card. I made it with a bunch of scraps and leftover bits & pieces as well as this adorable image from Your Next Stamp.


Even the pink scalloped border was leftover from a different project, and it is from the Cake Pop-Up.


Like many kids, these three are super excited to get back to school and their friends. I love that I can make them happy before they head back with these fun cards.

Supplies:
White, blue, black and green card stocks
Boy and girl stamps - Your Next Stamp
Marvy LePlume II markers
Water brush
Circle panel background die - Your Next Stamp
Patterned paper (leftover bits and pieces) - Simple Stories
Signo white gel pen
Black fine point marker
Staedtler fine point markers
Chalks - Stampin' Up
Crayola markers
Dashing rectangle dies - Elizabeth Craft Designs
Dotted scalloped rectangles - Elizabeth Craft Designs
Blueprints #21 (banner) - MFT Stamps
Hey you! - MFT Stamps
Stickles
Bear stamp - Pink and Main
Layered Stripes die set - Pink and Main
Stitched rectangle dies - Elizabeth Craft Designs
Cloud background stamp - Brutus Monroe
1045 Outdoor scene (clouds) - Karen Burniston
Sakura black and clear glaze pens
Wink of stella
Stitched fishtail banner dies - Elizabeth Craft Designs
Fun foam
1052 Word Set 6 Summer - Karen Burniston

Thanks for stopping by today

Wednesday, 29 August 2018

Fall Themed Adirondack Chair Pop-Up Card

Good morning friends

Today's share uses another one of Karen Burniston's upcoming release - the Adirondack Chair Pop-Up. This is a re-release of a previously retired set and there has been a lot of excitement on the Pop-Up Peeps Facebook page about the return of this one. I've also used the new Autumn Elements (which I LOVE), pieces from the new Frame Pull Pop-Up, and the new Word Set 7 Autumn!

My card front is quick and easy, since all the fun is on the inside. 


I used the frame and square from the Frame Pull Pop-Up, and the pumpkin is from the Autumn Elements. This is a die set that I will use year round - well - except for the pumpkin. The leaves have a lovely embossed veining detail and the cap on the acorn does as well. The pumpkin also has a stencil feature built into the die which I used on this card. The die cut elements were paired with some fall themed stickers to complete my card. I do love stickers!


And here is the inside - a Fall themed Adirondack Chair! Scroll down for a mini tutorial on how to cut a different coloured chair into your card. Here I have used a wonderful woodgrain patterned card stock for my chair and I love the look and feel it gives.


I die cut the 'happy' three times, then adhered two brown card stock ones on top of each other then the woodgrain one on top. This gives a nice sturdy embellishment, and with the larger size of the 'happy' it's easy peasy to do. The Maple Leaf (thank you Karen B for adding a Maple leaf to the mix) was cut  from yellow and orange card stocks, then adhered directly to the front and back of the woodgrain Adirondack chair.


I scattered several leaves around on the card, which were die cut from the Tree Pop-Up. They each got a swipe from a Wink of Stella glitter pen. The signing block was created with the Crosshatch Rectangles, and I added a pumpkin sticker and an acorn from the Autumn Elements.


Here is a side view so you can see the pop-up portion a little better. The Adirondack Chair is such a fun die set, and works year round as you will see as the Design Team starts to post their projects with this new release.


In order to get a woodgrain looking chair, you could simply die cut the chair portion again as shown below. Snip away the excess and adhere to the pop-up chair and you have a coloured chair. BUT - with the 'fold in a fold', it never fits perfectly and gives you additional layers and bulk.

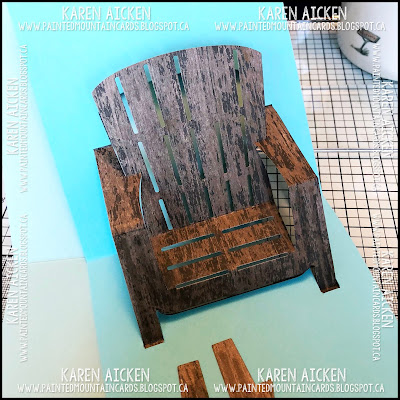
Instead, I cut the chair portion again from woodgrain paper but dit NOT cut away the excess. You will need this to adhere inside your card. In the photo below, you can see how I cut the Adirondack Chair from my inner card (the turquoise) then snipped it away at the four places where the chair meets the card. The aqua piece is the card front and doesn't have anything to do with this technique. I just wanted to show you all the pieces we would be using for the card.


Now, slip the woodgrain Adirondack Chair into the opening from the back and adhere by using adhesive on the excess pieces. Be sure not to get any adhesive on the chair pieces that will pop-up. I like to use a wet glue for a little 'wiggle room'.


And this is how it looks from the other side! You now have a woodgrain (or whatever you prefer) Adirondack Chair without additional folds and bulk. Decorate your inner card as desired then proceed as you would normally to adhere the inner pop-up card to the backing card. The turquoise chair that we cut away in the first step can be saved to use on a different project, if desired.


Finally, here is a 'front & inside' shot for those who like to pin them.


The new release will be shipping from the website around mid September, but you can also ask your local retailer to pre-order what you'd like to purchase. They will be available for pre-order on September 1st 2018.

Supplies:
1071 Adirondack Chair Pop-Up - Karen Burniston - SHIPPING SEPTEMBER 2018
Woodgrain patterned paper - Stampin' Up
Copic markers
Stickers - Echo Park
Blue, brown, orange and yellow card stocks
1060 Word Set 7 Autumn - Karen Burniston- SHIPPING SEPTEMBER 2018
1059 Autumn Elements - Karen Burniston- SHIPPING SEPTEMBER 2018
Wink of Stella
1070 Frame Pull Pop-Up (frame) - Karen Burniston- SHIPPING SEPTEMBER 2018

Thanks for stopping by today

Tuesday, 28 August 2018

'You are the Sweetest' Thank You Card

Good morning friends

I am making a nice stack of Thank You cards for our daughters birthday next month, and when I was tidying up from an Art Journal project I had this piece of patterned paper that was large enough for a card front. I hate tossing useable papers! So ... this card was born.


Once again I used MFT's Triple Peek A Boo window die set and these adorable images from Pink and Main.  Then the panel was die cut with the Crosshatch Rectangles. The words fit perfectly on the banner die from Karen Burniston's Word Set 5 Royalty. I love getting more use from my dies than what they were intended for.


The inside is blank, so she can write a longer note inside if needed.

Supplies:
Patterned paper - My Minds Eye
The Scoop stamp set - Pink and Main
1054 Rectangles, Crosshatch - Karen Burniston
Triple Peek a Boo Window die - MFT Stamps
Gelato's
Water brush
Signo white gel pen
Stickles
Copic marker
Pink and white card stocks
1034 Word Set 5 Royalty (banner) - Karen Burniston
Sentiment stamp - MFT Stamps
Sequins

Thanks for stopping by today

Monday, 27 August 2018

Palm Tree Celebrate Pop-Up Card

Good morning friends

Today's card using a few more of the upcoming new release by Karen Burniston ... the Ocean Animals, Wine Charms and Celebrate die. I've paired them here with the Palm Tree Pop-Up, but used it a little differently as you will see .


The front panel were fun to make. I cut the decorator panel slightly smaller than the Gatefold card front, which is 6 x 5". Then I die cut the stitched waves from the Tropical Scene several times across the panel. It doesn't reach all the way to the edges, so I just centred the die between the edges each time I ran it through the Big Shot. Then I cut the panel in half vertically and adhered each half to the sides of my Gatefold card. I like the embossed look the waves give the panel, but since they didn't cut all the way to the edges it was easy peasy to adhere the side panels.

The light water colour panel was just a scrap of white card stock I had grabbed when there were some ink puddles on my glass mat. I dipped and dragged it through the ink then put it aside to dry as I didn't need it but didn't want to 'waste' the ink puddles. I always save these pieces to use later on on something.

I die cut the Octopus from the new Ocean Animals, and several wine glasses from the new Wine Charms. I used a water colour panel from my stash that I had created with Colorburst and Magical Shakers. The purple isn't nearly as harsh in real life as it shows in the photos. The Wine Charms are really cool - they are going to be a fun addition to many people's collections. They have two differently shaped glasses, two differently shaped bottles, the labels for the bottles and the 'filler' for the glasses, as well as a bunch of grapes. I cut the wine glass filler from white card stock and added some shimmer with a Wink of Stella pen.


Here is a look at the inside, where I added the Palm Tree Pop-Up to the left side of my Gatefold card. I like that this is such a different way to use this Pop-Up, instead of a standard top or side fold card.


The Sea Turtle from the Sea Animals is holding one of the wine bottles, and I added some stamped dot clusters as well as a sprinkling of die cut sea shells from the Tropical Scene die set.


The Celebrate is the same font as the previously released Happy Birthday die that I use so often and it's a nice big size to make a statement on your projects. The crab from the Sea Animals is also holding a wine glass. The new Ocean Animals also has a crab, but it is bigger and facing the other direction so that will be fun to pair with the Sea Animal crab for lots of different scenes etc.


The Palm Tree island comes from the Tropical Scene set as well.


Finally, for those of you who like to Pin group shots, here you go:


Remember to ask your local retailer to bring them in for you! Otherwise, the new release will be available for pre-orders on September 1st.

Supplies:
Teal, green kraft, brown and black card stocks
Patterned paper - Ella & Viv
Sakura white gel pen
Sakura black glaze pen
Dot stamp - Stamps by Judith
Brown and black fine point markers
1068 Ocean Animals - Karen Burniston - COMING IN SEPTEMBER 2018
Magical Shakers - Lindy's Stamp Gang
Colorburst - Ken Oliver
1073 Wine Charms - Karen Burniston - COMING IN SEPTEMBER 2018
1067 Celebrate - Karen Burniston - COMING IN SEPTEMBER 2018
Distress Oxide Inks
Wink of Stella
Card size - 6 x 5"

Thanks for stopping by today

Sunday, 26 August 2018

Snowflake Owl Holiday Card

Good morning friends

I have a holiday card to share today, created using this sweet snowflake owl stamp from Prickley Pear.


I used some Cut Aparts, patterned paper and coordinating embellishments from a My Minds Eye. I picked up this package last year for the holidays and I still have quite a bit left. The owl got some glitter as well - frosty snowflakes!


Here is a peek at the inside:


Into the holiday card stash!

Supplies:
Patterned paper and embellishments - My Minds Eye
Owl stamp - Prickley Pear
Derwent water colour pencils
Water brush
Stickles
Sakura black glaze pen
Blue & white card stock
1167 Peel Off's - Elizabeth Craft Designs
Pink heart (on stamping table)
Blueprints #13 (stitched panel) - MFT Stamps
Stamps inside - Neat & Tangled

Thanks for stopping by today

Saturday, 25 August 2018

C4C 449 Masculine Sneak Peek Pop-Up Card.

Good morning friends

It's Saturday and that means a new challenge at the Crazy4Challenges Blog. Since it's a new month we also have a new Hostess and Guest Designer! Our August hostess is Anja de Regt, and our guest designer is Connie VanLoosen.

Anja's challenge this week is:  "Our youngest son is turning 21 tomorrow, how did that happen? No little boys card for this one anymore, my challenge for you today is to make a masculine card."


Today is the day the Design Team can start to share peeks at Karen Burniston's new release, which will be shipping in early September. YAY!!!


As usual, the front of my Pop-Up card is fairly simple. I dangled three fish from the Camping Charms on a piece of twine, highlighting the fish with metallic gel pens. The 'Celebrate' is one of the new dies!


Inside, I used another one of the new dies - the Evergreen Pivot Panel. Now this is not the first card I made with this die set, but that one didn't fit with the challenge and since today is the day we can share I am sharing this card first.

The COMING SOON Pivot Panels are pretty cool for a number of reasons. They are easy to use, they don't require a backing card and they give a lot of dimension. There are two Pivot Panels being released, this one and a House Pivot Panel. The decorator dies seem to be interchangeable - I have used the houses with the Evergreen Pivot Panel and visa versa. As well as working inside a regular card, they fit PERFECTLY on the Tag Book Pop-Up to completely change the look of that die set. The Tag Book Pop-Up is really popular, so people will love having additional dies that work with that. AND it also is meant to work with the Twist Panel Pop-Up - another incredibly popular die set. For my card today, I used a side fold wide A2 card.


Our son likes to fish, so this card is for his birthday next month. The Fall tree panels were cut from patterned paper using the Crosshatch Rectangle dies. I cut the Evergreen Pivot Panel from kraft card stock, then dipped and dragged it through Distress Oxide ink puddles to add colour. I added a stamped & die cut bear/fish and trees from both the Evergreen and the House Pivot Panels.


The greeting was white embossed on a zig-zag circle, then adhered to one of the Evergreen pop-out pieces. I love using dies in ways other than the way they were intended, and I can't wait to play with these Pivot Panels some more.


Finally, for those that like to pin group shots - here you go:


Since the KBR offices are in the process of a big move, you won't be able to pre-order these dies until September 1st and they will start shipping around the second week of September. Remember you can always ask your local retailer to bring them in for you as well! For a little video showing the entire September 2018 release, check out Karen Burniston's blog HERE:  


Check out the C4C blog to see how the Crazies have been inspired by the challenge. We'd  love to see your take on it, so be sure to stop by the Crazy 4 Challenges blog and link up your creations. If you are uploading to an online gallery, please use the keyword C4C449.

Supplies:
1062 Evergreen Pivot Panel - Karen Burniston - coming September 2018
Kraft and white card stocks
Patterned paper - DCWV
Distress Oxide Inks
1063 House Pivot Panel (tree) - Karen Burniston - coming September 2018
White embossing powder
Birthday fishes stamp - Paper Smooches
Bear/fish stamps - Local King Rubber Stamps
Wink of Stella
Derwent Water colour pencils
Waterbrush
Sakura metallic pens
1067 Celebrate - Karen Burniston - coming September 2018
Twine - Stampin' Up

Thanks for stopping by today

Friday, 24 August 2018

New House Pop-Up Card & Gift Card Holder

Good morning friends

Our son and partner purchased a new house in the same town as our eldest daughter, and this is the card we gave them. I had so much fun creating the front of the card, using a photo they sent us when the SOLD sign went up and some Photo Frames by Lynda Kanase. I printed the photo with my Instax SHARE printer, and cut the frames from some Colorburst backgrounds I had in my stash. All of the words & borders in the different Photo Frame sets work with each other so I paired a HAPPY with the ADVENTURE and cut some of the included arrows and a heart too. The Home Sweet Home is a Wild Whisper stamp.


Inside, I made it a Pop-Up using Karen Burniston's House & Fence Pop-Up. I just love the floating floor that comes with that die set.


I used more of my Colorburst backgrounds for the shrub and tree foliage, and also below our signing block. a bunch of stitched clouds form a shrub and there are white gel pen accents on the fence.


We gave them a gift card to a home improvement store as a housewarming gift. They had a big 'to do list' so we thought it might come in handy to pick up some shrubs or a tree of their choice. Their new back yard is HUGE! And bare. I used Lynda Kanase's Slider Card die for the Gift Card Holder, and added a paintbrush die cut to the front.


The ENJOY is from Karen Burniston's Word Set 6 Summer - another die I get a lot of use out of.


I have several used/empty gift cards that I use as photo props, this is not the actual card we gave them. 

Supplies:
1015 House & Fence Pop-Up - Karen Burniston
Kraft, yellow, black, brown, red, blue, grey card stocks
Woodgrain packaging
Black marker
1005 Tree Pop-Up - Karen Burniston
1006 Nature Edges - Karen Burniston
1054 Rectangles Crosshatch - Karen Burniston
1002 Word set 1 Greetings - Karen Burniston
Stamps - Wild Whisper
Photo Frame, Travel - Lynda Kanase (Sizzix)
Photo Frame & Words - Lynda Kanase (Sizzix)
Instax SHARE printer
1019 Gift Card Label (hearts) - Karen Burniston
Copic marker
Wink of stella
Card, Slider - BigZ die - Lynda Kanase (Sizzix)
Patterned paper - Basic Grey
Corner Rounder - We R Memory Keepers
Paintbrush die - MFT Stamps
1052 Word Set 6 Summer - Karen Burniston

Thanks for stopping by today