Friday, 30 June 2017

CANADA Accordion Tabletop Decoration

Good morning friends

I woke up one morning and this idea just hit me as I was getting dressed so I headed straight to the craft room to get it made. I used the Charm Accordion, one of the new releases from Karen Burniston. I really like that it cuts two pages at a time!

Below is the accordion in the closed position.


Here is the table top decoration fully open. I used an old Stampin' Up die to cut the letters out of red glitter card stock, and the dangling heart charms are also cut from the same glitter card stock. One of the coolest dies in this set is the JUMP RING DIE! It cuts 4 jump rings at a time, and having them cut from card stock etc makes it much easier to assemble than using actual jump rings. And not just for me - I see that comment a lot from people who have also purchased Karen Burniston's Charm Accordion. For this accordion, I cut the jump rings from gold Shimmer Sheets.


When open, the decoration is a full 15" wide! It was fun choosing the different words to add from Karen B's new collection - I think the font is so sweet. These ones were cut from card stock with Xyron adhesive on the back which essentially turned them into stickers so they were easy to adhere.


I cut the Charm Accordion three times, twice from red and once from white. The hinges (the hinge die comes with the Charm Accordion) were cut from black and they are what holds the panels together. I also cut the Charm Frames (included) from black card stock.


Look at how flat it all folds up! Hubby was surprised and impressed at that - in fact, he quite liked the whole project! I'll be able to store it for other July 1st Canada Day celebrations as well. Canada is turning 150 this year, but I didn't add any numbers so I can put this out again next year.


Supplies
1007 Charm Accordion - Karen Burniston
Red, White & Black card stocks
Red glitter - Stampin' Up
Alpha dies - Stampin 'Up
Gold shimmer sheetz - Elizabeth Craft Designs
1002 Word Set 1 - Greetings - Karen Burniston
1003 Word Set 2 - Birthday - Karen Burniston
Xyron
Stitched leaf die - Lawn Fawn

Thanks for stopping by today

Thursday, 29 June 2017

Succulent Love Note

Good morning friends

I made this card back in the early Spring when we were in Arizona. I am an early riser, but don't like to take the dogs outside until after 8am because of barking. So I got in the habit of getting up and leaving the dogs snoozing with hubby while I played in the craft room until 8am. Then I'd go get the dogs their breakfast and get them outside. I really enjoyed those mornings of solitude, with Netflix on my little iPad, sun shining and birds singing. What a great way to start a morning!

I didn't have a plan for this one, but the patterned paper stack was out from a different project and I just started playing and layering.


LOVING these cactus and succulent dies from the Stamps of Life. They hit my Wish List the moment they were released to the club members, but I had to wait until near the end of the month when they were available to the rest of us.


I really like the soft colours in this paper stack. It's about 3 years old now and I still have lots left!

Supplies:
Patterned paper - We R Memory Keepers
Stitched circle frame dies - Lawn Fawn
Cactus/succulent dies - The Stamps of Life
Plant pots - MFT Stamps
Coral, white card stocks
Stitched Rectangle dies - Elizabeth Craft Designs
Seam Binding

Thanks for stopping by today

Wednesday, 28 June 2017

Birthday Squirrel and Wagon Birthday Pop-Up Card

Good morning friends

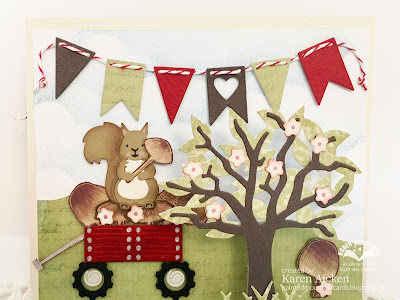
Today's share is a Pop-Up Birthday card using a bunch of new dies by Karen Burniston.


I've had the patterned paper for several years and I think it is going to work really well with the new Woodland Animals. Here, the squirrel is holding a die cut flower while standing on a fussy cut mushroom.


Inside, I made a Pop-Up with the new Tree Pop-Up. The greenery on the tree is cut with one pass so you can quickly make a full tree - or even lots of trees!


I'm kind of proud of the wagon, which was made with the swing from the Tree Pop-Up. I cut four swings from red card stock and embossed the wood grain on them using the emboss feature of the die. They were adhered to a scrap of red card stock in behind, then I added the tire swing for wheels. The hubcaps were made with the jump-ring die from the Charm Accordion - I left the centre intact and adhered the whole thing inside the tires. The wagon handle was hand cut from a scrap of red card stock with markings from a silver Sharpie marker.

The little squirrel fits perfectly in the wagon, but here I have added some fussy cut mushrooms for him to hold and perch on.


I used two of the three Nature Edges for the greenery,  the ground/hill/snow/grass/dirt one and the grass is on the bottom part of the card with another fussy cut mushroom.


I decided to add a few flowers to the tree and wagon - the flower die cuts six at a time, so it doesn't take long to cut a whole bunch. I cut a stitched puffy cloud (Nature Edges) from scrap card stock, then used it as a stencil/mask with dye inks to create the puffy clouds in the sky.


I hope you enjoyed this card as much as I enjoyed making it. While I am in NO WAY trying to hurry through summer to get to Fall, I am thinking it will be fun to make autumn coloured leaves with this tree for Fall themed cards too. And bare, it will work great for Halloween!

Supplies:
Patterned paper Recollections
Brown, peach, black, red and silver pearl card stocks
1001 Woodland Animals - Karen Burniston
1005 Tree Pop-Up - Karen Burniston
1006 Nature Edges - Karen Burniston
1011 Katherine Label Pop-Up (labels) - Karen Burniston
Fishtail banner dies - MFT Stamps
1003 Word Set 2 - Birthday - Karen Burniston
Silver gel pen - Sakura
Chalks - Stampin' Up
Black fine point marker
Pink coloured pencil
1007 Charm Accordion (Jump ring) - Karen Burniston
Bakers Twine
Copic's
1009 Twist Panel Pop-Up (Banners) - Karen Burniston

Thanks for stopping by today

Tuesday, 27 June 2017

Hay There Cow Card

Good morning friends

This is a card I made just for fun. I had some items on my stamping table (sunburst, cow, stitched circle) so I combined them to make a square card.


The sunburst was actually the negative area from THIS card but I thought it could be used on it's own. The tree die actually cuts a tree on either side, but this time I only wanted a single tree. I added a second leafy bit behind the one to make it look like there are two trees on that side.


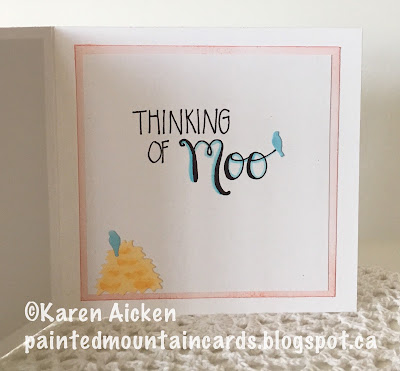
A little hand lettering inside, along with a haystack and a pair of blue birds.  Done!


Into my stash with this one.

Supplies:
Sunburst  die- Paper Smooches
Soft Finish Card Stock - Elizabeth Craft Designs
White, green, yellow and black card stocks
Tree die - Taylored Exressions
Stitched clouds - MFT Stamps
Quick Critters - Taylored Expressions
Hey There Pop Stand - Pop it Ups, Karen Burniston (Elizabeth Craft Designs)
Stitched Circle die - MFT Stamps
Small bird dies - Impression Obsession

Thanks for stopping by today

Monday, 26 June 2017

Hot Air Balloon Masculine Birthday Card

Good morning friends

It's Masculine Card Monday here on my blog, and for my second post today I have a Birthday card to share using Karen Burniston's Hot Air Balloon die. As you can see, it makes a great embellishment for a card in addition to a Pop-Up card.


The papers were in my stash and I've had them for many years. Fun to break them out again. I embossed the white panel with a clouds embossing folder and lightly sponged blue on it so the raised edges would catch the ink.


This card is going into my donation box for Seniors Secret Service.

Supplies:
5 x 7" card base and envelope - Walmart
Patterned paper - K & Company
white and black card stocks
Hot Air Balloon, Pop it Ups - Karen Burniston (Elizabeth Craft Designs)
Embossing folder - Darice
Action Wobble
Black fine point marker
Stitched fishtail banner dies - Elizabeth Craft Designs
What's Up Clear Stamps, Pop it Ups - Karen Burniston (Elizabeth Craft Designs)
Staedtler markers

Thanks for stopping by today

Travellers Journal for Olivia

Good morning friends.

Note - this is a photo heavy post. Lots of people do YouTube videos showing their journals, but I don't do videos. So ...

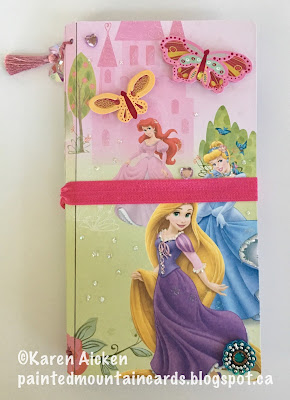
I had fun this past weekend making a Travellers Journal for our 6 year old Granddaughter Olivia. If you follow my blog, you know that she loves pink and purple and everything girlie. I've had this pad of Disney Princess paper since Children's Wish Foundation sent Olivia to Disney World so I got it out  againfor her journal.

I used Eileen Hull's Journal die to make the journal itself - it's from her Heartfelt Collection and it's AMAZING. The different ways people are using this die are nothing short of inspiring. It goes together perfectly, all the scoring is done and holes cut with the die. It's a BigZ Score Board die, which means it cuts matt board, chipboard etc. I used heavy chipboard for my covers, covered front and back with patterned paper and it still cut beautifully.

Here is the front cover, embellished with lots of glitter glue, some purple heart gems (purple for Pulmonary Hypertension and hearts because of Olivia's big heart) and layered sparkly 3-d butterfly stickers.


I added a mauve tassel and iridescent heart beads to the spine.


You need to cut two covers - one for the front and one for the back. Then they adhere together with a strong adhesive. Since I use the Elizabeth Craft Designs double sided adhesive for my paper crafting, I used that on my first Travellers Journal. However it is NOT strong enough. I picked up red-line tape for this one. Here you can see that there are three signatures (inserts/booklets) inside the journal.


This is the cover flattened out so you can see the front and back. I chose a wide, pink sparkly elastic to close the journal ... the end photo shows it closed with the elastic.


Here is the inside - there is a little bag with a window & transparency that I've tucked some iridescent rose stickers in and added some purple gems. Olivia can add other goodies to the bag as well. You can also see all three inserts as they fan out when the journal is opened. I added a punched tab to the top of each insert, staggered, with an iridescent gem on the front and a purple one on the back. The front cover of the insert has lots of sparkle and a fabric flower.


Inside each insert, I added a flat paper bag with the bottom trimmed off and notches cut into the top and bottom. They are folded in half sideways and placed against the cover, so when the pages are added to the book the bag forms a pocket. There is one at the inside front cover and the other end is inside the back cover. I added sparkly washi tape to each end to decorate them up a little. Olivia can doodle or write on the bags as well.


Inside each of the bag/pockets there are 4 x 6 patterned paper pieces that Olivia can write secrets or special things on, and a small sheet of washi stickers.


I added a sheet of patterned paper to each of the inserts as well. This first insert has quad paper inside that Olivia can use for practicing her writing. I also stamped each of the pages and she can colour the images in or draw around them.


Below you see the back of the first insert and the front of the second. There is another tab with gems at the top, lots of glitter and another 3-d sparkly butterfly sticker.


I stamped a few images throughout this book as well, but the pages are sketchbook paper so Olivia can use this one for drawing in.


Below is the back of the second insert and the front of the third. As with the others, there is a tab with gems, lots of glitter and a 3-d sparkly butterfly sticker...


... and here you see another bag/pocket. The Disney patterned paper is double sided so there are sweet patterns inside the covers as well.


This third insert has a combination of sketch paper and quad paper. I added iridescent rose stickers throughout this one.


Below is the back of the third insert and the back cover of the journal.


Finally, here is the journal with the elastic closure. It's not too tight so little fingers will be able to slide it off and on easily.


This must seem like a lot of work to do for a 6 year old, but with the amount of time Olivia has to spend at the Children's Hospital I think she will get a lot of use out of it. It will easily fit in her backpack too.  I may look for some small gel pens to go with the Travellers Journal and add a pen-loop. But for now, I'm calling it done!

I'll be back later today with my regular 'Masculine Card Monday' post ...

Thanks for stopping by today


Sunday, 25 June 2017

Farm Week Card #6

Good morning friends

Today is the last day of Farm Week here on my blog - I had so much fun creating this Farm themed card set for our daughter on Mother's Day. So much fun - I got to use some of my new goodies as well as some older products that needed some love. Win win!


Inside is a Pop-Up, using Karen Burniston's older Pop 'n Cut dies. This 'Love' insert is going to get a ton of use. I love how it pairs here, with the Sending (Love), Hogs & Kisses. The little heart on the front, is the centre that falls away when you cut the LOVE die inside.


I know. I stacked a lot of die cut farm critters on these cards ... but really, they look so cute stacked.


Finally, here is a side view so you can see the Pop-Up a little better.


Our daughter loved her cards. She said she didn't think she would be able to send them to anyone until she had coveted them for awhile. Ha - she is my daughter all right.

Supplies:
Pattered paper - Recollections
Farm stamps and dies - Papertrey Ink
Pink card stock
Stitched Fishtail Banner - Elizabeth Craft Designs
A2 Pop 'n Cut base with Love insert - Karen Burniston (Sizzix)
Love Sizzlet - Karen Burniston (Sizzix)
Scallop border - The Stamps of Life
Sending die - Simon Says Stamps
Xyron

Thanks for stopping by today

Saturday, 24 June 2017

C4C391 Ocean Themed 'Thank You' Card Trio

Good morning friends

It's Saturday so that means a new challenge at the Crazy 4 Challenges Blog. Our June 2017 Hostess is Joanne Grzelak. 

Here is Joanne's Challenge this week:  Today is Swim a Lap Day. Please include some form of water on your card.....a river, the ocean, a pool, raindrops, puddles, bubbles......it is up to you what form the water takes.


I have an ocean themed Thank You card to share today ... three of them in fact! But this first one was done specifically for the challenge. Technically I didn't include WATER on my cards but stretching is part of the challenge fun.


I love Stampin' Up's gold foil card stock, and used it here for the outline of the ECD seahorse. It picks up the gold foil bits in the patterned panel, so then I added gold dots with a gel pen inside each of the scallops. Each of the design patterns received a small dab of gold Nuvo Crystal Drops for more gold shine.


Inside is some gold seaweed, and a die cut oval to write our message on.


This second card also uses Elizabeth Craft Designs products ... I used Distress Oxide inks and made a water coloured panel. From that panel I die cut the solid shell, the paper strip across the card centre and a second shell inside the card.


More gold foil card stock for the shell outlines, above and below the water coloured strip and the Thanks die cut.  Note, the patterned paper panels I'm using for these three cards were from a package of A2 note cards. The patterns were so pretty and the price was amazing so I couldn't resist them. I cut each of the note cards in half and used one half for the outside and the other half inside of each card.


The third card had this lovely foiled mermaid on the front. I added some Nuvo Crystal Drops and a gold die cut THANKS, as well as some inking around the mermaid so she stood out a little from the background.


Finally, here is a look at the inside of the Mermaid card.


Check out the C4C blog to see how the Crazies have been inspired by the challenge. We'd  love to see your take on it, so be sure to stop by the Crazy 4 Challenges blog and link up your creations. If you are uploading to an online gallery, please use the keyword C4C391.

Supplies:
Seahorse card:
Teal and white card stocks
Patterned A2 card - DCWV
Seahorse dies - Elizabeth Craft Designs
Gold foil card stock - Stamping' Up
Dotted Scallop Oval dies - Elizabeth Craft Designs
Gold gel pen - Sakura
Words and banner stamps/dies - the Stamps of Life
Crystal Nuvo Drops
Coral/Seaweed - Elizabeth Craft Designs
Fitted Ovals - Elizabeth Craft Designs

Gold shell card:
Patterned A2 card - DCWV
White and green card stocks
Distress Oxide Inks - Tim Holtz
Gold foil card stock - Stampin' Up
Shell dies - Elizabeth Craft Designs
Seaweed dies - Elizabeth Craft Designs
Thanks die - Elizabeth Craft Designs
Signo white gel pen
Nuvo Crystal Crops

Mermaid card:
Patterned A2 card - DCWV
Wonky stitched rectangle dies - MFT Stamps
Thanks die - Elizabeth Craft Designs
Gold foil card stock - Stampin' Up
Xyron
Nuvo Crystal Drops
Seabirds - Impression Obsession

Thanks for stopping by today