Saturday, 30 June 2018

C4C441 Eclipse Technique Thank You Card

Good morning friends

It's Saturday and that means a new challenge on the Crazy4Challenges Blog.  Frances Byrne is our hostess for June, and our Guest Designer is Karen Nofziger of Craftily Yours.

Frances' challenge this week is: "I love the look of inlaid die cutting using alphabet or word dies over a design on a card which is becoming popularly known as the Eclipse Technique."


As usual, I did my own thing for the challenge. Since I'm working on a set of Thank You cards for my daughter's birthday, I decided to use the inlaid die cutting technique with a shape instead of an alphabet or word. Karen Burniston's new Crosshatch Circle die set worked perfectly, and I got to use an older sheet of patterned paper from my stash as well.


I didn't' Google' the technique, just played with cutting nested circles then layering some with foam tape. I'm happy with the subtle dimension on the card - I think it's a unique look.


I had an idea for the inside that didn't work, so instead I adhered the butterfly piece to the inside left of the card. No mistakes in card making, right?  Ha! 


Check out the C4C blog to see how the Crazies have been inspired by the challenge. We'd  love to see your take on it, so be sure to stop by the Crazy 4 Challenges blog and link up your creations. If you are uploading to an online gallery, please use the keyword C4C441.

Supplies:
Stickles
Black, pink and white card stocks
Bakers Twine
Patterned paper - DCWV

Thanks for stopping by today

Friday, 29 June 2018

Flamingo Floatie Flip-It Card

Good morning friends

It's Flip-It Friday here on my blog and today's share is a thank you card I am adding to my daughter's pile. I am going to give her a set of Thank You Cards for her birthday.


This Circle Fancy Edge Flip-Its die set is exclusive to The Stamps Of Life. I love Flip-It cards, and I love circles .... how could I not add this die set to my collection? Ha. I have mentioned how much I'm liking flamingoes these days, so when I spied this cute stamp on clearance I thought it would be fun to play with.


I also added a couple of Karen Burniston's new Beach Charms - the palm tree and flamingo. Simply snipping off the charm hanging hole makes them work as regular die cuts.


Supplies:
Blue and white card stocks
Fancy Edge Circle Flip-Its - The Stamps of Life
Girl & float stamp - Neat & Tangled
Patterned paper - Reminisce
Marvy LePlume II markers
Water brush
Signo white gel pen
Words - MFT
Sequins

Thanks for stopping by today

Thursday, 28 June 2018

Cake Sticker Gatefold Birthday Card

Good morning friends

I have always loved stickers, so when I discovered the Violette Sticker Club this Spring, I signed up! How fun to get a nice selection of stickers in the mail each month. 

I loved the cake stickers when I saw them online, but was initially surprised at how small they are. I'm terrible at judging sizes online and see things as big as I want them to be in my head. But they are cute and so fun for planner and calendar decorating too. They would look classy on your calendar and there are so many on a sheet I'm able to USE them and not hoard them. I used several here and made a Birthday Card using my ScorPal to easily make a Gatefold card.


The patterned paper was a 'free with purchase' - and it has lovely copper foiled bits on one side. There were a couple of different patterns that came in the freebie - I think they might have been in one of the Simon Says Stamp Card Kits at some point.

A little glitter on the cakes and they were ready for the card.


Here is a peek at the inside, with more of that pretty foiled paper and a few more cake stickers for good measure.


The 'eat cake' stamp and the little banner and Happy Birthday are both by Lynda Kanase.


I'm a planner girl - and have used a planner to keep my life organized for over 30 years. Back in the day, all you could get was a Daytimer at an office supply store! I don't generally do a lot of decorating in my planner, but it was fun to add some of these cute cakes on the dates our family has birthday's.

Supplies:
Patterned paper - MME 
ScorPal
Stitched Mini Scallop Rectangles - MFT Stamps
Dashing Rectangle dies - Elizabeth Craft Designs
Cake stickers - Violette Stickers
Make a Wish - MFT Stamps
Photo Frame, Celebrate - Lynda Kanase (Sizzix)
Stickles

Thanks for stopping by today

Wednesday, 27 June 2018

Unicorn Pop-Up Birthday Card

Good morning friends

Our son called two days before Olivia's birthday to ask if I happened to have a horse or unicorn card they could give to Olivia. I did not, but said I would make them one. I was secretly happy that they wanted to give her a card I'd made instead of scooting out to pick one out at the drug store.

It was a busy few days, but the Katherine Label Pop-Up makes great card fairly quickly so that is what I grabbed to work with.


I kept the front fairly simple, cutting the candle patterned paper with the new Crosshatch Squares  and adding glitter and bakers twine.


Inside I added a stamped and die cut unicorn to the pop-up 'arm' and fussy cut some sentiment banners from another sheet of patterned paper in the stack.


Lots more glitter was added to the unicorn!


The cute unicorn stamp is from Michaels, and it got used a fair bit for Olivia's birthday! Heather borrowed it to stamp on pink and purple aprons for Olivia's friends as they decorated cakes as the party activity. I also found a cute journal to tuck in with Olivia's gifts, and it was from the same line with the same unicorn on the front.

Supplies:
Zig Clean Colour Markers 
Waterbrush
White and pink card stocks
Unicorn stamp & die - Michaels
Metallic gel pens - Sakura
Patterned paper - Dear Lizzy
Bakers Twine
Fun foam
Stickles

Card size 5 x 5" square

Thanks for stopping by today

Tuesday, 26 June 2018

Birthday Card Group for Girls

Good morning friends

Hold onto your hats, I have a ton of photos to share today. Because I made these cards from similar papers etc, I decided to lump them into one giant blot post rather than spread them out. These were the 'girl cards' I included in the big set of Birthday Cards I gave to each of our daughters for Mother's Day. Note, I only photographed one but I did make two of each design.

I started the cards with pre-printed A2 size cards I picked up at Michaels last year for a screaming deal. I love the pretty colours and all the sparkle on them, and the cards are printed on the front and the back. So the first thing I did was cut them apart at the fold and then make standard A2 sized cards from coloured card stock. Because I cut the patterned cards into two, I was able to make 12 cards decorated inside and out using the patterned card backs for embellishments & layers!

Below are all six of the different cards photographed together. They turned out so pretty - I am happy with them, and our daughters loved them.


For the first card, I cut the words from one of the patterned cards and added them with other bits and pieces including sequins. I kept every little scrap and off-cut as I was working and found all kinds of creative ways to use the bits & pieces ... like the stitched clouds that were cut from tiny scraps..


Here is the inside ... the large cloud was the cutaway piece from the card with the cloud shaped shaker.


Here is card number two and it had lots of gold glittered bits on it. I simply cut the panel with a stitched rectangle die, added some sequins and Bakers Twine then adhered it to the card front with fun foam.


I have had these cute stamps for several years and it was fun to get them out again for card number 3. This card features several of the patterned cards cut with a Blueprints die set and layered back together.


I made a little shaker at the top of this fourth card, and decorated it with a little cupcake from Karen Burniston's Birthday Charm die set.


Using a MISTI makes stamping a multi coloured easy peasy. The stamp below is a single stamp!


I waited SO LONG for this Happy Birthday Circle die to be in stock. Every time I went to place an order it was out of stock, so when I finally saw it was available again I was pretty happy. I have big plans for this one, and the first thing I wanted to do was create a shaker with one of the circle shaker pouches from MFT Stamps. This is card number five...


I am really enjoying making shaker cards these days, and MFT Stamps Cloud shaker set is going to be a lot of fun to play with. For my final card I also added a cute stamped unicorn.


After making all these cards (twelve in total) I only have a few tiny bits of patterned card leftover, and one that is a little larger and polka dotted. They will be perfect to use for  cupcake icing dies so I'm hanging onto them. 

Whew - thanks for hanging in there with me!

Supplies:
A2 patterned cards - Michaels (cut apart)
Blueprints #24 - MFT Stamps
Cloud Shaker Window & Frame dies - MFT Stamps
Cloud shaker pouches - MFT Stamps
Happy Birthday Circle Frame - MFT Stamps
Circle shaker pouches - MFT Stamps
Fun foam
Stitched fishtail banner dies - Elizabeth Craft Designs
Black fine point marker
Nuvo Crystal Drops
Enamel heart stickers - Doodlebug Designs
Pink, blue and white card stocks
Sequins and glitter for filler
Unicorn stamp - C.C. Designs
Copic markers
Stickles
Bakers Twine
Glossy Accents
Sequins & gold flakes
Gold embossing powder
Eat cake today stamp - Waffle Flower
Transparency
Spectrum Noir Glitter Pen
Happy Birthday - MFT Stamps
MISTI - My Sweet Petunia
Words - MFT Stamps
Thanks for stopping by today

Monday, 25 June 2018

VW Bus Masculine Birthday Shaker Card

Good morning friends

Today's share is the birthday card I made for my Mom to give our Son for his birthday. I make all her cards as well as our own, which means more playtime for me!

I was looking through my sticker stash and saw this large VW Bus. Eureka! Our son used to have a Westfalia (we called it the Westie) so I knew he would love this image.

I have terrible time using the correct amount of sequins and wish I'd added more to this one. If you are making shaker cards, remember that the depth of foam tape makes a difference. For this one I used Stampin' Up's adhesive foam strips which are double the thickness to their dimensionals. At least the filler shakes really easy when it's not stuffed too full!


I made it a shaker card using the MFT Essential Cover Up (Horizontal) and added a die cut greeting over the transparency.


The windows, headlights and tire rims got some Glossy Accents to make them shiny.


Finally, here is a peek at the inside.


It's so much fun to customize a card and I know he is going to get such a kick out of this card!

Supplies:
Patterned paper - DCWV
White, black card stocks
Transparency - Hero Arts
Sequins
Essential Cover Up Horizontal - MFT Stamps
Foam strips - Stampin' Up
Fun foam
Grassy Border die - Lawn Fawn
VW Bus sticker - Chickaniddy Crafts from my stash
Glossy accents
Happy Birthday die - Lawn Fawn
Xyron
Bakers Twine
MISTI - My Sweet Petunia
Words inside - MFT Stamps

Thanks for stopping by today

Sunday, 24 June 2018

(Mostly) Holiday Lip Balm Holders

Good morning friends

Note - this is a LONG post with lots of photos.

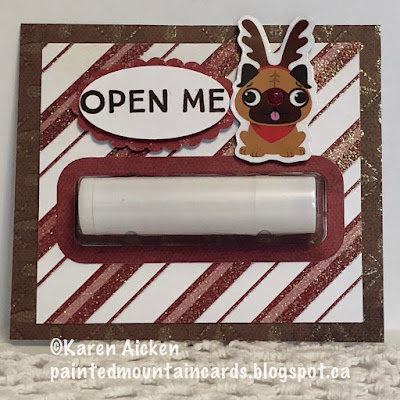
Today's share will be some of the Lip Balm holders I've made and given out as gifts. Most of the photos are of holiday ones, but I thought I'd start with non holiday ones. This first one I made for a friend who was coming to visit me. It can be dry here if you aren't used to it - my Mother In Law always needs lip balm when she visits - so I thought this would come in handy.

I was really excited when MFT came out with these lip balm pouches and the coordinating window and frame dies and added them to my stash right away. In fact, a friend who is on a different time zone than me and awake much earlier, emailed me the link and said "YOU NEED THESE". I hadn't even seen the new release by MFT yet! Ha - I make my own lip balms and she has received a couple so thought of me when she saw the release.

This first lip balm holder was a little fancy, because I had the time to sit and play. I used the pretty Succulent Serenity paper pad by Lynda Kanase and just wrapped a coordinating paper scrap around the balm so it looked pretty in the package.


The leafy sprig is from Karen Burniston's Flowers & Bee set and the paper succulent was in my stash.  I swiped the edges with Distress Oxide inks before adhering it over the sprigs. I also added some bling to the centre, just because.


I added this patterned paper to the back side, along with a thumb hole to make it easy to tear off and get to the lip balm.


This next one was for a friend who was going to be visiting on Mother's Day. I wanted a little something for her, and since they love the ocean this is what I came up with.


She loved it - the Born to Swim is perfect for her! I added the sea turtle from Karen Burniston's Sea Animals and also the 'enjoy' die from the new Word Set 6 - Summer. That die alone is going to get a ton of use!


I added a piece of patterned paper, cut slightly narrower and shorter than the 'born to swim' panel, then cut a notch for a thumb hole. This was adhered on the two sides only and it was easy for her to lift that piece away and get to the lip balm without tearing the card.


Then the whole 'born to swim' panel was adhered to the underwater panel at the top edge only.


This next one was quick and easy ... I was practically heading out the door to pick up our dog from the groomers, and realized I wanted to bring a little somethin' somethin'. She was thrilled, as she says her lips get so dry while she is working.  The patterned paper is nice and sparkly, which you don't really see in the photos. A friend had just given me these cute holiday dog stickers so I added one to white card stock, fussy cut it out and popped it up with foam tape.


When I was getting our holiday parcel ready to send back East, I decided to add in a lip balm surprise for my Sister-in-Law as well. The pink is actually glitter paper so this was SUPER sparkly!


I cut the frame from glitter paper as well.


Finally, I decided to pick up some 'masculine' looking lip balms and made these to give the guys in the family on Christmas morning. I was able to use up some of this older 6 x 6" patterned paper from a Stampin' Up Paper share so that made me happy as well.


Supplies:

Succulent holder:
Patterned paper - Linda Kanase
Lip Balm Window and Frame dies - MFT Stamps
Lip Balm Pouch - MFT Stamps
Tag Topper punch - Stampin' Up
Paper flower - Michaels
1026 Flowers and Bee - Karen Burniston
Bling
Seam binding
Tiny tag die - MFT Stamps
Black marker
White ribbon - swap
Stickles

Born to Swim:
Lip Balm Window and Frame dies - MFT Stamps
Lip Balm Pouch - MFT Stamps
1052 Word set 6 - Summer - Karen Burniston
1037 Sea Animals - Karen Burniston
Patterned paper - Craft Smith
Teal card stock
1054 Rectangles, Crosshatch - Karen Burniston
Wink of Stella

Groomers:
Patterned paper - My Minds Eye
White card stock
Lip Balm Window and Frame dies - MFT Stamps
Lip Balm Pouch - MFT Stamps
Open Me stamps - MFT Stamps
Christmas Dog Stickers - Recollections
Red Nuvo Drops
Oval punches - Stampin' Up

Pink Snowflake
White card stock
Snowflake panel die - Your Next Stamp
Lip Balm Window and Frame dies - MFT Stamps
Lip Balm Pouch - MFT Stamps
Pink glittered fun foam
White glimmer paper
Black shimmer ribbon - Stampin' Up
Snowflake punch - Martha Stewart

Masculine Holiday 
Lip Balm Window and Frame dies - MFT Stamps
Lip Balm Pouch - MFT Stamps
White, red and black card stocks
Wonky stitched rectangle dies - MFT Stamps
Patterned paper - Stampin' Up
Banner - Blueprints #13 - MFT Stamps
Black fine point marker
Crayole red marker
Bakers Twine
1012 Snowman Twist Circle Pop-Up (snowflake) - Karen Burniston
Fun foam
Glitter Dots

Thanks for stopping by today