Saturday 31 August 2024

Four Christmas Cards w/ Holiday Characters


As much as I am not trying to hurry summer out the door, I do work on holiday cards throughout the year. Here are the four cards I made in August ... sneaking this post in just under the wire, ha ha.

I went looking for a different pad and spied this older 6x6 pad at the bottom of the drawer.  When I took it out to flip through I understood why it was there - I really wasn't keen on the majority of the leftover papers. So I gave myself permission to toss the ones I really didn't like into recycling and just USE a couple of the sheets that I thought I could live with. The others I like better and the pad has been put back into the drawer and not at the bottom of the pile.

The adorable holiday characters are by Divinity Designs - one of their Paper/Die Duo's ... you simply line up the die on the pre-printed sheet and with one pass you get three characters. (I didn't use the Santa on these cards.)

These cards are based on the August 2023 Sheetload of Cards, definitely my all time favourite.

I have only a few of the Merry Christmas Peel-Off stickers left and then I will have to find out where else to buy them. They do come in handy and I've long been a fan of Peel-Off's.


I used an older stamp set for the inside, along with a leftover strip of patterned paper and narrow gold foil tape.

Supplies used:
Patterned paper - North Country, Prima (6x6")
Blending sponge - Ranger
Catherine Pooler coloured inks
Narrow gold tape - Amazon .ca
Santa & Friends Paper/Die Duo - Divinity Designs
Nuvo Glaze
Gold foil card stock
Sentiment stamp - unknown (old, from my stash)
Merry Christmas die - Karen Burniston
Snowflake Peel-Off stickers - Ecstasy Crafts
Merry Christmas Peel-Off stickers - Elizabeth Craft Designs


Friday 30 August 2024

Rainbow Birthday Accordion Card


Welcome to Fun fold Friday here on my blog! I'm really late posting today - I had a Tetanus shot yesterday, and the trouble with having an autoimmune disease (Rheumatoid Arthritis) is that vaccines set up a doozy of an immune response. Lots of pain meds and I'm finally able to sit with my laptop to get this posted. Whew. Today I'm sharing a fun card using dies -and stamps!!- by Karen Burniston! I have a walkthrough of my card on YouTube:  


Apparently the Fancy Label Accordion is one of Karen B's most popular die sets, and her last release included both the Fancy Solid Frame dies and Tree Add-Ons. So fun! Below you can see the card closed and how it will look coming out of the envelope.


She also has a selection of stamps that go perfectly with her new release and I used the birthday set for this card. The front has "Make A Wish" and the back has a white label which is where we can sign our names. I was impressed at how well the stamps stamp, too!


I cut the Fancy Label Accordion four times, using the Tree Add-On's for the centre two panels. 


For a little something extra, I added the Happy Birthday on a separate strip - which I adhered to the left and right tree panels. I took my time placing it inside the card so it wouldn't stick out past the edge of the card when it's all closed up.


The card folds up surprisingly flat, and while it will likely need an extra stamp for thickness it won't have to go as a 'parcel'. I really had fun making this happy card and look forward to more playtime with these dies.

 
Supplies used:
Fancy Label Accordion - Karen Burniston
Fancy Solid Frame -  - Karen Burniston
Patterned paper - JJ's Rainbows, Waffle Flower
Tree Add-Ons (for the Fancy Label Accordion) - Karen Burniston
Birthday/Belated Sentiments - Karen Burniston
Dot stamp - Stamps by Judith


Tuesday 27 August 2024

Four Journal Card Birthday Cards

I pulled out some Project Life Journal Cards and made birthday cards for donating to my Mom's old nursing home. I've had the journal cards for a couple of years and initially purchased them to use for this very reason. But then I forget to use them, ha ha. They are sized 3 x 4" and I added two to each card front.

The background panel was embossed with a dots embossing folder for a little somethin' somethin' and I added a stamped greeting directly on the journal card. Bling was accomplished with gold foil bee stickers 😊

The inside of each card was done the same ...


Supplies used:
Journal cards - Project Life
Swiss Dots embossing folder - Sizzix
Lots of Birthday2Stamp - the Stamps of Life
Catherine Pooler coloured inks
Gold foil bee stickers - Amazon .ca

Friday 23 August 2024

Pop Up Birthday Card w/ Sheetload


Welcome to Fun Fold Friday here on my blog! I finished off another one of those July Sheetload of Cards (that makes 5 finished out of 8) and made it a pop-up using dies by Karen Burniston. In her newest release there are two Add-Ons for the Lorna Label Pop-Up, and I couldn't wait to play with this one. It's the Just A Note Lorna Add-Ons and it creates this lovely cutaway area in the centre of the Lorna Label Pop-Up. 


OMGoodness, I am going to have so much fun with this. The words can be cut away from the centre if you just want to use the words with their shadow, or you can use the word dies only to create the phrase on it's own. I used gold foil card stock to tie in with the front, but will use something with a little more contrast on my next card. I believe the instructions said it will fit in a 4" deep card (this one is 5x7") so there is even more versatility. Yep - I'm a fan 😊


I stamped the greeting on one of the Short Crosshatch Rectangles (matted with more patterned paper from the package) and added some butterflies die cut from gold foil paper. Sticking with the gold foil theme, I die cut the Happy Birthday to adhere to the pop-up step on the Lorna Label and my card was finished. 


Into my stash with this one ...


Supplies used:
Lorna Label Pop Up - Karen Burniston
Just a Note Lorna Add-Ons - Karen Burniston
Happy Birthday die - Penny Black
Little Etched Butterflies - Paper Rose
Short Rectangle Crosshatch - Karen Burniston
Birthday Greetings - Studio Katia
Patterned paper - Brianna, K & Company (old, from my stash)
Narrow gold foil tape - Amazon .ca
Gold foil paper - Recollections
Floral cluster die - Hand Penned, Stampin' Up
Stardust glitter pen - Sakura
Catherine Pooler coloured inks
Blending sponges - Tim Holtz
Stitched Scalloped circle nesting dies - Tutti Designs
5x7" card bases & envelopes - Ohuhu (Amazon .ca)
Vellum - Stampin' Up


Thursday 22 August 2024

Trio of Back To School Cards


It's time to get these cards in the mail, as Back To School time is fast approaching for our grandkids! I shared two of the cards back when I did the May Sheetload of Cards, and here are the remaining three. 

I was able to use some smaller strips &  leftover pieces from the paper package for the layouts, and the word dies were die cut 3x and stacked together for a fun chipboard look. Since I didn't have the words I wanted in a stamp set, I used my label maker for the sentiments on the card fronts. The apple stickers were added to white card stock and fussy cut so I could pop them up with foam tape.

When I did the school themed cards using May's Sheetload of Cards (see HERE) I really liked the stack of washi tape with the apple sticker. I did it again on these cards to give a pop of colour inside while still leaving me lots of room to write a personal note to the grandkids.


Supplies used:
Apple Stickers - Amazon .ca
Washi Tape - Doodlebug 
Hooray die - Avery Elle
Hip Hip Hooray die - Kaisercraft
Label Maker
Patterned Paper - School Days, Miss Kate Cutables


Monday 19 August 2024

August '24 Sheetload of Cards

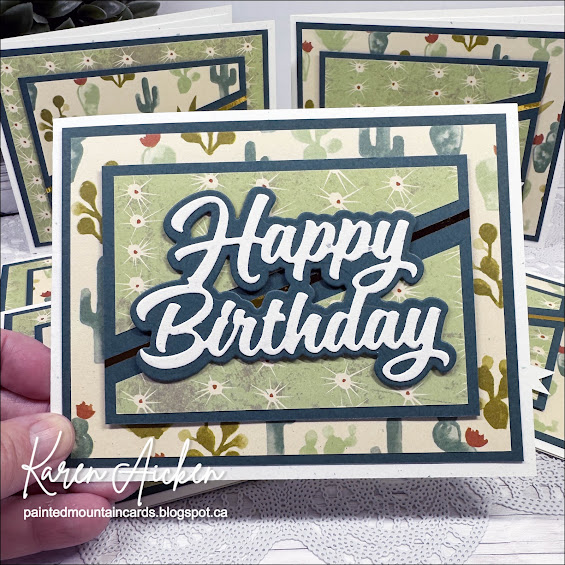
Today I'm sharing my take on the August 2024 Sheetload of Cards. I actually finished these cards on the 2nd, but it took awhile to get the photos taken and I also have a walkthrough on YouTube.

This month's Sheetload yields eight cards, and I used the leftover patterned paper for two more. So I ended up with 10 cards! (Note - the bonus cards are shown in the video, but I didn't take photos of them).

Above you can see how I made six of the cards - these ones will be donated to my Mom's old nursing home. I took two of them to make pop up cards for my stash, using dies by Karen Burniston.

The Twist Flower Pop Up is such a fun pop-up die set, and works on a variety of card sizes. I made my cards into wide A2 (5.5 x 4.25") since I don't like top folding cards for my donation cards as they tend to collapse.


Supplies used:
August Sheetload of Cards - Call Me Crafty Al
Patterned paper - Desert Dreams, Recollections
Narrow gold foil tape - Amazon .ca
Twist Flower Pop Up - Karen Burniston
Happy Birthday & Happy Birthday Shadow die - Karen Burniston
Happy Birthday sentiments - Pinkfresh Studios


Friday 16 August 2024

Floral Pop-Up Birthday Card


It's Fun Fold Friday here on my blog! The pretty floral bouquet on this card was made using a stamp/layering stencil set from Taylored Expressions, called Autumn Array. I die cut it using Karen Burniston's Squares Crosshatch and added it to a 5x7" card that had a floral paper panel mounted to the front. Since it's a birthday card going to a friend, of course I made it into a pop-up, too!


The sentiment is from my plastic envelope - I do a bunch of different birthday greetings at a time and store them all together so I just need to poke around in that envelope to find the one I want to finish off my card. So I'm not sure who makes that stamp!


Inside I used the Twist Flower Pop-Up die set by Karen Burniston, which is definitely one of my favourites. This time I actually used the included decorator dies, which was also fun. I took a 4 x 6" strip of leftover patterned paper and cut it in half at 2". Then I adhered each piece right up to - but not over - the fold. The daisy borders were also cut from the patterned paper, but since it's double sided I used the blue print side instead of the floral. 


The leaves were die cut from scraps of green pearlized cardstock and I added Pops Of Color (sparkly thick glitter glue) on the daisy border centres and the focal flower centre as well.  Finally I added a stamped sentiment on either side of the card and got it photographed and ready to mail.


Supplies used:
Autumn Array stamp and stencil set - Taylored Expressions
Catherine Pooler coloured inks
Blending brushes - Taylored Expressions
Blending sponges - Ranger
Twist Flower Pop Up die set - Karen Burniston
Squares Crosshatch dies - Karen Burniston
Scraps of green pearl cardstock
Shimmer Spray
Patterned paper - Miss Caroline, My Minds Eye
Happy Birthday (stash)
Pops of Color, Snowflake - Scrapbook .com
Birthday Wishes stamps - Honeybee Stamps
5x7 Card base and envelope


Wednesday 14 August 2024

Slimline 'Thinking of You' Card


After making the Pop-Up Birthday Card last week, I wanted to use up the leftover paper pieces and not just store them away. This is the card I came up with, one I can send to a friend for Happy Mail.

The diagonal strip is matted with rainbow holographic cardstock for some shine, and the flowers were added to a scalloped vellum circle.


I always like this sentiment, since I do so much texting these days.


Supplies used:
Patterned paper - Miss Caroline, My Minds Eye
Rainbow Holographic Cardstock - Recollections
'Hey You' die - Pinkfresh Studios
Vellum - Stampin' Up
Scallop Circles - Divinity Desixgns
Beautiful Blossoms Paper Die Duo Set 1 - Divinity Designs
Self Adhesive gem stickers - Dazzles
Wink of Stella
Slim Lacy Layers - Waffle Flowers
Inside Sentiment - Just Because, Gina K

Monday 12 August 2024

Ball Cap Birthday Card


Welcome to Masculine Card Monday here on my blog! I am so happy with today's card AND that with the strip of patterned paper I USED UP that older 6x6" paper pad I've been working on. Woot!!!  I guess when you have paper pads that you pick away at for years and years, eventually you get to the point where there aren't many sheets left in them. I've been able to use up a couple of pads already this year and I love that. Usually I feel like my patterned paper supply is never ending, that it must multiply on it's own overnight

I have had this Hats Off bundle for a couple of years and definitely don't use it enough. I really enjoyed making this card and have kept the set out to use again. But I keep getting pulled away with florals, since it's summer so .....   

The hat was stamped on white card stock then die cut. I added the colour with a water brush dipped onto the lid of the ink pad. I probably should have used water colour paper but I'm a lazy stamper and used what I had close by. In the end, I loved the worn look but doubt I can replicate it a second time.


This one is going into my stash!


Supplies used:
Patterned paper - Boy Oh Boy, Carta Bella (6x6")
Hats Off Bundle, Stampin' Up
Catherine Pooler coloured inks
Water brush
Mini MISTI
Blending Sponge
Birthday Wishes - Lots of Birthday2Stamp, the Stamps of Life
Dots Embossing Folder - (old)

Friday 9 August 2024

Pop Up Wedding Card


Welcome to Fun Fold Friday on my blog! ItOur daughter-in-law's brother is getting married this month and I offered to make a wedding card. The bride loves pink, orange and yellow so those are the colours I went with - along with lots and lots of white.


I love a larger card for a wedding, so this one is 5x7". The patterned paper had the right colours, and since it's such a 'loosey goosey' print, I scribbled more pink, orange and yellow onto the flowers with alcohol markers. I knew I'd be covering the paper with vellum to soften the paper, but it would have been OK without. The Foliage Frame was die cut from white pearl cardstock and the Happily Ever After was cut from rainbow holographic cardstock. Actually I cut it three times - twice from white and once from the holographic. I adhered the three layers together so it would be nice and sturdy - like a chipboard element, and since the card is being hand delivered I didn't have to worry about bulk. Finally, I added a trio of mirrored heart confetti pieces and filled in the open heart on the sentiment with glitter glue.


Inside I used Karen Burniston's Twist Flower Pop Up. I sure get a lot of use out of that one having made over 15 cards with it already!  


The wedding charms are also by Karen Burniston. When you snip off the hanging hole, they become cute little elements you can add to your cards. I love the embossed feature on the brides dress.


Supplies used:
Patterned paper - Meandering Meadows 6x6", Stampin' Up
5x7" Foliage Frame - Kat Scrappiness
Rainbow Holographic cardstock - Recollections
Vellum - Stampin' Up
White pearl cardstock
Nuvo Glaze
Happily Ever After - Karen Burniston
Mirrored hearts - Kat Scrappiness
Catherine Pooler coloured inks
Sentiment - One in a Million, Stampin' Up
Nesting hearts dies - Hero Arts
Wedding Charms - Karen Burniston
Congrats (stamp and die) - Pinkfresh Studios
5x7" card base & envelope


Monday 5 August 2024

Game Controller Birthday Card

It's Masculine Card Monday here on my blog and today I'm sharing a birthday card for my stash. I've been working at using up this older 6x6" paper pad and was down two three 2x6" strips (and lots of small scraps). I used two of the strips for this card and saved the final one for a card to share another day.

Once again I used the Game Controller die - it just worked so well with the patterned paper, how could I not?


Here is a peek at the inside ...


Supplies used:
Patterned paper - Boy Oh Boy, Carta Bella (6x6")
Short Rectangle Crosshatch - Karen Burniston
Game Controller die - Marianne Designs
Happy Birthday 4HSN - the Stamps of Life
Everybody Say Happy - Catherine Pooler
Nuvo Drops
Pops of Color - Scrapbook .com

Friday 2 August 2024

Butterfly Bunny Birthday Card Duo

Welcome to Fun Fold Friday here on my blog!  After I used this die to make Easter cards, I made a note to use it again for summer Birthday cards. This week I made these two and the second one is a pop up.

The die is quite large, so I made my cards into 5x7" but a 6x6" square card would work as well. The patterned paper is MANY years old and from my stash. I die cut the Butterfly Bunny from patterned paper and adhered them both to burgundy card stock. Then the images were fussy cut so I could pop them up with thin foam tape.

For this first card I added Stickles glitter glue around the butterfly wings, and added a pair of small die cut butterflies.

Below is the inside of the first card ... with a stamped sentiment and a light green vellum butterfly.

The second card is stepped up. I die cut butterflies from both patterned paper and white pearl vellum, adhering three of them over the butterflies on the main image. They were glued down along the butterfly bodies only, so there is some lift to the wings.

The first card base was white but I wanted to try it with a Kraft card base as well. In the end, I think I like the white one better. For the inside of this second card I used Karen Burniston's Lorna Label Pop Up.

The 'fluttering by' sentiment is actually part of a larger stamp that also says 'I miss you'. I knew I wouldn't use that one very often, so I trimmed away the 'miss you' portion and can add it to the 'fluttering by' sentiment again if I do need it. But I will get lots more use out of that stamp with it saying "fluttering by to say ..." 

I also added a couple more butterflies to the pop up area, and of course - Glitter Dot stickers for some shimmer.


The birthday sentiment was stamped on a scalloped white panel - both it and the crosshatch green panel are from the Short Crosshatch Rectangles die set - also by Karen Burniston


Supplies used:
Patterned paper - K & Company (very old, from my stash)
Bunny & Butterfly die - Creative Expressions
Butterfly dies - Scrapbook .com
Shimmer spray
Sakura glitter pen
Lorna Label Pop Up - Karen Burniston
Short Crosshatch Rectangles - Karen Burniston
Little Etched Butterflies - Paper Rose
White pearl vellum - stash
Fluttering By Sentiments - Waffle Flower 
Catherine Pooler coloured inks
Blending sponge - Tim Holtz
Glitter Dot stickers - Ecstasy Crafts
Stickles glitter glue
Happy Birthday - Birthday Blowout, Poppy Stamps
Essential Birthday Sentiments - LDRS
Kraft 5x7" card base & envelope
White 5x7" card base & envelope