Saturday, 28 September 2024

Fourth Set of Birthday Cards


Today I'm sharing the fourth set of Birthday Cards I made using a 6x6 paper pad & coordinating ephemera. You can see the first batch HERE, the 2nd set HERE and the 3rd set HERE if you are curious! (So far, I've made 16 cards)

I took a couple of evenings, cutting down the papers in the pack to work with the June 2021 Sheetload of Cards (a favourite). These four cards don't use the Sheetload, but using these full sheets cut to 5.25 x 4" left me with severe 2" strips to use. Most of them were shown with the 3rd set of cards - remember I rarely end up posting things in the same order I make them. 😊

Then I chose coordinating ephemera for each card and have everything stored together in a plastic bag. I know how busy things are going to get in the next couple of months, so I want to get a jump on my nursing home donation cards. This way I can just reach into the bag and pull out the pieces to quickly complete a couple of cards!


The cards are all the same inside, and I used an old banner punch and some scraps to add some colour to the inside panels.


Supplies used:
Patterned paper - Let's Celebrate, Carta Bella (6x6")
Let's Celebrate Ephemera - Carta Bella
Stickles glitter glue
Mini MISTI
Catherine Pooler coloured Inks
Lots of Birthday2Stamp - the Stamps of Life
Label punch - Stampin' Up
Banner Punch - Stampin' Up
Bakers Twine

Monday, 16 September 2024

Third Set of Birthday Cards


Today I'm sharing the third set of Birthday Cards I made using a 6x6 paper pad & coordinating ephemera. You can see the first batch HERE and the 2nd set HERE if you are curious! (So far, I've made 12 cards)

I took a couple of evenings, cutting down the papers in the pack to work with the June 2021 Sheetload of Cards (a favourite). These four cards don't use the Sheetload, but made good use out of the leftover 2" paper strips along with one full sheet. Haha - cutting that sheet down to 5.25 x 4" left another 2" strip to use up (see the card in the upper right). Then I chose coordinating ephemera for each card and have everything stored together in a plastic bag. I know how busy things are going to get in the next couple of months, so I want to get a jump on my nursing home donation cards. This way I can just reach into the bag and pull out the pieces to quickly complete a couple of cards!


The cards are all the same inside, and I used an old banner punch and some scraps to add some colour to the inside panels.


Supplies used:
Patterned paper - Let's Celebrate, Carta Bella (6x6")
Let's Celebrate Ephemera - Carta Bella
Stickles glitter glue
Mini MISTI
Catherine Pooler coloured Inks
Lots of Birthday2Stamp - the Stamps of Life
Label punch - Stampin' Up
Banner Punch - Stampin' Up

Friday, 13 September 2024

'Boat Pop-Up' Birthday Card


Welcome to Fun Fold Friday here on my blog!  Today I'm sharing the pop-up birthday card I made for our son (who likes to fish). 


This was my first play with the Boat Pop-Up, a die set by Karen Burniston. There are Add-On's that can turn it into a Sailboat or even a Pirate Ship, so that will be fun. When using a die like this for the first time, I tend to keep my cards fairly simple but I know my son will love it. He inspects his cards very closely and notices all the details. 😊


Either Karen B herself, or someone(s) on her Design Team used the Camping Charms with their Boat Pop-Up card and I thought it was a great match. I added the fishing hat inside the boat and used rainbow holographic cardstock for the fish. This die set is going to be fun to play with some more.

The card is 5" square, and I put it in a square envelope that was decorated with stamps from a retired Stampin' Up set. Since the card will be hand delivered, I don't have to worry about bulk or extra cost for mailing with a square envelope.


... one more look ...


Supplies used:
Tree patterned paper - North Country, Prima (6x6")
Water patterned paper - Mermaid Party, Reminisce
Woodgrain patterned paper - Stampin' Up (old)
Boat Pop Up - Karen Burniston
Camping Charms - Karen Burniston
Banners Crosshatch - Karen Burniston
Sail Away Sentiments - Karen Burniston
Happy Birthday die - Karen Burniston
Black Pen
Alcohol markers
Label punch - Stampin' Up
Sakura Stardust Pen
Rainbow Holographic cardstock - Recollections
Envelope stamps - Best Catch, Stampin' Up

Wednesday, 11 September 2024

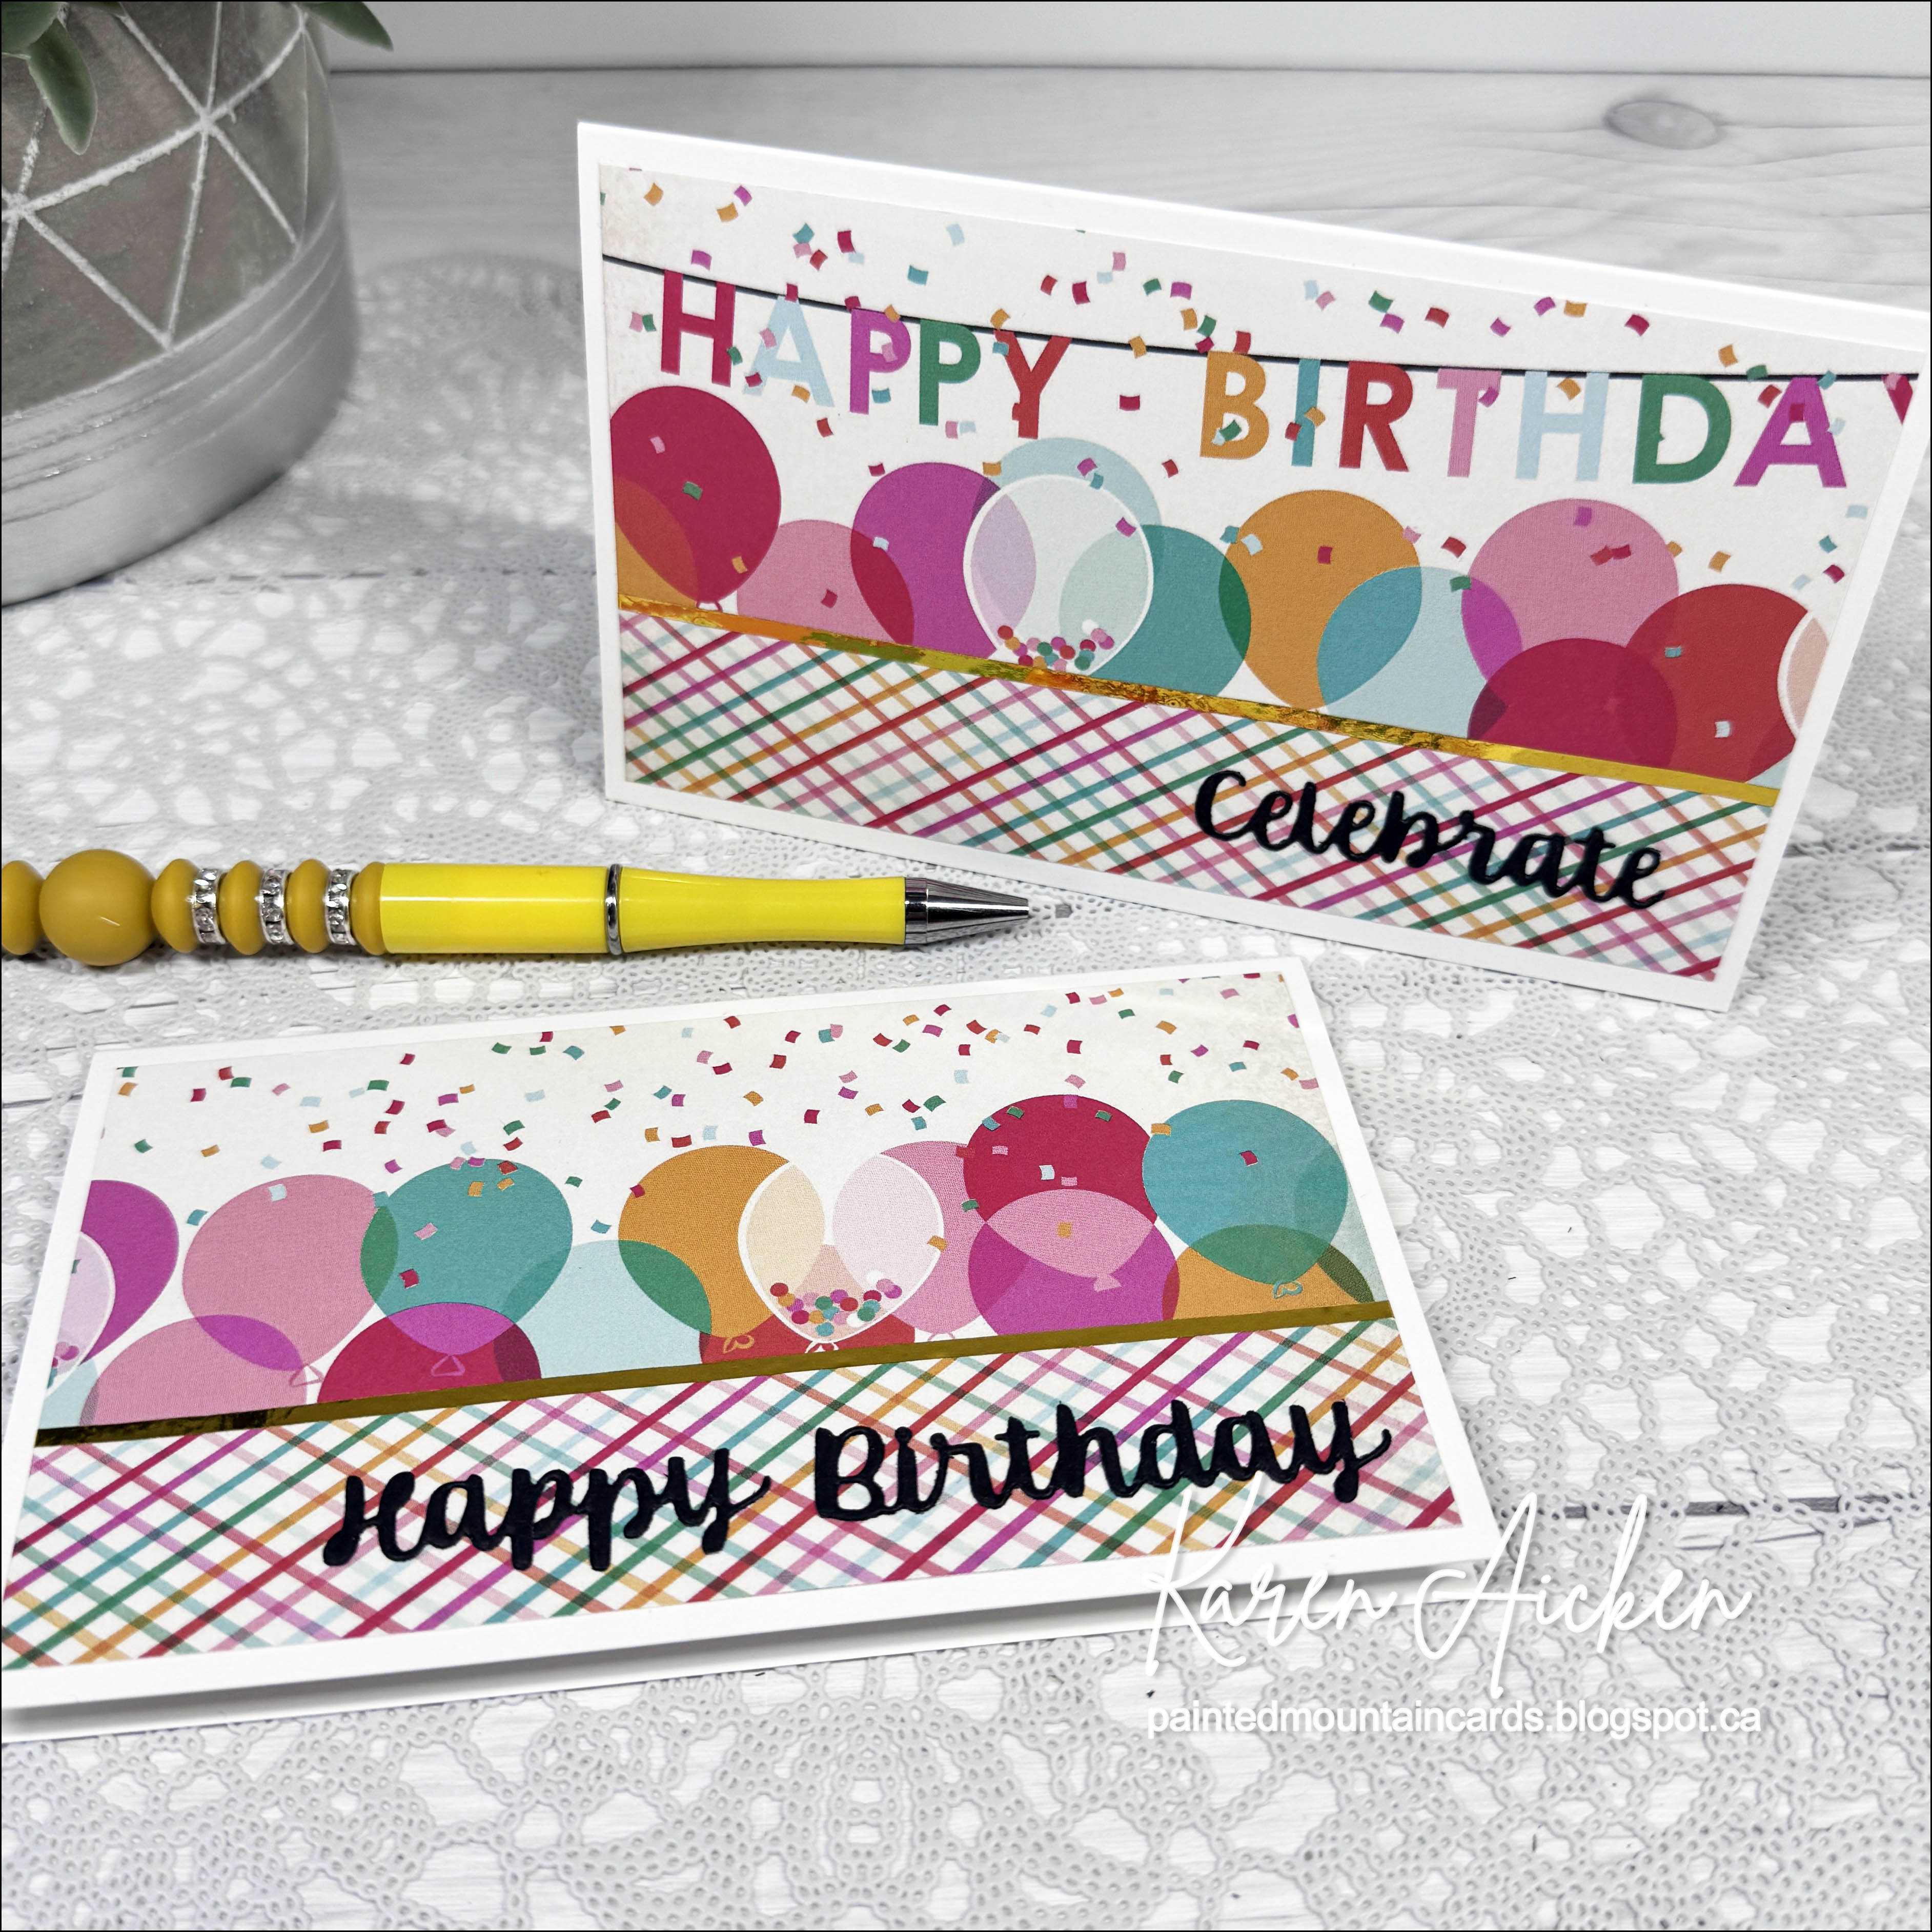
Pair of Birthday Mini Slimline Cards


I love it when patterned paper takes second stage. This 12x12" sheet was in a package I was flipping through and I pulled it out for a better look. It was a sheet of border prints, the idea being that you would trim them apart for horizontal borders on scrapbook pages etc. I liked the way the plaid and the balloons went together (they were next to each other on the sheet) so I trimmed them away from the rest of the patterned paper cutting them in half so I had two 6" pieces. I trimmed each one to a 3/25" height and wrapped narrow gold tape over where the two patterns joined.


It was a happy accident that the Happy Birthday was printed to perfectly fit on the one 6" piece! I die cut both the words Happy Birthday and Celebrate using dies by Karen Burniston.


Here is a peek at the inside ... I wrapped the inside panels with washi tape and stamped the sentiment before adding them inside the cards. The remainder of the paper was put back into the package to use on cards another day.


Supplies used:
Patterned paper - Party Time, Echo Park
Narrow gold foil tape - Amazon .ca
Word Set 2 Birthday dies - Karen Burniston
Stamp inside - Lots of Birthday2Stamp - the Stamps of Life
Washi Tape

Monday, 9 September 2024

Second Set of Birthday Cards

Today I'm sharing the second set of Birthday Cards I made using a 6x6 paper pad & coordinating ephemera. You can see the first batch HERE if you are curious! (So far, I've made 8 cards)

I took a couple of evenings, cutting down the papers in the package to work with the June 2021 Sheetload of Cards (a favourite). I chose  ephemera to match and have them stored in a plastic bag. I know how busy things are going to get in the next couple of months, so I want to get a jump on my nursing home donation cards. This way I can just reach into the bag and pull out the pieces to quickly complete a couple of cards!


For the border strip, the sketch shows the patterned paper going right to the outer edge, I did that on some and on others I left a border.  


Supplies used:
Patterned paper - Let's Celebrate, Carta Bella (6x6")
Let's Celebrate Ephemera - Carta Bella
Label punch - Stampin' Up
Sentiment inside - Birthday, Darkroom Door

Friday, 6 September 2024

'Let The Music Play' Pop-Up Card


Welcome to Fun Fold Friday here on my blog! I finished off another one of those July Sheetload of Cards (that makes 6 finished out of 8) and made it a pop-up using dies by Karen Burniston. In her newest release there are Music Charms, this WAY cool Piano Keys Pop Up, and a coordinating stamp set. I used all three of those here. 


I am impressed with the Piano Keys Pop Up - it goes together so slick -  and look forward to making more cards with it. I hope to find some Christmas music paper in my stash so I can use it for holiday cards too.


Since this was my first play with the die set, I kept my card nice and simple. But you can add more than one (side by side) to create a longer keyboard ... and it fits in different card sizes too! (This one is 7 x 5"). I just found some music themed birthday paper in my stash so made a note to use it for a couple of birthday cards. I will also use it for our granddaughter's piano teacher's thank you card at the end of the year. 

The music notes come included with the Piano Keys Pop Up, but the treble cleft is from the Music Charms. You simply snip off the hanging hole to take it from a charm to an embellishment!

Supplies used:
Piano Keys Pop-Up - Karen Burniston
Music Sentiment stamps - Karen Burniston
Black fine point marker
Short Rectangle Crosshatch - Karen Burniston
Mini MISTI
Catherine Pooler coloured inks
Music Charms - Karen Burniston
Patterned paper - Brianna, K & Company (old, from my stash)
Narrow gold foil tape - Amazon .ca
Gold foil paper - Recollections
Floral cluster die - Hand Penned, Stampin' Up
Stardust glitter pen - Sakura
Catherine Pooler coloured inks
Blending sponges - Tim Holtz
Stitched Scalloped circle nesting dies - Tutti Designs
5x7" card bases & envelopes - Ohuhu (Amazon .ca)
Vellum - Stampin' Up


Wednesday, 4 September 2024

First Set of Birthday Cards

I pulled out a 6x6" paper pad from my stash that had a coordinating ephemera pack. A couple of years ago I took advantage of an Echo Park sale when we were visiting Arizona and I'm realizing that I haven't used much of what I purchased (papers/stickers/ephemera).

Once I got flipping through the pad, I figured I could just work cutting down the paper pad until it was gone, so I chose a Sheetload that worked with 6x6" papers (the June 2021 is a favourite) and then started to choose paper combinations.

It took two evenings, but I got all the papers selected and cut down as well as the elements chosen and stored everything together in a clear bag. Now all I have to do is to pull out the pieces I want to work on to finish off the cards! These are my first ones, and they will be donated to my Mom's old nursing home.

For the horizontal border strip, the sketch shows the patterned paper going right to the outer edge, I did that on some and on others I left a border.  


There are two 6x6" sheets leftover which have a music print on them. I put them aside to work with one of Karen Burniston's new release dies - the Piano Key's Pop Up die set. 🥰


Supplies used:
Patterned paper - Let's Celebrate, Carta Bella (6x6")
Let's Celebrate Ephemera - Carta Bella
Label punch - Stampin' Up
Sentiment inside - Birthday, Darkroom Door

Monday, 2 September 2024

September 2024 Sheetload of Cards

Well this is exciting - not only is it time for a new Sheetload of Cards, this month it is based on one of my video's AND I am the Guest Designer!  I have a walkthrough of my cards on YouTube as well:  

The original video is still one of my most popular, which makes me happy. You can find it HERE if you are curious.  It makes three Mini Slimlines with three sheets of 6x6 patterned papers and NO leftover pieces! 

The September 2024 Sheetload yields twelve cards and uses three 12x12" sheets of patterned paper. Again, there are no leftover pieces. I did change up the images and greetings so I wouldn't have twelve identical cards, and while most of the birthday ones will be donated to my Mom's old nursing home - I think they are cute and will be keeping one or two for my stash. 

Again, I'm holding onto summer because I am NOT ready for cooler weather. So I made my cards with a Bee theme. Some will be sent out for Happy Mail and the rest are birthday cards. (All the supplies are listed below.)

I had fun making these up and have some ideas for using this Sheetload again without the fold flap, instead using the left strip and the center strip combined on the card front. 🤷‍♀️


I hope you will check out the PLAYLIST and see what Alicia and the rest of the creative team made with this month's Sheetload.  It is also linked in the description of my YouTube video. 


Supplies used:
September 2024 Sheetload of Cards - Call Me Crafty Al
Patterned papers:  Mellow Yellow Dot - Bo Bunny
Treasure Hunt - American Crafts
Busy As A Bee - Echo Park
Double Stitched Circle dies - Divinity Designs
Little Book of Bees - Hunkydory
Honey Bee - Stampin' Up
I Bee Fierce - Picket Fence Studios
Bee4Me - the Stamps of Life
Dots peg stamp - Stamps by Judith
Comic markers
Wink of Stella
Bees sentiments - Elizabeth Craft Designs
Pops of Color - Scrapbook .com


Saturday, 31 August 2024

Four Christmas Cards w/ Holiday Characters


As much as I am not trying to hurry summer out the door, I do work on holiday cards throughout the year. Here are the four cards I made in August ... sneaking this post in just under the wire, ha ha.

I went looking for a different pad and spied this older 6x6 pad at the bottom of the drawer.  When I took it out to flip through I understood why it was there - I really wasn't keen on the majority of the leftover papers. So I gave myself permission to toss the ones I really didn't like into recycling and just USE a couple of the sheets that I thought I could live with. The others I like better and the pad has been put back into the drawer and not at the bottom of the pile.

The adorable holiday characters are by Divinity Designs - one of their Paper/Die Duo's ... you simply line up the die on the pre-printed sheet and with one pass you get three characters. (I didn't use the Santa on these cards.)

These cards are based on the August 2023 Sheetload of Cards, definitely my all time favourite.

I have only a few of the Merry Christmas Peel-Off stickers left and then I will have to find out where else to buy them. They do come in handy and I've long been a fan of Peel-Off's.


I used an older stamp set for the inside, along with a leftover strip of patterned paper and narrow gold foil tape.

Supplies used:
Patterned paper - North Country, Prima (6x6")
Blending sponge - Ranger
Catherine Pooler coloured inks
Narrow gold tape - Amazon .ca
Santa & Friends Paper/Die Duo - Divinity Designs
Nuvo Glaze
Gold foil card stock
Sentiment stamp - unknown (old, from my stash)
Merry Christmas die - Karen Burniston
Snowflake Peel-Off stickers - Ecstasy Crafts
Merry Christmas Peel-Off stickers - Elizabeth Craft Designs


Friday, 30 August 2024

Rainbow Birthday Accordion Card


Welcome to Fun fold Friday here on my blog! I'm really late posting today - I had a Tetanus shot yesterday, and the trouble with having an autoimmune disease (Rheumatoid Arthritis) is that vaccines set up a doozy of an immune response. Lots of pain meds and I'm finally able to sit with my laptop to get this posted. Whew. Today I'm sharing a fun card using dies -and stamps!!- by Karen Burniston! I have a walkthrough of my card on YouTube:  


Apparently the Fancy Label Accordion is one of Karen B's most popular die sets, and her last release included both the Fancy Solid Frame dies and Tree Add-Ons. So fun! Below you can see the card closed and how it will look coming out of the envelope.


She also has a selection of stamps that go perfectly with her new release and I used the birthday set for this card. The front has "Make A Wish" and the back has a white label which is where we can sign our names. I was impressed at how well the stamps stamp, too!


I cut the Fancy Label Accordion four times, using the Tree Add-On's for the centre two panels. 


For a little something extra, I added the Happy Birthday on a separate strip - which I adhered to the left and right tree panels. I took my time placing it inside the card so it wouldn't stick out past the edge of the card when it's all closed up.


The card folds up surprisingly flat, and while it will likely need an extra stamp for thickness it won't have to go as a 'parcel'. I really had fun making this happy card and look forward to more playtime with these dies.

 
Supplies used:
Fancy Label Accordion - Karen Burniston
Fancy Solid Frame -  - Karen Burniston
Patterned paper - JJ's Rainbows, Waffle Flower
Tree Add-Ons (for the Fancy Label Accordion) - Karen Burniston
Birthday/Belated Sentiments - Karen Burniston
Dot stamp - Stamps by Judith