Showing posts with label Hanukkah. Show all posts

Thursday, 7 December 2023

Hanukkah Tags


Last year I bought a Hanukkah paper package by Photo Play and there was a 12 x 12" sticker sheet included. I didn't come up with a use for the eight number stickers but this year I decided to add them to tags for our daughter to use on Hanukkah gifts for our grandkids.


Then I made another eight tags and used up some of the smaller stickers on the sheet. These were quick and easy but not something she can easily buy so I hope she has fun with them. I also added strips of patterned paper from the package, narrow gold tape and some gold circle stickers for a little sparkle.


Having been asked how many cards I make I thought it would be fun to keep track this year. Many of my posts include more than a single card or project and below is my tally. 

Card Tally for 2023
January - 53 cards
February - 56 cards
March - 55 cards
April - 32 cards
May - 43 cards
June - 34 cards
July - 56 cards
August - 106 cards
September - 61 cards
October - 51 cards & 5 Tags
November - 46 cards
December so far - 9 cards & 16 tags

I decided to cancel the subscription that provided linked thumbnails to what products I used on my cards. It was costing me out of pocket each month, so I’m back to listing what I used 

Supplies:
Tag die - Cool Tag 6, Your Next Stamp
Stickers - Happy Hanukkah, Photo Play
Scraps of patterned paper - Happy Hanukkah, Photo Play
Glitter circle stickers - Dazzles
Gold narrow tape - Amazon .ca

Thursday, 30 November 2023

Hanukkah Card Duo


Today I'm sharing a pair of Hanukkah cards I made for our grandkids. I couldn't resist the new (6x6") patterned paper pad by Catherine Pooler because it's so different from the 12 x 12" papers I've been using for the past few years. The layout is loosely based on the August 2023 Sheetload of cards, which has become my new go-to sketch.


The images were stamped in Catherine Pooler ink and I added some sparkle with a Wink of Stella Pen.


Both cards have Happy Hanukkah stamped inside and I added a couple of angled patterned paper scraps to add a little colour inside.


Having been asked how many cards I make I thought it would be fun to keep track this year. Many of my posts include more than a single card or project and below is my tally. 

Card Tally for 2023
January - 53 cards
February - 56 cards
March - 55 cards
April - 32 cards
May - 43 cards
June - 34 cards
July - 56 cards
August - 106 cards
September - 61 cards
October - 51 cards & 5 Tags
November - 46 cards

I decided to cancel the subscription that provided linked thumbnails to what products I used on my cards. It was costing me out of pocket each month, so I’m back to listing what I used with

Supplies:
Patterned paper - 6 x 6", Eight Nights - Catherine Pooler
Catherine Pooler Inks
Nested Hexagon dies - Pinkfresh Studios
Stamps - Happy Hanukkah, Honey Bee Stamps
Wink of Stella
Gold glitter dot stickers - Ecstasy Crafts

Friday, 25 November 2022

Diamond Z Fold for Hanukkah


Hello my crafty friends and welcome to Fun Fold Friday here on my blog. I pulled out this 12 x 12" patterned paper to make a Hanukkah card and got looking at the sticker sheet that was included.  I hadn't planned on making ANOTHER Diamond Z Fold card but with the partial paper sheet and those stickers ... it seemed to be the perfect choice.


I added some gold gel pen highlights and Pops of Color for shimmer and shine. The two navy stitched circles were the fallaway pieces from when I made a Magic Iris Card  and they were popped up with foam tape.


There are a lot of tutorials online for this type of card, but I really liked the 5 x 7" version rather than an A2 as then the diamonds are a nice size for decorating. I found a tutorial to link for you, but of course, she doesn't refer to it as a Diamond Z-Fold. 😂  I always find it funny when stampers come up with their own names for a popular fun fold, not realizing it makes it hard for people to find your blog or YouTube video when searching. Anyhow, her finished card is BEAUTIFUL, which is why I chose to share her tutorial.  NOTE:  I didn't add all the layering panels that are often shown in these cards, as they are heavy enough and with even more layers the card would require extra postage. Click HERE to see Heather's tutorial and card.

Additional Supplies:
5 x 7" card and envelope
White cardstock

This blog uses affiliate links whenever possible. This means, that at no cost to you, if you make a purchase through one of my affiliate links that I may receive a small commission from your purchase. I only link products that I own, love and use for my card making and not every link below is an affiliate one! 😊

Thursday, 17 November 2022

Hanukkah Shaker Card


Hello my crafty friends. Today I'm sharing a fun shaker card for Hanukkah.

The shaker on the card front is a 'Full Front Shaker' (also called 'Infinity Shaker' or 'Edge to Edge' shaker). I liked the 4 x 6" cut apart that was on one of the 12 x 12" sheets and knew it would great for one of these shaker cards. As usual, I cut a transparency to 5 x 7" and scored it on all 4 sides at 1/2". The corners were mitred and I added strong double sided tape to each outer edge. 

You secure the transparency to the back of the cut apart on 3 sides and pour in your filler on that 4th side then seal it up. I added some patterned paper to the front of a 5 x 7" card base then added the shaker on top. 

The glitter was sticking to the underside of the transparency and I felt like it was obscuring the sentiment in the centre of the cut apart. To remedy that, I added a large Hanukkah sticker right on top of the transparency!


Inside I added a strip of the patterned paper and some stickers that were also included in the paper package. 


Since the Hanukkah package I used is retired, I will link a different one that would work just as well if you wanted to make a similar card. 😊

Additional Supplies:
Transparency - office supply store
Cut apart, stickers and patterned paper - Happy Hanukkah (Photo Play)
Sequins - stash
5 x 7" card and envelope

This blog uses affiliate links whenever possible. This means, that at no cost to you, if you make a purchase through one of my affiliate links that I may receive a small commission from your purchase. I only link products that I own, love and use for my card making and not every link below is an affiliate one! 😊

Thursday, 3 November 2022

Hanukkah Shaker Cards


Hello my crafty friends. I am still having fun creating 'full front shakers' (or 'edge to edge' or 'infinity shakers' ... they go by a lot of different names!) using some of the cut aparts in my stash. These cards are for the two Grandkids that celebrate Hanukkah.


Most of the supplies are from an older paper package called Happy Hanukkah by Photo Play. I've been using it for so long there aren't any more full 12 x 12" sheets left, in fact I am close to using up that package up!


Below is a peek at the inside of card #1 ...


Card #2 also has a shaker on the front using a different cut apart ...


... and a sticker inside for the sentiment (this one of from Simple Stories) ...


Since the 12 x 12" Hanukkah package I used has been retired, I linked some different ones for you that would also work if you wanted to make similar cards.

This blog uses affiliate links whenever possible. This means, that at no cost to you, if you make a purchase through one of my affiliate links that I may receive a small commission from your purchase. I only link products that I own, love and use for my card making and not every link below is an affiliate one! 😊

Any supplies I'm unable to link are listed at the very bottom of my post.


Additional Supplies:
Transparency - office supply store
Cut aparts & patterned paper - Happy Hanukkah (Photo Play)
Sequins - stash
White cardstock

Sunday, 28 November 2021

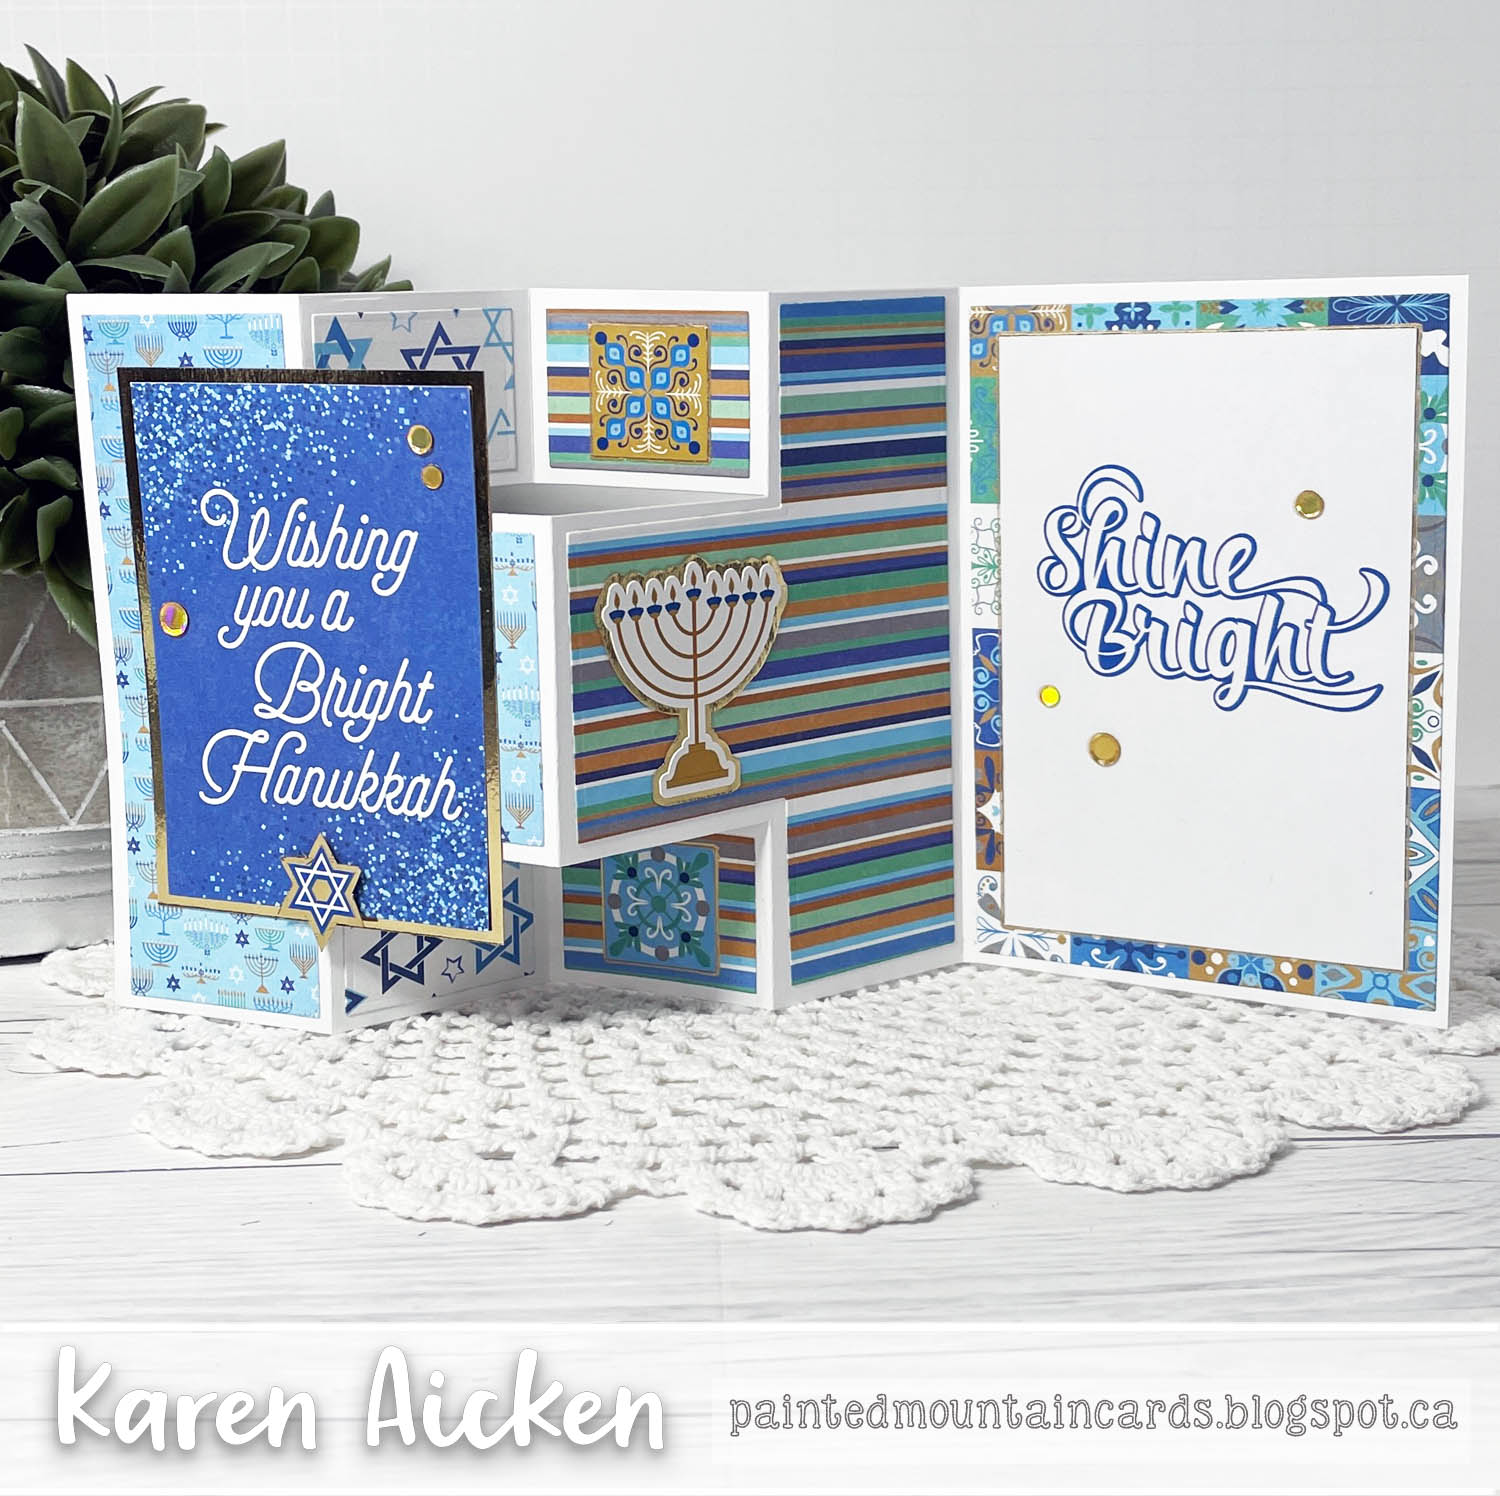
Hanukkah Half Shutter Card

Hello! Today I'm sharing a Half Shutter card for Hanukkah. The Half Shutter Card With Layers is a die set from Divinity Designs and I am really enjoying it. This one was decorated simply with patterned papers and stickers, and a gold matted cut apart/journal card on the front. I have a walkthrough of my card on YouTube:  

Neither the gold mirror card stock nor the Hannukah themed papers are available, but I have linked other ones below for you. I have those too, but wanted to use this package up. While I don't have any more 12 x 12" papers in the package, there are several cut apart and stickers left as well as smaller paper pieces still to use.


Above is what the card looks like when it comes out of the envelope and below is what the card looks like opened up ...


This view gives you a better idea of the different folds. While the card looks complicated, it is fairly quick and easy to put together because all the scoring is done for you. I always appreciate layering dies with a fun fold die set too. 😊

This blog uses affiliate links whenever possible. This means, that at no cost to you, if you make a purchase through one of my affiliate links that I may receive a small commission from your purchase. I only link products that I own, love and use for my card making!

Any supplies I'm unable to link are listed at the very bottom of my post

Supplies:
12 x 12” White card stock - Recollections
Patterned paper, cut apart and stickers - Happy Hanukkah, Photo Play
Gold foil card stock- Recollections

Monday, 15 November 2021

Hanukkah Pop Up Slimline Card

Hello! Today is the day the Design Team can start to share SNEAK PEEKS of Karen Burniston's NEW RELEASE!! We have all been having lots of fun creating with it - remember the Design Team is linked on the right side of my blog if you want to see what they have made as well. I have more details on the release below.

Today's card is a Slimline Pop Up card using the new Little Labels Pop Up, combined with the new Big Birthday Charms and Crosshatch Labels. I have a walkthrough of my card on YouTube:  


Inside is where I added the new Little Labels Pop Up (probably my favourite die from the new release) and created a Menorah Style card using the candles from the Big Birthday Charms.


The candles were cut from a rainbow holographic card stock with gold mirror card stock flames. This card has lots of sparkle and shine!


I used retired Hanukkah papers, stickers & cut aparts from my stash and since this package isn't available anymore I have linked some different Hanukkah products for you. Which I have also purchased 😊!


NEW RELEASE ITEMS will be available on November 22 and we will be celebrating with a Blog Hop (and prizes!). Here is a peek at the whole new release ❤️

This blog uses affiliate links whenever possible. This means, that at no cost to you, if you make a purchase through one of my affiliate links that I may receive a small commission from your purchase. I only link products that I own, love and use for my card making!

Supplies used that I'm unable to link are listed at the end of my post  
Supplies:
Mirri Rainbow Holographic - HunkyDory
Patterned paper, cut apart and stickers - Happy Hanukkah, Photo Play

Friday, 26 July 2019

Hanukkah Train Pivot Panel Card

Hello my crafty friends

It's Fun Fold Friday here on my blog and today I'm sharing another Hanukkah card made with the new Train Pivot Panel by Karen Burniston. Wednesday's Hanukkah card was also made with the same die and paper package but it looks completely different than this one! How fun to see the versatility you can get from a single die set.

The front is nice and simple - I cut one of the 4 x 6" journal cards from a sheet in the paper package and added some gold gel pen to the candle flames. I tied it with Bakers Twine and adhered it to my patterned card base.


Here is the inside! I made this card a little bigger than an A2 as I wanted to add a double row of the printed tiles from the patterned paper on each side. I also added a few more stickers from the package, and gold gel pen highlights on the train. The Train Tracks are from the new Train Elements and they are the perfect accessory die for the Train Pivot Panel.


Whenever I give anyone a card made with a Pivot Panel, they turn it to see what it looks like from the top - so I took a photo of that view for you. Such fun dimension!


Since I have a couple of Hanukkah stamp sets, I pulled them out and used Karen B's idea of adding dreidels to the train cars. So fun!


I am including a little YouTube video for you so you can see the card in action.


Supplies:
Patterned paper, journal card, stickers - Happy Hanukkah, Photo Play
1106 Train Pivot Panel - Karen Burniston
Stitched Rectangle dies - Your Next Stamp
White, navy, black card stocks
Sakura gold gel pen
Stamps - 8 Happy Nights, CAS-ual Friday Stamps
Symbol on train engine - Paper Smooches
1107 Train Elements - Karen Burniston
Water Brush
Bakers Twine

Card size - 4-1/2 x 6"

Thanks for stopping by today

Thanks for stopping by today

Wednesday, 24 July 2019

Hanukkah Train Pop-Up

Hello my crafty friends

Last week I shared a different way to use the new Train Pivot Panels to create a dynamic, generic pop up, and said that I had made four cards with the technique. This is the third card I made, and by using a coordinated package of patterned paper and stickers, this card was Quick and Easy!!!


This lovely panel is a journal card, which I trimmed from a 12 x 12" sheet in the package and added gold Nuvo Drops. Since lots of people are participating in 'Christmas in July' challenges, I thought I'd duck in with a Hanukkah card. 😀


Here is a peek at the inside! I added the stickers to a sheet of lightweight acetate and fussy cut them out. This gives the illusion that the popped up images are floating! Note - while I used stickers for my card embellishments, you could also use stamps.


I will sign the card with a gold gel pen, but you could also add a small white rectangle as a signing block.


I actually made a second Hanukkah card with the Train Pivot Panels - this time used as intended, which will be on my blog tomorrow. I have a little YouTube video for you too:


Supplies:
Navy Duplex card stock (navy on one side, white on the other) older and from my stash
Patterned paper, Journal Cards, Stickers etc - Happy Hanukkah, Photo Play
1106 Train Pivot Panel - Karen Burniston
Stitched rectangle dies - Your Next Stamp
Acetate
Nuvo Glitter Drops
White card stock

Thanks for stopping by today

Sunday, 2 December 2018

Hanukkuh Shaker Card

Good morning friends

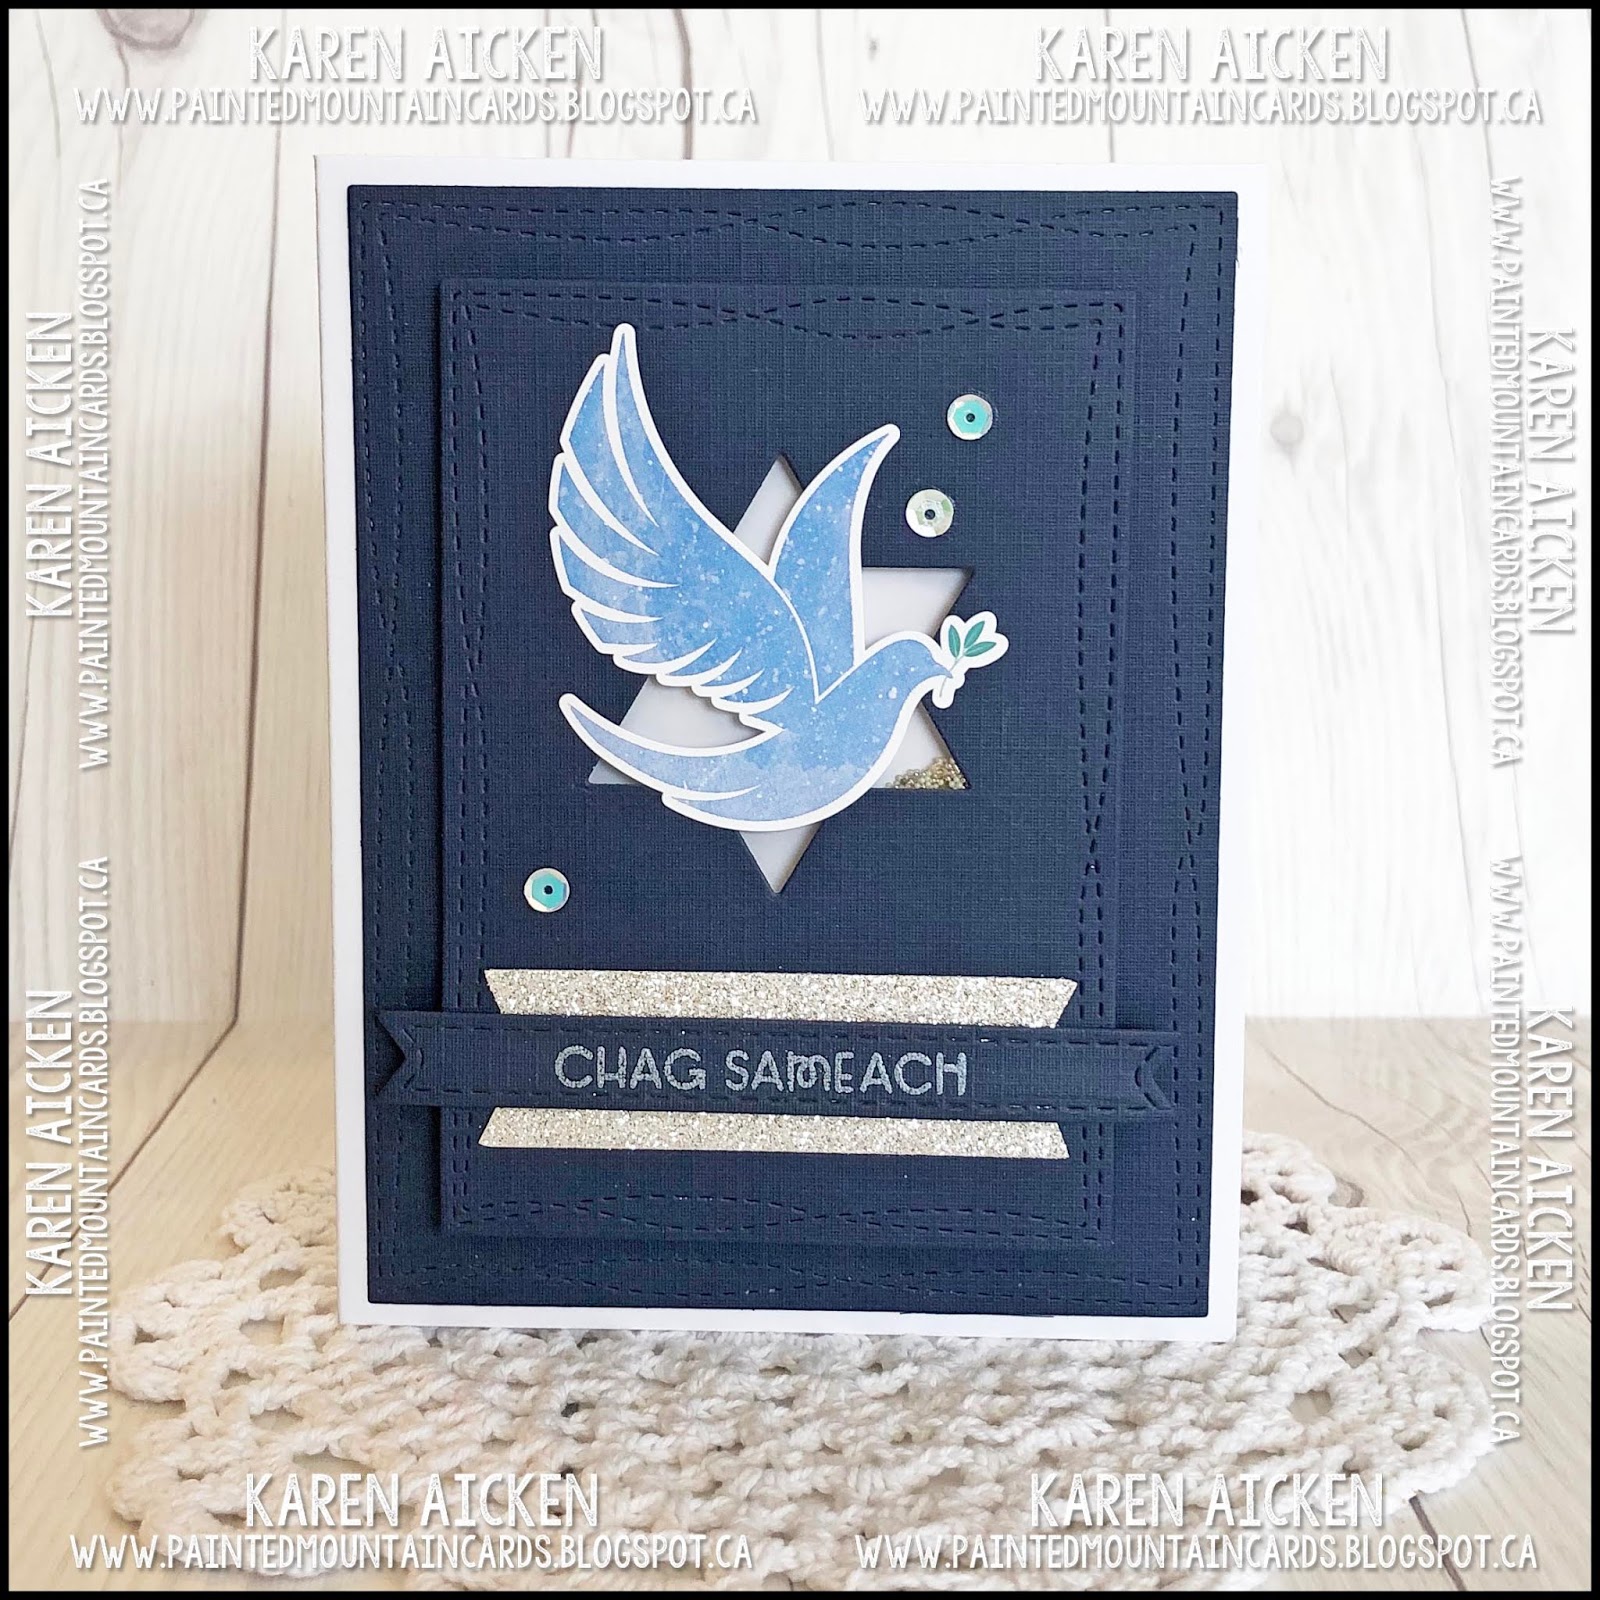
Today's card is a shaker card I made for our middle daughter and family, who celebrate Hanukkah.


I am enjoying making shaker cards these days so that is what is on the card front. I constructed it from a smaller piece of the navy card stock them adhered it to the card front. I do love dimension on my cards!


While there aren't a ton of Jewish themed stamps and dies around out there, I'm always happy to find some. This Star of David die has been in my collection for several years, and I love that Paper Smooches has some Hanukkah items too.


I lightly stamped the words 'shake me' inside the Star of David die cut inside, since the Dove sticker covers up a lot of the open space on the front shaker.

Supplies:
Navy and white card stocks
Transparency scrap
Wonky stitched rectangle die - MFT Stamps
Star of David die - MFT Stamps
Fun foam
Silver pearl embossing powder
Word stamps - Paper Smooches
Filler - various beads, sequins etc
Stitched fishtail banner die - Elizabeth Craft Designs
Sequins - Spiegelmom Scraps
Dreidel stamp - Lawn Fawn
'shake me' stamp - Lawn Fawn
Dove sticker - Photo Play

Thanks for stopping by today

Thursday, 29 November 2018

Hanukkah Cards for Ilai and Alma

Good morning friends

When I saw these adorable 'Darling Dreidels' in a recent release by Neat and Tangled, I couldn't wait to get my hands on them. I immediately made Hanukkah cards for Ilai and Alma - those two LOVE to get cards in the mail!


Ilai (4) is as blonde as they come, so I coloured the boy to resemble him. That will not be lost on him, either. He always examines the cards very carefully.  When you take the card out of the envelope, this is what it looks like:


The Hanukkah paper package by Photo Play also came with a sheet of themed stickers, so I added the 'spin the dreidel' sticker to a stitched fishtail banner then popped it up below the circle frame. The background was done by cutting two different patterned papers from the package with stitched rectangle dies.


When you start to open the card, you see that it is not a flat card but a Pop-Up with a window in the front!


I used the Katherine Label Pop-Up and circle dies instead of the included label shape and added two strips of patterned down the outer edges.


There is so much dimension to the Katherine Label Pop-Up!


For those that like to pin card fronts & insides together, here you go:


Now Alma (2) didn't get a Pop-Up card, as right now she is into shakers. She grabbed Ilai's shaker Birthday card and hung onto it (talking away to it) for pretty much the rest of his Birthday Party last month.


I used this Reverse Scallop die by Your Next Stamp for the window, backing it with two  different papers from the package and added colour coordinated sequins as the filler. I also added some of the stickers from the paper package and a strip of the striped patterned paper.


Inside I added one of the cut-parts from the package to a white rectangle and Alma's card was done!


Supplies:
Stamps - Neat & Tangled
1011 Katherine Label Pop-Up - Karen Burniston
White card stock
Alcohol markers
Sakura White gel pen
Patterned paper, Cut Apart and stickers  - Photo Play
Soft Finish Card Stock - Elizabeth Craft Designs
Vertical Stitched Strip dies - MFT Stamps
Stitched frame - MFT Stamps
Stitched Circles - MFT Stamps
Stitched Fishtail Banner dies - MFT Stamps
Dashing Rectangle dies - Elizabeth Craft Designs
MISTI - My Sweet Petunia
Reverse Scallop with Optional Stripes die - Your Next Stamp
Sequins
Acetate - Hero Arts
Nuvo Glitter Pan

Thanks for stopping by today