Showing posts with label Pull Tab Cards. Show all posts

Friday, 20 October 2023

Mini Slimline Pull Tab Card for Halloween


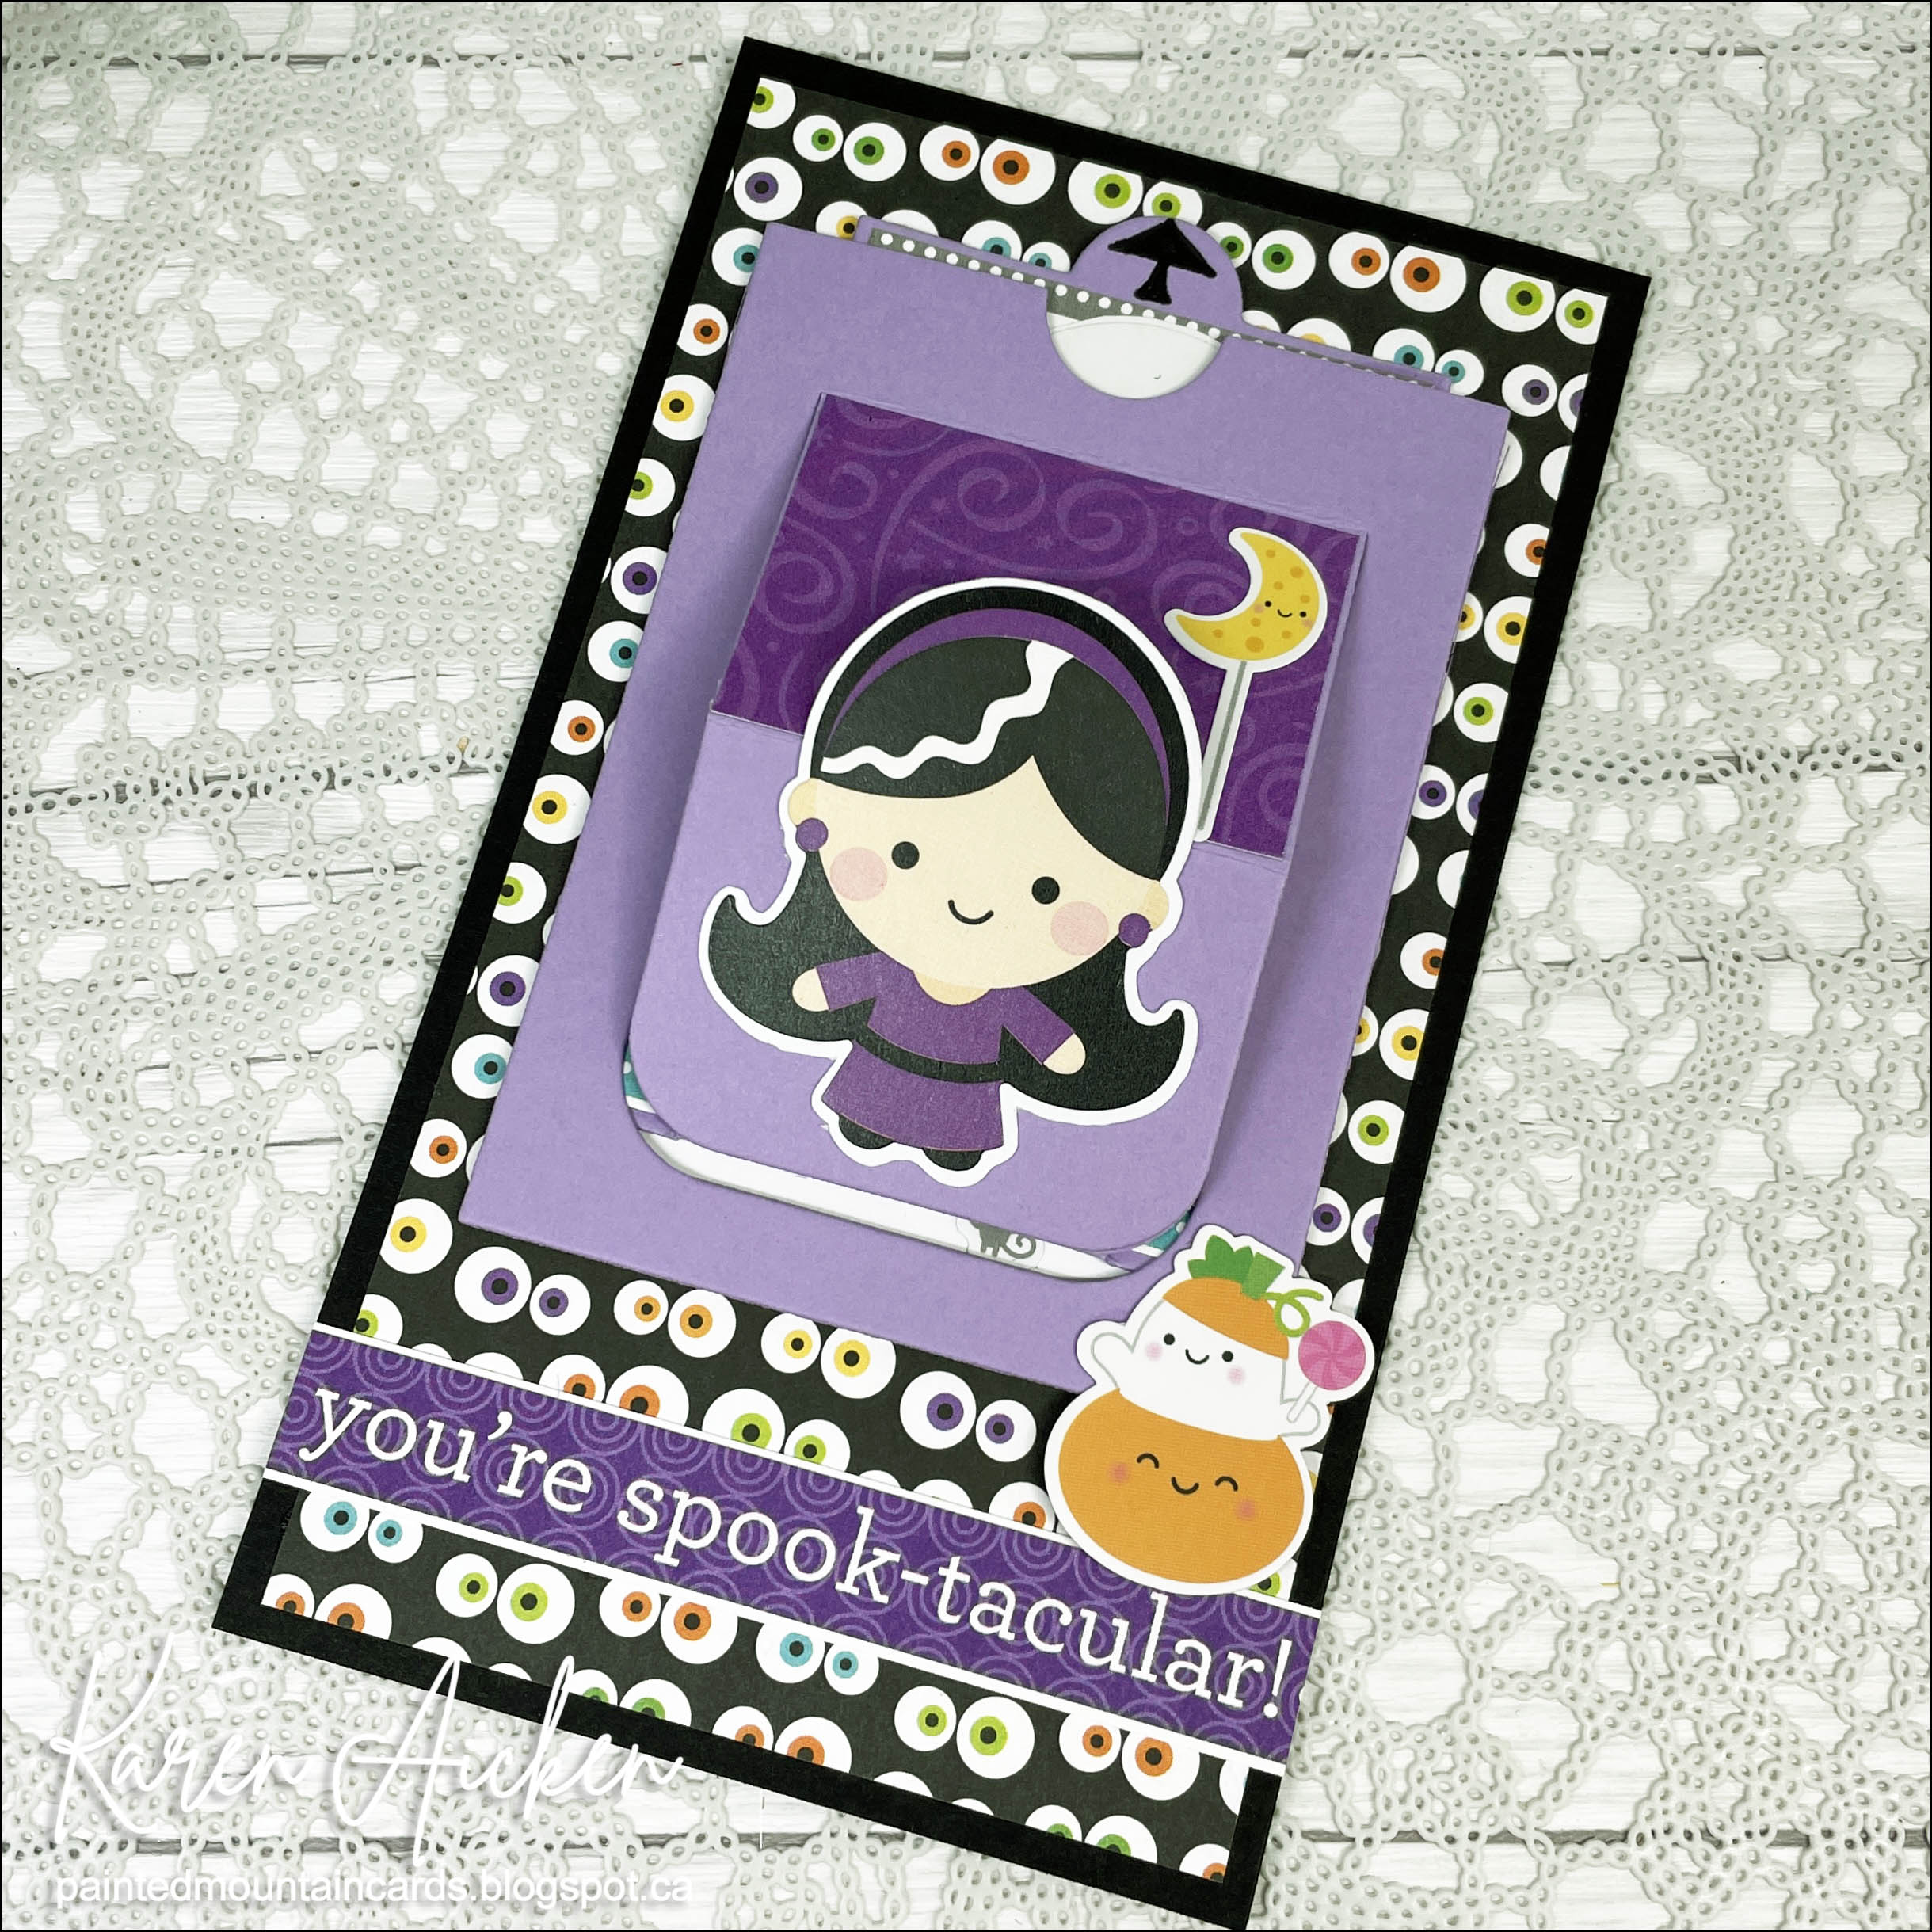
Welcome to Fun Fold Friday on my blog! Today I'm sharing a Mini Slimline card made as the October edition to my monthly series 'Throwback Fun Fold Dies'. I pulled out these VERY OLD pull tab dies from Papertrey Ink. At the time there were very few fun fold dies out there, and I thought these were so fun! 


When you pull the tab, the center section lifts up to reveal the stamped sentiment. Aren't those tiny mouse stickers adorable? I added one in the greeting  area and one on the back as well. All of the papers, stickers and ephemera are from Doodlebug Designs. ❤️


When I make a card like this, I tend to make them post card style rather than an opening card. Below is the back of the card, which is where I will add our personal message & signature. The stamp set by Karen Burniston & is retired. It continues to be a set I pull out and use every year!


Having been asked how many cards I make I thought it would be fun to keep track this year. Many of my posts include more than a single card or project and below is my tally. 

Card Tally for 2023
January - 53 cards
February - 56 cards
March - 55 cards
April - 32 cards
May - 43 cards
June - 34 cards
July - 56 cards
August - 106 cards
September - 61 cards
October so far - 35 cards

I decided to cancel the subscription that provided linked thumbnails to what products I used on my cards. It was costing me out of pocket each month, so I’m back to listing what I used.

Supplies:
Pull Tab die - Papertrey Ink (old)
Patterned paper - Doodlebug, Boos & Brews
Stickers - Doodlebug, Ghost Town
Catherine Pooler Inks
Halloween stamps - Karen Burniston/ECD (retired)

Friday, 22 October 2021

Flippy Flappy Halloween Card


Hello!
 It's Fun Fold Friday here on my blog and today I'm sharing the Halloween Card I sent to a friend, She is also a card maker and I thought she would enjoy receiving the first card I've made with Lawn Fawn's new Flippy Flappy die set! I have a walkthrough with tips on YouTube:


The patterned papers and elements I used are all from Doodlebug Designs. This collection is no longer available, but I will link some newer Doodlebug products for you. I have most of those too, ha ha - I'm such a fan of Doodlebug.

On the October 31st element, I brushed the black letters with Wink of Stella for some shimmer & shine.


When you pull the tab, this little pumpkin & spider slides out and pops out - so fun!


I also stamped a sentiment on the tab that pulls out.


Inside, I added the Giant Happy Halloween (also from Lawn Fawn). I cut it from some inferior quality black card stock that I normally only use for matting. So it cut kind of raggedy but I decided I liked that look for a Halloween card and adhered it onto the layered panels inside.

Here is a link to Lawn Fawn's Assembly Video for their Flippy Flappy Die Set.

This blog uses affiliate links whenever possible. This means, that at no cost to you, if you make a purchase through one of my affiliate links that I may receive a small commission from your purchase. I only link products that I own, love and use for my card making!

Additional Supplies:
Tangerine Tango card stock - Stampin' Up
Green Copic marker
Stamps - Halloween, Karen Burniston/ECD (retired)

Thanks for stopping by

Thursday, 2 April 2020

Two Interactive Spring Cards

Hello crafty friends ...

Today I'm sharing TWO interactive cards with TWO videos! The first one is a 'swing' card, and the second is a 'pull tab' - both are for the two grandkids who celebrate Passover.


Remember you can always see my interactive card videos HERE on YouTube. The second video today is grouped with the card below this one.


Using the i-crafter Haley Alphabet die set, I personalized the card front with his name, and used a puffy cloud die for the greenery at the top. The inside is fairly simple, with some inked clouds and lettering that he will likely be able to read himself this year.


I think he will enjoy moving the swinging boy to the right ...


... and to the left by tilting the card.  I don't have a stamp with this phrase and my printer is out of ink, so I used a label maker to create the 'swinging by to wish you' greeting.


Now for Miss Alma's card. Once again I personalized it with an i-crafter alphabet die set - this one is the new Carly Alpha. I like that it comes with both capital AND small letters, as well as symbols and numbers. Plus, the font is pretty cute.


Remember you can always see my interactive card videos HERE on YouTube


I am SUCH a huge fan of Doodlebug Designs. I picked a couple of their 'odds and sods' printed elements for both cards, and on Alma's card the frog moves out from behind the daffodils when you slide the tab.


As usual,, the eyes all got a shiny treatment with a black glaze pen. And I added white details with a gel pen too.


Finally, here is the inside of Alma's card.


Supplies
On a Hinge Die - Taylored Expressions
Printed elements - Simply Spring Odds & Sods, Doodlebug Designs
Patterned paper - Simply Spring - Doodlebug Designs
Sakura black glaze pen
White, green, kraft and blue card stocks
1006 Nature Edges - Karen Burniston
Copic marker
Let's Toast Pull Tab Add On die set - Lawn Fawn
Circle dies - Hero Arts
Catherine Pooler Inks
Makeup Brush
Cloud template - MFT Stamps
Brother labeller
222016 Alphabet, Haley (Ilai's card)
222009 Alphabet, Carly (Alma's Card)
Black marker
Fine markers
Nuvo Drops
Stitched rectangle die set - Your Next Stamp

Card size - Standard A2, 4.25 x 5.5"

Thanks for stopping by today

Friday, 2 August 2019

Coffee Themed Flip Card

Hello crafty friends

It's Fun Fold Friday here on my blog and today I'm sharing another one of my adaptations to Karen Burniston's new Triple Flip die set. This time I tried using a regular A2 side fold card - up until now people have been only using it in a landscape format.

I was careful placing the die, checking placement from the back and the front of the turquoise chevron panel making sure the far left slot was off the left edge of the paper so it didn't cut. I then added just the coffee cup from the Coffee Cup Pop-Up to the 'centre' flipper, which is now the one at the far left.

To get the coffee cup, I simply trimmed off the excess that I didn't need - the folding tab and the part that wraps around to the back of the cup to attach to that folding tab. Easy peasy - if you try it yourself you will see exactly what I mean as soon as you cut the cup. I cut the cup twice, so I could sandwich the flipper paddle between the cups.

I decorated the front with the circles that are included with the Coffee Cup Pop Up, and added the Crabby til Coffee stamp to the sweet little stitched oval that comes in the new Enjoy the Ride set.


I adore the coffee beans that you can cut from the Coffee Cup Pop Up so added a trio here. I also added a couple of borders from the Border Blends Argyle, and made my scallopy border at the top and bottom using the Nature Edges Clouds.  Some got a white gel pen outline and others got gold.


The words that are revealed when you pull the tab (Funny Bones from Riley & Company) are funny and very true for me! I LOVE my morning cup of coffee!  There was still the slot that cuts with the die for the far right paddle, which is what I covered up with the word panel. I had to careful trimming (a scant 1/16" at a time) to get it to fit behind the coffee cup while not cutting off any of the letters. But it did work and fits perfectly.


I didn't think the inside needed another sentiment, so instead I added a fun Riley the Moose image and a die cut heart.


I have a short YouTube video for you as well, so you can see this card in action. The Triple Flip die set is really fun and proving to be versatile as well.


Supplies:
Kraft, white and brown card stocks
Patterned paper - Snap, Color Vibe - Simple Stories
1104 Triple Flip die set - Karen Burniston
1006 Nature Edges - Karen Burniston
Sakura white gel pen
Sakura gold gel pen
Sakura black glaze pen
W-1 Copic marker
1033 Coffee Cup Pop Up - Karen Burniston
This Morning I Drank Water - Funny Bones, Riley & Company
1090 Border Blends Argyle - Karen Burniston
Catherine Pooler Over Coffee Ink
Crabby Til Coffee - Funny Bones, Riley & Company
1103 Enjoy the Ride (stitched oval) - Karen Burniston
1019 Gift Card Label (hearts) - Karen Burniston
1091 Border Blends Party - Karen Burniston
1054 Rectangle Crosshatch - Karen Burniston
Cookie Riley - Riley & Company
Chameleon Color Tone markers

Thanks for stopping by today

Wednesday, 31 July 2019

Sparkly Snowflake Triple Flip Adaptation

Hello my crafty friends

I was SO excited when this idea worked. I had been busy doing paperwork and paying bills, dealing with my Mom's estate etc when BOOM this idea popped into my head. Well actually, the first idea was to use an acetate hinge and have just the snowflake be the flipper but I went with a rectangle under the snowflake and a card stock hinge for the first one.

The new Triple Flip die set is proving to be a fan favourite, and I'm thrilled to be able to share another way for you to use your dies! I have a lot of ideas for this technique - more ideas than days, haha. Since it is still July, I can call this my 'Christmas in July' post! I have seen some pretty wonderful holiday cards this month, which is always fun.

I adapted the Triple Flip and only used one 'flipper' - the one on the far left - and attached a decorated crosshatch rectangle to that arm.


I have had these snowflake dies for many years - and I'm not even sure who made them. I die cut the largest one from really sparkly card stock and adhered it to the flipping rectangle with foam tape. I also added some sparkly borders using Karen Burniston's Border Blends dies.


When you pull the tab, the rectangle flips over to reveal a sentiment and another die cut snowflake. The sentiment rectangle covers up the remaining slots that cut with the Triple Flip die, since we only needed the one on the left.


Because the pull tab arm has to extend all the way across the width without the additional two flipper arms, there is some wobble to it and it tends to sag below the notches a little. To remedy this, I added a narrow 1/2" long piece of foam tape above and below the pull tab about where the far right slot is. That keeps the pull tab arm where it needs to be!


The card is a top folding A2, and there is another stamped greeting inside.


I also have a little YouTube Video so you can see the card in action:


I have another idea for a Triple Flip adaptation that I will share in a couple of days. So fun!

Supplies:
Blue and white card stocks
Patterned paper - Winter Frost, Stampin' Up (retired)
1104 Triple Flip - Karen Burniston
1054 Rectangles Crosshatch - Karen Burniston
Glitter card stock - AC Moore
1091 Border Blends Party - Karen Burniston
Large Snowflake dies - unknown, older from my stash
Stamps on front - Verve (retired)
Water brush
Inside stamps - Hero Arts
Glitter Dots - Elizabeth Craft Designs

Thanks for stopping by today

Wednesday, 10 July 2019

Succulent Triple Flip Birthday Card

Hello my crafty friends

I'm back today sharing another Triple Flip card, which is part of Karen Burniston's new release. Those dies will be shipping mid July! This is a versatile interactive die set that you can change the look of depending on the decorations, colours and papers you choose.


I added some white Peel Off border stickers as well as one of the Border Blend die cuts. I like the shine from the stickers and I added lots of Stickles to the elements as well.


When you pull the arrow the three panels flip over to reveal a greeting and three different decorations.


Here is a peek at the inside, where I stamped the birthday greetings and added another one of the printed elements from the package.


I also have a little YouTube video for you to see the card in action:


Supplies:
1104 Triple Flip - Karen Burniston - shipping mid July 2019
Green and white card stocks
Patterned paper and printed embellishments - Kaisercraft, Greenhouse Collection
1056 Squares Crosshatch - Karen Burniston
1090 Border Blends Party - Karen Burniston
Peel-Off's - Stamp On It
Live, Laugh, Love stamp - Taylored Expressions
Inside stamps - The Inside Scoop, Taylored Expressions
Sakura Gold Gel Pen
Stickles

Thanks for stopping by 

Thursday, 2 February 2017

'Love You This Much' Pull Tab Card

Good morning friends

Today I have a Pull Tab Valentine Card to share today, with bright, sparkly puffy stickers as the front decoration. I used the Hanging Charm Pull Tab by Karen Burniston, but used a solid piece on the front rather than dangle a charm.


When you pull the tab, the frame stands up for display, and reveals the stamped sentiment.


I usually make my pull tab cards flat, post card style - but always like to add a little somethin' somethin' to the back. This one has some doodles and a fussy cut stamped heart that was coloured with Pan Pastels.


Supplies:
Hanging Charm Pull Tab, Pop it Ups - Karen Burniston (Elizabeth Craft Designs)
Patterned paper - MFT
White card stock
Puffy stickers - stash
Stamp on front - C.C. Designs
Ribbon - Offray
Heart stamp - Verve
Pan Pastels
Hairspray to set the pastels


Thanks for stopping by today

Thursday, 19 January 2017

Hearts and Roses Pull Tab Card

Good morning friends

Today's share is a Valentine Pull Tab card, made using Karen Burniston's Hanging Charm  Pull Tab die set. Here is the card in the closed position ...


When you pull the tab, the heart & frame pulls up and stands for display - AND reveals a stamped message.


I make these cards flat, post card style cards but I still add a little decoration to the back side.


I was working ahead, so have a bunch of cards to post here with my Altered Scrapbooking watermark instead of Painted Mountain Cards. I'm choosing not to re-do all those photos.

Supplies
Hanging Charm Pull Tab, Pop it Ups - Karen Burniston (Elizabeth Craft Designs)
Tag Pivot (reinforcement), Pop it Ups - Karen Burniston (Elizabeth Craft Designs)
Rose Patterned paper - Hot Off The Press
Pink card stock
Heart sticker - Me and My Big Ideas
Small heart stickers - Recollections
Red card stock
Elizabeth Craft Designs Clear Double Sided Tape - 6" width
White card stock
Love stamp - C.C. Designs
Stickles
Pink and Red Bakers Twine
Sakura Stardust pen

Thanks for stopping by today