Showing posts with label Stencils. Show all posts

Friday, 16 August 2024

Floral Pop-Up Birthday Card


It's Fun Fold Friday here on my blog! The pretty floral bouquet on this card was made using a stamp/layering stencil set from Taylored Expressions, called Autumn Array. I die cut it using Karen Burniston's Squares Crosshatch and added it to a 5x7" card that had a floral paper panel mounted to the front. Since it's a birthday card going to a friend, of course I made it into a pop-up, too!


The sentiment is from my plastic envelope - I do a bunch of different birthday greetings at a time and store them all together so I just need to poke around in that envelope to find the one I want to finish off my card. So I'm not sure who makes that stamp!


Inside I used the Twist Flower Pop-Up die set by Karen Burniston, which is definitely one of my favourites. This time I actually used the included decorator dies, which was also fun. I took a 4 x 6" strip of leftover patterned paper and cut it in half at 2". Then I adhered each piece right up to - but not over - the fold. The daisy borders were also cut from the patterned paper, but since it's double sided I used the blue print side instead of the floral. 


The leaves were die cut from scraps of green pearlized cardstock and I added Pops Of Color (sparkly thick glitter glue) on the daisy border centres and the focal flower centre as well.  Finally I added a stamped sentiment on either side of the card and got it photographed and ready to mail.


Supplies used:
Autumn Array stamp and stencil set - Taylored Expressions
Catherine Pooler coloured inks
Blending brushes - Taylored Expressions
Blending sponges - Ranger
Twist Flower Pop Up die set - Karen Burniston
Squares Crosshatch dies - Karen Burniston
Scraps of green pearl cardstock
Shimmer Spray
Patterned paper - Miss Caroline, My Minds Eye
Happy Birthday (stash)
Pops of Color, Snowflake - Scrapbook .com
Birthday Wishes stamps - Honeybee Stamps
5x7 Card base and envelope


Thursday, 4 July 2024

July 2024 Sheetload of Cards - Camping Themed

Today I'm sharing my first card batch made with the July 2024 Sheetload of Cards. I can always tell when it's going to be one of my favourite Sheetloads, when I'm ready to start another right away. For this month, I spied a butterfly print 12x12" sheet and immediately cut it down to make 'half' a Sheetload, or 4 cards. I didn't even get started assembling those ones when my head thought how great this one would be for masculine cards. 

I pulled out this older paper package by Echo Park and cut the pieces. I am going to keep a couple in my stash and the others will be donated to my Mom's old nursing home. On the first four cards I used the reverse of the arrow print for the strips, since the paper is double sided. 

The tree is an old punch from my stash and I added some ink blending with a water brush then an alcohol marker.

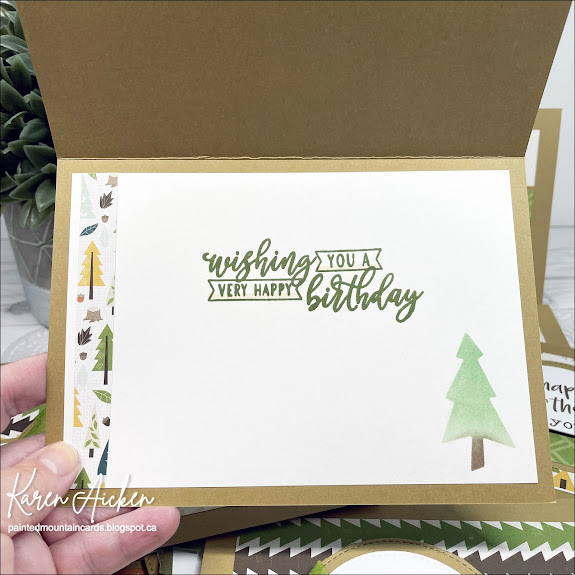
Below is a peek at the inside where I added a strip of patterned paper from a scrap in the package, and a stamped sentiment. I also punched a tree from a scrap of white cardstock and used it as a stencil with blending brushes & ink to add a tree inside.


When I was finished these, I went through some older paper pads and pulled out another two sheets which I have now started on. 😊  When I'm done with those eight cards, I'll finally assemble the four butterfly paper cards! I plan on using gold foil paper with those to dress them up ... and possibly a pop up inside one or two of them. 

I usually have a video walkthrough of my Sheetload cards, but since I don't have anything else to share for the next couple of days, I wanted to get the photographs taken and watermarked instead of waiting for a quiet time to take a video. I'll try to do one when I do the butterfly cards! 


Supplies used:
Patterned paper - Happy Camper, Echo Park
Happy Birthday words - Happy Birthday Many Ways, Catherine Pooler
Stitched circle dies - MFT Stamps
Tree punch - EK Success (old!)
Catherine Pooler coloured inks
Water Brush
Inside - Essential Birthday Sentiments, LDRS
Blending brushes
Alcohol markers

Tuesday, 26 March 2024

Mini Slimline Dog Sympathy Card


Sigh. Had to make our first pet sympathy card of 2024.  ðŸ˜¢

This one started with a white panel that I stencilled the bones & paw prints, then used blending brushes to add some subtle colour. I stamped the little dog on a circle, lightly inked around him in blue and added it behind a reverse scalloped circle. Nuvo Glaze on the eyes gave them a little shine. The sentiment was stamped and added across the card - such a true sentiment.


Below is a peek at the inside ...


Supplies used:
Inverted Stitched Scallop Circles - Pinkfresh Studios
Catherine Pooler Inks
Water Brush
Wink of Stella
Stencil - Bow Wow, Photo Play
Blending brushes - Taylored Expressions
Critter Condolences - MFT Stamps
White pearl cardstock
Mini Slim Embossed Edge dies - Kat Scrappiness
Pawfect Sentiments - Waffle Flower
Best Friend - Waffle Flower
Nuvo Glaze

Monday, 5 February 2024

Lakeside Scene Birthday Card

Welcome to Masculine Card Monday here on my blog!

Today I'm sharing another birthday card made using my Grassy Grove stamps & dies - this time I used scenic patterned paper to cut the forest piece and I loved the look!. I will be doing this again for sure.

Then I couldn't decide on what to put behind the die cut forest ... nothing seemed to look right. Finally I pulled out a stencil set from Crafters Companion and created a scene on white card stock using blending brushes and dye inks. One of the included stencils had the flying geese so I added them to the patterned paper layer, and a single goose on the stencilled panel. There was still room to stamp Happy Birthday in the center so I didn't need to add a fishtail banner or anything else to the card front. I matted the panel on cinnamon card stock then added it to a card base.


Inside are more stencilled birds above a stamped sentiment. I added the leftover strip from the patterned paper used on the front and then stamped the trees.


Supplies used:
Blending brushes - Taylored Expressions
Grassy Grove bundle - Stampin' Up
Happy Birthday Many Ways - Catherine Pooler
Catherine Pooler inks
Inside sentiment - At The Lake, Hero Arts
6.5 x 5" card base and envelope - Michaels

Wednesday, 20 December 2023

Our Groomer's Christmas Card & Gift Card Holder


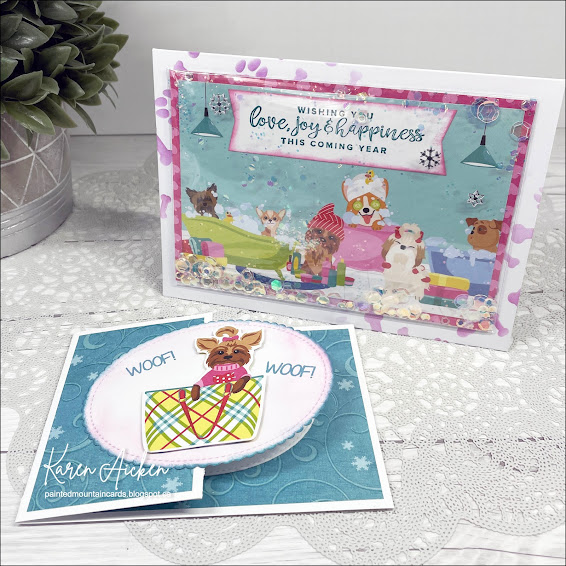
When I saw this sheet of cut-aparts (Photo Play) I knew I had to buy a sheet. I love the colours with the fun dog images and the 'spa day' one was just too perfect for what I had in mind.

Since Jasper had a grooming appointment last week, I wanted to bring the groomer a holiday card that included a Gift Card. They always do such a good job with Jasper and he looks totally handsome when he comes out. Not like the 'homeless Sheltie' look he has going in, ha ha.


First up is the Gift Card Holder. I used the measurements in my Gift Card Holder Tutorial (click HERE) and some patterned paper that matched the card. The purse/dog was fussy cut from another cut apart on the sheet and popped up onto the scalloped oval with foam tape. I stamped WOOF! on the oval to fill up some of the white space and the front was done.


Inside, there is the pocket for the Gift Card, and one more WOOF!. We wrote a personal message onto the inside oval.


After matting the 4 x 6" cut-apart onto pink patterned paper, I stamped a sentiment on a fishtail banner and adhered it over the words that were printed on the cut-apart. Then I created an infinity shaker with a transparency and filler that resembled bubbles from a bubble bath.


I stencilled on the card front from the upper left to the lower right corner, and also added stencilling to the envelope.


Here is a peek at the inside. The dog on the spa towel was fussy cut from one of the 3 x 4" cut-aparts on the sheet and I added Nuvo Glaze to the cucumber slices on his eyes. Too funny.


Having been asked how many cards I make I thought it would be fun to keep track this year. Many of my posts include more than a single card or project and below is my tally. 

Card Tally for 2023
January - 53 cards
February - 56 cards
March - 55 cards
April - 32 cards
May - 43 cards
June - 34 cards
July - 56 cards
August - 106 cards
September - 61 cards
October - 51 cards & 5 Tags
November - 46 cards
December so far - 19 cards (& 16 simple tags)

I decided to cancel the subscription that provided linked thumbnails to what products I used on my cards. It was costing me out of pocket each month, so I’m back to listing what I used.

Supplies:
Cut aparts - Pampered Pooch, Photo Play
Pink patterned paper - - Pampered Pooch, Photo Play
5 x 7" card blank and envelope
Outside sentiment - Encircled in Warmth, Stampin' Up
Catherine Pooler inks
Blending sponge - Ranger
Transparency
Bow Wow Stencil - Photo Play
Blending Brushes - Taylored Expressions
Snowflake peel offs - Ecstasy
Nuvo Glaze
Stitched oval dies- MFT Stamps
Scalloped stitched oval dies - MFT Stamps
Woof - Dog Happiness, Frantic Stamper
Blue patterned paper - Countdown to Christmas, MME (old!)

Wednesday, 29 November 2023

Boot-iful Birthday Card


This card just makes me happy. I had this 'Boot-iful' embossing folder/die on my Wish List pretty much since it first came out, and I finally bought it earlier this month. There were also a set of layering stencils that I debated about, but finally added them to my cart at the same time. I LOVE them and I'm so glad I got the stencils as well. This is the first card I've made with the set, a birthday card for my Mother-In-Law.

I ended up cutting a letter sized sheet of white cardstock into four (A2 sized) panels, and did the stencilling on all four panels to save cleaning off the stencils after just one inking. So I actually have three more of these ready to go! After the stencilling was done I used the coordinating die to cut three of the boot/floral images but I left one as an A2 sized panel. Then I placed the stencilled, die cut piece carefully into the embossing folder and ran I through. I ooooooohed. I ahhhhhhed. I was happy. I repeated with the other pieces, and put those away for another day.

For this card I embossed a Kraft panel with a brick embossing folder that I've had for years, and I rubbed my finger into Catherine Pooler's new Champagne ink pad (pigment ink) and over some of the raised areas of the brick panel. I love the soft sheen it gave those bricks! I also added a little on the orange blooms, then a die cut butterfly from gold mirror cardstock.


Here is a look at the inside. The butterfly was die cut from a scrap of pink patterned paper and rubbed with gold Lunar Paste before adding it inside.


Having been asked how many cards I make I thought it would be fun to keep track this year. Many of my posts include more than a single card or project and below is my tally. 

Card Tally for 2023
January - 53 cards
February - 56 cards
March - 55 cards
April - 32 cards
May - 43 cards
June - 34 cards
July - 56 cards
August - 106 cards
September - 61 cards
October - 51 cards & 5 Tags
November so far - 44 cards

I decided to cancel the subscription that provided linked thumbnails to what products I used on my cards. It was costing me out of pocket each month, so I’m back to listing what I used.

Supplies:
Boot-iful Embossing Folder and Die - Lisa Horton
Boot-iful Layering Stencils - Lisa Horton
Catherine Pooler Inks
Bricked embossing folder - Tim Holtz
Blending brushes - Taylored Expressions
Small blending brushes
Gold mirror cardstock scrap
Little Etched Butterflies - Paper Rose
Catherine Pooler Champagne Ink***
Special sentiments - Penny Black
Gold Lunar Paste (on inside butterfly)

Wednesday, 15 November 2023

Bee Anniversary Card


Months ago I purchased 'The Little Book of Bees' ... which is a thick booklet of bee printed panels along the same lines of 'The Little Book of Muddy Paws' which I use a lot for dog themed cards. The bee images are just SO cute, and this is the first card I made using it. I adhered the panel to brown cardstock, then created an infinity shaker with a transparency and sequins/filler from my stash. 


I cut the transparency to 5 x 7" and scored the outer edges so the matted panel would fit inside it. Then I mitred the corners of the transparency and adhered it to the back of the bee panel on three sides. I poured the filler inside then adhered that final side, and mounted the whole thing onto the card base. Oh, and I lightly stencilled the card front and envelope as well.


Here is a peek at the inside with a stamped greeting and some cute little bees.


Having been asked how many cards I make I thought it would be fun to keep track this year. Many of my posts include more than a single card or project and below is my tally. 

Card Tally for 2023
January - 53 cards
February - 56 cards
March - 55 cards
April - 32 cards
May - 43 cards
June - 34 cards
July - 56 cards
August - 106 cards
September - 61 cards
October - 51 cards & 5 Tags
November so far - 17 cards

I decided to cancel the subscription that provided linked thumbnails to what products I used on my cards. It was costing me out of pocket each month, so I’m back to listing what I used. 

Supplies:
Little Book of Bees - Hunkydory
Stickles
Transparency
Sequins - my stash
5 x 7" Card blank and envelope
The Inside Scoop Anniversary - Taylored Expressions
Catherine Pooler Inks
Stencil - Clear Scraps
Blending Brushes - Taylored Expressions
A7 Lacy Layers - Waffle Flower
Patterned Paper inside - K & Co
Bee Mine - Lawn Fawn

Tuesday, 31 October 2023

Tree Sympathy Card


Isn't this tree background stamp pretty? It was in the Stampin' Up holiday catalogue and if you follow me you know I love trees & mountains etc. There were actually a few items in the catalogue that ended up jumping into my online shopping cart - a set of owls, and a gondola set that I bought because it was so different! There were also two holiday sentiment sets that I know I will get a lot of use out of. Of course I loved the patterned papers but managed restraint and didn't purchase any. I know - shocking, ha ha.

Right away I pulled out my MISTI and stamped the background a couple of times to see if it was as nice in real life and ... yep ❤️   I cut this one down with a stitched rectangle die and wrapped it with a strip of torn vellum. I stamped on the vellum and set it aside to dry while I die cut a tree and inked it. The stamps and inks are all from Catherine Pooler. The decorated panel was mounted to a slightly larger white card stock panel then to my card base.


Here is a peek at the inside. I used the negative image (from the cardstock that the tree was cut from) as a stencil and a bit of torn cardstock for the ground.


Having been asked how many cards I make I thought it would be fun to keep track this year. Many of my posts include more than a single card or project and below is my tally. 

Card Tally for 2023
January - 53 cards
February - 56 cards
March - 55 cards
April - 32 cards
May - 43 cards
June - 34 cards
July - 56 cards
August - 106 cards
September - 61 cards
October - 51 cards & 5 Tags

I decided to cancel the subscription that provided linked thumbnails to what products I used on my cards. It was costing me out of pocket each month, so I’m back to listing what I used.

Supplies:
Fragrant Forest background stamp, Stampin' Up
Catherine Pooler Inks
Blending Brushes - Taylored Expressions
MISTI stamping platform
Double Stitched Rectangle dies - Divinity Designs
Vellum - stash 
Encouraging Word Sentiments - Catherine Pooler
Forest Trees (dies) - Echo Park
Circle Stickers - Dazzles

Thursday, 7 September 2023

Second Rosh Hashanah Card


I didn't need another Rosh Hashana card as I made one for our daughter and family already. But after MONTHS of not purchasing any new paper crafting supplies I placed a couple of orders. One of my new goodies is the 'Little Book of Bees' - a thick pad of ~4x6" printed panels with different bee scenes. I think there are four of each design - it's the same as the 'Little Book of Muddy Paws' that I use all the time to make dog themed cards. I thought this panel would make a cute Rosh Hashanah (Jewish New Year) card and this is what I came up with. I've decided to give this one to our daughter and hang onto the previous one for next year. 😊

I trimmed the bee panel slightly then matted it with brown cardstock so the panel measured 4 x 6". Then I cut a 5 x 7" piece of transparency and scored approx 1/2" from each edge. I mitred the corners then added strong double sided adhesive to each of the transparency edges. Those edges were wrapped around to the back side of the bee panel and three sides adhered down securely.  I added some sequins to the front, turned it over and stuck down that remaining side. Ta Da ... an infinity shaker (also called edge to edge shaker). 


Using a hexagon stencil and distress oxide inks, I added some colour to the top left and bottom right corners of a Kraft card base before adhering down the shaker. I have these gold foiled bee stickers so added them to the envelope and also onto the front of the shaker. They almost disappear but catch the light when you turn the card. 


Below is a peek at the inside, using an older stamp set from Papertrey Ink.


Having been asked how many cards I make I thought it would be fun to keep track this year. Many of my posts include more than a single card or project and below is my tally. 

Card Tally for 2023
January - 53 cards
February - 56 cards
March - 55 cards
April - 32 cards
May - 43 cards
June - 34 cards
July - 56 cards
August - 106 cards
September so far - 8 cards

I decided to cancel the subscription that provided linked thumbnails to what products I used on my cards. It was costing me out of pocket each month, so I’m back to listing what I used with a few affiliate links included.

Supplies:
Little Book of Bees - Hunkydory 
(purchased online at R&R Scrapbooking in Edmonton Alberta)
Transparency 
Sequins - stash
5 x 7" card blank and envelope
Gold foiled bee stickers - stash
Stencil - Clear Scraps
Blending Brushes - Taylored Expressions
Spiced Marmalade Distress Oxide Ink
Mazel Tov - Papertrey Ink
5 x 7" Lacy Layers - Waffle Flower


Thursday, 6 July 2023

Rainbows, Rubber Boots and Butterflies!


Each week I've been sharing an Paper Pumpkin Alternate card made with the March 2020 kit called No Matter The Weather. I actually finished the kit back in March but spread out sharing the cards so my posts didn't all end up looking the same, since I used the same rainbow patterned paper for a lot of the alternate cards. Today I'm sharing a shaker card made with items from the kit and my craft room. I think this is one of my favourites!


Using Karen Burniston's Happy Spring attached to the back of the shaker, I added some fun spring type filler and created my shaker with the rainbow frame. On top of the acetate, I added a couple of stencilled butterflies and one of the colourful rubber boot pieces from the Paper Pumpkin kit.


Here is a look at the inside, using patterned paper and gold foiled elements from a retired Stampin' Up package. I thought this sentiment was perfect for the card and I can send this out for Happy Mail next year anytime in the Spring!


Having been asked how many cards I make I thought it would be fun to keep track this year. Many of my posts include more than a single card or project and below is my tally. 

Card Tally for 2023
January - 53 cards
February - 56 cards
March - 55 cards
April - 32 cards
May - 43 cards
June - 34 cards
July so far - 4 cards

Additional Supplies:
5 x 6.5" card base and envelope - Michaels
March 2020 Paper Pumpkin kit "No Matter The Weather", Stampin' Up
White cardstock
Shaker filler - from my stash
Brown fine marker
Patterned paper inside - Over the Rainbow, Recollections
Abstract Beauty Ephemera - Stampin' Up
Thinking of You - Tucked In, PTI

This blog uses affiliate links whenever possible. This means, if you make a purchase through one of my affiliate links that you pay the same amount but I may receive a small commission from your purchase. I only link products that I own, love and use for my card making and not every link below is an affiliate one! 😊

Wednesday, 3 May 2023

Notes of Cheer Butterfly Card Trio


Today I'm sharing another trio of cards created with a card kit from Stampin' Up. I added some holographic card stock and Pinkfresh Studio butterflies to finish off the cards. The sentiment strip, gems and laser cut piece were included in the kit.


I just love the scalloped and lined envelopes that came with the kit. One of these went to a friend for Happy Mail and the others went into my stash. I also added layers of rainbow holographic cardstock for extra shine.


I have a bin filled with these die cut butterflies. Some are just stencilled (in several different colour schemes), some are stencilled and stamped, and others are heat embossed and stencilled. It does nine at a time, so it's easy to build up a whole bunch to have on hand.

Having been asked how many cards I make I thought it would be fun to keep track this year. Many of my posts include more than a single card or project and below is my tally. 

Card Tally for 2023
January - 53 cards
February - 56 cards
March - 55 Cards
April - 32 Cards
May so far - 17 Cards

Additional Supplies
Notes of Cheer card kit - Stampin' Up
Shimmer Spray
Rainbow Holographic cardstock - Recollections
Gray fine point marker

This blog uses affiliate links whenever possible. This means, if you make a purchase through one of my affiliate links that you pay the same amount but I may receive a small commission from your purchase. I only link products that I own, love and use for my card making and not every link below is an affiliate one! 😊


Thursday, 6 April 2023

Spring Cascade Card


One of the dies I received for my late February birthday was this Cascade Card die set. It's by Creative Crafts but they refer to it as a Zig Zag Stepper Card, ha ha. I had looked at it previously but when I saw it was on sale for a great price, I decided to buy it. I love a die set that comes with all the layering pieces! There were no directions or card samples on the Craft Stash US website, so I just sort of crossed my fingers.

It arrived with no instructions or guidance but I figured it would be fairly self explanatory - which it was.  I was mindful of the direction of both the dies and the papers so I wouldn't end up with upside down tulips on one side. But when I went to assemble it, it appears that the left panel should have been cut from the underside of the paper to get the tulip print to show.

Initially disappointed, I realized that it probably would have been too busy and using the softer print on the reverse side of the tulips made for a more pleasing card. I added the Giant Happy Spring (cut a couple of times from white cardstock so it would be sturdy) and some Pink Fresh Studio butterflies, then had to figure out what to put on the front.

Finally I opted for one of the layering dies and tulip paper for the left side, then I added one of Lawn Fawns layered butterflies. I adhered adhesive only along the outer butterfly sides so the card would still have movement. The other butterflies are stencilled and die cut (Pinkfresh Studios).


On the back side I added a stamped white panel (3 x 4") across both sides and another butterfly. While it's hard to see in the photo, I also added a strip of the tulip paper across the bottom of that white panel and one on the envelope flap. 


I know that most people would have made this from cardstock and used the included layers to add the patterned paper, but I wanted to try it this way with my first play. I'm quite happy with how it turned out and it stands nicely for display. It's also nice and lightweight and will mail for a single stamp!

We had been in Arizona and I was able to order from Craft Stash US ... but I don't know if they ship to Canada. I'm guessing that Canadians would order from their UK site? I'm set with new fun fold dies for several months now, so I won't be needing to find out! 😂

Card Tally for 2023
January - 53 cards
February - 56 cards
March - 55 Cards
April so far - 10 Cards

Additional Supplies:
Zig Zag Stepper Card die set (I call it a Cascade Card) - Creative Crafts (Craft Stash US)
Sentiment - Verses (wood mount)
Patterned paper - Flowering Fields, Stampin' Up
Shimmer Spray
Fine Point Brown Marker
5 x 7" envelope

This blog uses affiliate links whenever possible. This means, if you make a purchase through one of my affiliate links that you pay the same amount but I may receive a small commission from your purchase. I only link products that I own, love and use for my card making and not every link below is an affiliate one! 😊


Wednesday, 5 April 2023

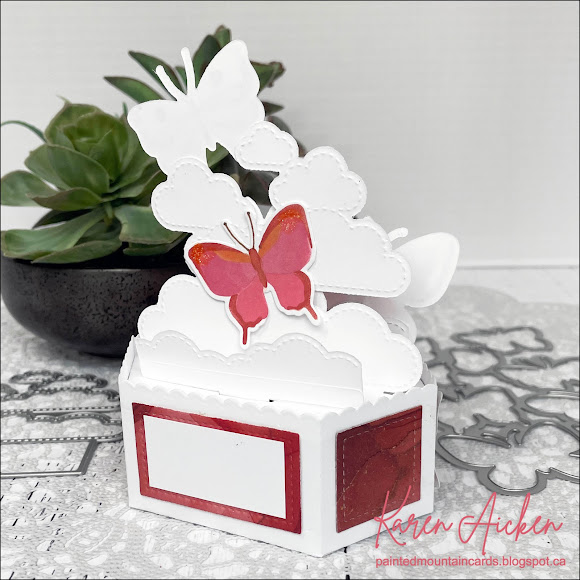
'Clouds & Butterflies" Platform Pop up


I know there are lots of papercrafters who love, say florals. Whenever a company has a new floral release, they are happy to add them to their collection. Me? Apparently its sky related things. Clouds, sun, rainbows, sunbursts (stencils and dies) ... that is my weakness. Ha. So when Lawn Fawn's release included cloud inserts for the Platform Pop Up I didn't hesitate to hit 'add to cart'. I didn't purchase their cloudy wrap around for the base, but it IS on my Wish List. 😊  

Also included in that release was a cloud hot foil plate and I practically jumped for joy. Since I couldn't wait to play with the cloud insert I paired it with butterflies from Pinkfresh Studios. Since I know I also love butterflies - this card just makes me happy! 


This is the 4th edition to my series using the Platform Pop Up and I'll be back next month with another one. By the end of the year I hope to have made twelve different cards with this die set.


The card folds flat for mailing, and this one fits in a 5 x 7" envelope. I was mindful of how high I placed that top butterfly so it would fit inside the envelope.


Having been asked how many cards I make I thought it would be fun to keep track this year. Many of my posts include more than a single card or project and below is my tally. 

Card Tally for 2023
January - 53 cards
February - 56 cards
March - 55 cards
April so far - 9 cards

Additional Supplies:
White cardstock
Brown pen

This blog uses affiliate links whenever possible. This means, if you make a purchase through one of my affiliate links that you pay the same amount but I may receive a small commission from your purchase. I only link products that I own, love and use for my card making and not every link below is an affiliate one! 😊