After making the Pop-Up Birthday Card last week, I wanted to use up the leftover paper pieces and not just store them away. This is the card I came up with, one I can send to a friend for Happy Mail.
The diagonal strip is matted with rainbow holographic cardstock for some shine, and the flowers were added to a scalloped vellum circle.
I always like this sentiment, since I do so much texting these days.
Supplies used:
Patterned paper - Miss Caroline, My Minds Eye
Rainbow Holographic Cardstock - Recollections
'Hey You' die - Pinkfresh Studios
Vellum - Stampin' Up
Scallop Circles - Divinity Desixgns
Beautiful Blossoms Paper Die Duo Set 1 - Divinity Designs
Hello my crafty friends. Today I'm sharing my first play with the Autumn Array layering stencils from Taylored Expressions. They were released last year, I believe - but I just recently added them to my craft room. The HI is also new - it's from Studio Katia's latest release - there is a stamp set, a die to cut out the large HI and also the large HI in a hot foil stamp! WOOT ... had to get them - I'll get lots of use out of them.
In addition to the HI hot foil stamp, I used Pink Fresh Studio's Hot Foil Nested Hexagons. When you are foiling, you have to use a very smooth cardstock. Since I hadn't anticipated foiling when I did the stencilling, I just used my regular white cardstock. You can see it didn't foil completely, and instead looks a little 'worn'. I used my usual matte coated cardstock for the HI, though, and it foiled beautifully!
The plaid patterned paper is long retired, but I will link a few others for you. This card is larger than A2, it's a 5 x 6.5" card and envelope set that I bought at Michaels several years ago. Oh, and the sentiment on the front is from Taylored Expressions and also linked below.
Inside I added another hexagon, this time stamped with a set from Gina K.
While I had the stencils out anyhow, I ended up creating 4 panels with them. I put one aside for another day but completed three cards - this one is the first. The others will be shared later this month.
This blog uses affiliate links whenever possible. This means, that at no cost to you, if you make a purchase through one of my affiliate links that I may receive a small commission from your purchase. I only link products that I own, love and use for my card making and not every link below is an affiliate one! 😊
Any supplies I'm unable to link are listed at the very bottom of my post.
Additional Supplies: White cardstock 5 x 6.5" card and envelope - Michaels Shimmer Spray Green Copic marker Patterned paper - Plaid Tidings, 6x6" - Stampin' Up (retired)
Hello my crafty friends. Today I'm sharing a fun fold card that is ready to send off for Happy Mail. I used the Four Panel Fold Card Die with Layers from Divinity Designs, and some Doodlebug goodies with all of the details on YouTube:
The first photo shows what the card would look like coming out of the envelope, and below you can see the card fully open.
I added some glitter glue here and there for some sparkle ... white gel pen highlights too.
The back of the card has a stamped sentiment and a few more bits from Doodlebug, and that is where I will write the message.
This blog uses affiliate links whenever possible. This means, that at no cost to you, if you make a purchase through one of my affiliate links that I may receive a small commission from your purchase. I only link products that I own, love and use for my card making!
Any supplies I'm unable to link are listed at the very bottom of my post.
Additional Supplies: White 12 x 12" card stock - Michaels
Hello my crafty friends! I am just SO happy with how this card turned out - I love it when a card ends up looking like it did in your head. I have been using this rainbow packing tape for a couple of years. It does take care and patience (lots of patience) as well as a willingness to surrender to a few wrinkles or puckers as you add it to white card stock. It is packing tape, after all and stretches and buckles.
Normally I add rows of it to a letter sized sheet of card stock, then cut it into various width strips to have on hand to add a pop of colour to my projects. For this card though, I backed the Scalloped Heart background die from Studio Katia with a slightly smaller whole piece ... not strips.
Then, I made a little shaker using the Hearts Crosshatch by Karen Burniston, filling the shaker with cute filler from Kat Scrappiness. Everything that is available is linked below for you.
Here is a peek at the inside, with a sentiment from Gina K - same set was used for the small sentiment on the card front. I added a single rainbow from the shaker filler, and two different width's of the packing tape strips I keep on hand.
Looking forward to sending this out for Happy Mail!
This blog uses affiliate links whenever possible. This means, that at no cost to you, if you make a purchase through one of my affiliate links that I may receive a small commission from your purchase. I only link products that I own, love and use for my card making!
Any supplies I'm unable to link are listed at the very bottom of my post.
Additional Supplies: Rainbow packing tape - Amazon.ca White card stock - Accent Opaque Digital Super Smooth (Amazon .ca)
Hello my crafty friends! It's Fun Fold Friday here on my blog and today I'm sharing a card made with Karen Burniston's Circle Charm Pop Up. This is another die that I get a lot of use out of - the decoration on the card front pivots to the inside as the card is opened. If you check the labels on the right side of my blog (web version, not mobile version) you will see there are two dozen different cards made using this die set since it was released! I have a walkthrough of my card on YouTube:
The only new items I used on my card today are the mirrored heart sequins - everything else has been in my craft room for 6 months or longer. The sequins are my new favourite embellishment, as you may have noticed. As soon as I added that first one to my card, I immediately ordered 2 more packages. Ha. Yes, I linked them below for you as well as everything else that is available.
Since I went over everything in the video I will keep my comments here to a minimum. 😊
This blog uses affiliate links whenever possible. This means, that at no cost to you, if you make a purchase through one of my affiliate links that I may receive a small commission from your purchase. I only link products that I own, love and use for my card making!
Any supplies I'm unable to link are listed at the very bottom of my post.
Additional Supplies: Patterned paper, stamps Amd dies - Hand Penned Bundle, Stampin' Up (retired) Card and envy - Hand Penned Memories & More, Stampin' Up (retired)
Light pink card stock - stash
White card stock - Accent Opaque Digital Super Smooth (Amazon .ca)
Hello! Today I'm sharing another card using stamps and dies from Divinity Designs, including the Poppies Paper/Die Duo from April's Blessings Box. ❤️ The fence die on this card reminded me of those little white fences people used to add around the perimeter of their garden beds.
Here is a peek at the inside, using sentiment stamps from Gina K. The card was sent to a friend for Happy Mail.
For your convenience I have linked many of the products used below. Some may be affiliate links which means if you use these links to purchase I may earn a small commission but there is NO extra cost to you.
Additional Supplies: Black and green card stocks Grey copic marker Sequins
Hello! Today I'm sharing a group of cards I made to donate to my Mom's old nursing home. I was flipping though this 12 x 12" paper pad from Michaels and stopped at this wavy rainbow print. Then I knew exactly what I wanted to do!
I used a rectangle die to cut the centre away from each of the panels which left me with a wavy patterned frame and a matching centre rectangle for each panel. That centre panel was matted with yellow card stock that was cut with Karen Burniston's Crosshatch Rectangles. After adhering the frames to the pink card bases, I popped up the matted rectangles over the openings in the larger panels.
The rainbow was stamped onto one of YNS Stitched Wavy Circles using my Mini MISTI. I stamped one colour at a time ('inking' with water based markers) on each of the circles and it was amazing how easy the Mini MISTI made this project! I stamped the Birthday Wishes below each rainbow and popped the circles up on the panels. Since the cards are hand delivered to the residents, I don't need to worry about bulk or too many layers!
I felt it needed something else, so used strips of black card stock to create little fishtail banners to tuck under each circle and then added black Nuvo Drops as well.
Here is a look at the inside ... all of them were done the same and I used my Mini MISTI so there were no 'oopses' or crooked sentiments.
For your convenience I have linked many of the products I used below. Some may be affiliate links which means if you use these links to purchase I may earn a small commission but there is NO extra cost to you.
Additional Supplies: Patterned paper - Over the Rainbow, Recollections Orange, red and black card stocks Water based markers In and Out Birthday - Taylored Expressions (retired)
Hello! The photo above shows the twelve cards I created with the July Sheetload of Cards. I have a walkthrough of my cards on YouTube, and I explain why I had to change up the sketch.
Below is the single card I made following the sketch - Alicia always includes dimensions for a single card, and that is what I used for this one.
From the photo below, you can see the sparkle in the patterned paper. I also added Wink of Stella to the pierced flowers for even more sparkle.
Here is a peek at the inside ...
... and one more look at the twelve birthday cards that will be donated to my Mom's old nursing home.
For your convenience I have linked many of the products used below. Some may be affiliate links which means if you use these links to purchase I may earn a small commission at NO extra cost to you.
Additional Supplies: Patterned paper - Over the Rainbow, Recollections Patterned paper - Citrus Stack, DCWV Purple, green and orange card stocks - stash Scallop Nesting Circles - Tutti Designs Picture Perfect Birthday - Stampin' Up (retired) Shimmer Spray Pierced Bloom dies - Stampin' Up Hologram floral stickers - old, stash Bakers Twine
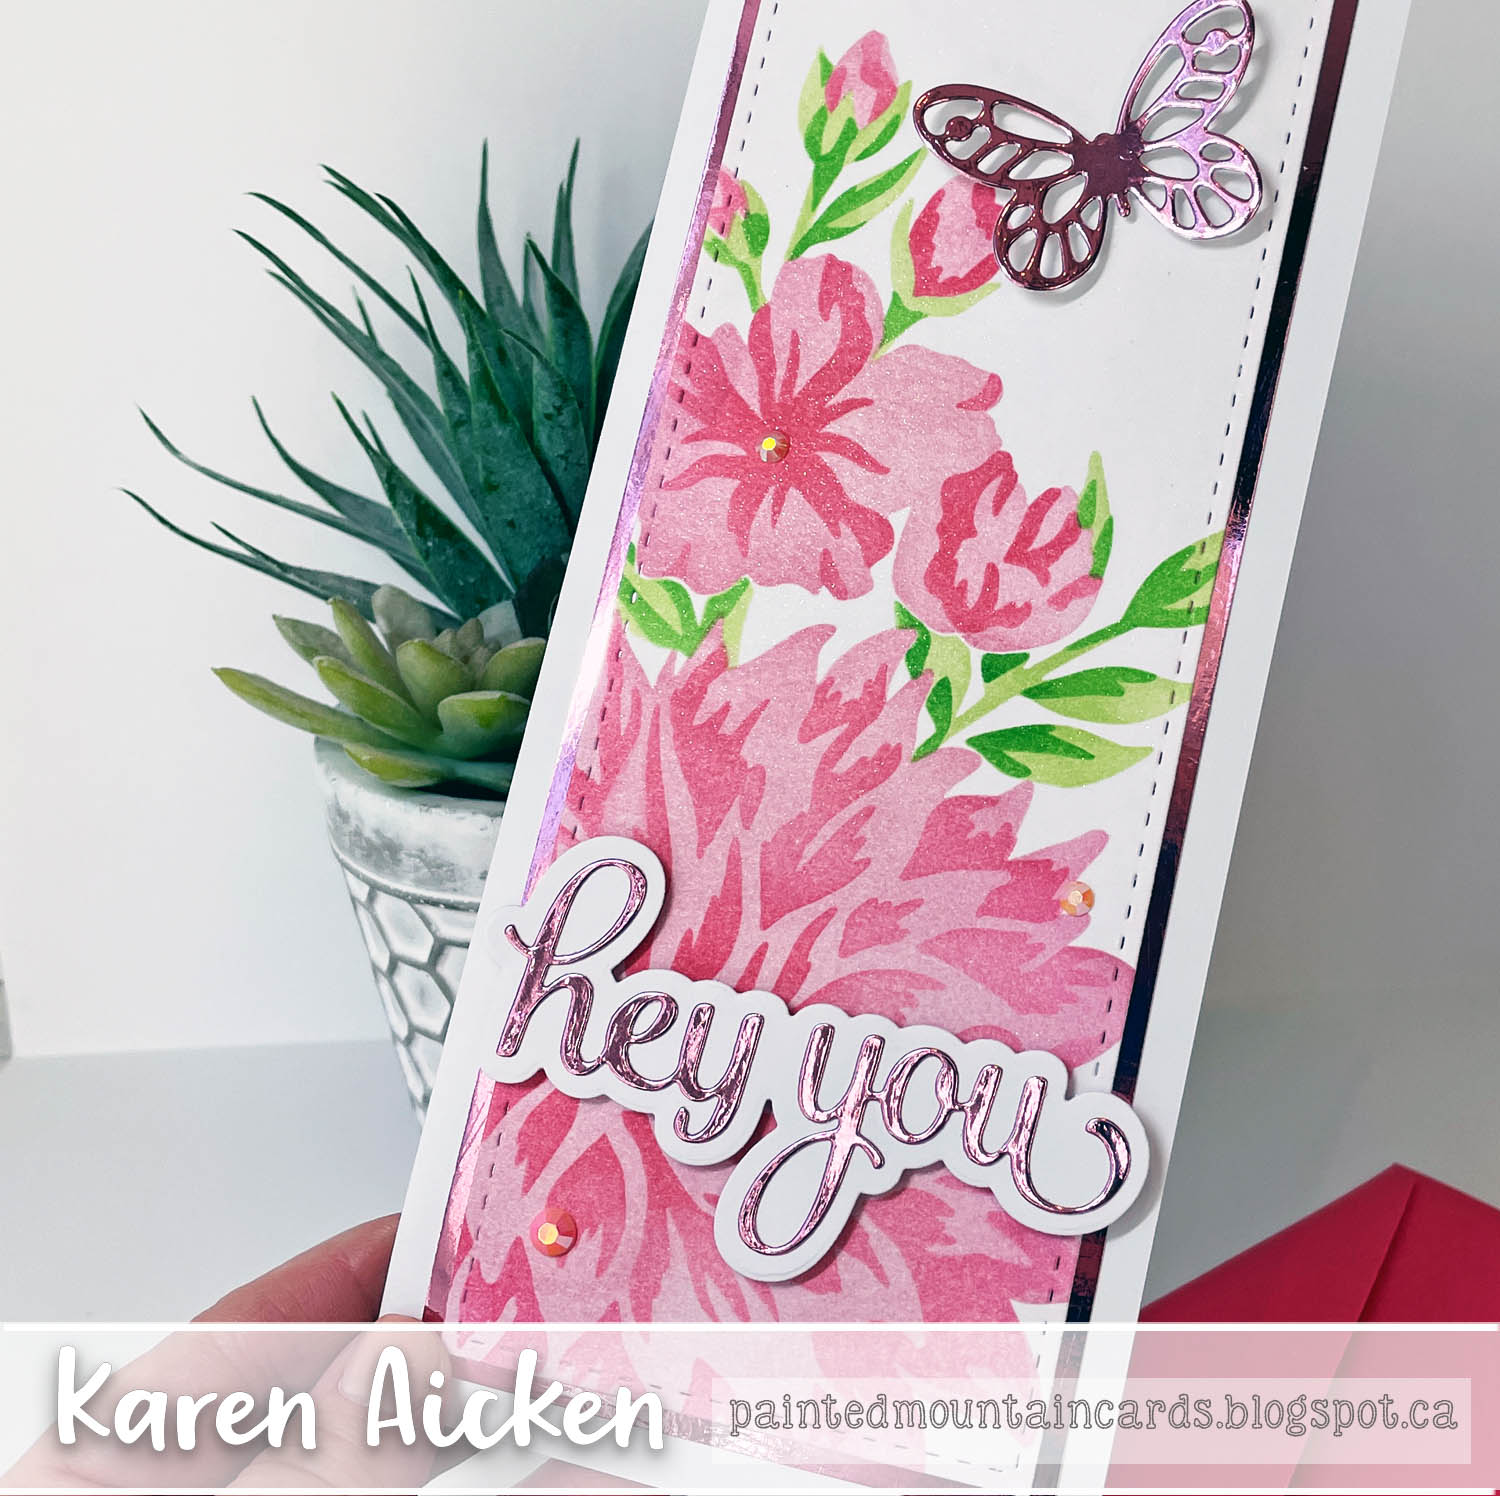
Hello! Today I'm sharing two Slimline cards I made to send out for Happy Mail. I took the photo above so you could see the difference in the Slimline sizes. The card on the left is my most used Slimline card size, 3.5 x 8.5". The card on the right is the larger 4 x 9" size. Both fit in a #10 Business Envelope.
I used some new items in my craft room ... a Slimline layering stencil set by Pinkfresh Studio (linked below) that also has a coordinating stamp. I didn't use the stamp for these two mostly because I was too impatient and couldn't wait to try out the stencils. What a quick and easy way to add a large statement floral image to your cards!
The butterfly was cut from pink foil card stock, and the Hello is from Crafty Meraki (also linked below). The floral panel got a spritz with my shimmer spray as well.
Here is a peek at the inside, where I added a punched butterfly and sentiments from Gina K.
The second card uses a different colour combo and has a pink foil matting layer. Note, I actually cut out the butterflies, Hey You and Hello from the centre area of that pink foil since the openings are hidden by the white stencilled panel. I hate to 'waste' specialty papers!
I have had the Hey You for awhile, but this is my first chance to use it. I am looking forward to playing with some more of my own products again, now that a lot of my Design Team work has settled down.
I decorated the inside similar to a Slimline Poppy card made last month. The pretty lacy element is from a long retired Stampin' Up set. It's such a lovely touch and I have to remember to use it more. Hmmmmm ... maybe I should just die cut a bunch of them from different colours and keep them on hand?
The bold Happy Birthday stamp is from Divinity Designs.
This idea would be pretty on the front of a CAS (Clean And Simple) card too!
For your convenience I have linked many of the products used below. Some may be affiliate links which means if you use these links to purchase I may earn a small commission at NO extra cost to you.
Additional Supplies: Shimmer spray Pink foil card stock - Stampin' Up Butterfly die - Watercolour Wings, Stampin' Up (retired) Lacy Strip - Petal Palette, Stampin' Up (retired) Pink & green card stocks - stash Butterfly punch - Martha Stewart Card sizes - 3.5 x 8.5", and 4 x 9" - both fit in a #10 Business Envelope
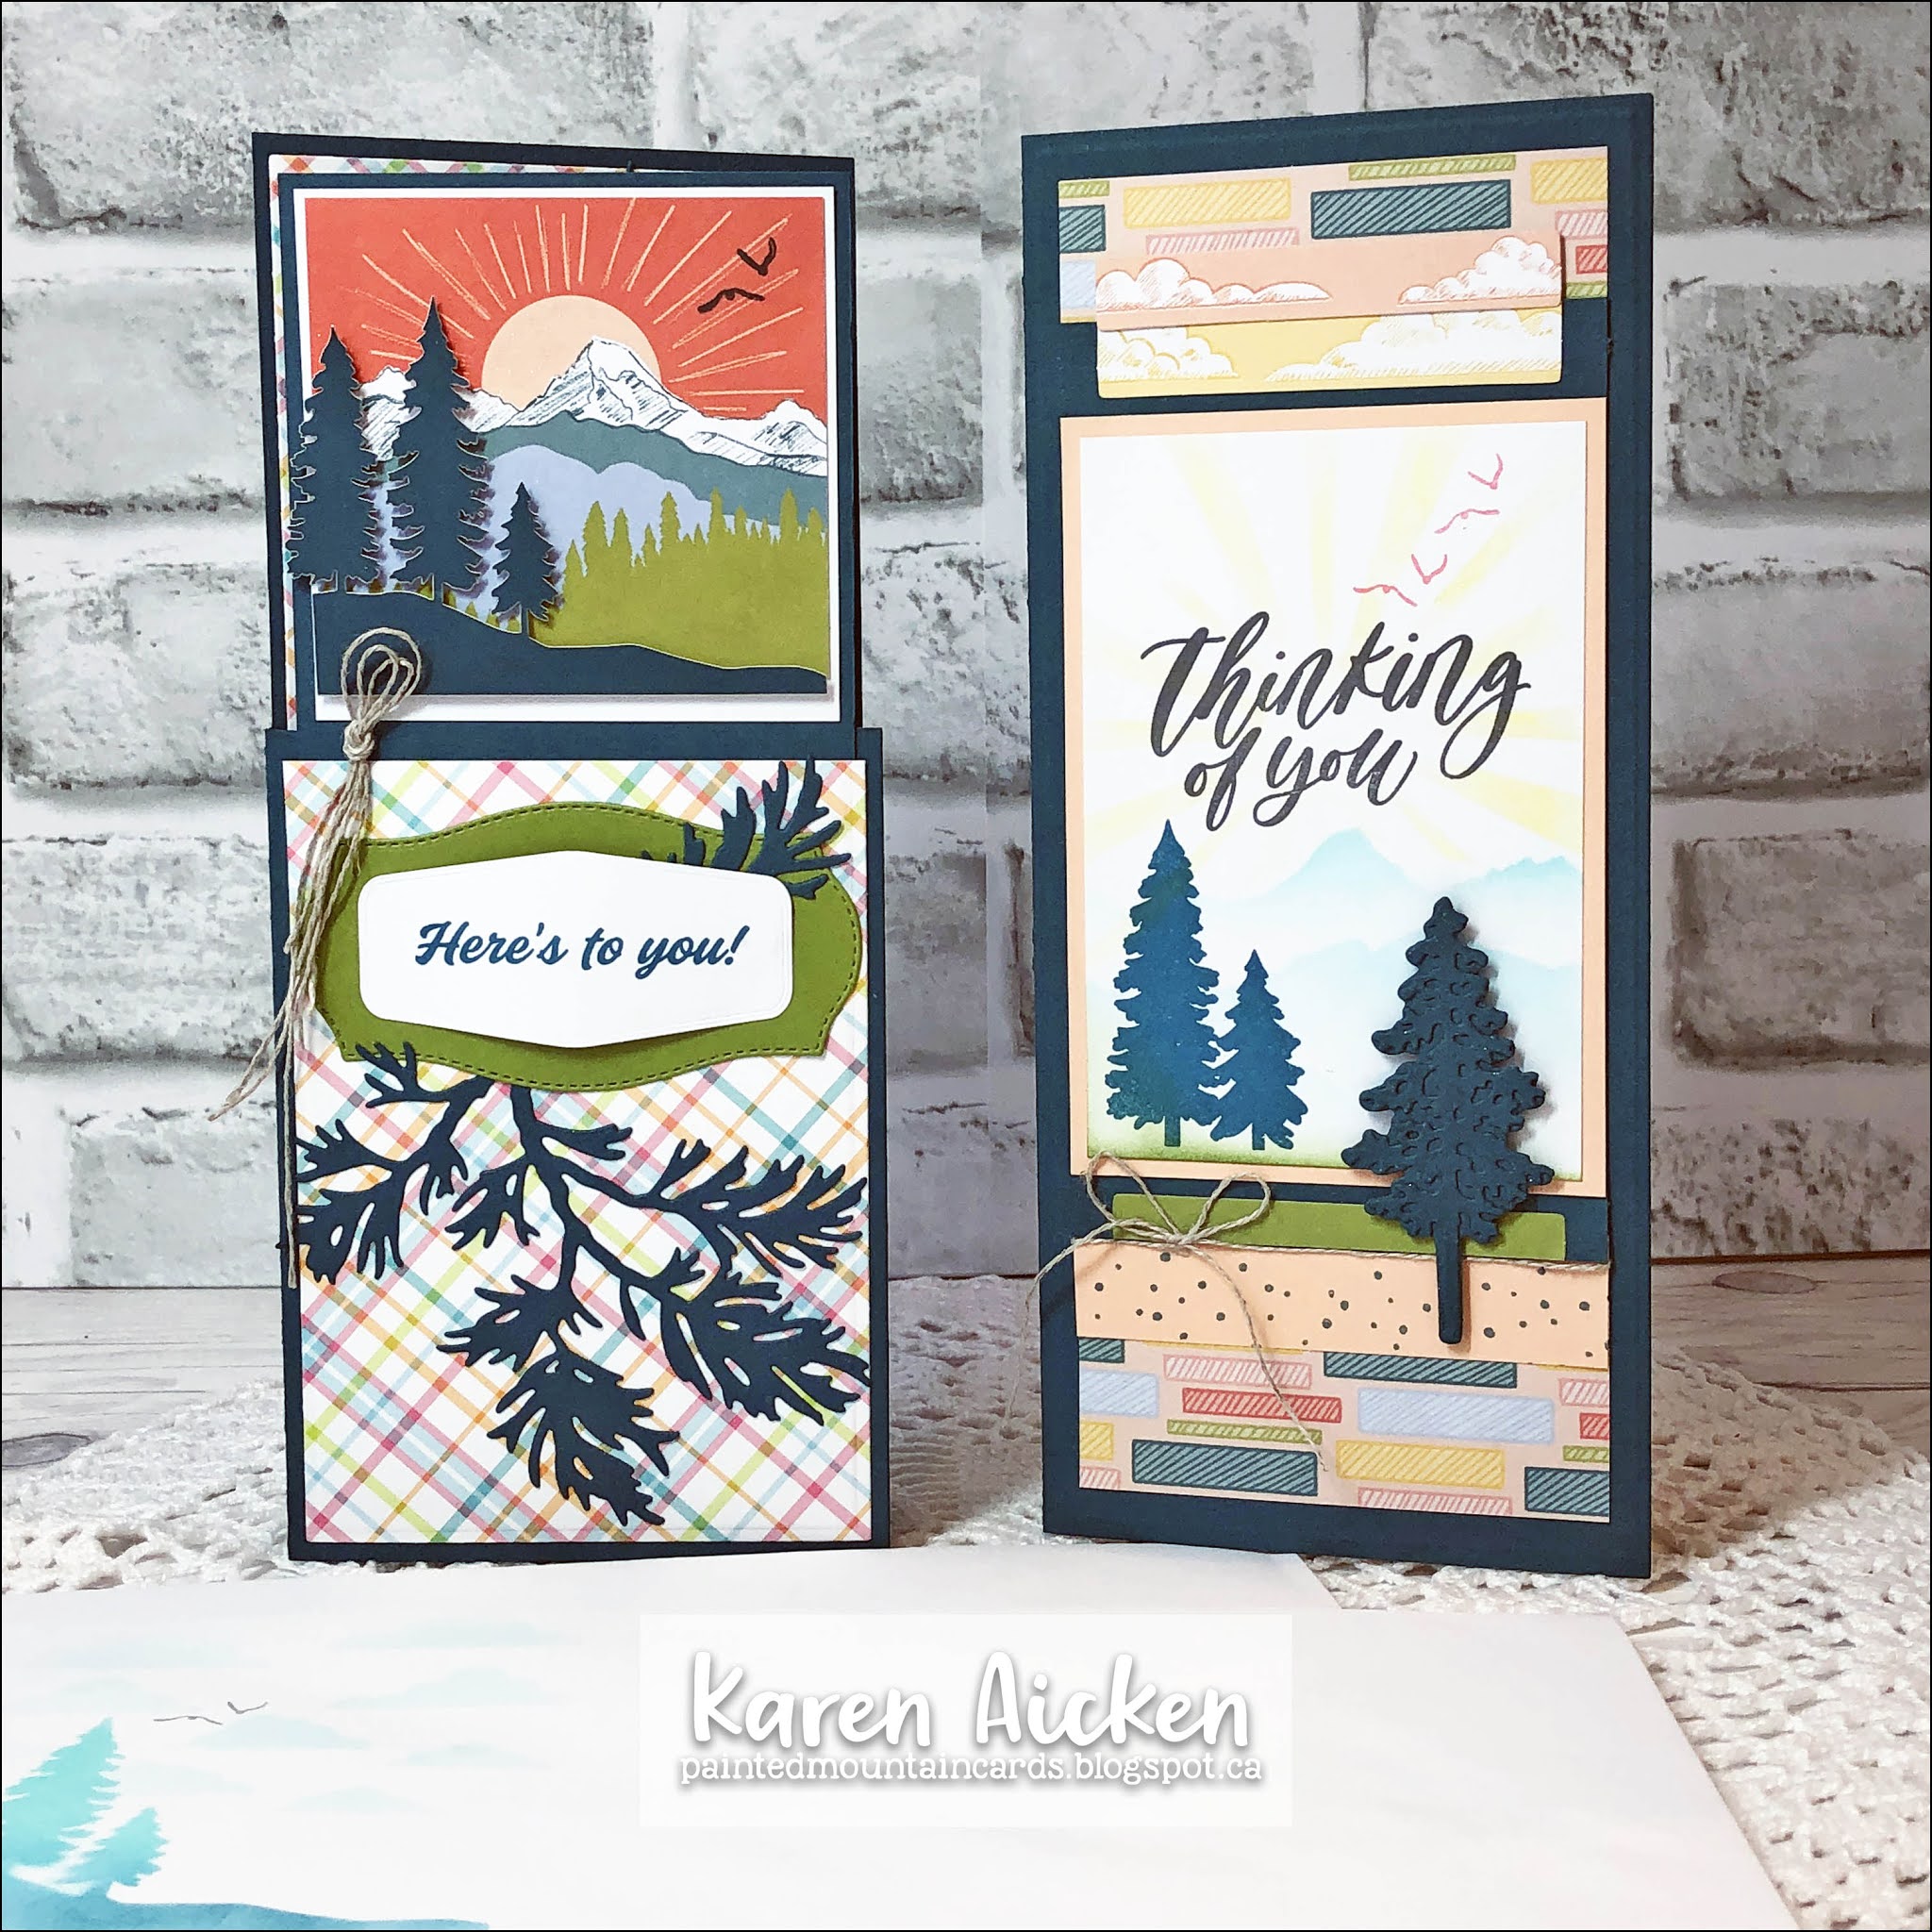
Hello! It's Fun Fold Friday here on my blog and today I'm sharing my first two alternate cards using the March 2021 Paper Pumpkin kit called "Here's To You". The First card is a Dutch Door fun fold card, and the second one has a Pop Up inside. I am going to have a lot of fun making up this kit! I have a walkthrough of my cards on YouTube:
Both of my Paper Pumpkin Alternates are Slimline cards, and this first one started out as a Dutch Door Card but I had to make some adjustments as I explained in the video.
I pulled in the Peaceful Boughs for added elements, since I think they work so well with the laser cut trees that are included in the Paper Pumpkin Kit.
Here is a peek at the inside ...
I used Slimline dies by Divinity Designs for my cards, both the Slimline Card Base** and the Slimline Rectangles. Both have an embossing feature on the edges, which adds a lovely detail.
Since the March Paper Pumpkin came with stencils as a free gift, I decided to add a little scene inside my card with the stencils. On the envelope, I used a couple of the stencils as well as the negative portion of the laser cut trees as a stencil.
My second card also uses the stencils, as well as the In The Pines bundle.
The stamped sentiment is from Gina K and I added some of the printed cloud rectangles from the kit as well as pieces of one envelope liner.
Inside is the pop up, created using a simple box pop up. I will link a tutorial below for that.
I added some older patterned paper from my stash and both inner panels were die cut and embossed with the Slimline Rectangle dies by Divinity Designs.
Click HERE to see the video on how to make a simple box pop up on YouTube.
As I said above, I am looking forward to playing more with this Paper Pumpkin kit - but have put it aside for a bit while I work on Design Team projects.
Supplies: Everything included in the March 2021 Paper Pumpkin kit "Here's To You", plus what is listed below
Slimline Card Die** - Divinity Designs Slimline Rectangle Dies - Divinity Designs Card stocks - stash Glimmer Brush Pen Mini MISTI - My Sweet Petunia Plaid patterned paper - Lawn Fawn Peaceful Boughs bundle (dies) - Stampin' Up Tasteful Label dies - Stampin' Up Sentiment inside - Another Year Older, Taylored Expressions Celebrate - Birthday Greetings, Studio Katia Thinking of You stamp - Just Because, Gina K In the Pines Bundle (dies) - Stampin' Up Patterned paper - Studio K (old, stash) Smile Often stamp - Impression Obsession Stitched Mini Scallop Oval dies - MFT Stamps Card size (both) - ~4 x 9", fits in a #10 Business Envelope