Showing posts with label Mother's Day. Show all posts

Friday, 10 May 2024

Pop Up Mother's Day Card


Welcome to Fun Fold Friday here on my blog!

I'm VERY late posting today, but it's still Friday here so it still counts. Ha!  It was another busy day here - it feels like the last three weeks have just been a whirlwind. Should be a busy weekend as well, with Mother's Day, our granddaughter AND our daughter's birthdays. Next week has a few busy days but also one or two with nothing on the calendar so hopefully I can catch my breath. I haven't been able to get into my craft room in over a week and I'm getting cranky. 


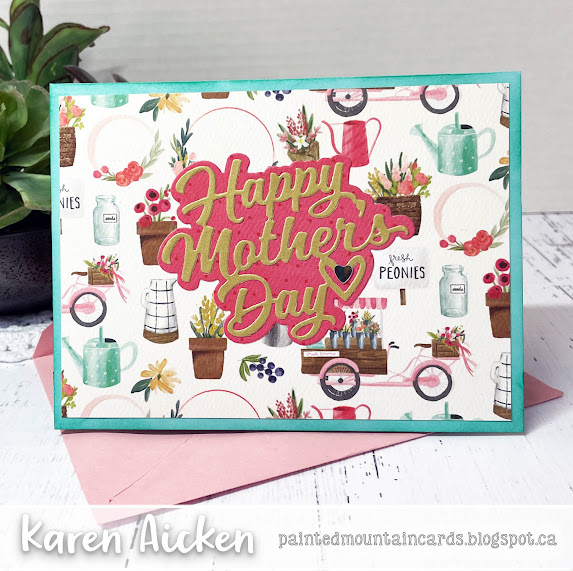
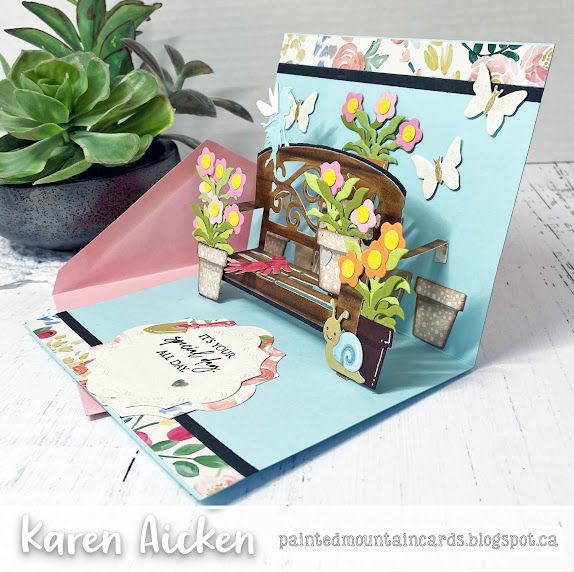
Today's card is a 6x6" square card - not a common card size for me, only because they cost so much to mail. But this will be hand delivered so I was free to load it up. I was able to use up several things with this card as well - the patterned paper (only 1 full sheet left in the package and not many scraps!), the nice big sticker (which I was saving and finally got to use it) and some more fussy cut images from a sheet of Stamperia paper. The Love You is a die by Karen Burniston.


Inside I used more dies by Karen Burniston - the Happy Mother's Day with the shadow, the XOXO and of course the Twist Flower Pop Up for the mechanism. Lots of chipboard elements too, and on the centre ones I peeled off a few layers so there wasn't quite so much bulk.


Such cute ephemera - it made me happy to use so much of it on the card. Oh, and I used an alcohol marker to create the grass on the white stitched circle for the little girl to sort of ground her.


Supplies used:
Patterned paper (both 12x12" and 6x6") - Flower Market, Cartabella
Narrow gold tape - Amazon .ca
Chipboard ephemera - Stamperia
Double stitched circles - Divinity Designs
Pops of Color, Snowflake - Scrapbook .com
Word Set 9 - Love, Karen Burniston
Happy Mother's Day - Karen Burniston
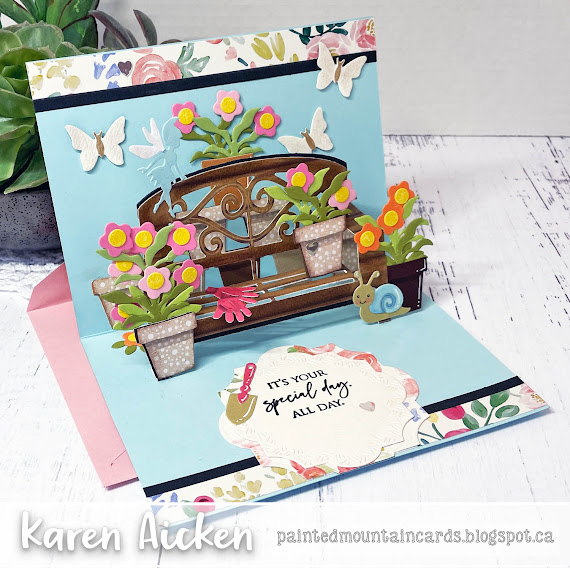
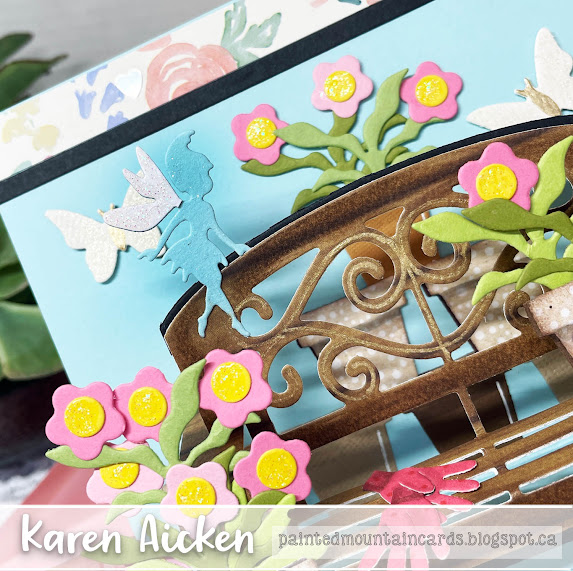
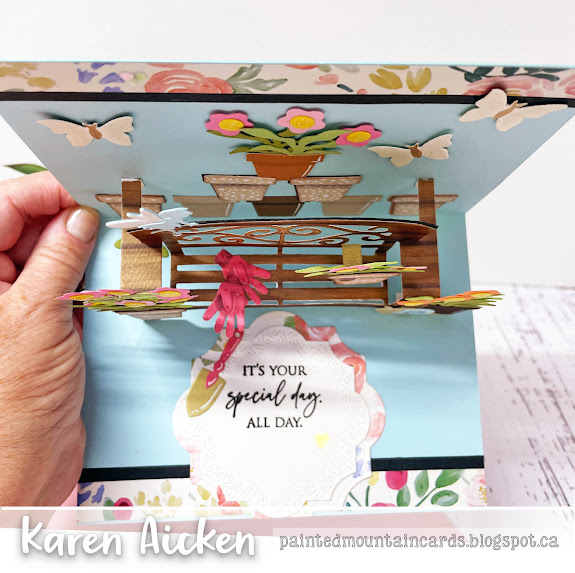
Twist Flower Pop Up - Karen Burniston
Catherine Pooler coloured inks
Water brush
Other patterned paper/elements - Stamperia

Friday, 12 April 2024

Mother's Day Easel Card


Welcome to Fun Fold Friday here on my blog!

I try really hard not to purchase any patterned paper, since I have a H*U*G*E stash of it. But every so often I see some that I just cannot pass up and this 6 x 8" pad by 49 & Market was one of them last year. Florals, a little grunge, beautiful colours ... yep - 'add to cart'. 😊.  I used it a lot for awhile, then put it away. Got it out again for this Mother's Day card for our eldest daughter - it's a 5 x 7" Easel Card.


Below you can see how the card front folds and rests on those two little butterfly bumpers to stand for display.


Below is a peek at the inside. Honestly, that printed border along the bottom of the page just makes me happy! 


Supplies used:
Nested Butterfly Shapes - Hero Arts
Patterned paper - Art Options Rouge, 49 Market
Rainbow Holographic cardstock -  Recollections
Stardream cardstock
Pink cardstock scrap
Happy Mother's Day - Karen Burniston
Water Brush
Bling - Queen & Co
Pops of Color, Snowflake - Scrapbook .com
Blue Skies Ahead - MFT stamps
Catherine Pooler coloured inks
 5 x 7" Card blank and envelope

Wednesday, 17 May 2023

Mother's Day Flip Card


Today I'm sharing the Flip Card I made for our middle daughter for Mother's Day ❤️


Once again I used this beautiful patterned paper. I had purchased it specifically for our May Birthdays and Mother's Day and I have made good use out of it! I am also really enjoying the 5 x 7" Fabulous Flip die set by Sam Calcott, especially on cards that I will hand deliver. That way I'm free to add as many layers as I want without worrying about extra postage.

In her tutorial (linked below) she suggests cutting the frame a second time (which adds to the weight) and I used a heavy weight card base as well. The Flip pieces also have a couple of layers on them. I was really happy with the card (and our daughter liked it too) so I'm just giving you the heads up about adding layers and additional postage.


My friend Frances had has this die set for awhile, and she made a card with an accordion strip along the inside bottom edge to help the card stand nicely for display. I tried it out and it worked like a charm!  

Below you can see the sentiments that are revealed when you pull the frame to the right, but you also have the option of having it pull to the left when you are assembling your card.


Since this card doesn't open like a traditional card, I added a decorated panel to the back where we wrote our personal message. The Happy Mother's Day is by Karen Burniston, and I love the shadow cut from that holographic cardstock. ❤️


 If you would like to see Sam's assembly video, click HERE.

I'm not sure what measurements Frances used for her card, but I took a 7 x 3" strip of white card stock, and scored it down the 3" side at .5, 1.5 and 2.5" to create the accordion folded strip. If you are making a different sized card, you would change your measurements for that size ... this one is a 5 x 7" card.

Having been asked how many cards I make I thought it would be fun to keep track this year. Many of my posts include more than a single card or project and below is my tally. 

Card Tally for 2023
January - 53 cards
February - 56 cards
March - 55 Cards
April - 32 Cards
May so far - 29 Cards

Additional Supplies:
 5 x 7" Fabulous Flip die set, Sam Calcott (Made to Surprise)
White cardstock
5 x 7" Card blank and envelope
Pink cardstock
Rainbow Holographic Cardstock - Recollections
Pull stamp - from an old Stampin' Up set
Sequins - the Cat's Pajamas

This blog uses affiliate links whenever possible. This means, if you make a purchase through one of my affiliate links that you pay the same amount but I may receive a small commission from your purchase. I only link products that I own, love and use for my card making and not every link below is an affiliate one! 😊


Wednesday, 10 May 2023

Faux Step Mother's Day Card


I have wanted to try one of these faux step cards for AGES, so I created a 5 x 7" version. This one was sent to my Mother In Law for Mother's Day and is the 5th edition to my monthly series "New Fun Folds". 


One of the reasons I was intrigued by this faux version ... and the reason I never invested in a step card die set (or side step as they are sometimes called), is that the cards usually collapse and don't display nicely for very long. This faux version seemed to be a good way to ensure that didn't happen, and it does work a lot better. 

Since I was happy with how sturdy they are I decided to make another one (to be shared another day) but I added the sentiment panel to the back side and added an accordion strip inside that holds the card upright. That, to me, was the perfect solution - and now I will be making more of this type of card.


I have had this patterned paper pad for many years - it has embossed shiny bits on it and is so pretty! Adding Karen Burniston's Happy Mother's Day, some stitched foliage and butterflies cut with rainbow holographic cardstock gives the card even more shine.


Inside I added a matted sentiment panel with a stamped sentiment and another little butterfly.


I didn't have a chance to do a tutorial, but below are my measurements.

Card base - 9 x 7", scored down the 9" side at  1.5", 3" and 6"

Patterned paper - 6.75 x 2.75"

Top folded piece - 10 x 4", scored at 5"

Refer to the photos for what the folding & placement looks like. If you are unsure use some older paper or cardstock to make a prototype! I will try to do a tutorial but it won't be until summertime.

Having been asked how many cards I make I thought it would be fun to keep track this year. Many of my posts include more than a single card or project and below is my tally. 

Card Tally for 2023
January - 53 cards
February - 56 cards
March - 55 Cards
April - 32 Cards
May so far - 23  Cards

Additional Supplies:
White cardstock
Blue cardstock
Patterned paper - Water Colour Bouquet, K & Co (old from my stash)
Happy Thoughts stamp set - Stampin' Up
Rainbow Holographic cardstock - Recollections
Heart - leftover from a different project and sitting on table

This blog uses affiliate links whenever possible. This means, if you make a purchase through one of my affiliate links that you pay the same amount but I may receive a small commission from your purchase. I only link products that I own, love and use for my card making and not every link below is an affiliate one! 😊


Friday, 13 May 2022

Floral Pop Up Mother's Day Card


Hello my crafty friends and welcome to Fun Fold Friday here on my blog! While Mother's Day in Canada is over, I couldn't share this card earlier as I had used some of Karen Burniston's new release which we couldn't share until this week. I have a walkthrough of my card with all the details on YouTube:   


Inside I used the Little Labels Pop Up, as well as stickers that were included in the paper package. I like that the Happy Mother's Day comes with the shadow die!


The centre pop up has one of the expanding butterflies from the Butterfly Collage Add On, and the rectangles on the lower portion are from the new Short Rectangles Crosshatch.    


Instead of adding a banner or sentiment to the lower platform, I tied it with pink seam binding. The bow creates a little bulk but since I'm hand delivering the card that isn't a problem.


... one more look ...

This blog uses affiliate links whenever possible. This means, that at no cost to you, if you make a purchase through one of my affiliate links that I may receive a small commission from your purchase. I only link products that I own, love and use for my card making!

Any supplies I'm unable to link are listed at the very bottom of my post.


Additional Supplies:
Patterned paper, stickers & Cut aparts - Flower Market, Carta Bella (retired)
5 x 6.5" Card & envelope - Michaels
Pink cardstock scrap
Pink seam binding - stash
Washi tape - stash
White card stock - Accent Opaque Digital Super Smooth (Amazon .ca)

Friday, 15 April 2022

Vintage Truck Pop Up Mother's Day Card


Hello my crafty friends. Today is Fun Fold Friday here on my blog and I'm sharing the pop up Mother's Day card I made for my Mother-In-Law. Vintage trucks like this always make me think of her, as she grew up on a working farm that had old trucks around. I have a walkthrough of my card on YouTube HERE:  


 I kept the front nice and simple, because all the fun is on the inside! 


The (retired) patterned paper is a package I've had for several years and I've been working at using it up. the 12 x 12" package included a 12 x 12" sheet of stickers, and a couple of the pages had cut-aparts. The truck is one of the included stickers, so I adhered it to white card stock for stability then fussy cut it out. Then I added two box platforms so the truck would pop up and the boxes were hidden behind each wheel. I didn't to a tutorial for this one, but I do have a video for creating a Simple Box Pop Up and you can find that HERE

I fussy cut several of the potted plants from a different sheet in the package and added them to the truck bed and added lots of sparkle with the Pops of Color. The banner uses more of the included stickers. I also added the Crosshatch Labels by Karen Burniston - they are such a great shape for sentiment blocks!

This blog uses affiliate links whenever possible. This means, that at no cost to you, if you make a purchase through one of my affiliate links that I may receive a small commission from your purchase. I only link products that I own, love and use for my card making!

Any supplies I'm unable to link are listed at the very bottom of my post.


Additional Supplies:
Patterned paper, stickers etc - Flower Market, Carta Bella (retired)
Shimmer Spray
Butterfly punch - Stampin' Up (retired)
Blue cardstock
White card stock - Accent Opaque Digital Super Smooth (Amazon .ca)

Tuesday, 5 April 2022

Garden Bench Pop Up Mother's Day Card


Hello my crafty friends. It's time for Karen Burniston's April Designer Challenge, where she challenged her Design Team to create a project with 'Flowers'. This time of year I'm craving 'green growing things' so I enjoyed creating a Pop Up card for our eldest daughter for Mother's Day. The front is nice and simple (but still sparkly!) because all the fun is on the inside ...


I did a walkthrough of my card on YouTube with all the details:   


The little fairy from the Garden Charms shows up better in real life than in the pictures so I added a close up shot below.


The Garden Bench Pop Up comes with little pop up dies that can be used to add pillows (the pillow die is included in the set) but I used one of them to pop up the little flower pot on the bench. I used mostly the Garden Charms and the Backyard Charms and you can see the stacked flower pots behind the bench. NOTE:  A few of the flower pots were die cut from recycled stamp packaging that I'd been saving. 

This card is larger than A2, it measures 6 x 4.5" but the Garden Bench can fit in a wide A2 card (5.5 x 4.25"). I just prefer to make something other than A2 sized cards after so many years of making them.


One more look ...


I have the rest of the Design Team linked on the right side of my blog, and I hope you will check out what they came up with for the challenge. Karen Burniston will have her post tomorrow (Wednesday) on her BLOG.

This blog uses affiliate links whenever possible. This means, that at no cost to you, if you make a purchase through one of my affiliate links that I may receive a small commission from your purchase. I only link products that I own, love and use for my card making!

Any supplies I'm unable to link are listed at the very bottom of my post.


Additional Supplies:
Various cardstock scraps
Patterned paper, stickers etc - Flower Market, Carta Bella (discontinued)
Blue cardstock - stash 
Alcohol markers - generic, from Amazon
Hero Arts stamp packaging (recycled)
White card stock - Accent Opaque Digital Super Smooth (Amazon .ca)

Tuesday, 1 March 2022

Pop Up Mother's Day Shaker Card


Hello my crafty friends and welcome to Karen Burniston's March Designer Challenge. The challenge is to " incorporate a shaker element into a card of any theme.". I chose to crate a Pop Up Mother's Day card with a shaker along the bottom edge. I have a walkthrough on YouTube:  


As I explained in the video, this card was created in two pieces ... the card front was cut at 7 x 5.5" with a 1/2" scoreline along the top long edge. The back was cut 7 x 5" and my finished, folded card is 7 x 5" and fits in a standard A7 envelope.

Working on the front of the card, I cut in two pieces with the Long Nature Edges. I used one of the Long Rectangles Crosshatch to cut a long window from the smaller of the two pieces and that is what I created the shaker part on. The shaker was adhered directly to the bottom edge of the inside back panel, then I was able to adhere the remaining front piece to the back using that 1/2" flap. I also added the Happy Mother's Day with the included shadow, an expanding butterfly and heart - everything is linked below for you.


Inside I used the Street Lantern Pop Up for the little pop up platform which allowed me to add another heart as well as the Love You.


More butterflies were added to the scalloped heart with leftover strips of acetate from when I made the shaker. This allows the butterflies to expand when the card is open and displayed.❤️. That idea was inspired by teammate Sandy Diller!


The greenery is also from the Street Lantern Pop Up, cut from some of the aqua printed paper to decorate the edges of the shaker card and also the front bottom edge. Once again, I used one of the rectangles from the Slim Flaps and Frames to add a signing block and a place for our personal message.


One more look ...


I have the rest of the Design Team linked on the right side of my blog, and I hope you will check out what they came up with for the challenge. Karen Burniston will have her post tomorrow (Wednesday) on her BLOG.

This blog uses affiliate links whenever possible. This means, that at no cost to you, if you make a purchase through one of my affiliate links that I may receive a small commission from your purchase. I only link products that I own, love and use for my card making!

Any supplies I'm unable to link are listed at the very bottom of my post.


Additional Supplies:
Patterned paper - Flower Market, Carta Bella (retired)
Shaker filler - my stash

Tuesday, 4 May 2021

Mother's Day Pop Up Card

Hello!  It's Designer Challenge time, and Karen Burniston challenged her design team to create a project using dies from her new release. I made a Pop Up Mother's Day Card and have a YouTube video for you as well:

I used the new Tiny House Pop Up, which was made with new technology. The roof not only die cuts, and embosses the shingles - but if you ink the die up before cutting, it also stamps the shingles. SOOOOO cool! 


I used the roof piece as a stencil to add 'bricks' to the house. 


View from the back ...


Remember Karen Burniston has assembly videos for her pop up dies!  Once you know how to assemble your die, the rest is card size, paper and colour choice as well as embellishments! You can change the look of your card every time you use the dies. :-)  I always enjoy showing you different ways you can use your dies once you know how to assemble them.


I knew I wanted to make a 4.5 x 6" (A6) card but didn't have that shade of green card stock in a 12 x 12". To get around that, I cut my green card stock at 11 x 4.5", scored at 5". That gave me an offset front (which I actually really liked) and the back is the full A6 size!

The list below contains some affiliate links. If you use these links to purchase I may earn a small commission at NO extra cost to you.


Additional Supplies:
Card stocks - stash
Woodgrain patterned paper - Stampin' Up
Green patterned paper - Stampin' Up
Silver matte card stock
Sequins
Card sie - 4-1/2 x 6", fits in an A6 envelope

Thanks for stopping by today!

Wednesday, 28 April 2021

Mother's Day Waterfall Mini Slimline Card


Hello!  One of the die sets in Karen Burniston's new release is this Waterfall Card set and it even has different edges you can cut on the sides of the flap. I used the bracket edge for my card today and have a walkthrough on YouTube:  


As with my other new release cards, I created a Mini Slimline card! Pulling out some pretty stickers from my stash, I kept everything nice and flat to show that these cards really can be mailable.


As you pull the tab, the panels flip over to reveal the next sentiment and image.


While you could stamp a sentiment or write a message to be revealed on the decorator panel of the tab, I added another sicker as I have room for signing on the back of the card.


The flowers and sprig are from the Flowers and Bee die set.


The stickers got some glitter on them as well using Stickles.


When I do a card like this, I usually make it a post card style to keep the back nice and flat. In keeping with that, I used the shadow die for the new Happy Mother's Day to inlay into the back panel.


Here is a link to Karen Burniston's assembly video for the Waterfall Card:


This list contains affiliate links. If you use these links to buy something I may earn a small commission at NO extra cost to you. Thank you for your support!


Supplies:
Card stocks and scrap of patterned paper - stash
Stickers - Violette Stickers
Gold foil card stock scrap
Ribbon
"Hugs & Smiles" - Verve
Stickles
Wink of Stella
Card size - 6 x 3.5", fits in a #8 Envelope

Thanks for stopping by